Table of Contents
Advertisement
Quick Links
CD Stereo System
XR-EC11
EZ
8C-CL3-906-01
020320ASW-H-M
OPERATING INSTRUCTIONS
MANUAL DE INSTRUCCIONES
MODE D'EMPLOI
BEDIENUNGSANLEITUNG
ISTRUZIONI PER L'USO
GEBRUIKSAANWIJZING
NÁVOD K OBSLUZE
HASZNÁLATI UTASÍTÁS
INSTRUKCJA OBSŁUGI
En
(English)
E
(Español)
F
(Français)
D
(Deutsch)
I
(Italiano)
NL
(Nederlands)
Cz
(Česky)
M
(Magyar)
Po
(Polski)
Advertisement
Table of Contents

Related Manuals for Aiwa XR-EC11


Summary of Contents for Aiwa XR-EC11
- Page 1 OPERATING INSTRUCTIONS (English) MANUAL DE INSTRUCCIONES (Español) CD Stereo System MODE D'EMPLOI (Français) XR-EC11 BEDIENUNGSANLEITUNG (Deutsch) ISTRUZIONI PER L’USO (Italiano) GEBRUIKSAANWIJZING (Nederlands) NÁVOD K OBSLUZE (Česky) HASZNÁLATI UTASÍTÁS (Magyar) INSTRUKCJA OBSŁUGI (Polski) 8C-CL3-906-01 020320ASW-H-M...
-
Page 2: Precautions
PRECAUTIONS Read these Operating Instructions carefully and completely 8 Wall or ceiling mounting — The unit should not be WARNING before operating the unit. All precautions in this booklet and mounted on a wall or ceiling, unless specified in the on the unit should be strictly followed. -
Page 3: Table Of Contents
Damage Requiring Service TABLE OF CONTENTS Have the unit serviced by a qualified service technician if: BEFORE USE! PRECAUTIONS ........2 - The AC power cord or plug has been damaged •Since precision parts are included in the unit, do not turn - Foreign objects or liquid have got inside the unit PREPARATIONS ........ -
Page 4: Preparations
PREPARATIONS Before starting connection, check that the protective 3 Connect the supplied antennas. Remote control tag has been taken off (see page 3). Connect the FM antenna to the FM 75 Ω terminal and the Detach the battery compartment lid at the rear of the remote MW/LW antenna to the MW/LW LOOP jack. -
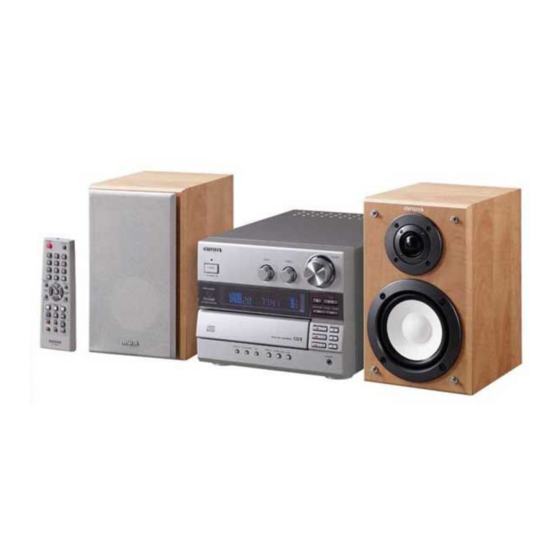
Page 5: Parts And Controls
PARTS AND CONTROLS 9 MW/LW LOOP jack and FM 75 Ω terminal Main unit Plug in the supplied MW/LW and FM antennas. 0 LINE IN jacks Accept analogue sound signals from external equipment. Connect external equipment using an optional connecting cable with RCA phono plugs (red plug to R jack, white plug to L jack). - Page 6 The numbered buttons take on these functions when pressed with 8 FUNCTION Remote control SHIFT held down Switches the active function among TUNER, AUX and CLOCK 9 PRESET +, - Selects clock mode. 0 DISC DIRECT PLAY 1, 2, 3 TUNER MODE Switches between stereo or monaural FM reception.
-
Page 7: Adjustments Before Operation
ADJUSTMENTS BEFORE OPERATION ECO mode Reduces power consumption in standby mode with the following POWER operations. Press ECO/DIMMER while the power is off (standby). POWER Each press of the button changes the mode as follows; 6STANDBY/ON DISC DIRECT CD,AUX PLAY ECO ON: Power economizing mode is activated. -
Page 8: Cd Operations
CD OPERATIONS Replacing disc during play While one disc is playing, the other discs can be replaced without interrupting play. 1 Press one of z OPEN/CLOSE (CD1/CD2/CD3) corresponding to the disc which is not being played. 0–10, +10 2 Remove the disc and replace with another one. RANDOM/ REPEAT 3 Close the disc tray. - Page 9 Random/Repeat play Programmed play To check the program Press f or g repeatedly in stop mode. The track In random play mode the unit plays all the tracks in random Up to 30 tracks can be programmed from any of the loaded number and program number are displayed in succession.
-
Page 10: Radio Operations
RADIO OPERATIONS Automatic presetting TUNER MODE Scans the receivable frequency range and stores tuned stations automatically with the preset number. 1 Press TUNER/BAND. 0–10, +10 POWER 2 Hold down RDS for 2 seconds until PRESET +,- "AUTO PRESET" scrolls on the display. TUNER/BAND PRESET 3 Press SET. - Page 11 Tuning in preset stations RDS features Program Type (PTY) RDS (Radio Data System) is a broadcasting service which allows This is an identification to specify the program being broadcast 1 Select the band. FM stations to send additional information along with the regular currently.
- Page 12 To cancel the standby mode for EON search PTY Search EON Search Press RDS repeatedly so that "EON PTY" and the specified The unit can search for a station broadcasting your desired PTY The unit can leap to a station which has just started broadcasting PTY are displayed alternately.
-
Page 13: Sound Adjustments
SOUND ADJUSTMENTS Adjustments To switch to monaural FM reception BASS, TREBLE Hold down SHIFT and press TUNER MODE on the remote control so that "MONO" is displayed. VOLUME To cancel, repeat the above so that “STEREO” is displayed. Tip: When FM stereo reception is poor, switching to monaural TONE reduces noise. -
Page 14: Timer Operations
TIMER OPERATIONS Sleep timer POWER Turns off the unit automatically after a specified time. VOLUME 1 Press SLEEP on the remote control. CLOCK "SLEEP" is displayed. POWER 2 Within 6 seconds, press f or g repeatedly 6STANDBY/ON TUNER/BAND, AUX, ECD, to set the sleep timer duration. - Page 15 7 Prepare the source. To check the timer setting Timer playback To play CD, load a disc. The currently selected disc is Press TIMER on the remote control so that "5 PLAY" Turns on the unit at a specified time for the specified duration. played.
-
Page 16: Reference
REFERENCE Erroneous display When transporting the unit with packing materials Care and maintenance •Reset the unit. (See "Resetting the unit".) When transporting the unit using the packing materials, for Occasional care and maintenance of the unit and the software example, when asking for repair, be sure to re-attach the are needed to optimize the performance of your unit. - Page 17 88 dB (1 kHz, 0 dB) Wow and flutter Unmeasurable NOTE AIWA CO. LTD. - JAPAN - DECLARES UNDER ITS OWN RESPONSIBILITY THAT THE PRODUCT DESCRIBED IN THIS MANUAL IS IN COMPLIANCE WITH THE DIRECTIVES OF D.M 28.8.95 No. 548, ACCORDING TO THE STIPULATIONS OF PARAGRAPH 3 OF ATTACHMENT A OF D.M.
- Page 18 ADVARSEL! Usynlig laserståling ved åbning, når sikkerhedsafbrydereer ude af funktion. Undgå udsættelse for stråling. VAROITUS! Laitteen käyttäminen muulla kuin tässä käyttöohjeessaa mainitulla tavalla saattaa altistaa käyttäjän turvallisuusluokan 1 ylittävälle näkymättömälle lasersäteiylle. VARNING! Om apparaten används på annat sätt än i denna bruksanvisning specificerats, kan användaren utsätta för osnylig laser- strålning, som överskrider gränsen för laserklass 1.