Agilent Technologies 100 Automated Disintegration Apparatus Operator's Manual
Hide thumbs
Also See for 100 Automated Disintegration Apparatus:
- Operator's manual (53 pages) ,
- Operator's manual (54 pages) ,
- User manual (48 pages)
Table of Contents
Advertisement
Quick Links
Advertisement
Table of Contents
Troubleshooting

Related Manuals for Agilent Technologies 100 Automated Disintegration Apparatus


Summary of Contents for Agilent Technologies 100 Automated Disintegration Apparatus
- Page 1 100 Automated Disintegration Apparatus Operator’s Manual...
- Page 2 Copyright editions. Further, to the maximum extent A CAUTION notice denotes a permitted by applicable law, Agilent © Agilent Technologies, Inc. 2020, 2022 hazard. It calls attention to an disclaims all warranties, either express or operating procedure, practice, or implied, with regard to this manual and...
-
Page 3: Table Of Contents
Content This manual covers the following modules: • Agilent 100 Automated Disintegration Apparatus ( G7962A Safety Electrical Hazards Warning Caution Note Information Symbols Introduction Introduction Conventions Used in this Manual Serial Number Format Setting Up the 100 Unpacking Your 100... - Page 4 Content Installing the Temperature Probe Water Bath Status LEDs Setting the Date / Time Clock Mounting Baskets and Filling Beakers Draining the Water Bath Hidden Key Functions Operating the 100 Setting Water Bath Temperature Setting Print Frequency for the Report Center Printer Adjusting Basket Height Placing Dosage Units in the Baskets Selecting Operating Mode...
- Page 5 Content Report Center Impact Printer Installing the Cartridge Ribbon Replacing the Paper Roll Toggling Your Printer Online Printer Self Test Printer Configuration Troubleshooting Obtaining Warranty and Other Services 100 Operator’s Manual...
-
Page 6: Safety
Safety Electrical Hazards 7 The Agilent 100 (G7962A) has been designed and tested so that when used properly you have an accurate, fast, flexible, and safe instrument. If the equipment is used in a manner not specified by the manufacturer, the protection provided by the equipment may be impaired. -
Page 7: Electrical Hazards
Safety Electrical Hazards The Agilent 100 (G7962A) contains electrical circuits, devices, and components operating at dangerous voltages. Contact with these circuits, devices, and components can cause death, serious injury, or painful electric shock. Panels or covers that are retained by fasteners which require the use of a tool for removal may be opened only by Agilent-trained, Agilent-qualified, or Agilent-authorized service engineers. -
Page 8: Warning
Safety Warning A ‘Warning’ message appears in the manual when failure to observe instructions WAR N IN G or precautions could result in death or injury. Read all warnings and cautions carefully and observe them at all times. Caution A ‘Caution’ message appears in the manual when failure to observe instructions C AU T I O N could result in damage to equipment (Agilent supplied and / or other associated equipment). -
Page 9: Information Symbols
Safety Information Symbols Switches main power on Switches main power off Indicates single-phase alternating current The apparatus is marked with this symbol when the user shall refer to the instruction manual in order to protect risk of harm to the operator and to protect the apparatus against damage. Confirms that a manufactured product complies with all applicable European Community directives. -
Page 10: Introduction
Introduction Introduction 11 Conventions Used in this Manual 12 Serial Number Format 12 100 Operator’s Manual... -
Page 11: Introduction
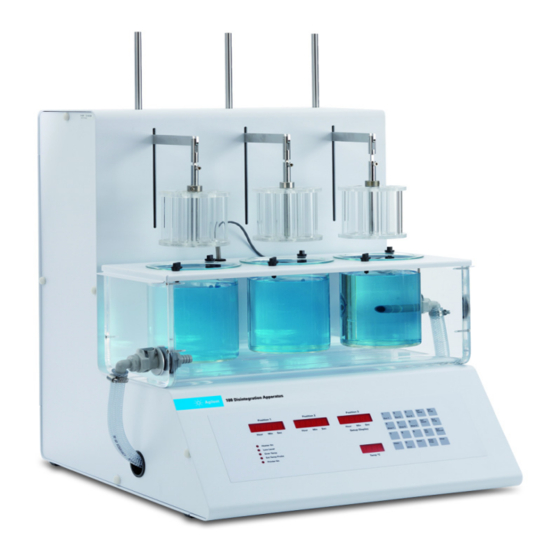
Introduction Introduction The 100 (G7962A) is designed to provide versatility and reliability, while meeting all current USP testing requirements. Its three basket positions can be programmed to dip together or independently, allowing up to three different tests to be run at the same time. In addition to the standard six-tube USP-approved basket rack, a variety of optional basket racks are available for large and bolus tablets. -
Page 12: Conventions Used In This Manual
Introduction Conventions Used in this Manual • Items you are asked to press are in bold. For example, “press H on the keypad”. Serial Number Format The serial number contains 10 characters and follows this syntax: CC1234xxxx Syntax Code Meaning Description Country of origin 2 alpha characters matching the required trade designation for... -
Page 13: Setting Up The 100
Setting Up the 100 Unpacking Your 100 14 Setting up the Water Bath 16 Initial Power Up 17 Installing the Temperature Probe 19 Water Bath Status LEDs 20 Setting the Date / Time Clock 21 Mounting Baskets and Filling Beakers 22 Draining the Water Bath 22 Hidden Key Functions 23 100 Operator’s Manual... -
Page 14: Unpacking Your 100
Setting Up the 100 Unpacking Your 100 1 Open each carton and check the contents for damage which may have occurred during shipping. Shipping damage rarely occurs, but if it does contact both the carrier who delivered the instruments and the Dissolution Systems Service Department. -
Page 15: Environmental Requirements For Installation
Setting Up the 100 Environmental Requirements for Installation • Humidity: max relative humidity 80% for temperatures up to 31 ºC decreasing linearly to 50% relative humidity at 40ºC • Indoor use only • Pollution Degree: 2 • Overvoltage Category: II •... -
Page 16: Setting Up The Water Bath
Setting Up the 100 Setting up the Water Bath 1 Ensure the 100 is not plugged in. 2 Place the water bath on the 100 with the lower quick-connect fitting positioned on the left side of the apparatus. Use the locator holes on the water bath and the locator pins on the 100 to ensure proper placement. -
Page 17: Initial Power Up
Setting Up the 100 Initial Power Up Electrical Connections Before plugging the 100 into any power outlet, ensure the instrument is WAR N IN G configured for the voltage provided. Check the serial number tag on the rear panel to confirm the voltage requirement. The electrical connection at the back of the apparatus is the primary disconnect for the instrument. - Page 18 Setting Up the 100 3 Turn on the 100. The three position screens and the temperature screen on the front panel illuminates immediately. You will hear the circulator working as it begins to pump the bath water through the system. Bubbles may appear at the water bath inlet as air is expelled from the system.
-
Page 19: Installing The Temperature Probe
Setting Up the 100 Installing the Temperature Probe The 100 is shipped with a factory-installed temperature probe inside the heater /circulator tank and an external probe to be placed directly in the water bath. Both probes are necessary and the temperature readings must remain within 5 °C of each other or the 100 will not operate. -
Page 20: Water Bath Status Leds
Setting Up the 100 Water Bath Status LEDs water bath status LEDs Figure 3. 100 Keypad The Heater On LED flashes to indicate heater activity. When the heater is on continuously, as will occur when the water bath is cold, the LED remains illuminated. -
Page 21: Setting The Date / Time Clock
Setting Up the 100 The Ext Temp Probe LED illuminates when the external temperature probe reading displays in the temperature screen. Otherwise the internal probe reading displays. If the external temperature probe is not connected, the temperature display reads NOTE 4.4. -
Page 22: Mounting Baskets And Filling Beakers
Setting Up the 100 Mounting Baskets and Filling Beakers 1 Ensure the water bath cover is in place on the water bath. 2 Place one, two, or three 1000 mL USP disintegration beakers through the water bath cover holes so they are suspended in the water bath. 3 Hold the beaker(s) down and pour 900 mL of the required disintegration medium in each beaker. -
Page 23: Hidden Key Functions
Setting Up the 100 Hidden Key Functions The following seldom-used operations can be performed by pressing and holding CLEAR and then pressing the number on the keypad and releasing both keys at the same time. Refer to Figure 3, “100 Keypad,” on page 20. Table 1 Hidden Key Functions Key Sequence... -
Page 24: Operating The 100
Operating the 100 Setting Water Bath Temperature 25 Setting Print Frequency for the Report Center Printer 25 Adjusting Basket Height 26 Placing Dosage Units in the Baskets 27 Selecting Operating Mode 27 Printer Operation During Manual or Program Operation (Optional) 31 100 Operator’s Manual... -
Page 25: Setting Water Bath Temperature
Operating the 100 Setting Water Bath Temperature To set the water bath temperature, press SET TEMP. Enter the desired water bath temperature and press ENTER. It may be necessary to set the water bath temperature up to 0.5 °C higher than NOTE the desired temperature of the medium in the beakers to compensate for heat loss through the walls of the beakers. -
Page 26: Adjusting Basket Height
Operating the 100 Adjusting Basket Height 1 Lower the basket to the lowest position and measure the distance from the bottom of the beaker to the bottom of the basket. This measurement should be no less than 2.5 cm. 2 If necessary, adjust the basket height by loosening the screw on the basket hanger with an Allen wrench. -
Page 27: Placing Dosage Units In The Baskets
Operating the 100 Placing Dosage Units in the Baskets Place one dosage unit in each of the six tubes of the basket. USP fluted disks may be added where specified in the individual monograph. Selecting Operating Mode You can select single-basket, multi-basket, or three-basket operation. The Position 3 screen is the display screen for all programming regardless of NOTE which position or parameter you are programming. -
Page 28: Multi-Basket Operation
Operating the 100 Multi-basket Operation There are two benefits of multi-basket mode: • You can program any combination of baskets to start and stop at exactly the same time. This feature allows the 100 to function as a conventional two- or three-basket apparatus. •... - Page 29 Operating the 100 The example on page 28 indicates the previously programmed test length for Position 1 was 30 minutes. • To accept the current test length, press ENTER. • To change it, enter the new value in hhmmss format and press ENTER. •...
- Page 30 Operating the 100 • To disable Position 2, enter 000000 and press ENTER. 4 In the display, the numeral 3 flashes, alternating with the previously programmed delay time for Position 3 in hhmmss format. The delay time is the amount of time between the start of the program and the start of dipping for Position 3.
-
Page 31: Three-Basket Operation
Operating the 100 To stop any individual basket during multi-basket operation, press STOP # (where # is the basket number you want to stop). To stop all baskets at the same time, press STOP in the lower right corner of the keypad. When an individual basket is stopped and the other baskets are dipping, the NOTE individual basket can only be restarted in the independent single-basket mode. -
Page 32: Troubleshooting And Maintenance
Troubleshooting and Maintenance Preventive Maintenance 33 Water Bath Temperature Probe Accuracy Test 38 Report Center Impact Printer 40 Troubleshooting 46 100 Operator’s Manual... -
Page 33: Preventive Maintenance
Troubleshooting and Maintenance Preventive Maintenance The apparatus contains electrical circuits, devices, and components operating WAR N IN G at dangerous voltages. Contact with these circuits, devices, and components can cause death, serious injury, or painful electric shock. Preventive maintenance intervals may vary depending on frequency of instrument usage. -
Page 34: Every Six Months Maintenance
Troubleshooting and Maintenance Every Six Months Maintenance “Water Bath / Acrylic Care” on page 36 as applicable for additional information on proper maintenance of your equipment. • Ensure media is removed and the system is wiped with a clean, damp cloth. -
Page 35: Disintegration Basket Care
Troubleshooting and Maintenance Disintegration Basket Care • All of our disintegration baskets are fabricated entirely of commercial grade acrylic, stainless steel, and glass. When using them with corrosive materials such as hydrochloric acid or media containing salts, be sure to rinse them thoroughly with deionized water immediately after each use, and dry thoroughly with a soft towel or cloth. -
Page 36: Water Bath / Acrylic Care
Troubleshooting and Maintenance Water Bath / Acrylic Care Do not use cleaning compounds containing ammonia or abrasive cleaners on C AU T I O N your water bath. The water bath supplied with the 100 Disintegration Apparatus should be maintenance free except for an occasional cleaning. If you use a water bath algaecide or clear bath product, ensure it is compatible with PETG and acrylic. -
Page 37: Visual Checks
Troubleshooting and Maintenance Repairing Leaking Fittings Complete these steps if any of your water bath fittings are leaking: 1 Turn off the heater / circulator and drain the water bath completely. 2 Remove the leaky bulkhead fitting. 3 Remove the elbow fitting from the bulkhead fitting. 4 Inspect the bulkhead fitting gaskets for damage and replace them as necessary. -
Page 38: Water Bath Temperature Probe Accuracy Test
Troubleshooting and Maintenance Water Bath Temperature Probe Accuracy Test The temperature probe can be tested using a high quality voltmeter capable of at least four digit resolution and a known-temperature bath. Both the voltmeter and the bath temperature must be traceable to a known reference standard such as NIST. - Page 39 Troubleshooting and Maintenance Table 2 Probe Resistance Values Temp. Resistance Temp. Resistance Temp. Resistance Centigrade Ohms Centigrade Ohms Centigrade Ohms 4703 38.0 1301 67.0 437.40 10.0 4482 39.0 1249 68.0 422.50 11.0 4273 40.0 1200 69.0 408.20 12.0 4074 41.0 1152 70.0 394.50...
-
Page 40: Report Center Impact Printer
Troubleshooting and Maintenance Report Center Impact Printer The following is helpful information for using your impact printer. Installing the Cartridge Ribbon If the printer is used infrequently, the print impression sometimes becomes weak because the ribbon dries out. If the printed material is difficult to read and you suspect this is the cause of the problem, advance to a new section of the ribbon by pressing the printer toggle switch to the Paper feed position. -
Page 41: Replacing The Paper Roll
Troubleshooting and Maintenance Replacing the Paper Roll 1 Toggle the printer off line by pressing the printer toggle switch to the OnLine / Off Line position. When the printer is off line, the Ready LED does not illuminate. 2 Grasp the paper roll cover firmly by the grooves on the side and the front edge. Pull outward to remove the cover. -
Page 42: Toggling Your Printer Online
Troubleshooting and Maintenance Toggling Your Printer Online Complete these steps to toggle your printer online: 1 Toggle the printer online by pressing the printer toggle switch to the OnLine / Off Line position. When the printer is off line, the Ready LED does not illuminate. -
Page 43: Printer Self Test
Troubleshooting and Maintenance Printer Self Test You can test the print head and ribbon only after inserting paper. Do not attempt to print without paper. Follow these steps to perform a printer self test: 1 Turn off the 100. 2 Press and hold the printer toggle switch in the Paper feed position. 3 Turn on the 100. -
Page 44: Printer Configuration
Troubleshooting and Maintenance Printer Configuration The printer configuration is set by the factory. This procedure should be NOTE performed only if the printer displays erroneous characters. Contact the Dissolution Systems Service Department for assistance, if necessary. 1 Turn off the 100. 2 Press and hold the printer toggle switch in the OnLine / Off Line position while turning on the instrument. - Page 45 Troubleshooting and Maintenance Table 3 Printer Commands *** SETUP MENU*** CONFIGURE [NEXT/OK] Press NEXT to avoid configuration CUSTOM [NEXT/OK] Press OK to enter custom mode ***CUSTOM MENU*** PRINT CUSTOM SETUP [NEXT/OK] Press NEXT AUTO SEQ = NO [NEXT/OK] Press OK ZERO = Ø...
-
Page 46: Troubleshooting
Troubleshooting and Maintenance Troubleshooting Table 4 Troubleshooting Symptom Probable Cause Possible Solution The displays do not illuminate. The unit is not connected to an AC Connect the 100 to a power outlet. power source. The fuse is blown. Replace the fuse. Dipping does not start immediately at Delay is programmed for the position Reprogram the delay. -
Page 47: Obtaining Warranty And Other Services
Troubleshooting and Maintenance Table 4 Troubleshooting Symptom Probable Cause Possible Solution Operation is noisy. Air is trapped in the tank or lines. Attempt to prime the system by raising and lowering the front and rear of the instrument. The pump or motor is faulty. Inspect the electrical connection from the pump / motor to the main PCB for damage or excessive wear. - Page 48 • Chapter 1 Safety • Chapter 2 Introduction • Chapter 3 Setting Up the 100 • Chapter 4 Operating the 100 • Chapter 5 Troubleshooting and Maintenance www.agilent.com Agilent Technologies, Inc. 2020, 2022 Edition: 03/2022 Document No: SD-29001863 Rev. E...