Doro PhoneEasy 338gsm Manual
Hide thumbs
Also See for PhoneEasy 338gsm:
- User manual (128 pages) ,
- Manual (36 pages) ,
- Manual (136 pages)
Table of Contents
Advertisement
Quick Links
Advertisement
Table of Contents

Related Manuals for Doro PhoneEasy 338gsm


Summary of Contents for Doro PhoneEasy 338gsm
- Page 1 Now available from M2Cshop.com PhoneEasy 338gsm...
- Page 2 Now available from M2Cshop.com...
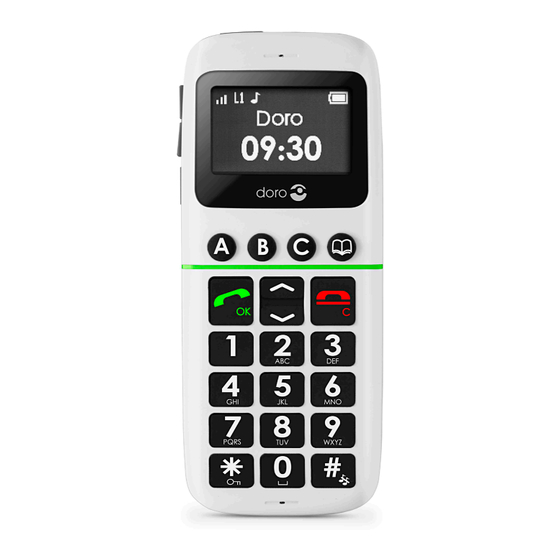
- Page 3 English Side key (volume) Charging contacts (for use Menu key with charging stand) Display Emergency call key Memory keys Headset socket Call key/OK Battery cover Numeric keypad Charging socket / Key lock Power on/off / Change profile Loudspeaker End call/back/Clear Microphone Arrow keys Phonebook key...
-
Page 4: Table Of Contents
English Contents Installation ........2 Installing the SIM card and battery . -
Page 5: Installation
English Installation Warning! Turn off the phone and disconnect the charger before remo- ving the battery cover. Installing the SIM card and battery The SIM card holder is located behind the battery. Remove the battery if it is already installed. Insert the SIM card by carefully sliding it into the holder. -
Page 6: Charging
English Charging Warning! Only use batteries, charger and accessories that have been approved for use with this particular model. Connecting other accessories may be dangerous and may invalidate the phone’s type approval and guarantee. When the battery is running low, is displayed and a warning signal is heard. -
Page 7: Operation
English Operation Activating the phone Press and hold 1 to turn the phone on/off. The following messa- The following messa- ges may be displayed: Insert SIM SIM card damaged or not SIM card missing or valid. incorrectly inserted. If the SIM card is valid but protected with a PIN code (Personal Identification Number), is displayed. -
Page 8: Making A Call
English Making a call Enter the phone number. Skip backwards with Press q to dial. Press L to end the call. Note! When making international calls, press * twice for the international prefix "+". Making a call from the Phonebook Press b to open the phonebook. -
Page 9: Display Symbols
English Display symbols Signal strength Missed call Ring only Keylock on Ring + vibration Battery level Vibration only New message Roaming (connected to Silent mode other network) Headset connected SIM card missing Charger connected SIM card error Charger disconnected Keypad locked Headset connected Unlocking keypad Headset disconnected... -
Page 10: Additional Functions
English Additional functions Handsfree mode ( q key) Activates handsfree mode during a call, which allows you to speak without holding the phone. Speak clearly into the microphone at a maximum distance of 1 meter (3 feet). Use the side keys to adjust the loudspeaker volume. -
Page 11: Text Input
English Text input Text is entered by pressing the numerical keys repeatedly to select characters. Press the key repeatedly until the desired character is shown. Wait a few seconds before entering the next character. Press * for a list of special characters. Select the desired cha- racter and press to enter it. -
Page 12: Phonebook
English Phonebook The phonebook can store 50 entries. Creating a phonebook entry Press and hold , scroll to and press Select and press Add new Select and press Name Enter a name for the contact, see input. Delete with Text Press Select and press... -
Page 13: Key Lock
English Key lock Press and hold * to lock/unlock the keypad. Incoming calls can be answered by pressing q even if the keypad is locked. During the call, the keypad is unlocked. When the call is ended or rejected, the keypad is locked again. for key lock options. -
Page 14: Sos Calls
English SOS calls As long as the phone is switched on, it is always possible to place an emergency call by entering 112 followed by q . Most – but not all – networks accept calls to 112 without a valid SIM card. -
Page 15: Sms Messaging
English SMS messaging Incoming messages The phone can receive (but not send) SMS text messages. is shown in the display when a message is received. Press and hold , scroll to and press Select a message from the list and press . -
Page 16: Settings
English Settings Note! The settings described in this chapter are carried out in standby mode. Time and date Setting the time and date Press and hold (on the side), scroll to and press Select and press Time & date Select and press Set time Press... - Page 17 English User setup Tone setup Press and hold , scroll to and press Select and press User setup Select and press Tone setup Select and press Ring tone Select one of the available tones, the tone will be played. Press to confirm, or press to discard changes.
-
Page 18: Sms Receive
English Changing the language The default language for the phone menus, messages etc. is determined by the SIM card. You can change this to any other language supported by the phone. Press and hold , scroll to and press Select and press User setup Select... -
Page 19: Emergency
English Emergency Settings for the Emergency Call key function. See also Operation/Emergency call. Press and hold , scroll to and press Select and press for the following settings: Emergency Activation Select one of the following options and press Emergency call key disabled. Emergency Call key enabled. -
Page 20: Security Settings
English Security settings Press and hold , scroll to and press Select and press Security SIM lock The SIM card is protected with a PIN code (Personal Identifica- tion Number). The phone can be set to ask for the PIN code on startup. -
Page 21: Safety Instructions
English Safety instructions Warning! The unit and the accessories can contain small parts. Keep all of the equipment out of the reach of small children. Operating environment Follow the rules and laws that apply wherever you are, and always turn off the unit whenever its use is prohibited or can cause interference or haz- ards. - Page 22 English Pacemakers The Health Industry Manufacturers Association recommends that a mini- mum separation of 15 cm be maintained between a handheld wireless phone and a pacemaker to avoid potential interference with the pace- maker. Persons with pacemakers: • Should always keep the phone more than 15 cm from their pacemaker when the phone is turned on •...
- Page 23 This device meets applicable international safety requirements for expo- sure to radio waves. Doro PhoneEasy 338gsm measures 0.521 W/kg (GSM 900MHz) / 0.159 W/kg (DCS 1800MHz) measured over 10 g tissue. The maximum limit according to WHO is 2.0 W/kg measured over 10 g tissue.
-
Page 24: Troubleshooting
English Troubleshooting Phone cannot be switched on Connect the power adapter and Battery charge low charge the battery for 12 hours. Check the installation of the Battery incorrectly installed battery. Failure to charge the battery Check the battery and charger. Battery or charger damaged Improve the charging environment. - Page 25 English SIM card error Check the condition of the SIM SIM card damaged card. If it is damaged, contact the network operator. Check the installation of the SIM SIM card incorrectly installed card. Remove the card and reinstall Wipe the contact surfaces of the SIM card dirty or damp SIM card with a clean cloth.
-
Page 26: Care And Maintenance
English Care and maintenance Your unit is a technically advanced product and should be treated with the greatest care. Negligence may void the warranty. • Protect the unit from moisture. Rain/snowfall, moisture and all types of liquid can contain substances that corrode the electronic circuits. If the unit gets wet, you should remove the battery and allow the unit to dry completely before you replace it. -
Page 27: Warranty And Technical Data
fluctuations. As a matter of precaution, we recommend disconnecting the charger during a thunderstorm. Batteries are consumables and are not included in any guarantee. This guarantee does not apply if batteries other than DORO original batter- ies are used. Specifications...