Table of Contents
Advertisement
Available languages
Available languages
Quick Links
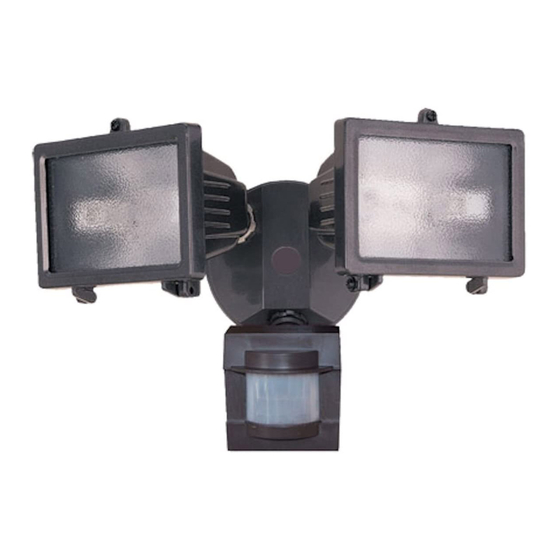
Twin Halogen Motion
Sensing Light Control
Model 5514
Features
• Turns on lighting when motion is detected.
• Automatically turns lighting off.
• Photocell keeps the lighting off during daylight
hours.
This package includes:
Plastic Hanger
Rubber Plug
Cover Plate
Light Control
2 Halogen Bulbs
Requirements
•
The light control requires 120-volts AC.
•
If you want to use Manual Mode, the control must
be wired through a switch.
•
Some codes require installation by a qualified
electrician.
•
This product is intended for use with the enclosed
gasket and with a junction box marked for use in
wet locations.
© 2012 HeathCo LLC
6 Mounting
Screws (3 sizes)
3 Wire
Connectors
Sensor
Mounting Strap
Mounting Bolt
Gasket
OPERATION
Mode:
On-Time
Test
5 Seconds
Auto
1, 5, or 10 Min
Manual
Until Dawn*
* resets to Auto Mode at dawn.
Note: When first turned on wait about 1
the circuitry to calibrate.
Put the ON-TIME switch on
the bottom of the sensor in the
TEST position.
Put the ON-TIME switch in the
1, 5, or 10 minute position.
MANUAL MODE
Manual mode only works at night
because daylight returns the
sensor to AUTO.
Flip the light switch off for one
second then back on to toggle
between AUTO and MANUAL
MODE.
Manual mode works only with
the ON-TIME switch in the 1, 5,
or 10 position.
Works:
Day Night
x
/
minutes for
1
2
TEST
ON-TIME
10 5 1 TEST
AUTO
ON-TIME
10 5 1 TEST
1 Second
OFF then...
... back on.
595-5730-07
x
x
x
Advertisement
Table of Contents

Related Manuals for Heath Zenith SL-5514-BZ-B


Summary of Contents for Heath Zenith SL-5514-BZ-B
- Page 1 OPERATION Mode: On-Time Works: Day Night Test 5 Seconds Twin Halogen Motion Auto 1, 5, or 10 Min Manual Until Dawn* Sensing Light Control * resets to Auto Mode at dawn. Note: When first turned on wait about 1 minutes for Model 5514 the circuitry to calibrate.
-
Page 2: Installation
Mode Switching Summary Before installing the light fixture under an eave, the sensor head must be rotated as shown in the next two steps for proper operation and to avoid the risk of TEST Move ON-TIME Switch to electrical shock. 1, 5, or 10 minutes AUTO For eave mount only:... - Page 3 Bulb Installation and Replacement Wire the Light Control WARNING: Turn power off at circuit breaker CAUTION: When replacing bulbs, turn power or fuse. off and let the fixture cool. 1. Remove the existing light fixture. Important: Use a clean glove or cloth when handling 2.
-
Page 4: Test And Adjustment
TEST AND ADJUSTMENT Mount the Light Control 1. Place the mounting bolt through the front of the 1. Turn on the circuit breaker and light switch. junction box cover. Push the small gasket hole over the mounting bolt. NOTE: Sensor has a 1 minute warm up period 2. -
Page 5: Specifications
SPECIFICATIONS The detector is less sensitive to motion directly towards it. Range ... . . Up to 60 ft.(18.3 m) [varies with surrounding temperature]. Motion Motion Sensing Angle ..Up to 110° Electrical Load. -
Page 6: Troubleshooting Guide
TROUBLESHOOTING GUIDE SYMPTOM POSSIBLE CAUSE SOLUTION Lights will not come 1. Light switch is turned off. 1. Turn light switch on. 2. Lamp is loose or burned out. 2. Check flood lamp and replace if burned out. 3. Fuse is blown or circuit breaker is turned off. 3. -
Page 7: Two Year Limited Warranty
TWO YEAR LIMITED WARRANTY This is a “Limited Warranty” which gives you specific legal rights. You may also have other rights which vary from state to state or province to province. For a period of two years from the date of purchase, any malfunction caused by factory defective parts or workmanship will be corrected at no charge to you. - Page 8 FUNCIONAMIENTO Modalidad: A tiempo: Trabaja: Día Noche Prueba 5 segundas Elemento de Halógeno Autom. 1, 5 o 10 min. Manual Hasta el Detector de Movimiento amanecer* *Se pone en Automático al amanecer. Modelo 5514 Nota: Cuando lo prenda por primera vez espere 1 minutos para que el circuito se calibre.
-
Page 9: Montaje En Pared
Resumen de las modalidades del interruptor PRUEBA Mueva el interruptor de tiempo (ON-TIME) a 1, 5 o 10 minutos AUTOM. Apague el interruptor por un segundo y Montaje en pared Montaje en alero préndalo de nuevo* MODO NOTA: La lámpara y el sensor debe montarse como MANUAL se indica arriba, una vez instalado (según el tipo de instalación). - Page 10 Instalación y Cambio de la Bombilla Conecte el Control de Luz ADVERTENCIA: Desconecte la energía en el CUIDADO: Cuando cambie la bombilla, apague disyuntor. la energía y deje que el aparato se enfríe. 1. Quite el aparato de luz existente. Importante: Cuando manipule la bombilla nueva use 2.
-
Page 11: Prueba Y Ajuste
PRUEBA Y AJUSTE Instale el Control de Luz 1. Ponga el perno de montaje a través del frente de 1. Prenda el cortacircuitos y el interruptor de luz. la tapa de la caja de empalme. Empuje el agujero pequeño de la empaquetadura sobre el tornillo de NOTA: El detector tiene un período de cerca de 1 montaje. -
Page 12: Especificaciones
ESPECIFICACIONES El detector es menos sensible del movimiento que se dirige hacia él. Alcance ... Hasta 18.3 m (varía con la tem- peratura del medio ambiente). Angulo de detección . Hasta 110° Carga Eléctrica . -
Page 13: Guia De Investigacion De Averias
GUIA DE INVESTIGACION DE AVERIAS SÍNTOMA POSIBLE CAUSA SOLUCIÓN La luz no se enciende. 1. El interruptor de luz está apagado. 1. Encienda el interruptor de luz. 2. El faro está flojo o quemado. 2. Revise el faro y cambie si está quemado. 3. - Page 14 GARANTÍA LIMITADA A 2 AÑOS Esta es una “Garantía Limitada” que le da a Ud. derechos legales específicos. Usted puede también tener otros derechos que varían de estado a estado o de provincia a provincia. Por un período de 2 años desde la fecha de compra, cualquier mal funcionamiento ocasionado por partes defectuosas de fábrica o mano de obra será...
-
Page 15: Caractéristiques
Exigences • La commande d’éclairage requiert une source d’alimentation 120V c.a. commandée par un in- terrupteur mural. • Certains codes de bâtiment locaux peuvent Commande d’éclairage exiger que l’installation soit faite par un élec- tricien qualifié. halogène double à • Ce produit est conçu pour être utilisé... -
Page 16: Montage Mural
Résumé du mode de commutation TEST Placer l’interrupteur ON- TIME à 1, 5 ou 10 minutes AUTO Mettre l’interrupteur hors circuit pendant une seconde, puis le PRIORITÉ MANUELLE remettre en circuit* Montage mural Montage sous avant-toit * Si vous ne savez plus dans quel mode se trouve l’ap- pareil, couper l’alimentation pendant une minute puis NOTE : Le luminaire et capteur devraient être montés la rétablir.Après le temps d’étalonnage, la commande... - Page 17 Installation et Remplacement de Câblage de la Commande L’ampoule D’Éclairage AVERTISSEMENT : Avant de remplacer une MISE EN GARDE : Coupez l’alimentation au ampoule, couper l’alimentation et attendre que disjoncteur ou au fusible. l’appareil refroidisse. 1. Enlever l’appareil d’éclairage existant. 2.
-
Page 18: Essais Et Réglages
ESSAIS ET RÉGLAGES Montage de la Commande D’Éclairage 1. Mettre en circuit le disjoncteur et l’interrupteur d’éclairage. 1. Insérer la vis de montage dans le trou du couvercle de la boîte de jonction. Pousser le petit trou de la NOTE: Le capteur doit se réchauffer 1 minute avant garniture sur la vis de montage. -
Page 19: Fiche Technique
FICHE TECHNIQUE Le détecteur est moins sensible au mouvement dans sa direction. Portée ... . Jusqu’à 18,3 m (varie selon la température environnante) Angle de détection. . . Jusqu’à 110˚ Mouvement Mouvement Charge électrique . -
Page 20: Guide De Dépannage
GUIDE DE DÉPANNAGE SYMPTÔME CAUSE POSSIBLE SOLUTION L’éclairage ne s’allume 1. L’interrupteur d’éclairage est hors tension. 1. Mettre l’interrupteur sous tension. pas. 2. Le projecteur n’est pas bien vissé ou est grillé. 2. Vérifiez le projecteur et remplacez-le s’il est grillé. 3. -
Page 21: Garantie Limitée De 2 Ans
GARANTIE LIMITÉE DE 2 ANS Il s’agit d’une « Garantie limitée » qui vous confère des droits juridiques spécifiques.Vous pouvez également jouir d’autres droits, variables d’une province à l’autre. Pendant une période de 2 ans à compter de la date d’achat, toute anomalie de fonctionnement imputable à... - Page 22 NOTE / NOTA _________________ _____________________________ _____________________________ _____________________________ _____________________________ _____________________________ _____________________________ _____________________________ _____________________________ _____________________________ _____________________________ _____________________________ _____________________________ _____________________________ _____________________________ _____________________________ _____________________________ _____________________________ _____________________________ 595-5730-07...
- Page 23 NOTE / NOTA _________________ _____________________________ _____________________________ _____________________________ _____________________________ _____________________________ _____________________________ _____________________________ _____________________________ _____________________________ _____________________________ _____________________________ _____________________________ _____________________________ _____________________________ _____________________________ _____________________________ _____________________________ _____________________________ 595-5730-07...
- Page 24 Purchase Information Información de la compra Renseignements d’achat Model #: _________________ Date of Purchase: ______________ Nº de modelo / N° de modèle Fecha de compra / Date d’achat Staple Purchase Receipt Here Engrape aquí el recibo de compra Agrafez le reçu d’achat ici PLEASE KEEP YOUR DATED SALES RECEIPT, IT IS REQUIRED FOR ALL WARRANTY REQUESTS.