Comelit Secur Hub HUB32LCD User Manual
Wireless intruder alarm control panel
Hide thumbs
Also See for Secur Hub HUB32LCD:
- Quick installation manual (16 pages) ,
- User manual (12 pages)

Related Manuals for Comelit Secur Hub HUB32LCD


Summary of Contents for Comelit Secur Hub HUB32LCD
- Page 1 USER MANUAL User manual for Secur Hub wireless intruder alarm control panel - HUB32LCD Passion.Technology.Design.
- Page 2 Table of contents Warning Table of contents ................2 Date format ................15 Set date ..................15 Available documentation ..............3 Time zone .................15 Introduction ..................3 Daylight time ................15 NTP server ................15 The front panel ................. 4 Wifi networks...................15 Main functions ................. 4 View dflt.
-
Page 3: Available Documentation
(ARC) by means of specific protocols. Real-time management, supervision and video verification are available via the Comelit app for Android and iOS. Live viewing - via the app - of the IP cameras connected to the system is instant and allows you to check the actual cause of any alarms, or to check whether everything is OK at home. A short video can also be recorded and sent to the app when an alarm occurs on the system, including the few seconds prior to the intruder event. -
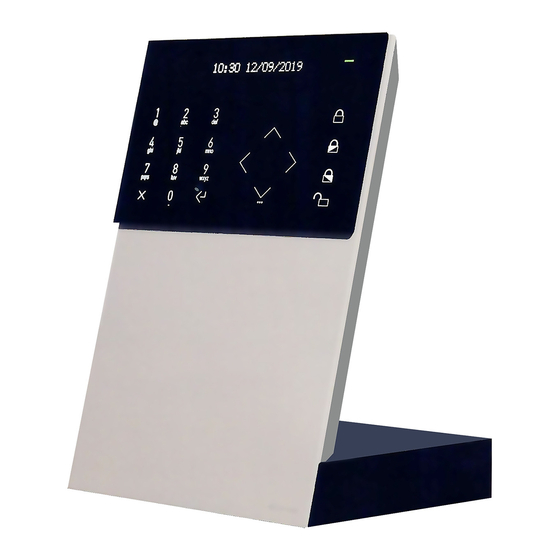
Page 4: The Front Panel
The front panel 16 x 2-character LCD. LED indicators: green, orange, red. Alphanumeric keypad. Arming/disarming buttons. Back/Cancel/Delete button. Enter/Confirm button. Navigation keypad / menu button. • Green LED: indicates the system is armed (lit steadily) or in “not ready to arm” condition (flashing). The LED is off if the system is ready for arming. -
Page 5: Accessing The Menu
Accessing the menu The user menu is accessed by entering the user code followed by the down arrow. For a full overview of the options available to the user, please refer to the “User menu” paragraph. Enter user code (default: 111111) 10:30 15/11/2019 10:30 15/11/2019 User menu... - Page 6 Custom area arming This procedure is used to configure a custom arming program in which the user can quickly select the arming status for each area. • Access custom arming set with [CODE] + [ENTER] • Using buttons 1, 2, 3, 4 the user can set the desired arming status for each area (if present). An asterisk beside the arming status indicates that the setting has been changed (but the areas are not in that condition yet) •...
- Page 7 Silencing an alarm / Alarm Memory After an alarm is triggered, the control panel begins to send the intruder event alerts to the contacts in the phonebook programmed by the installer. The siren begins to sound, the red LED on the control panel is lit steadily and the alarm alert is displayed. If the zone is reset, the control panel will show the notification “Alarm memory”...
- Page 8 View / edit zone status This menu can be used to select which zones will be bypassed in the next arming procedure. Bypassing prevents the violation of these zones from triggering an alarm. The same menu can be used to isolate a zone (this prevents that zone from generating any messages, including the tampering message). Please bear in mind that bypassed zones are automatically re-included when the system is disarmed.
- Page 9 Using the radio control 1. Button 1 2. Button 2 3. Button 3 4. Button 4 5. 3-Colour LED The remote control has 4 buttons. All the buttons can be configured using the programming software on the control panel. By default button 1 is assigned to the “total arming”...
- Page 10 Consult event log Use this function to consult the event log. The control panel can log up to 1024 events. New events are stored in the log as event 0000. Event 1023 becomes 1024 and is then deleted from the log. To consult the log: Enter the user code (default 111111) using the alphanumeric keypad and press the down arrow.
-
Page 11: Quick Commands
User menu The paragraphs below explain all the entries and options contained in the menu intended for the end user, which can be accessed by entering a user code followed by the “Down arrow”. Alarm Event log • Event memory Use this function to consult the event log. - Page 12 • Communications test Communications test is used to send a test message to the recipients configured by your installer. Select the recipient (a contact in the phonebook) and press enter to send the test message. Test Test Test dialer Test dialer Test dialer John •...
- Page 13 Users This menu is used to create and change new user codes that will be able to use the alarm system. Up to 32 users with different profiles and authorisations can be added. User 01 is already programmed by default with code 111111. The code and relevant settings can also be changed for User 01.
-
Page 14: Alarm Options
◊ Disable APP: this procedure disables the Comelit app for this contact, who will no longer be able to use the system via the Comelit app. • Call number: this menu can be used to call a telephone number using the number keypad. Module HUB2G or HUB3G is required for this function, to manage calls over the GSM network. -
Page 15: System Settings
System settings Date and time • Set time This menu can be used to set the system time. The system time is also set automatically if the control panel has internet access. • Date format This menu is used to select the format used to display the system date. •... - Page 16 APP act. code This menu can be used to generate a temporary code for use in the Comelit APP pairing procedure. The control panel shows the list of App - IDs, showing the text “Available” for the free IDs. On confirming the request for a free slot, the control panel displays a temporary code which must be entered when prompted by the Comelit app during the creation of a new system.
- Page 18 CERTIFIED MANAGEMENT SYSTEMS w w w . c o m e l i t g r o u p . c o m Via Don Arrigoni, 5 - 24020 Rovetta (BG) - Italy...