Table of Contents
Troubleshooting

Related Manuals for Elenco Electronics SCROV-50


Summary of Contents for Elenco Electronics SCROV-50
- Page 1 Copyright © 2008 by Elenco ® Electronics, Inc. All rights reserved. No part of this book shall be reproduced by 753305 any means; electronic, photocopying, or otherwise without written permission from the publisher.
-
Page 2: Table Of Contents
15 of the FCC Rules. These limits are designed to provide reasonable protection against harmful interference in a residential installation. Deluxe Snap Rover generates, uses and can radiate radio frequency energy and, if not installed and used in accordance with the instructions, may cause harmful interference to radio communications. -
Page 3: Parts List
Parts List (Colors and styles may vary) Symbols and Numbers Important: If any parts are missing or damaged, DO NOT RETURN TO RETAILER. Call toll-free (800) 533-2441 or e-mail us at: help@elenco.com. Customer Service • 150 Carpenter Ave. • Wheeling, IL 60090 U.S.A. Qty. -
Page 4: How To Use It
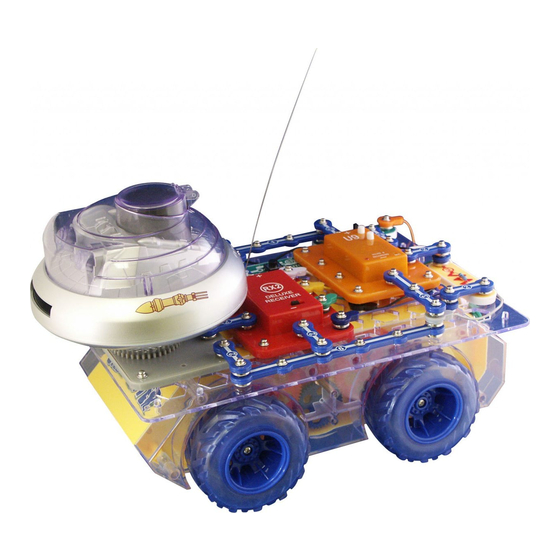
Install the antenna into the remote control unit by screwing it in. Antenna Front of Rover – The Deluxe Snap Rover Kit uses building blocks with snaps to ® build the different electrical and electronic circuits in the projects. Each block has a function: there are switch blocks, LED blocks, different length wire blocks, etc. -
Page 5: About Your Snap Circuits
Project #1 for a connection example: LBUT RBUT ® sets with this kit. The Snap Rover is a light emitting diode, and may be thought of as a are components that is a complex module containing a Deluxe Receiver: (+) - power from batteries L–... - Page 6 About Your Snap Circuits Sound & Recording IC (U9) module contains an integrated recording circuit, a dual timer integrated circuit for making audio tones, microphone, speaker, filtering circuitry, and other supporting components. It includes resistors (adjustable and fixed), capacitors, transistors and diodes that are needed to make the recordings and play all the sounds.
-
Page 7: How It Works
How It Works Remote Control Transmitter: When the levers in the Remote Control Unit are pushed, electrical contacts are made connecting the 9V battery power to the transmitter, indicating which commands the user wants sent to the Rover. Forwards/Backwards commands for each set of wheels and two extra functions are controlled by different levers or buttons. -
Page 8: General Operating Instructions
(S1) to ON, and extend the antenna on the Remote Control. Push both levers forward to make Snap Rover Push both levers backward to go backward. Push the left lever backward and the right lever forward to turn left. -
Page 9: Do's And Don'ts Of Building Circuits
® drawings. This Microsoft from www.snapcircuits.net/SnapDesigner.doc www.snapcircuits.net website. Warning to Snap Circuits other Snap Circuits page 44. The Snap Rover ® damage those parts. Our website www.snapcircuits.net also has approved circuits that you can use. NEVER DO THESE!!! Placing jumper... -
Page 10: Advanced Troubleshooting
Advanced Troubleshooting Elenco ® Electronics is not responsible for parts damaged due to incorrect wiring. If you suspect you have damaged parts, you can follow this procedure to systematically determine which ones need replacing: Rover body and jumper wires: Flip the Rover body upside down and make sure the wheel mechanisms are clean. -
Page 11: Project Listings
Project Listings Project # Description Space Rover Sound Disable Rover Fun Sounds Rover Spooky Sounds Rover Simple Sounds Not So Simple Sounds Space Sounds Audio Recorder One Sound Lighthouse Rover Remote Sound Remote Sound Switcher Parallel Pitch Reducer Series Pitch Reducer Resistor Row Ways to Light a Light Nightlite Rover... - Page 12 Project #1 Snap Circuits uses electronic blocks that snap onto a clear plastic base grid to build different circuits. These blocks have different colors and numbers on them so that you can easily identify them. Preparation: Install six (6) “AA” batteries into the bottom of the Rover body and one 9V battery into the remote control unit (batteries not included).
- Page 13 Project #2 Added part to circuit. Sound Disable Rover Modify the Project #1 circuit by adding a second slide switch (S1) over the U9 sound and recording IC, using two 1-snaps as shown. The circuit works the same as before except turning on the new S1 switch shuts off the space sounds.
- Page 14 Project #3 WARNING: Moving parts. Keep face and eyes away from the front of the disc launcher and from flying discs. -13- Fun Sounds Rover Parts in the circuit: Modify the Project #2 circuit by adding a the 100μF capacitor (C4N) over the 10K resistor (R4), using a 1-snap as shown.
- Page 15 Project #4 Added part to circuit. Part in the circuit: Parts you can replace it with: WARNING: Moving parts. Keep face and eyes away from the front of the disc launcher and from flying discs. Spooky Sounds Rover Modify the Project #2 circuit by adding a the 100μF capacitor (C4N) over the 10K resistor (R4), using a 1-snap as shown.
- Page 16 Project #5 Project #6 Turn knobs to adjust sound. -15- Simple Sounds Build the circuit with the base grid centered on the Rover body, and connect the jumper wires as shown. Turn knob Turn on the slide switch (S1). The to adjust pitch.
- Page 17 Project #7 Project #8 Keep OFF. Slide to ON to record message, then slide back to OFF. Microphone Push to play recording Space Sounds Build the circuit with the base grid centered on the Rover body, and connect the jumper wires as shown. Turn on the right slide switch (S1).
- Page 18 Rover body, and connect the jumper wires as shown. Place the Snap Rover a dimly lit room and turn on the slide switch (S1). The light will shine around the room as Snap Rover ® in the middle of ® spins.
- Page 19 Project #11 Turn knobs to the LEFT setting. Project #12 Turn knobs to the LEFT setting. Remote Sound Build the circuit with the base grid centered on the Rover body, and connect the jumper wires as shown. TURN THE KNOBS on U9 TO THE RIGHT setting. Turn on the slide switch (S1).
-
Page 20: Projects #1-63
Project #13 Project #14 -19- Parallel Pitch Reducer Turning on the switch Build the circuit with the base grid centered on the Rover body, places the 100 ohm and connect the jumper wires as shown. Set the upper knob resistor (R1) in parallel on the U9 to the middle and the lower knob to the right. - Page 21 Project #15 Project #16 Resistor Row When the slide switches are off the larger resistors (R2 and R4) are connected in a series, limiting the flow of electricity to the white LED. Turning on the slide switches bypasses the larger resistors and the LED gets brighter.
- Page 22 Project #17 Project #18 -21- Nightlite Rover Build the circuit (being sure to connect all eight colored jumper wires), and turn on the right slide switch (S1). Use the levers on the remote control unit to drive Rover around. The white LED (D4) in front acts as a headlight, so you can use it in a dark room.
- Page 23 Project #19 Project #21 Tone Flicker Build the circuit and connect the jumper wires as shown, note that the 1KΩ resistor (R2) is underneath the 100μF capacitor (C4N). Turn on the right slide switch (S1), you hear a tone and the white LED (D4) flashes.
- Page 24 Project #22 Project #23 -23- Electronic Metronome Flickering Metronome Build the circuit and connect the jumper wires as shown. Turn on one of the slide switches (S1) and adjust lower knob on the sound & recording IC (U9). The left switch adds the 100μF capacitor (C4N) to the circuit, which regulates the sound to be a slow clicking.
- Page 25 Project #24 Project #25 Not So Often Timer Build the circuit and turn on the right slide swtich (S1). Use the knobs on the sound & recording IC (U9) to adjust the tone. Push and hold the press switch (S2) to change the sound from a tone to clicking.
- Page 26 Project #26 Project #27 -25- Quad Red Blinker Build the circuit and turn on the right slide swtich (S1). The red lights in the Rover body are blinking and a tone is heard. Use the knobs on the sound & recording IC (U9) to adjust the blink rate and tone.
- Page 27 Project #28 Project #30 Super Blinker Build the circuit and connect the jumper wires as shown. Turn on the right slide switch (S1) to flash lights and make sound. Use the knobs on the sound & recording IC (U9) to adjust the blink rate and tone.
- Page 28 Project #32 Project #33 -27- Car Alarm Build the circuit and turn on the slide swtich (S1). Lights in the Rover body are blinking and a sound like a car alarm is heard. Use the knobs on the sound & recording IC (U9) to adjust the blink rate and tone.
- Page 29 Project #34 Project #35 Recording Blinker Build the circuit and connect the jumper wires as shown. Turn on the right slide switch (S1) to flash lights and make sound. Use the knobs on the sound & recording IC (U9) to adjust the blink rate and tone. Push the press switch (S2) to play the recording.
- Page 30 Project #36 Project #37 -29- Remote Control Flasher Build the circuit and connect all the jumper wires as shown. Be sure the deluxe receiver (RX2) and remote control unit are set to the same channel and turn on the slide swtich (S1). Lights in the Rover body are blinking and a tone is heard.
- Page 31 Project #38 Project #39 Remote Control Right Lite Build the circuit and connect the jumper wires as shown. Turn on the remote control unit and extend the antenna. Turn on the slide switch (S1) and use the remote control levers to drive Rover around. Press the buttons on the remote control to light the white LED (D4), note that it shines to the side.
- Page 32 Project #40 Project #41 Turning on the left switch changes sound because a resistor inside RX2 limits the current. current paths through U9 and D4 both lead into RX2, so turning on the D4 path reduces the current in the U9 sound-making path.
- Page 33 Project #42 Project #43 Multi-Tone Rover Build the circuit and connect the jumper wires as shown. Turn on the remote control unit and the slide switch (S1). Use the remote control levers to drive Rover around. Press the buttons on the remote control to change the tone.
- Page 34 Project #44 Project #45 -33- Double Launcher Build the circuit and place discs inside the disc launcher (DL). Turn on the slide switch (S1) - nothing happens yet. Push the press switch (S2) for a moment; a motor starts up, the “eyes” start blinking, and the white LED (D4) lights.
- Page 35 Project #46 Project #47 Groovy Launcher Build the circuit and place discs inside the disc launcher (DL). Turn on both slide switches (S1). Adjust the knobs on the sound & recording IC (U9) for sounds you like. The white LED (D4) blinks rapidly.
- Page 36 Project #48 -35- Venus Visitor Build the circuit and connect the 8 jumper wires as shown (C4N will hang over the edge of the base grid). Turn on the remote control unit and the slide switch (S1). Use the remote control levers to drive Rover around and adjust the tone sounds using the knobs on the sound &...
- Page 37 Project #49 Project #50 Easy Rover Build the circuit and connect the jumper wires as shown. Turn on the remote control unit and extend the antenna. Turn on the slide switch (S1) and use the remote control levers to drive Rover around. Press the left button on the remote control to light the white LED (D4).
- Page 38 Project #51 Project #52 REAR ROVER -37- Jupiter Jumble Helpless Rover Flip the Rover body so it is upside down and connect the jumper wires to the body and slide switch (S1) as shown. Turn on the switch to watch Rover Rear the wheels and gears move.
- Page 39 Try using both buttons on the remote control to start the disc launcher and launch discs. The wiring has been changed so that the levers do not control Snap Rover ® in the ways you’d expect, see how long it takes you to adjust.
- Page 40 Project #55 Project #56 The Sound of Water Use the preceding circuit but take the loose ends of the red and black jumper wires and place them in a cup of water, without letting them touch each other. The sound changes when both wires are in the water, so you have a water detector! Now spread some water on a table in puddles of different shapes.
- Page 41 Project #58 Parts in the circuit: Parts you can replace them with: Frequency Resistors Build the circuit and connect the jumper wires as shown. You hear a tone, use the switches (S1 and S2) to adjust the volume. Turning on the switches diverts some electrical energy away from the speaker, reducing the volume of the sound.
- Page 42 Project #59 Project #60 -41- Big Bully Build the circuit, place the base grid on the Rover body, and connect the jumper wires as shown. Push the press switch (S2) and the white LED (D4) is on, release the switch and the LED goes out slowly. Electricity stored in the 100μF capacitor (C4N) keeps the LED on after the batteries have been disconnected.
- Page 43 Project #61 Project #62 Electricity Station Build the circuit and connect the jumper wires, leaving one end of the orange jumper off as Notice that a capacitor is shown. Touch the loose end of the orange jumper not very efficient at storing to point on the Rover rear for a moment.
- Page 44 Project #63 Lunar Messenger Build the circuit as shown on turn off the slide switches (S1). You should hear a two-tone sound (it may be preceded by a recording); use both knobs on the sound & recording IC (U9) to change it. Removing the 2-snap wire at the point marked should also change it.
-
Page 45: Products
OTHER SNAP CIRCUITS Contact Elenco ® to find out where you can purchase these products. Snap Circuits ® Model SC-100 Build over Including: • Flying saucer • Spin draw • Sound activated switch • Alarm circuit Contains over Including: • Photoresistor •... - Page 46 Models SC-300, SC-500, or SC-750 (with 300+ experiments), then you may also build these circuits. Our website (www.snapcircuits.net) has additional circuits. DO NOT use parts from other Snap Circuits Rover ® except in our approved circuits - the Snap Rover -45- ® uses higher voltage which could damage those parts.
-
Page 47: Parts Map
Notes -46-... - Page 48 SCROV-50 Snap Rover Important: If any parts are missing or damaged, DO NOT RETURN TO RETAILER. Call toll-free (800) 533-2441 or e-mail us at: help@elenco.com. Customer Service • 150 Carpenter Ave. • Wheeling, IL 60090 U.S.A. Jumper Wire 4 x1 2 x4 ®...