Omron 10 Series Instruction Manual
Upper arm blood pressure monitor
Hide thumbs
Also See for 10 Series:
- User manual ,
- Instruction manual (55 pages) ,
- Instruction manual (44 pages)

Related Manuals for Omron 10 Series


Summary of Contents for Omron 10 Series
- Page 1 10 series Upper Arm Blood Pressure Monitor Model BP7450 Instruction Manual 3608646-1G...
-
Page 2: Table Of Contents
Table of Contents Introduction ..........2 8.3 Cleaning ........43 8.4 Disposal ........43 Safety Instructions .......2 9. Optional Accessories ......44 Intended Use ........2 Receiving and Inspection .....2 10. Specifications ........45 Symbols Glossary ........2 11. FCC Statement .........49 Important Safety Information ....3 12. -
Page 3: Introduction
Safety Instructions This instruction manual provides you with important information about the OMRON BP7450 Blood Pressure Monitor. To ensure the safe and proper use of this monitor, READ and UNDERSTAND all of the safety and operating instructions. If you do not understand these instructions or have any questions, contact 1-800-634-4350 before attempting to use this monitor. -
Page 4: Important Safety Information
Important Safety Information Read the Important Safety Information in this instruction manual before using this monitor. Follow this instruction manual thoroughly for your safety. Keep for future reference. For specific information about your own blood pressure, CONSULT WITH YOUR PHYSICIAN. Indicates a potentially hazardous situation which, if not Warning avoided, could result in death or serious injury. - Page 5 Important Safety Information AC Adapter Handling and Usage • DO NOT use the AC adapter if this monitor or the AC adapter cable is damaged. If this monitor or the cable is damaged, turn off the power and unplug the AC adapter immediately. •...
- Page 6 • Ensure that this monitor has acclimated to room temperature before taking a measurement. Taking a measurement after an extreme temperature change could lead to an inaccurate reading. OMRON recommends waiting for approximately 2 hours for the monitor to warm up or cool down when the...
- Page 7 Important Safety Information Data Transmission • DO NOT replace batteries or unplug the AC adapter while your readings are being transferred to your smart device. This may result in incorrect operation of this monitor and failure to transfer your blood pressure data. AC Adapter Handling and Usage •...
-
Page 8: Know Your Monitor
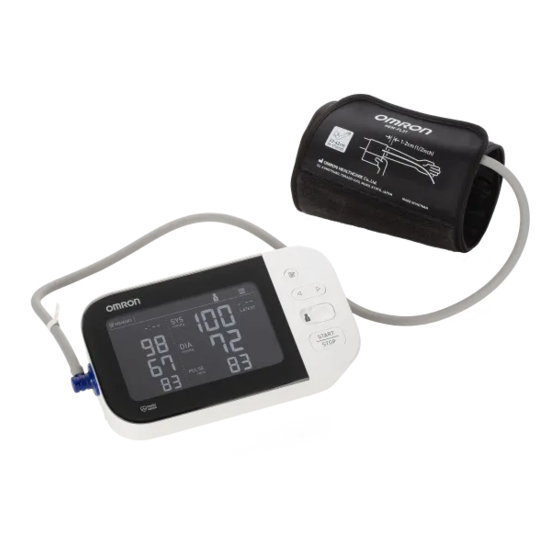
1. Know Your Monitor Contents/Product Includes Monitor, Easy Wrap ComFit Cuff, AC adapter (HEM-ADPTW5), 4 “AA” batteries, instruction manual, quick start guide Monitor and Arm Cuff Front of the monitor Display [Memory] button [Forward/Backward] buttons [User ID selection] switch [START/STOP] button Left and right side of the monitor Air jack AC adapter jack... - Page 9 1. Know Your Monitor Back and bottom of the monitor [Connection] button (Date/Time) Battery compartment Arm cuff (Upper arm circumference: 9" - 17" (22 - 42 cm)) Air plug Air tube...
-
Page 10: Display And Symbols
1. Know Your Monitor Display and Symbols Average value symbol Sync symbol Memory symbol Low battery symbol / Depleted battery symbol Systolic blood pressure Date/time display reading Comparison display TruRead symbol Pulse display / Memory High symbol number Diastolic blood pressure OK symbol reading Heartbeat symbol... - Page 11 1. Know Your Monitor Average value symbol Flashes when viewing the average of the latest 2 or 3 readings taken within the most recent 10 minute timeframe. Memory symbol Appears when viewing readings stored in the memory. Systolic blood pressure reading Comparison display Displays past readings.
- Page 12 1. Know Your Monitor Sync symbol Flashes/appears when your data needs to be transferred because the stored memory is either almost, or completely full. Once you pair your monitor with your smart device, transfer your readings immediately before the monitor deletes the oldest reading.
- Page 13 1. Know Your Monitor Movement error symbol Appears with your reading when your body is moving during a measurement. If it appears, remove the arm cuff and wait for 2 to 3 minutes. Then, reapply the cuff, remain still and take another measurement. Irregular heartbeat symbol Appears when irregular rhythm is detected 2 or more times during a measurement.
-
Page 14: Classification Of Bp (Blood Pressure)
1. Know Your Monitor Classification of BP (Blood Pressure) ACC/AHA 2017 Hypertension guidelines define categories of BP in adults as below. Categories of BP in Adults* BP Category Systolic BP Diastolic BP Normal < 120 mmHg < 80 mmHg Elevated 120 - 129 mmHg and <... -
Page 15: Preparation
2. Preparation Installing Batteries 1. Push down the hook of the battery cover and pull downward. 2. Insert 4 “AA” batteries as indicated in the battery compartment. 3. Close the battery cover. As soon as batteries are correctly installed, the year flashes on the display. -
Page 16: Using The Ac Adapter
2. Preparation Using the AC Adapter Note •Make sure not to place your monitor in a location where it is difficult to plug and unplug the AC adapter. •We recommend keeping batteries in your monitor at all times, even if you choose to use the AC adapter. If only the AC adapter is used without keeping batteries in your monitor, you may need to reset the date and time each time you unplug and plug back the AC adapter. -
Page 17: Setting The Date And Time
•Set your monitor to the correct date and time before taking a measurement for the first time. •The date and time will automatically be set when the monitor is paired with “OMRON connect US/CAN” app. Refer to sub-section 4.1. •As soon as batteries are correctly installed, the year flashes on the display of your monitor. - Page 18 2. Preparation 3. Press the button to confirm the year, then the month will flash. Repeat the same steps to adjust the month, day, hour, and minute. Year Month Hour Minute 4. Press the button to store the setting. TruRead mode setting is displayed 3 seconds after the minutes have been set in this sequence.
-
Page 19: Setting The Truread Mode
2. Preparation Setting the TruRead Mode The TruRead mode takes 3 consecutive measurements. The monitor will inflate, take a measurement, and deflate - 3 times, separated by a short interval between each measurement. The TruRead mode is set to “oFF” by default. 1. - Page 20 2. Preparation 4. Press the button to change the interval. It can be set 15, 30, 60, or 120 seconds. 5. Press the button to confirm. Your monitor will automatically turn off in 3 seconds. To take a measurement in TruRead mode, refer to “Using the TruRead Mode”...
-
Page 21: Blood Pressure Measurement Tips
2. Preparation Blood Pressure Measurement Tips To help ensure an accurate reading, follow these directions: •Stress raises blood pressure. Avoid taking measurements during stressful times. •Measurements should be taken in a quiet place. •It is important to take measurements at the same times each day. Taking measurements in the morning and in the evening is recommended. -
Page 22: Applying The Arm Cuff
•The blood pressure can differ between the right arm and the left arm, and the measured blood pressure readings can be different. OMRON recommends to always use the same arm for measurement. If the readings between both arms differ substantially, check with your physician to determine as to which arm to use for your measurements. - Page 23 2. Preparation 2. Apply the arm cuff to your left upper arm. 0.5 inch (1 to 2 cm) Bottom edge Bottom edge Note • The bottom edge of the arm cuff should be 0.5 inch (1 to 2 cm) above the inside elbow. The air tube is on the inside of your arm and aligned with your middle finger.
-
Page 24: Sitting Correctly
2. Preparation Sitting Correctly To take a measurement, you need to be relaxed and comfortably seated in a room at a comfortable temperature. Place your arm on the table. •Sit in a comfortable chair with your back and arm supported. •Keep your feet flat and your legs uncrossed. -
Page 25: Selecting A User Id
2. Preparation Selecting a User ID Your monitor is designed to take measurements and store the readings in the memory for 2 people using the [user ID selection] switch. 1. Select your user ID (1 or 2). -
Page 26: Using Your Monitor Without A Smart Device
3. Using Your Monitor without a Smart Device Taking a Measurement You can use your monitor without pairing to a smart device. To pair your monitor with a smart device, refer to sub-section 4.1. Note •To stop the measurement, press the [START/STOP] button once to deflate the arm cuff. - Page 27 3. Using Your Monitor without a Smart Device 3. Press the [START/STOP] button to turn your monitor off. Note • Your monitor automatically turns off after 3 minutes. • Wait 2 - 3 minutes between measurements. The wait time allows the arteries to decompress and return to their pre- measurement state.
- Page 28 3. Using Your Monitor without a Smart Device After the second measurement is complete, wait for the next measurement to start. The interval you selected during TruRead settings will appear on the display. START INFLATING DEFLATING COUNTDOWN After the third measurement is complete, the average for the 3 measurements appears on the display.
- Page 29 3. Using Your Monitor without a Smart Device Using the Guest Mode Your monitor stores readings for 2 users in the memory. The guest mode can be used to take a single measurement for another user. Note •No readings are stored in the memory, and the TruRead mode is not available when the guest mode is selected.
-
Page 30: Using Your Monitor With A Smart Device
1. Enable Bluetooth on your smart device. 2. Download and install the free “OMRON connect US/CAN” app onto your smart device. If you already have the “OMRON connect US/CAN” app and have created your account, open the app and add your new monitor. -
Page 31: Taking A Measurement
“OMRON connect US/CAN” app. • Your monitor automatically turns off after 2 minutes. • Be aware that OMRON will not be responsible for the loss of data and/or information in the app. • “OMRON connect US/CAN” is the only app that we recommend to use with your monitor to transfer data correctly. -
Page 32: Disabling/Enabling Bluetooth
4. Using Your Monitor with a Smart Device Disabling/Enabling Bluetooth Warning • This product emits radio frequencies (RF) in the 2.4 GHz band. DO NOT use this product in locations where RF is restricted, such as on an aircraft or in hospitals. -
Page 33: Using Memory Function
5. Using Memory Function Your monitor automatically stores up to 100 readings per user. Note •This monitor can be used by multiple users. Refer to sub-section 2.8 to switch user. Make sure which user ID stores your own readings. Viewing the Readings Stored in Memory 1. - Page 34 5. Using Memory Function 3. Press the button repeatedly to scroll through the previous readings stored in the memory. : To view the older readings : To view the more recent readings To view individual readings in TruRead measurement The readings with the TruRead symbols ( ) are the averages for the consecutive 3 measurements.
-
Page 35: Viewing The Average Reading
5. Using Memory Function Viewing the Average Reading Your monitor can calculate an average reading based on the latest 2 or 3 readings taken within the most recent 10 minute timeframe. Select your user ID. 2. When your monitor is off, press and hold the button for more than 3 seconds. -
Page 36: Other Settings
6. Other Settings Deleting All Readings Stored in Memory 1. Select your user ID. 2. Press the button. After a memory number appears, the latest reading will appear with a past reading. 3. While holding the button down, press and hold the [START/STOP] button for more than 3 seconds. -
Page 37: Restoring Your Monitor To The Default Settings
6. Other Settings 5. Press [START/STOP] button to turn your monitor off. Note • All readings will be deleted. You cannot partially delete the readings stored in the memory. • Your monitor automatically turns off after 2 minutes. Restoring Your Monitor to the Default Settings To delete all the information stored in your monitor, follow the instructions below. - Page 38 6. Other Settings 3. Press [START/STOP] button to turn your monitor off. Note • Reverting to the default setting of your monitor does not delete the information in the app. • Your monitor automatically turns off after 3 minutes. • You will need to re-pair your monitor when using the monitor again.
-
Page 39: Error Messages And Troubleshooting
7. Error Messages and Troubleshooting If any of the below problems occur during measurement, check to make sure that no other electrical device is within 12 inches (30 cm). If the problem persists, refer to the table below. Display/ Possible Cause Solution Problem Air plug is not... - Page 40 7. Error Messages and Troubleshooting Display/ Possible Cause Solution Problem Do not touch the arm cuff and/or bend the air tube The arm cuff is inflated while taking a exceeding the maximum measurement. appears allowable pressure. If inflating the arm cuff manually, refer to the end of sub-section 3.1.
- Page 41 7. Error Messages and Troubleshooting Display/ Possible Cause Solution Problem Follow the instructions shown in the “OMRON The monitor cannot connect US/CAN” app. If connect to a smart the “Err” symbol still device or transmit data appears after checking correctly.
- Page 42 Review sub-sections 2.5 - 2.7 and section 3. Follow the instructions shown in the smart device, Any other or visit the “Support” section in the “OMRON communication connect US/CAN” app for further help. If the issue occurs.
-
Page 43: Maintenance
8. Maintenance Maintenance To protect your monitor from damage, follow the directions below: •Changes or modifications not approved by the manufacturer will void the user warranty. Caution • DO NOT disassemble or attempt to repair this monitor or other components. This may cause an inaccurate reading. -
Page 44: Cleaning
8. Maintenance Cleaning •Do not use any abrasive or volatile cleaners. •Use a soft dry cloth or a soft cloth moistened with mild (neutral) detergent to clean your monitor and arm cuff and then wipe them with a dry cloth. •Do not wash or immerse your monitor and arm cuff or other components in water. -
Page 45: Optional Accessories
9. Optional Accessories Easy Wrap ComFit Cuff AC Adapter Arm circumference 9" - 17" (22 - 42 cm) Model: HEM-FL31-B HEM-FL31-BZ Model: HEM-ADPTW5 Protective LCD Cover For further information, visit our website at OmronHealthcare.com Model: HEM-CACO-734 Note •Do not throw the air plug away. The air plug can be applicable to the optional cuff. -
Page 46: Specifications
10. Specifications Model BP7450 HEM-7342T-Z Display LCD digital display Cuff pressure range 0 to 299 mmHg Blood pressure SYS: 60 to 260 mmHg measurement range DIA: 40 to 215 mmHg Pulse measurement 40 to 180 beats / min. range Pressure: ±3 mmHg Accuracy Pulse: ±5% of display reading Inflation... - Page 47 10. Specifications Monitor: Approximately 16.6 oz. (470 g) not Weight including batteries Arm cuff: Approximately 5.8 oz. (163 g) Monitor: Approximately 7.5" (w) × 3.1" (h) × 4.1" (l) (191 mm × 79 mm × 105 mm) Dimensions Arm cuff: Approximately 5.7" × 20.9" (air tube: 29.5") (145 mm ×...
- Page 48 10. Specifications About a wireless communication interference This product operates in an unlicensed ISM band at 2.4 GHz. In the event this product is used near other wireless devices such as microwave and wireless LAN, which operate on the same frequency band as this product, there is a possibility that interference may occur.
- Page 49 10. Specifications Pictogram on the Product Types of marks used to indicate the correct positioning of the artery for the upper arm Identifies the type of cuff that is compatible with the blood pressure monitor...
-
Page 50: Fcc Statement
11. FCC Statement FCC CAUTION Changes or modifications not expressly approved by the party responsible for compliance could void the user's authority to operate the equipment. This device complies with part 15 of the FCC Rules. Operation is subject to the following two conditions: (1) This device may not cause harmful interference, and (2) this device must accept any interference received, including interference that may cause undesired operation. -
Page 51: Limited Warranty
MAY BE IMPOSED BY LAW, IF ANY, ARE LIMITED IN DURATION TO THE PERIOD OF THE ABOVE EXPRESS WARRANTY. OMRON SHALL NOT BE LIABLE FOR LOSS OF USE OR ANY OTHER SPECIAL, INCIDENTAL, CONSEQUENTIAL OR INDIRECT COSTS, EXPENSES OR DAMAGES. - Page 52 12. Limited Warranty FOR CUSTOMER SERVICE Visit our web site at: OmronHealthcare.com Call toll free: 1-800-634-4350...
-
Page 53: Guidance And Manufacturer's Declaration
IEC60601-1-2:2014 Important information regarding Electromagnetic Compatibility (EMC) BP7450 manufactured by OMRON HEALTHCARE Co., Ltd. conforms to IEC60601-1- 2:2014 Electromagnetic Compatibility (EMC) standard. Further documentation in accordance with this EMC standard is available at OmronHealthcare.com/emc. Refer to the EMC information for BP7450 on the website. - Page 54 OMRON HEALTHCARE Co., Ltd. 53, Kunotsubo, Terado-cho, Muko, Kyoto, 617-0002 JAPAN Distributed by: OMRON HEALTHCARE, INC. 1925 West Field Court Lake Forest, IL 60045 U.S.A. OmronHealthcare.com © 2019 OMRON HEALTHCARE, INC. Made in Vietnam...