Kompernass IUK 5 A1 Quick Installation Manual
Ip surveillance camera
Hide thumbs
Also See for IUK 5 A1:
- Quick installation manual (181 pages) ,
- Operating instructions manual (131 pages) ,
- Operating instructions manual (93 pages)
Table of Contents
Advertisement
Available languages
Available languages
Quick Links
Quick installation guide
GB
IE
IP surveillance camera IUK 5 A1 (IAN 48807)
This guide shows you how to get your surveillance camera up and running in just a few steps using your smartphone or tablet. It also shows you how to connect to your Wi-Fi network.
Step 1
■
Screw the Wi-Fi antenna onto the camera.
■
Connect the mains adapter to the camera and
a mains power socket.
■
Using the supplied network cable, connect the
camera to your network router or switch.
■
Ensure that your smartphone or tablet is con-
nected to your Wi-Fi network.
Visit our product support website on www.kompernass.com to download the latest version of the operating instructions, any firmware updates and additional control software.
Step 2
■
If you are using an Android smartphone or
tablet, install the app "IUK Viewer" from the
Google Play Store.
■
If you are using an iPhone or iPad, install the
app "IUK Viewer" from the Apple App Store.
■
Start the app and tap on "Add a new camera".
Step 3
■
Select "Scan QR-Code" and scan the QR code
on the underside of the camera.
Step 4
■
Once the QR code has been successfully
scanned, the corresponding camera ID
appears in the CAMERA INFO.
Then tap on "Done".
Advertisement
Chapters
Table of Contents

Related Manuals for Kompernass IUK 5 A1


Summary of Contents for Kompernass IUK 5 A1
- Page 1 "IUK Viewer" from the Apple App Store. ■ Start the app and tap on "Add a new camera". Visit our product support website on www.kompernass.com to download the latest version of the operating instructions, any firmware updates and additional control software.
- Page 2 You will find further information in the camera’s full operat- ing instructions. Visit our product support website on www.kompernass.com to download the latest version of the operating instructions, any firmware updates and additional control software.
- Page 3 "IUK viewer", ki jo najdete v Apple App-Store. ■ Zaženite aplikacijo in pritisnite na "Dodaj kamero". Obiščite naše spletno mesto za podporo za izdelke na naslovu www.kompernass.com, od koder lahko prenesete najnovejšo različico navodil za uporabo, morebitne posodobitve vgrajene programske opreme in dodatno programsko opremo.
- Page 4 WLAN in lahko jo upravljate preko aplikacije. Nadaljnje informacije najdete v podrobnih navodilih za uporabo kamere. Obiščite naše spletno mesto za podporo za izdelke na naslovu www.kompernass.com, od koder lahko prenesete najnovejšo različico navodil za uporabo, morebitne posodobitve vgrajene programske opreme in dodatno programsko opremo.
- Page 5 „IUK viewer” din Apple App-Store. ■ Porniţi aplicaţia și apăsaţi „Adăugare cameră”. Vizitaţi pagina noastră de asistenţă pentru produse la www.kompernass.com pentru a descărca ultima versiune a instrucţiunilor de utilizare, eventuale actualizări de firmware şi software de comandă suplimentare.
- Page 6 Informaţii suplimentare sunt disponibile în instrucţiunile de utilizare detaliate ale camerei. Vizitaţi pagina noastră de asistenţă pentru produse la www.kompernass.com pentru a descărca ultima versiune a instrucţiunilor de utilizare, eventuale actualizări de firmware şi software de comandă suplimentare.
- Page 7 Sie sich die App „IUK viewer“ aus dem Apple App-Store. ■ Starten Sie die App und tippen Sie auf „Kamera hinzufügen“. Besuchen Sie unsere Produktunterstützungs-Webseite unter www.kompernass.com, um die aktuellste Version der Bedienungsanleitung, eventuelle Firmware-Updates und zusätzliche Bediensoftware herunterzuladen.
- Page 8 Sie können die Kamera über die App bedienen. Weitere Informationen finden Sie in der ausführlichen Bedienungsanleitung der Kamera. Besuchen Sie unsere Produktunterstützungs-Webseite unter www.kompernass.com, um die aktuellste Version der Bedienungsanleitung, eventuelle Firmware-Updates und zusätzliche Bediensoftware herunterzuladen.
- Page 9 IP SURVEILLANCE CAMERA IUK 5 A1 IP SURVEILLANCE CAMERA IP-NADZORNA KAMERA Operating instructions Navodila za uporabo CAMERĂ DE SUPRAVEGHERE IP IP-ÜBERWACHUNGSKAMERA Instrucţiuni de utilizare Bedienungsanleitung IAN 48807...
- Page 10 Before reading, unfold both pages containing illustrations and familiarise yourself with all functions of the device. Pred branjem obe strani s slikami odprite navzven in se nato seznanite z vsemi funkcijami naprave. Înainte de a citi instrucţiunile, priviţi ambele pagini cu imagini şi familiarizaţi-vă cu toate funcţiile aparatului.
-
Page 13: Table Of Contents
Central monitoring via special software ........33 IUK 5 A1... - Page 14 Importer ............. . 42 IUK 5 A1...
-
Page 15: Introduction
A warning notice at this hazard level indicates an imminently hazardous situation. If the hazardous situation is not avoided, it could result in death or serious physical injury. ► Follow the instructions in this warning notice to avoid the risk of death or serious injury. IUK 5 A1... -
Page 16: Safety
DANGER! Do not allow children to play with the packaging material! Keep all packaging materials out of the reach of children. Risk of suffocation! ■ When mounting the device, ensure that it cannot fall and injure anyone. IUK 5 A1... - Page 17 A damaged mains adapter can cause a fire or electrical shock. Check the mains adapter regularly. If it is damaged, contact your nearest authorised customer service centre or your dealer to have it replaced. IUK 5 A1...
-
Page 18: Possible Infringements Of The Rights Of Third Parties
Surveillance cameras at the workplace Surveillance at the workplace is subject to particularly strict regulations in Germany. Employers should not use surveillance cameras in the workplace in any cases where this could lead to a possible infringement of legal rights. IUK 5 A1... - Page 19 The brand names and logos used are the property of their respective manufacturers and are subject to their copyright provisions. Further information can be found in the respective publications of the manufacturers. IUK 5 A1...
-
Page 20: Operating Components
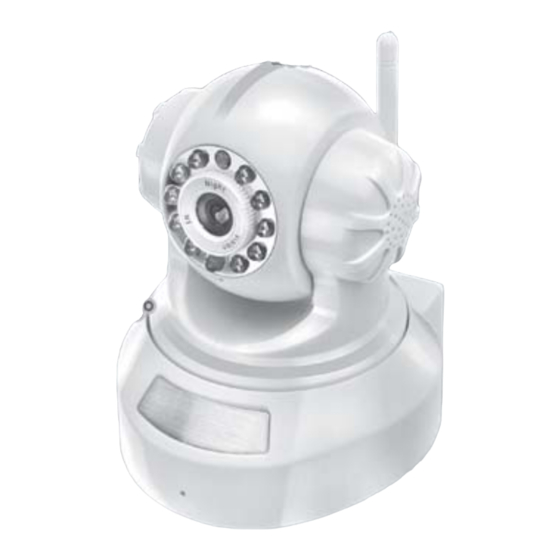
Figure C: Thread for attaching the mounting arm Reset switch QR code for quick synchronisation with smartphone Mains adapter Wi-Fi antenna Mounting arm Network cable Figure D: Data CD Plug adapter for alarm connection Mounting material Operating instructions IUK 5 A1... -
Page 21: Setting Up And Connecting
Returning the packaging to the material cycle conserves raw materials and reduces the amount of waste which is generated. Dispose of packaging materials that are no longer needed in accordance with applicable local regulations. IUK 5 A1... -
Page 22: Set-Up Location Requirements
(B) so that the camera is held securely on the mounting arm ■ Operate the device only in dry locations, never in a hot environment or anywhere near fl ammable materials. ■ Operate the device only in locations with adequate ventilation. IUK 5 A1... -
Page 23: Power Supply
OUT contacts. Here, a signal is produced as soon as the output is manually activated or when the output is selected for alarm signals and the surveillance camera recognises an alarm. The maximum switching capacity of the OUT contacts is 5 V/500 mA. ♦ For more information, read the operating instructions of the components involved. IUK 5 A1... -
Page 24: Handling And Operation
2.0 GHz or higher RAM: 512 MB or more Network card: 10 MBit/s or better Graphics card memory: 512 MB or more Supported web browsers: Internet Explorer 11, various others but with reduced functionality Screen resolution: 1024 × 768 or higher IUK 5 A1... -
Page 25: Before Use
Open the drive in Explorer and double-click on the fi le "Search Tool". This will start the program to search for your camera in the network (no fi les are installed on your computer). 1) Depending on your computer confi guration, a fi rewall warning will appear. Click on "Allow access". IUK 5 A1... - Page 26 Now enter the network data for the surveillance camera manually. Generally, these data include the network settings for your router. For further information, read the operating instructions for your router. Click "Apply" to accept the new settings. IUK 5 A1...
-
Page 27: Displaying The Camera Image In Internet Explorer 11
). Then click on "Upgrade" to carry out the required update. Displaying the camera image in Internet Explorer 11 NOTE ► You only have access to all of the features of the IP surveillance camera when using the Internet Explorer 11 browser. IUK 5 A1... - Page 28 Click on "Save". Shortly afterwards, the indicator bar appears on the lower edge of the screen. Here, click on "Open". An Explorer window will open. Double-click on the fi le "oPlayer.msi" and follow the on-screen instructions to install the plug-in. IUK 5 A1...
- Page 29 5) Click on the "Security" tab, select "Trusted sites" and then click on the "Sites" button: 6) In the next window, you have the option to add the camera address to your trusted zone. Uncheck the box "Server verifi cation", click on "Add", then on "Close" and fi nally "OK". IUK 5 A1...
-
Page 30: Meaning Of The Control Buttons And Fields
Click this button to mirror the image vertically. −> Click this button to mirror the image horizontally. −> Click this button to switch on an external alarm connection −> Click this button to switch off an external alarm connection IUK 5 A1... - Page 31 (1–16) of the desired position from the number fi eld that appears then. −> To display one camera image. −> To simultaneously display 4 camera images as tiles. −> To simultaneously display 9 camera images as tiles. The activated option is marked orange. IUK 5 A1...
- Page 32 −> Click on this button to save a snapshot of the current camera image as a bitmap on your computer. −> Click on this button to open the confi guration described below in the browser interface. IUK 5 A1...
-
Page 33: Configuration Via The Browser Interface
Here, you can give the device a different name so that you can identify it more easily in the network if necessary. A maximum of 24 characters can be used. Spaces may not be used; otherwise, the new name will not be accepted. IUK 5 A1... - Page 34 field "Reserved disk space (MB)". If you want previously saved videos to be overwritten when the allotted memory is full, check the box "Overwrite existing video files". Otherwise, no more new videos will be saved. IUK 5 A1...
-
Page 35: The "Alarm Settings" Page
"Trigger level" to "High" or "Low". If you want to see a specific "Preset position when alarm is triggered", choose the desired position that was previously stored from the selection box under this menu item. IUK 5 A1... - Page 36 If you have checked the box "Alarm mail notification" on the menu page "Alarm settings", you can enter the e-mail address of the sender as well as the SMTP server and SMTP port to be used under "Sender’s email". Note the corresponding parameters and settings of your e-mail provider. IUK 5 A1...
- Page 37 FTP server after the alarm has been triggered. After you have made your entries, you can test the FTP connection by clicking the "Test" button. Alarm logs Here you can view the alarm log file. IUK 5 A1...
-
Page 38: The "Network" Page
Enter the name of the second DNS server here. This server will be used if the first server is not available. Http port: Enter the number 81 here. Otherwise, the transfer of the image to the computer will not work. IUK 5 A1... -
Page 39: The "Pan & Tilt" Page
Amount of patrols: Here you can set the number (1–10) of horizontal or vertical pans. These will be executed if the corresponding function is activated in the main menu. If the setting "Always" is selected, the camera pans continuously. IUK 5 A1... -
Page 40: The "User Settings" Page
■ Then, in the upper device list, click on the name of the camera that you want to assign. The required information is added automatically. ■ Enter the user name and the password and click on "Add". IUK 5 A1... - Page 41 NOTE ► You may be able to display the camera image and make configuration settings in other browsers. However, it is possible that not all of the options described for Internet Explorer 11 will be available. IUK 5 A1...
-
Page 42: Operating Differences When Using The Smartphone Preview
Tap on the entry to see the camera image on the smartphone display. ♦ Swipe over the screen to pan the camera head in the corresponding direction. NOTE ► Using the smartphone to control the device has no eff ect on the web interface. IUK 5 A1... -
Page 43: Controlling The Camera Via Smartphone
Tap this icon to rotate the display by 90°. −> Tap this icon to switch the audio transmission between camera and mobile on or off . −> Tap this icon to save a snapshot of the display. IUK 5 A1... - Page 44 Tap this icon to reset the brightness and contrast settings to the factory defaults. −> Tap this icon to switch the camera’s infrared LEDs on or off . −> Tap this icon to stop displaying the camera image. IUK 5 A1...
-
Page 45: Central Monitoring Via Special Software
Afterwards, start the program "IUK Viewer" and confirm the authorisation query from the operating system’s firewall if applicable, when the program is started for the first time. On the bottom left in the program window, you will see a list of the installed cameras. IUK 5 A1... - Page 46 Therefore, they will not be described here again in detail. Configure the displayed parameters as required. Afterwards, click on the "OK" button. You can also open this window by clicking on "System settings" on the left of the main window. IUK 5 A1...
- Page 47 You can also open this window by clicking on "Device settings" on the left of the main window. Click on "Add" if you want to add a camera in the subsequent window by manually entering the connection details. After making your entries, click on "OK" to close the window. IUK 5 A1...
- Page 48 If new cameras are found by the "Search" function, they can be added to the list by double-clicking on the camera. A camera can also be installed multiple times. You can also open this device list by clicking on "Device settings" on the left of the main window. IUK 5 A1...
- Page 49 When using more than one camera, you must start by clicking on the image of the camera that you want to control with the mouse. The activated image will be bordered in red. IUK 5 A1...
-
Page 50: Cleaning
Observe the following safety information to avoid hazards and property damage: ► Repairs to electrical devices should only be carried out by specialists trained by the manufac- turer. Improper repairs can cause considerable risks to users and damage to the device. IUK 5 A1... -
Page 51: Fault Causes And Rectification
NOTE ► If you are unable to resolve the problem by taking any of the aforementioned steps, please contact the Customer Service department. IUK 5 A1... -
Page 52: Appendix
Vertical: 105°, horizontal: 355° Min. illumination 2.0 lux @ 500 nm Operating temperature 5 to +40°C Storage temperature −10 to +60°C Humidity (no condensation) 5 to 75% Dimensions approx. 11.8 x 10.3 x 12.9 cm Weight approx. 300 g IUK 5 A1... -
Page 53: Warranty
Any damage and defects present at the time of purchase must be reported immediately after unpacking, but no later than two days after the date of purchase. Repairs carried out after expiry of the warranty period shall be subject to charge. IUK 5 A1... -
Page 54: Service
Service Service Great Britain Tel.: 0871 5000 720 (£ 0.10/Min.) E-Mail: kompernass@lidl.co.uk IAN 48807 Hotline availability: Monday to Friday 08:00 - 20:00 (CET) Importer KOMPERNASS HANDELS GMBH BURGSTRASSE 21 44867 BOCHUM GERMANY www.kompernass.com IUK 5 A1... - Page 55 Upravljanje kamere s pametnim telefonom ........73 Centralni nadzor z uporabo posebne programske opreme ..... . . 75 IUK 5 A1...
- Page 56 Garancijski list ............84 IUK 5 A1...
-
Page 57: Uvod
V teh navodilih za uporabo se uporabljajo naslednje vrste opozoril: NEVARNOST Opozorilo na tej stopnji nevarnosti označuje grozečo nevarno situacijo. Če nevarne situacije ne preprečite, lahko pride do smrti ali težkih poškodb. ► Upoštevajte navodila v tem opozorilu, da preprečite nevarnost smrti ali težkih poškodb oseb. IUK 5 A1... -
Page 58: Varna Uporaba
NEVARNOST! Embalažni materiali niso igrača. Embalažni materiali naj ne bodo v bližini ■ otrok. Obstaja nevarnost zadušitve! ■ Med pritrjevanjem naprave pazite na čvrst prijem, da naprava ne bo padla na tla in koga poškodovala. IUK 5 A1... - Page 59 čezenj. Poškodovan omrežni adapter lahko povzroči požar ali električni udar. Občasno preverite stanje omrežnega adapterja. Če zaznate poškodbe na kablu, se obrnite na bližnji pooblaščeni servis ali svojega prodajalca, da vam ga zamenja. IUK 5 A1...
-
Page 60: Možne Kršitve Pravic Tretjih Oseb
Osebne določljivosti se v vsakem primeru izogibajte. Nadzorne kamere na delovnem mestu Nadzor na delovnem mestu je v Sloveniji dovoljen le izjemoma. Delodajalci naj se nadzornim kameram na delovnem mestu izogibajo, če ne morejo v celoti izključiti kršenja pravnih predpisov. IUK 5 A1... - Page 61 Tudi če te na navedenih mestih niso označene kot take, veljajo ustrezni zakonski predpisi. Uporabljene blagovne in trgovske znamke ter logotipi so last njihovih proizvajalcev in so zaščitene v skladu z določili o avtorskih pravicah. Informacije o teh določilih najdete v ustreznih objavah proizvajalcev. IUK 5 A1...
-
Page 62: Upravljalni Elementi
QR za hitro sinhronizacijo s pametnim telefonom omrežni adapter brezžična antena WLAN montažna roka omrežni kabel Slika D: podatkovni CD vtični adapter za priključitev alarma montažni material navodila za uporabo IUK 5 A1... -
Page 63: Postavitev In Priključitev
Da preprečite materialno škodo, upoštevajte navodila za električno priključitev naprave. Vsebina kompleta in pregled po prevozu Preverite obseg dobave (glejte zložene strani). Komplet obsega naslednje komponente: ● Nadzorna IP-kamera IUK 5 A1 ● Omrežni adapter ● Snemljiva brezžična antena ●... -
Page 64: Zahteve Glede Mesta Postavitve
(B), da bo kamera v čvrstem prijemu na montažni roki ■ Napravo uporabljajte samo na suhih mestih, ne v vroči, mokri ali zelo vlažni okolici ali v bližini gorljivega materiala. ■ Napravo uporabljajte samo na mestih, ki nudijo zadostno prezračevanje. IUK 5 A1... -
Page 65: Električno Napajanje
Tukaj se odda signal, ko ročno vklopite izhod ali ko je izbran izhod za alarme in nadzorna IP-kamera zazna alarm. Največja stikalna zmogljivost izhodnih (OUT) priključkov znaša 5 V/500 mA. ♦ Za več informacij preberite navodila za uporabo uporabljenih komponent. IUK 5 A1... -
Page 66: Uporaba In Delovanje
RAM: 512 MB ali zmogljivejši Omrežna kartica: 10 Mbit/s ali hitrejša Pomnilnik grafične kartice: 512 MB ali zmogljivejši Podprti spletni brskalniki: Internet Explorer 11, različni drugi z omejenim naborom funkcij Ločljivost zaslona: 1024 × 768 ali višja IUK 5 A1... -
Page 67: Začetek Uporabe
® valec in dvokliknite datoteko »Search tool«. S tem zaženete program za iskanje kamere v omrežju (brez nameščanja datotek v vaš računalnik). 1) Odvisno od konfi guracije računalnika se lahko prikaže opozorilo požarnega zidu: Kliknite »Allow access«. IUK 5 A1... - Page 68 Izberite možnost »Custom«. S tem se bodo možnosti vnašanja konfi guracije v polja odprle. Sedaj lahko ročno vnesete omrežne podatke nadzorne IP-kamere. Te podatke praviloma dobite prek omrežnih nastavitev usmerjevalnika. Za več informacij preberite navodila za uporabo usmerjevalnika. Kliknite »Apply«, da se vnesene spremembe shranijo. IUK 5 A1...
-
Page 69: Prikaz Slike Iz Kamere V Brskalniku "Internet Explorer 11
IP-kamere ( ). Nato kliknite »Upgrade«, da izvedete želeno posodobitev. Prikaz slike iz kamere v brskalniku »Internet Explorer 11« OPOMBA ► Celotno funkcionalnost nadzorne IP-kamere lahko izkoristite samo v brskalniku »Internet Explorer 11«. IUK 5 A1... - Page 70 2) Izberite želeni jezik: 3) Kliknite najprej »Plug-in download«, da namestite zahtevani vtičnik. Izberite »Save«, nato se na spodnjem robu slike prikaže seznam. Kliknite »Open«. Odpre se okno raziskovalca. Dvokliknite datoteko »oPlayer.msi« in sledite navodilom na zaslonu za namestitev vtičnika. IUK 5 A1...
- Page 71 5) Izberite zavihek »Security«, označite »Trusted sites« in kliknite »Sites«. 6) V naslednjem oknu imate možnost, da dodate naslov kamere med zaupanja vredne strani: Odstranite kljukico pri »Server verifi cation«, kliknite »Add«, nato »Close« in na koncu »OK«. IUK 5 A1...
-
Page 72: Pomen Polj In Tipk Za Upravljanje
Če aktivirate vodoravni in navpični premik, izvede kamera neprekinjen diagonalni premik. −> Kliknite ukazni gumb, da preklopite kamero v infrardeči način v temi. Infrardeče lučke osvetlijo bližnjo okolico kamere z za človeka nevidno infrardečo lučjo. IUK 5 A1... - Page 73 »Save preset position« in z miško izberite želeno številko med 1 ter 16 za to nastavitev na pojavnem oknu, ki se prikaže. Da premaknete kamero na predhodno shranjen položaj, kliknite »Choose preset posi- tion« in z miško izberite številko med 1 ter 16 za želen položaj na pojavnem področju, ki se prikaže. IUK 5 A1...
- Page 74 VLC z naslova www.videolan.org. −> Kliknite ta ukazni gumb, če želite shraniti trenutni posnetek kamere v obliki slike formata bitmap v računalnik. −> Kliknite ta ukazni gumb, da odprete v nadaljevanju opisano konfi guracijo prek vmesnika brskalnika. IUK 5 A1...
-
Page 75: Konfiguracija Prek Vmesnika Brskalnika
Tukaj dobite zgoraj prikazane informacije in lahko prek menija »Language« izberete uporabniški jezik za napravo. Device name Tukaj lahko kamero preimenujete, da jo lahko v omrežju hitreje najdete. Ime je lahko dolgo največ 24 znakov. Izvzeti so presledki, saj se drugače novo določeno ime ne shrani. IUK 5 A1... - Page 76 »Reserved disk space (MB)«. Če na novo shranjeni posnetki dosežejo zgornjo mejo rezervirane količine shranjevanja, lahko obsto- ječe posnetke prepišete z novimi, za kar morate označiti možnost »Overwrite existing video files«. Drugače se novi videoposnetki ne bodo shranjevali. IUK 5 A1...
-
Page 77: Stran "Alarm Settings
V vrstici »Trigger level« lahko nastavite prag na »High« ali »Low«. Če želite videti določeno prednastavljeno pozicijo sprožanja alarma (»Preset position when alarm is triggered“), izberite ustrezno predhodno shranjeno pozicijo v tem meniju. IUK 5 A1... - Page 78 Elektronska pošta in nalaganje sta na voljo samo v primeru internetne povezave kamere. Mail notification settings Če na menijski strani »Alarm settings« označite možnost »Alarm mail notification«, lahko vnesete elektronski naslov pošiljatelja (»Sender's mail«) ter uporabljen SMTP-strežnik in SMTP-vrata. Upoštevajte ustrezne parametre in nastavitve ponudnika elektronske pošte. IUK 5 A1...
- Page 79 Pri možnosti intervalov nalaganja (»Upload intervall (seconds)«) lahko v sekundah nastavite razmik nalaganja slik na FTP-strežnik, če pride do sprožitve alarma. Po nastavljanju lahko preverite delovanje povezave s FTP-strežnikom s klikom na »Test«. Alarm logs Tukaj lahko pogledate dnevnike beleženja alarmov. IUK 5 A1...
-
Page 80: Stran "Network
IP-naslov. DNS Server 2: Tukaj vnesite IP-naslov drugega DNS-strežnika, ki se bo uporabil, če prvi DNS-strežnik izpade ali ni dosegljiv. Http port: Vnesite številko 81. Sicer prenos slike od kamere do računalnika ne bo deloval. IUK 5 A1... -
Page 81: Stran "Pan & Tilt
Na voljo imate hitrosti: hitro (»Fast«), srednjo (»Medium«) in počasno (»Slow«). Število premikov: Tukaj lahko nastavite število (1–10) vodoravnih ali navpičnih premikov kamere. To se izvede, če aktivirate ustrezno funkcijo na glavnem zaslonu. Z nastavitvijo »Always« se premiki izvajajo neprekinjeno. IUK 5 A1... -
Page 82: Stran "User Settings
Kliknite besedo »Device« na želenem mestu v tabeli na spodnjem seznamu naprav, nato se odpre dodatna tabela: ■ Kliknite na zgornjem seznamu naprav ime kamere, ki jo hočete dodeliti. Potrebne informacije se samodejno prevzamejo. ■ Vnesite uporabniško ime in geslo ter kliknite »Add«. IUK 5 A1... - Page 83 Naprave nikakor ne odklopite iz napajanja med postopkom posodobitve, sicer se lahko nepopravljivo pokvari. OPOMBA ► Prikaz slike iz kamere in konfiguracija naprave sta možna tudi v drugih brskalnikih, le da v teh vse funkcije, ki so na voljo v programu Internet Explorer 11, tam ne delujejo. IUK 5 A1...
-
Page 84: Spremembe Pri Upravljanju V Primeru Uporabe Predogleda Na Pametnem Telefonu
Tapnite vnos, da se na zaslonu pametnega telefona prikaže slika iz kamere. ♦ Potegnite s prstom čez zaslon, da premaknete glavo kamere v želeno smer. OPOMBA ► Upravljanje s pomočjo pametnega telefona ne vpliva na upravljanje prek spletnega vmesnika. IUK 5 A1... -
Page 85: Upravljanje Kamere S Pametnim Telefonom
Pritisnite ukazni gumb še enkrat, da ustavi- te premik oz. ga nadaljujete. −> Dotaknite se tega ukaznega gumba, da zavrtite zaslon za 90°. −> Dotaknite se tega ukaznega gumba, da vklopite ali izklopite prenos zvoka med kamero in mobilnim telefonom. IUK 5 A1... - Page 86 Dotaknite se tega ukaznega gumba, da boste lahko ponastavili nastavitve kontrasta in svetlost na tovarniške nastavitve. −> Dotaknite se tega ukaznega gumba, da vklopite ali izklopite infrardeče lučke LED kamere. −> Dotaknite se tega ukaznega gumba, da prekinete prikaz slike iz kamere. IUK 5 A1...
-
Page 87: Centralni Nadzor Z Uporabo Posebne Programske Opreme
Na koncu zaženite program »IUK Viewer« in po prvem zagonu programa potrdite zahtevo za nadaljevanje, ki jo prikaže požarni zid operacijskega sistema. Spodaj levo se vam v programskem oknu pojavi seznam nameščenih kamer. IUK 5 A1... - Page 88 Zato na tem mestu ne bomo ponavljali podrobnega opisa. Nastavite prikazane parametre po svoji želji in na koncu kliknite »OK«. To okno lahko odprete tudi s klikom »System settings« v levem delu glavnega okna. IUK 5 A1...
- Page 89 Kliknite »Searching«, nato se pojavijo imena in parametri kamer, ki so na voljo v omrežju. To okno lahko odprete tudi s klikom »Device settings« v levem delu glavnega okna. Kliknite »Add«, če želite ročno dodati kamero v naslednjem oknu z vnosom priključnih podatkov. Po koncu vnašanja kliknite »OK«, da zaprete okno. IUK 5 A1...
- Page 90 Če s funkcijo »Search« najdete nove kamere, jih lahko preprosto z dvoklikom kamere na seznamu prenesete. Določena kamera je lahko nameščena tudi večkrat. Seznam naprav lahko odprete tudi s klikom »Device settings« v levem delu glavnega okna. IUK 5 A1...
- Page 91 Nadaljnje upravljanje kamere z ukaznimi gumbi na levi strani glavnega okna ustreza že opisanemu upravljanju prek spletnega vmesnika. Če uporabljate več kamer, morate najprej klikniti sliko kamere, ki jo želite upravljati. Tako aktivirana slika je prikazana rdeče obrobljena. IUK 5 A1...
-
Page 92: Čiščenje
Upoštevajte naslednje varnostne napotke, da preprečite nevarnost in stvarno škodo: ► Popravila električnih naprav smejo izvajati le strokovnjaki, ki jih je proizvajalec usposobil v ta namen. Zaradi nestrokovnih popravil lahko nastanejo velike nevarnosti za uporabnika in poškodbe naprave. IUK 5 A1... -
Page 93: Vzroki In Odprava Napak
Kamera se ne Notranja napaka. Pritisnite s koničastim in ostrim predmetom gumb odziva. za ponastavitev skozi odprtino na spodnji strani naprave. OPOMBA ► Če z zgornjo pomočjo težav ne morete odpraviti, se obrnite na servisno službo. IUK 5 A1... -
Page 94: Priloga
2,0 Lux pri 500 nm Delovna temperatura od 5 do 40 °C Temperatura shranjevanja od –10 do 60 °C Vlažnost zraka (brez kondenzacije) od 5 do 75 % Mere pribl. 11,8 x 10,3 x 12,9 cm Teža pribl. 300 g IUK 5 A1... - Page 95 MW6FU21NGS Proizvajalec Minwa Electronics Co., Ltd. Vhodna napetost 100–240 V ~ , 50/60 Hz Vhodni tok 0,26 A Izhodna napetost Izhodni tok 2100 mA |10,5 VA (max) Razred zaščite II / IUK 5 A1...
-
Page 96: Proizvajalec
Od ponedeljka do petka od 8:00 do 20:00 (po srednjeevropskem času) Garancijski list 1. S tem garancijskim listom jamčimo Kompernass Handels GmbH, da bo izdelek v garancijskem roku ob normalni in pravilni uporabi brezhibno deloval in se zavezujemo, da bomo ob izpol- njenih spodaj navedenih pogojih odpravili morebitne pomanjkljivosti in okvare zaradi napak v materialu ali izdelavi oz. - Page 97 Monitorizare centrală prin software special ........117 IUK 5 A1...
- Page 98 Importator ............126 IUK 5 A1...
-
Page 99: Introducere
Avertizările pentru acest grad de pericol marchează o situaţie periculoasă iminentă. Dacă nu se va evita situaţia periculoasă, aceasta poate produce moartea sau rănirea gravă. ► Respectaţi instrucţiunile prezentate în această avertizare, pentru a evita pericolul de moarte sau rănire gravă a persoanelor. IUK 5 A1... -
Page 100: Siguranţa
PERICOL! Materialele de ambalare nu sunt jucării! Păstraţi materialele de ambalare departe de accesul copiilor. Există pericol de asfixiere! ■ La fixarea aparatului se va avea în vedere asigurarea stabilităţii, pentru a evita căderea acestuia şi rănirea persoanelor. IUK 5 A1... - Page 101 încât nimeni să nu calce pe el sau să se împiedice de el. Un adaptor de reţea deteriorat poate provoca incendiu sau electrocutare. Verificaţi din când în când adaptorul de reţea. În cazul în care este deteriorat, adresaţi-vă celui mai apropiat serviciu autorizat pentru clienţi sau comerciantului dvs., pentru a-l înlocui. IUK 5 A1...
-
Page 102: Potenţiala Încălcare A Drepturilor Terţilor
într-un anumit loc. Identificarea se poate face şi cu ajutorul unui marcaj individual, cum ar fi, de exemplu, numărul de înmatriculare. O astfel de identificare a persoanelor trebuie evitată cu orice preţ. IUK 5 A1... - Page 103 în locurile respective, sunt valabile prevederile legale corespunzătoare. Numele mărcilor şi logo-urilor utilizate sunt proprietatea producătorului şi se supun prevederilor acestora privind drepturile de autor. Puteţi consulta informaţii privind aceasta din publicaţiile corespunzătoare ale producătorilor. IUK 5 A1...
-
Page 104: Elemente De Operare
Comutator de resetare Cod QR-Code pentru sincronizarea rapidă cu un smartphone Adaptor de reţea Antenă WLAN Braţ de montaj Cablu de reţea Figura D: CD de date Adaptor cu introducere pentru conectarea alarmei Material pentru montaj Instrucţiuni de utilizare IUK 5 A1... -
Page 105: Amplasarea Şi Conectarea
şi aspectelor tehnice privind eliminarea, fiind astfel reciclabile. Reintroducerea ambalajelor în circuitul de materiale contribuie la economia de materie primă şi reduce cantitatea de deşeuri. Eliminaţi ambalajul de care nu mai aveţi nevoie conform prevederilor locale în vigoare. IUK 5 A1... -
Page 106: Cerinţe Privind Locul De Amplasare
În fi nal strângeţi din nou îmbinarea cu şurub (B) astfel încât camera să stea sigur pe braţul de montaj ■ Utilizaţi aparatul numai în locuri uscate, niciodată într-un mediu fi erbinte sau în apropierea mate- rialelor infl amabile. ■ Utilizaţi aparatul doar în locuri cu aerisire sufi cientă. IUK 5 A1... -
Page 107: Alimentarea Cu Energie
IP recunoaşte o alarmă. Puterea maximă de comutare a conexiunilor OUT este 5 V / 500 mA. ♦ Pentru informaţii suplimentare citiţi instrucţiunile de utilizare ale componentelor respective. IUK 5 A1... -
Page 108: Operarea Şi Funcţionarea
512 MB sau mai mult Card de reţea: 10MBit/s sau mai bun Placă grafică: 512 MB sau mai mult Browsere web acceptate: Internet Explorer 11, diverse altele cu volum de funcţii redus Rezoluţia ecranului: 1024 × 768 sau mai mare IUK 5 A1... -
Page 109: Punerea În Funcţiune
Deschideţi unitatea în Explorer şi faceţi dublu clic pe fi şierul „Search Tool”. Aceasta porneşte programul pentru căutarea camerei în reţea (fără instalarea fi şierelor pe calculatorul dvs.). 1) În funcţie de confi guraţia calculatorului apare o avertizare a fi rewall-ului: Faceţi clic pe „Allow access”. IUK 5 A1... - Page 110 Acum introduceţi manual datele reţelei pentru camera de supraveghere IP. De regulă, aceste date se obţin prin intermediul setărilor reţelei routerului. Pentru alte informaţii citiţi manualul de utilizare al routerului. Faceţi clic pe „Apply” pentru a prelua setările modifi cate. IUK 5 A1...
-
Page 111: Prezentarea Imaginii Camerei În Browserul „Internet Explorer 11
). Apoi faceţi clic pe „Upgrade” pentru a efectua actualizarea dorită. Prezentarea imaginii camerei în browserul „Internet Explorer 11” INDICAŢIE ► Întreaga funcţionalitate a camerei de supraveghere IP este disponibilă numai în cazul utilizării browserului „Internet Explorer 11”. IUK 5 A1... - Page 112 Selectaţi „Save”, în scurt timp apare bara de afi şare în marginea de jos a imaginii. Aici faceţi clic pe „Open”. Se deschide o fereastră Explorer. În aceasta faceţi dublu clic pe fi şierul „oPlayer. msi” şi urmaţi instrucţiunile de pe ecran pentru instalarea plugin-ului. IUK 5 A1...
- Page 113 5) Selectaţi tabulatorul „Security”, marcaţi „Trusted Sites” şi faceţi clic pe „Sites”: 6) În următoarea fereastră vi se solicită să adăugaţi adresa camerei la paginile de internet de încredere: Eliminaţi bifa pentru „Server verifi cation”, faceţi clic pe „Add”, „Close” şi apoi pe „OK”. IUK 5 A1...
-
Page 114: Semnificaţia Tastelor Şi Câmpurilor De Comandă
Dacă activaţi pivotarea orizontală şi verticală, camera execută o pivotare diagonală continuă. −> Faceţi clic pe acest buton pentru a comuta camera pe infraroşu când este întuneric. Ledurile infraroşii luminează apoi mediul înconjurător apropiat al camerei cu lumină infraroșie invizibilă pentru om. IUK 5 A1... - Page 115 şat ulterior. Pentru a pivota camera în poziţiile salvate anterior faceţi clic pe „Choose preset position” şi selectaţi cu mouse-ul numărul 1 – 16 pentru poziţia dorită din câmpul de cifre afi şat ulterior. IUK 5 A1...
- Page 116 −> Faceţi clic pe acest buton pentru a salva pe calculator ca Bitmap un instantaneu al imaginii actuale a camerei. −> Faceţi clic pe acest buton pentru a deschide prin intermediul interfeţei browserului confi guraţia descrisă în continuare. IUK 5 A1...
-
Page 117: Configurarea Prin Intermediul Interfeţei Browserul-Ului
Device name Aici puteţi redenumi camera pentru a o putea identifica mai bine în reţea dacă este cazul. Pot fi folosite maxim 24 de caractere. Sunt excluse spaţiile goale, în caz contrar numele nou alocat nu este preluat. IUK 5 A1... - Page 118 înregistrările video, adică spaţiul care nu poate fi ocupat de alte aplicaţii. Dacă la atingerea limitei spaţiului de stocare trebuie şterse înregistrări video anterioare, aplicaţi bifa pe „Overwrite existing video files”. În caz contrar nu mai sunt salvate alte înregistrări video noi. IUK 5 A1...
-
Page 119: Pagina „Alarm Settings
„Trigger level”, acest prag poate fi stabilit ca „High” sau „Low” . Dacă doriţi să vizualizaţi o anumită „Preset position when alarm is triggered”, selectaţi în caseta de selectare a acestui element de meniu poziţia dorită şi salvată anterior. IUK 5 A1... - Page 120 Dacă pe pagina de meniu „Alarm settings” aţi aplicat bifa pe „Alarm mail notification”, puteţi intro- duce la „Senders‘s email” adresa de e-mail a utilizatorului, precum şi serverul SMTP şi portul SMTP utilizat. Respectaţi parametrii şi setările corespunzătoare ale furnizorului dvs. de e-mail. IUK 5 A1...
- Page 121 Apoi, în secţiunea „Upload intervall (seconds)” puteţi introduce în secunde, la ce interval de timp vor fi încărcate imagini pe serverul FTP în cazul declanşării alarmei. După ce aţi finalizat setările, puteţi verifica conexiunea FTP printr-un clic pe „Test”. Alarm logs Aici puteţi vizualiza fişierul Alarm-Log. IUK 5 A1...
-
Page 122: Pagina „Network
Introduceţi aici adresa IP a celui de-al doilea server DNS folosit dacă primul server DNS se defectează sau nu poate fi accesat. Http port: Introduceţi aici cifra 81. În caz contrar, transmiterea imaginii camerei către calculator nu funcţionează. IUK 5 A1... -
Page 123: Pagina„Pan & Tilt
„Fast”, „Medium” sau „Slow”. Amount of patrols: Aici este setat numărul (1 – 10) pivotării orizontale, respectiv verticale. Acestea sunt efectuate dacă este activată funcţia corespunzătoare pe ecranul principal. Cu setarea „Always” sunt efectuate continuu pivotări. IUK 5 A1... -
Page 124: Pagina „User Settings
■ Apoi faceţi clic pe numele camerei în lista de sus a aparatelor pe care doriţi să le atribuiţi. Informaţiile necesare sunt preluate automat. ■ Introduceţi numele de utilizator şi parola şi faceţi clic pe „Add”. IUK 5 A1... - Page 125 fi deteriorat ireparabil. INDICAŢIE ► Prezentarea imaginii camerei, precum şi configurarea aparatului sunt posibile şi prin interme- diul altor browsere de internet, însă este posibil să nu fie disponibile toate opţiunile descrise pentru Internet Explorer 11. IUK 5 A1...
-
Page 126: Operarea Diferită În Cazul Utilizării Previzualizării Pe Smartphone
Apăsaţi pe înregistrare pentru a vedea imaginea camerei pe ecranul smartphone-ului. ♦ Glisaţi cu degetele pe ecran pentru a pivota capul camerei în direcţia corespunzătoare. INDICAŢIE ► Comanda prin intermediul interfeţei web nu este infl uenţată de comanda prin smartphone. IUK 5 A1... -
Page 127: Comanda Camerei Prin Intermediul Smartphone-Ului
Atingeţi din nou butonul pentru a opri pivotarea, respectiv pentru a continua ulterior. −> Atingeţi acest buton pentru a roti afi şajul ecranului la 90°. −> Atingeţi acest buton pentru a porni sau opri transmisia audio între cameră şi telefonul mobil. IUK 5 A1... - Page 128 Atingeţi acest buton pentru a reseta setările pentru luminozitate şi contrast pe setările din fabrică. −> Atingeţi acest buton pentru a porni sau opri ledurile infraroşii ale camerei. −> Atingeţi acest buton pentru a încheia afi şarea imaginii camerei. IUK 5 A1...
-
Page 129: Monitorizare Centrală Prin Software Special
Apoi porniţi programul „IUK Viewer” şi la prima pornire a programului confirmaţi, dacă este cazul, întrebarea de acces a firewall-ului sistemului de operare. În partea stângă jos a ferestrei programului este afişată lista camerelor instalate. IUK 5 A1... - Page 130 De aceea aici nu mai este prezentată din nou o descriere detaliată. Configuraţi cum doriţi parametrii afișaţi, apoi faceţi clic pe butonul „OK”. Puteţi deschide această fereastră şi printr-un clic pe „System settings” în partea stângă a ferestrei principale. IUK 5 A1...
- Page 131 Puteţi deschide această fereastră şi printr-un clic pe „Device settings” în partea stângă a ferestrei principale. Faceţi clic pe „Add” dacă doriţi să adăugaţi manual o cameră în următoarea fereastră prin introdu- cerea detaliilor de conectare. După finalizarea introducerilor faceţi clic pe „OK” pentru a închide fereastra. IUK 5 A1...
- Page 132 fi preluate cu uşurinţă în listă, prin dublu clic pe cameră. O cameră poate fi instalată şi de mai multe ori. Lista de aparate poate fi deschisă şi printr-un clic pe „Device settings” în partea stângă a ferestrei principale. IUK 5 A1...
- Page 133 În cazul utilizării mai multor camere, trebuie să faceţi mai întâi clic cu mouse-ul pe imaginea camerei pe care doriţi să o controlaţi. Imaginea activată în acest mod este reprezentată cu margini roşii. IUK 5 A1...
-
Page 134: Curăţarea
AVERTIZARE Respectaţi următoarele indicaţii de siguranţă pentru a evita pericolele şi pagubele materiale: ► Repararea aparatelor electrice este permisă numai specialiştilor autorizaţi de producător. Reparaţiile incompetente reprezintă un pericol pentru utilizatorul aparatului şi defectarea acestuia din urmă. IUK 5 A1... -
Page 135: Cauzele Defecţiunilor Şi Remedierea Acestora
Apăsaţi cu atenţie comutatorul de resetare cu un reacţionează. funcţionare. obiect subţire, ascuţit prin orificiul aflat pe partea de jos a aparatului. INDICAŢIE ► Dacă nu reuşiţi să rezolvaţi problema cu niciunul dintre paşii indicaţi anterior, adresaţi-vă serviciului pentru clienţi. IUK 5 A1... -
Page 136: Anexa
2,0 Lux @ 500 nm Temperatura de operare 5 până la +40°C Temperatura de depozitare -10 până la +60°C Umiditatea (fără condens) 5 până la 75 % Dimensiuni cca 11,8 x 10,3 x 12,9 cm Greutate cca 300 g IUK 5 A1... -
Page 137: Garanţia
înlocuite şi reparate. Deteriorările şi deficienţele prezente deja la cumpărare trebuie semnalate imediat după dezambalare sau cel târziu la două zile de la data cumpărării. Reparaţiile necesare după expirarea perioadei de garanţie se efectuează contra cost. IUK 5 A1... -
Page 138: Service-Ul
Service-ul Service România Tel.: 0800896637 E-Mail: kompernass@lidl.ro IAN 48807 Acces linie telefonică directă: De luni până vineri, între orele 8:00 - 20:00 (CET) Importator KOMPERNASS HANDELS GMBH BURGSTRASSE 21 44867 BOCHUM GERMANY www.kompernass.com IUK 5 A1... - Page 139 Zentrales Monitoring über spezielle Software ....... . 159 IUK 5 A1...
- Page 140 Importeur ............168 IUK 5 A1...
-
Page 141: Einführung
Situation. Falls die gefährliche Situation nicht vermieden wird, kann dies zum Tod oder zu schweren Verlet- zungen führen. ► Die Anweisungen in diesem Warnhinweis befolgen, um die Gefahr des Todes oder schwerer Verletzungen von Personen zu vermeiden. IUK 5 A1... -
Page 142: Sicherheit
Person benutzen. ■ GEFAHR Verpackungsmaterialien sind kein Kinderspielzeug! Halten Sie alle Verpackungsma- terialien von Kindern fern. Es besteht Erstickungsgefahr! ■ Achten Sie beim Befestigen des Gerätes auf sicheren Halt, damit es nicht herunterfallen kann und Menschen verletzen kann. IUK 5 A1... - Page 143 Ein beschädigter Netzadapter kann einen Brand oder elektrischen Schlag verursachen. Prüfen Sie den Netzadapter von Zeit zu Zeit. Sollte er beschä- digt sein, wenden Sie sich an Ihre nächste autorisierte Kundendienststelle oder Ihren Händler, um ihn zu ersetzen. IUK 5 A1...
-
Page 144: Mögliche Verletzung Von Rechten Dritter
Eine personelle Bestimmbarkeit liegt vor, wenn festgestellt werden kann, dass eine bestimmte Person zu einer bestimmten Zeit an einem bestimmten Ort war. Die Identifikation kann dabei auch über ein personenbezogenes Kennzeichen, wie z. B. das Fahrzeugkennzeichen, erfolgen. Eine personelle Bestimmbarkeit von Personen ist unbedingt zu vermeiden. IUK 5 A1... - Page 145 Anleitung stellt keine Urheberrechtsverletzung dar, sondern dient als Hinweis. Auch wenn diese an den jeweiligen Stellen nicht als solche gekennzeichnet sind, gelten die entsprechenden gesetzlichen Bestimmungen. Die verwendeten Markennamen und -logos sind Eigentum der Hersteller und unterliegen deren Urheberrechtsbestimmungen. Informationen hierzu entnehmen Sie bitte den entsprechenden Veröffentlichungen der Hersteller. IUK 5 A1...
-
Page 146: Bedienelemente
Anschluss für die Versorgungsspannung vom Netzadapter Alarmanschluss (IN/OUT) LAN-Anschluss AUDIO-Ausgang Abbildung C: Gewinde zur Befestigung auf dem Montagearm Reset-Schalter QR-Code zur schnellen Synchronisierung mit einem Smartphone Netzadapter WLAN-Antenne Montagearm Netzwerkkabel Abbildung D: Daten-CD Steckadapter für den Alarmanschluss Montagematerial Bedienungsanleitung IUK 5 A1... -
Page 147: Aufstellen Und Anschließen
Die Verpackung schützt das Gerät vor Transportschäden. Die Verpackungsmaterialien sind nach umweltverträglichen und entsorgungstechnischen Gesichtspunkten ausgewählt und deshalb recyclebar. Die Rückführung der Verpackung in den Materialkreislauf spart Rohstoffe und verringert das Abfallaufkommen. Entsorgen Sie nicht mehr benötigte Verpackungsmaterialien gemäß den örtlich geltenden Vorschriften. IUK 5 A1... -
Page 148: Anforderungen An Den Aufstellort
Unterseite des Kamerafußes ■ Öff nen Sie ggf. die Schraubverbindung (B), um den Winkel des Montagearms zu verändern. Anschließend drehen Sie die Schraubverbindung (B) wieder fest zu, damit die Kamera sicher auf dem Montagearm gehalten wird. IUK 5 A1... -
Page 149: Stromversorgung
Insgesamt besteht der Alarm-Anschluss aus 4 Anschlüssen. An die beiden IN-Anschlüsse rechts können Sie Alarmgeber anschließen, z. B. Bewegungsmelder oder sonstige alarmge- bende Geräte. Werden die IN-Anschlüsse extern miteinander verbunden, so wird ein Alarm ausgelöst. Dabei kann die Verbindung über einen Schalter bzw. Relais stattfinden. IUK 5 A1... -
Page 150: Bedienung Und Betrieb
® ® Prozessor: 2.0 GHz oder höher RAM: 512 MB oder mehr Netzwerk-Karte: 10MBit/s oder besser Grafikkartenspeicher: 512 MB oder mehr Unterstützte Web-Browser: Internet Explorer 11, diverse andere mit reduziertem Funktionsumfang Bildschirmauflösung: 1024 × 768 oder höher IUK 5 A1... -
Page 151: Inbetriebnahme
Datei „Search Tool“. Dies startet das Programm zur Suche der Kamera im Netzwerk (keine Installation von Dateien auf Ihrem Computer). 1) Je nach Konfi guration des Rechners erscheint eine Firewall-Warnung: Klicken Sie auf „Zugriff zulassen“. IUK 5 A1... - Page 152 Geben Sie nun die Netzwerkdaten für die IP-Überwachungskamera manuell ein. Diese Daten erhalten Sie in der Regel über die Netzwerkeinstellungen des Routers. Für weitere Informationen lesen Sie die Bedienungsanleitung Ihres Routers. Klicken Sie auf „Apply“, um die geänderten Einstellungen zu übernehmen. IUK 5 A1...
-
Page 153: Kamerabild Im Browser „Internet Explorer 11" Darstellen
Dann klicken Sie auf „Upgrade“, um die gewünschte Aktualisierung durchzuführen. Kamerabild im Browser „Internet Explorer 11“ darstellen HINWEIS ► Nur bei Verwendung des Browsers „Internet Explorer 11“ steht Ihnen die gesamte Funktionalität der IP-Überwachungskamera zur Verfügung. IUK 5 A1... - Page 154 3) Dann klicken Sie zunächst auf „OCX Download“, um ein notwendiges Plugin zu installieren: Wählen Sie „Speichern“, kurz darauf erscheint die Anzeigeleiste am unteren Bildrand. Hier klicken Sie „Öff nen“. Ein Explorer-Fenster öff net sich. Klicken Sie dort doppelt auf die Datei„oPlayer.msi“ und folgen den Bildschirmanweisungen zur Installation des Plugins. IUK 5 A1...
- Page 155 5) Wählen Sie den Reiter „Sicherheit“ aus, markieren Sie „Vertrauenswürdige Sites“ und klicken auf „Sites“: 6) Im nächsten Fenster wird Ihnen angeboten, die Kameraadresse zu den vertrauenswürdigen Seiten hinzuzufügen: Entfernen Sie den Haken für die „Serverüberprüfung“, klicken Sie auf „Hinzufügen“, dann auf „Schließen“ und dann auf „OK“. IUK 5 A1...
-
Page 156: Bedeutung Der Steuertasten Und -Felder
Wenn Sie Horizontal- und Vertikalschwenk aktivieren, vollzieht die Kamera einen kontinuierlichen Diagonalschwenk. −> Klicken Sie auf diese Schaltfl äche, um die Kamera bei Dunkelheit in den Infrarot-Modus zu schalten. Die Infrarot-LEDs erleuchten dann das nähere Umfeld der Kamera mit für den Menschen unsichtbarem Infrarot-Licht. IUK 5 A1... - Page 157 Zahlenfeld aus. Um die Kamera auf zuvor gespeicherte Positionen schwenken zu lassen, klicken Sie auf „Voreingestellte Position aufrufen“ und wählen die Nummer 1 – 16 für die gewünschte Position mit der Maus aus dem dann erscheinenden Zahlenfeld aus. IUK 5 A1...
- Page 158 −> Klicken Sie auf diese Schaltfl äche, um einen Schnappschuss des aktuellen Kamerabil- des als Bitmap auf dem Computer zu speichern. −> Klicken Sie auf diese Schaltfl äche, um die im Folgenden beschriebene Konfi guration über das Browser-Interface zu öff nen. IUK 5 A1...
-
Page 159: Konfiguration Über Das Browser-Interface
Gerätename Hier können Sie der Kamera einen anderen Namen geben, um sie im Netz ggf. besser identifizieren zu können. Maximal können 24 Zeichen verwendet werden. Ausgenommen sind Leerzeichen, andern- falls wird der neu vergebene Name nicht übernommen. IUK 5 A1... - Page 160 Speicherplatz für Videoaufzeichnungen reserviert bleibt, also nicht von anderen Applikationen belegt werden kann. Wenn bei Erreichen der Speicherplatzgrenze zuvor aufgenommene Videos gelöscht werden sollen, setzen Sie das Häkchen bei „Vorhandene Video-Dateien überschreiben“. Andernfalls werden keine neuen Videos mehr gespeichert. IUK 5 A1...
-
Page 161: Die Seite „Alarm
Sie in der Auswahlbox dieses Menüpunktes die gewünschte zuvor abgespeicherte Position. Wenn Sie das Häkchen bei „Bei Alarm externe Sirene auslösen“ setzen, erscheint eine zusätzliche Zeile „Ausgabe Level“, in deren Auswahlbox Sie diesen Pegel als „Hoch“ oder „Gering“ festlegen können. IUK 5 A1... - Page 162 Einstellungen Ihres E-Mail-Providers. Wenn der E-Mail-Versand mit Authentifi zierung durchgeführt werden muss, setzen Sie das Häkchen bei „Benötige Authentifi kation“. Dann erscheinen die zusätzlichen Zeilen „SMTP Benutzer“ und „SMTP Passwort“. Tragen Sie hier die benötigten SMTP-Informationen Ihres E-Mail-Providers ein. IUK 5 A1...
- Page 163 Unter „Upload Intervall (Sekunden)“ können Sie dann in Sekunden eingeben, in welchem Intervall bei Alarmauslösung Bilder zum FTP-Server hochgeladen werden sollen. Nachdem Sie die Einstellungen vervollständigt haben, können Sie die FTP-Verbindung mit einem Klick auf „Testen“ überprüfen. Alarm Protokoll Hier können Sie die Alarm-Log-Datei einsehen. IUK 5 A1...
-
Page 164: Die Seite „Netzwerk
Geben Sie hier die IP-Adresse des zweiten DNS-Servers ein, der benutzt wird, wenn der erste DNS-Server ausfällt oder nicht erreichbar ist. Http Port Tragen Sie hier die Zahl 81 ein. Andernfalls funktioniert die Übertragung des Kamerabildes zum Computer nicht. IUK 5 A1... -
Page 165: Die Seite „Steuerungs Einstellungen
Auswahl. Anzahl der Patrouillen: Hier wird die Anzahl (1 - 10) der horizontalen bzw. vertikalen Schwenks ein- gestellt. Diese werden durchgeführt, wenn die entsprechende Funktion im Hauptbildschirm aktiviert wird. Mit der Einstellung „Immer“ werden dauerhaft Schwenks durchgeführt. IUK 5 A1... -
Page 166: Die Seite „Benutzer Einstellungen
■ Klicken Sie anschließend auf den Namen der Kamera in der oberen Geräte-Liste, die Sie zuweisen wollen. Die benötigten Informationen werden automatisch übernommen. ■ Geben Sie den Benutzernamen und das Passwort ein und klicken Sie auf „Hinzufügen“. IUK 5 A1... - Page 167 HINWEIS ► Die Darstellung des Kamerabildes sowie die Gerätekonfiguration sind auch über andere Internet-Browser möglich, allerdings stehen dann ggf. nicht alle für den Internet Explorer 11 beschriebenen Optionen zur Verfügung. IUK 5 A1...
-
Page 168: Abweichende Bedienung Bei Verwendung Der Smartphone-Vorschau
Tippen Sie auf den Eintrag, um das Kamerabild auf dem Smartphone-Bildschirm zu sehen. ♦ Wischen Sie mit den Fingern über das Display, um den Kamerakopf in die entsprechende Richtung schwenken zu lassen. HINWEIS ► Die Steuerung über das Webinterface bleibt von der Smartphone-Steuerung unbeeinfl usst. IUK 5 A1... -
Page 169: Kamera Über Smartphone Steuern
Schwenk anzuhalten, bzw. dann wieder fortzusetzen. −> Berühren Sie diese Schaltfl äche, um die Displayanzeige um 90° zu drehen. −> Berühren Sie diese Schaltfl äche, um die Audioübertragung zwischen Kamera und Handy ein- oder auszuschalten. IUK 5 A1... - Page 170 Berühren Sie diese Schaltfl äche, um die Einstellungen für Helligkeit und Kontrast wie- der auf die Werkseinstellungen zurückzusetzen. −> Berühren Sie diese Schaltfl äche, um die Infrarot-LEDs der Kamera ein- oder auszu- schalten. −> Berühren Sie diese Schaltfl äche, um die Anzeige des Kamerabildes zu beenden. IUK 5 A1...
-
Page 171: Zentrales Monitoring Über Spezielle Software
Zulassungsanfrage der Benutzerkontensteuerung des Betriebssystems. Anschließend starten Sie das Programm „IUK Viewer“ und bestätigen beim ersten Starten des Programms ggf. die Zulassungsanfrage der Firewall des Betriebssystems. Unten links im Programm- fenster erscheint die Liste der installierten Kameras. IUK 5 A1... - Page 172 Web-Interface beschrieben wurden. Daher erfolgt hier keine erneute detaillierte Beschreibung. Konfigurieren Sie die gezeigten Parameter wie gewünscht, anschließend klicken Sie auf die Schalt- fläche „OK“. Sie können dieses Fenster auch durch einen Klick auf „System Einstellungen“ im linken Teil des Hauptfensters öffnen. IUK 5 A1...
- Page 173 Sie können dieses Fenster auch durch einen Klick auf „Geräte Einstellungen“ im linken Teil des Hauptfensters öffnen. Klicken Sie auf „Hinzufügen“, wenn Sie in folgendem Fenster eine Kamera durch Eingabe der Anschlussdetails manuell hinzufügen wollen. Nach Abschluss der Eingaben klicken Sie auf „OK“, um das Fenster zu schließen. IUK 5 A1...
- Page 174 Doppelklick auf die Kamera in die Liste übernommen werden. Eine Kamera kann auch mehrfach installiert werden. Die Geräteliste kann auch durch einen Klick auf „Geräte Einstellungen“ im linken Teil des Hauptfensters geöffnet werden. IUK 5 A1...
- Page 175 Steuerung über einen Web-Browser. Bei Verwendung mehrerer Kameras müssen Sie zunächst mit der Maus einmal auf das Bild der Kamera klicken, die Sie steuern wollen. Das so aktivierte Bild wird rot umrandet dargestellt. IUK 5 A1...
-
Page 176: Reinigung
Beachten Sie die folgenden Sicherheitshinweise, um Gefahren und Sachschäden zu vermeiden: ► Reparaturen an Elektrogeräten dürfen nur von Fachleuten durchgeführt werden, die vom Her- steller geschult sind. Durch unsachgemäße Reparaturen können erhebliche Gefahren für den Benutzer und Schäden am Gerät entstehen. IUK 5 A1... -
Page 177: Fehlerursachen Und -Behebung
Drücken Sie mit einem schmalen spitzen Gegenstand reagiert nicht. vorsichtig den Reset-Schalter durch die Öffnung auf der Geräteunterseite. HINWEIS ► Wenn Sie mit den vorstehend genannten Schritten das Problem nicht lösen können, wenden Sie sich bitte an den Kundendienst. IUK 5 A1... -
Page 178: Anhang
Vertikal: 105°, Horizontal: 355° Min. Beleuchtung 2,0 Lux @ 500 nm Betriebstemperatur 5 bis +40°C Lagertemperatur −10 bis +60°C Feuchtigkeit (keine Kondensation) 5 bis 75 % Maße ca. 11,8 x 10,3 x 12,9 cm Gewicht ca. 300 g IUK 5 A1... -
Page 179: Garantie
Gewährleistung nicht verlängert. Dies gilt auch für ersetzte und reparierte Teile. Eventuell schon beim Kauf vorhandene Schäden und Mängel müssen sofort nach dem Auspacken gemeldet werden, spätestens aber zwei Tage nach Kaufdatum. Nach Ablauf der Garantiezeit anfallende Reparaturen sind kostenpflichtig. IUK 5 A1... - Page 180 Service Schweiz Tel.: 0842 665566 (0,08 CHF/Min., Mobilfunk max. 0,40 CHF/Min.) E-Mail: kompernass@lidl.ch IAN 48807 Erreichbarkeit Hotline: Montag bis Freitag von 8:00 Uhr – 20:00 Uhr (MEZ) Importeur KOMPERNASS HANDELS GMBH BURGSTRASSE 21 44867 BOCHUM GERMANY www.kompernass.com IUK 5 A1...
- Page 181 KOMPERNASS HANDELS GMBH BURGSTRASSE 21 44867 BOCHUM DEUTSCHLAND / GERMANY www.kompernass.com Last Information Update · Stanje informacij Versiunea informaţiilor · Stand der Informationen: 04 / 2015 · Ident.-No.: IUK5A1-012015-4 IAN 48807...