Table of Contents
Advertisement
Quick Links
Advertisement
Table of Contents

Related Manuals for ResMed S8 AutoScore


Summary of Contents for ResMed S8 AutoScore
- Page 1 S8 AutoScore System ™ USER’S MANUAL Reorder number : 338243/2 05 07 English...
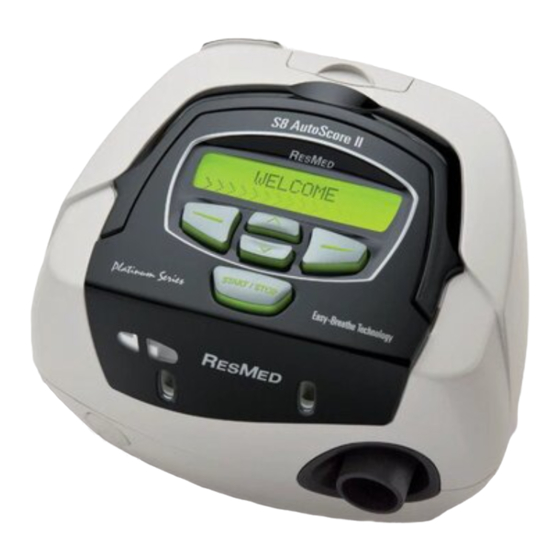
- Page 2 INTEGRATED HUMIDIFIER SETTING UP THE S8 ™ S8 AutoScore ™ System ILLUSTRATIONS Component of 338243 /2 SYSTEM COMPONENTS HumidAire 3i™ Carry handle OTHER ACCESSORIES Keypad Air outlet LCD screen Module Air filter cover Air inlet DC input AC input Note: Some products not available in all regions.
- Page 3 HUMIDAIRE 3i AND S8 USING THE DATA CARD HumidAire 3i BLANK MODULE Data communications port Note: Some products not available in all regions. DATA CARD MODULE...
- Page 4 S8 AutoScore System ™ USER’S MANUAL Reorder number: 338243/2 05 07 English...
- Page 5 Manufactured by: ResMed Ltd 1 Elizabeth MacArthur Drive Bella Vista NSW 2153 Australia Tel: +61 (2) 8884 1000 or 1 800 658 189 (toll free) Fax: +61 (2) 8883 3114 Email: reception@resmed.com.au ResMed Offices: ResMed Corp 14040 Danielson Street Poway CA 92064-6857 USA Tel: +1 (858) 746-2400 or 1-800-424-0737 (toll free) Fax: +1 (858) 746-2900 Email: reception@resmed.com...
-
Page 6: Table Of Contents
ONTENTS ..........1 NTRODUCTION ESPONSIBILITY . - Page 7 EEKLY LEANING ERIODIC LEANING EPLACING THE ILTER ERVICING ....... 23 REQUENTLY SKED UESTIONS...
-
Page 8: Introduction
NTRODUCTION Thank you for choosing the flow generator. The is a ™ S8 A S8 A CORE CORE compact, all-in-one package with an inbuilt power supply and the option of integrated data management and humidification. This user manual contains the information you need for the correct use of your S8 A CORE ESPONSIBILITY... -
Page 9: Warnings
A patient should not connect a device to the data communication port unless • instructed to do so by their health care provider or physician. Only ResMed products are designed to be connected to the data communication port. Connecting other devices could result in injury, or damage to the... -
Page 10: Cautions
Caution should be exercised if the room temperature is warmer than 32°C. When AC mains power (100/240V AC) is not available, always use a ResMed • DC-12 converter. (The DC-12 converter is available as an optional accessory.) If supplied, the ™... -
Page 12: He S8 Auto Core Ystem
The 2 m air tubing connects the to your mask. S8 A CORE ASKS You will also need a ResMed mask system (supplied separately). The ResMed mask systems that are recommended for use with the are: S8 A CORE ASAL ASKS •... -
Page 13: Humidifier
IRAGE Note: Not all masks are available in all regions. WARNING Only ResMed mask systems are compatible for use with the S8 AutoScore. Please refer to “Warnings” on page 2. UMIDIFIER Please refer to the illustration in section B of the illustration sheet. -
Page 14: How To Use The S8 Auto Score
Note: You can also place your S8 AutoScore on the floor beside or underneath your bed. Ensure that the area is free from dust and clear of bedding, clothes or any other objects that could block the air inlet. -
Page 15: Start Treatment
Fit your mask as described in the mask user instructions. WARNING A mask should not be used unless the S8 AutoScore device is powered and operating properly. When ramping begins, the LCD will display the word "RAMPING", with the current pressure indicated as dashes. -
Page 16: Using The Mask -Fitting Feature
SING THE ITTING EATURE You can use the mask-fitting feature to help you fit your mask properly. S8 A CORE This feature delivers air pressure for a three-minute period, prior to starting treatment, during which you can check and adjust your mask fit to minimise leaks. Note: Make sure that the mask setting on the MASK screen is the same as the mask you are using. -
Page 17: Ow To Ttach Aumidifier
Make sure the water chamber of the HumidAire 3i is empty before you attach or detach the humidifier. b. Remove the connector plug on the S8 AutoScore before you attach the HumidAire 3i. Reattach the connector plug firmly after you detach the humidifier. -
Page 18: How To Use The Keypad
• Starts or stops treatment. • Extended hold (for at least three seconds) starts the mask- fitting feature. • Allows you to scroll through the S8 AutoScore menus and submenus, and increase the setting options. Down • Allows you to scroll through the S8 AutoScore menus and submenus, and decrease the setting options. -
Page 19: How To Change The Settings
OW TO HANGE THE ETTINGS You can change settings on the by using the keypad and LCD. When S8 A CORE is in standby mode you can display a series of screens (a menu) on the S8 A CORE LCD screen in order to view and change the settings for a particular function. Your clinician will preset the menu to either a standard view or a detailed view. -
Page 20: How To Use The Standard Menu
OW TO SE THE TANDARD Figure 1 shows the standard menu. WELCOME >>>>>> RAMP: 10min menu EPR SETTING: 1 change exit exit USAGE: 1000/1068 exit MASK: ULTRA change exit SW: SX3960200 exit Figure 1 : Standard menu screen You enter the standard menu from the standby (RAMP) screen, by pressing the Left (menu) key. - Page 21 The following table shows the setting that should be selected for each mask type. Table 2: Settings for mask types Settings Mask ULTRA Ultra Mirage Nasal Mask MIR FULL Mirage Full Face Mask Mirage Full Face Mask Series 2 Ultra Mirage Full Face Mask ACTIVA Mirage Activa Nasal Mask SWIFT...
-
Page 22: Ow To Se The Etailed Enu
OW TO SE THE ETAILED Figure 2 shows the detailed menu. WELCOME >>>>>> RAMP: 10 min menu SETTINGS enter exit EPR SETTING: 1 change exit MASK: ULTRA change exit TUBE LENGTH: 2m change exit HUMID: NONE change exit SMARTSTART: ON change exit LEAK ALERT: OFF... -
Page 23: Settings Menu
ETTINGS Select Enter (Left key) on the Settings menu to access the options in this menu. OW TO HANGE THE XPIRATORY RESSURE ELIEF ETTING Note: EPR may not be available in all regions. Your clinician may have set up your device to deliver expiratory pressure relief (EPR). This can be used to help ease any discomfort you may experience when breathing out during treatment. -
Page 24: Results Menu
OW TO HANGE THE MART TART ETTING SmartStart enables your device to start automatically when you breathe into the mask. Scroll to SMARTSTART and select Change (Left key). Press the Up or Down keys to change the option to ON or OFF. OW TO HANGE THE LERT... -
Page 25: Messages On The S8 Auto Score Lcd
S8 A ESSAGES ON THE CORE Your clinician may have set your to remind you about important S8 A CORE events, such as when to replace your mask, when to insert your Data Card (if your device is Data Card enabled), and so on. The reminder message is displayed on the LCD, and is visible if the device is not delivering therapy. -
Page 26: S8 Modules
S8 M ODULES Note: Do not remove modules while power is connected to the S8 AutoScore. Your will have one of two modules fitted to the back: a blank module S8 A CORE or a Data Card module. SING A... - Page 27 Hold the Data Card with the arrow facing up, and insert it into the slot in the • Data Card module (H-1). Push the card in smoothly until it stops moving (H-2) and messages start • appearing on the LCD. ATA ONTO THE Data copying starts automatically when the Data Card is inserted into the Data •...
-
Page 28: Leaning And Aintenance
LEANING AND AINTENANCE You should regularly carry out the cleaning and maintenance described in this section. Refer to your mask manual for detailed instructions. AILY LEANING Clean the mask according to the instructions supplied with the mask. IR TUBING Disconnect the air tubing from the (and humidifier, if used) and hang S8 A CORE... - Page 29 Ensure the air filter and air filter cover are fitted at all times. ERVICING CAUTION Do not attempt to open the S8 AutoScore case. There are no user serviceable • parts inside. Inspection and repair should only be performed by an authorised agent. Under •...
- Page 30 REQUENTLY SKED UESTIONS S8 A OW WILL IT FEEL WHEN AM BREATHING WITH THE CORE When you first use your , you may feel uncomfortable breathing against S8 A CORE the airflow. This is normal. You will continue to breathe normally while you sleep. Take time to adjust to this new sensation.
- Page 31 You must use a ResMed DC-12 converter to connect the to a 12V or S8 A CORE 24V DC power source. Contact your equipment supplier or ResMed for details. WARNING The device should not be connected to both AC and DC power sources simultaneously.
- Page 32 ROUBLESHOOTING If there is a problem, try the following suggestions. If the problem cannot be solved, contact your equipment supplier or ResMed. Do not attempt to open the device. Problem Possible Cause Solution No display. Power not connected. Ensure the appropriate power...
- Page 33 If this does not clear the message, disconnect the power cord and then reconnect it to restart the device. Display error message: Component failure. Return your S8 AutoScore for servicing. SYSTEM ERROR Call service! Display error message: You have experienced...
- Page 34 If this message appears again, contact your clinician. Display error message: Component failure. Return your S8 AutoScore for Exxxx (where xxxx servicing. defines an error) The following message The Data Card is not inserted...
- Page 35 Problem Possible Cause Solution The following message The identification details on the Contact your clinician is displayed on the Data Card do not match the immediately. LCD after you try to details on your device. update the settings using the Data Card: Settings Invalid Remove Card The following message...
- Page 36 UMID 400 Hz; 2.5A <140 VA (110 W) (maximum power consumption). Instantaneous peak power consumption <340 VA. Refer to the DC-12 converter instructions for DC ratings. Only use the ResMed • DC-12 converter for DC input. Actual power consumption will vary, depending on factors such as the use of accessories, height above sea level and ambient temperature.
- Page 37 ODULE Dimensions (H x W x D): 49.7 mm x 42.2 mm x 12 mm EVICES WHERE APPLICABLE Housing Construction: Flame retardant engineering thermoplastic Environmental Conditions Operating Temperature: +5°C to +40°C Operating Humidity: 10%–95% non-condensing Storage and Transport Temperature: -20°C to +60°C Storage and Transport Humidity: 10%–95% non-condensing Operating Altitude: sea level to 2591 m Electromagnetic Compatibility...
- Page 38 ’ UIDANCE AND ANUFACTURER ECLARATION LECTROMAGNETIC MISSIONS AND MMUNITY Guidance and manufacturer’s declaration—electromagnetic emissions The S8 series of devices is intended for use in the electromagnetic environment specified below. The customer or the user of the S8 device should assure that the device is used in such an environment. Electromagnetic environment—...
- Page 39 Guidance and manufacturer’s declaration—electromagnetic immunity The S8 series of devices is intended for use in the electromagnetic environment specified below. The customer or the user of the S8 device should assure that the device is used in such an environment. IEC60601-1-2 Electromagnetic Immunity test...
- Page 40 Guidance and manufacturer’s declaration—electromagnetic immunity The S8 series of devices is intended for use in the electromagnetic environment specified below. The customer or the user of the S8 device should assure that the device is used in such an environment. IEC60601-1-2 Compliance Immunity test...
- Page 41 Recommended separation distances between portable and mobile RF communications equipment and the S8 series of devices The S8 series of devices is intended for use in an environment in which radiated RF disturbances are controlled. The customer or the user of the S8 device can help prevent electromagnetic interference by maintaining a minimum distance between portable and mobile RF communications equipment (transmitters) and the S8 device as recommended below, according to the maximum output power of the communications equipment.
- Page 42 NDEX accessories 6 frequently asked questions 23 air filter 5 front cap 16 replacing 22 front cap (muffler) 6 air pressure 25 air tubing 5 cleaning 21 headgear position 25 connect to air outlet 7 HumidAire 3i 6 kinked 25 attaching 10 positioning 8 storage 5...
- Page 43 18 replace air filter 18 replace mask 18 service due 18 ResScan Data Card module 6 Results Menu 17 right key 11 S8 AutoScore servicing 22 setup 7 start treatment 8 travelling with 23 S8 modules 19 serial number 17...