Table of Contents
Advertisement
Advertisement
Table of Contents

Related Manuals for Xerox D35


Summary of Contents for Xerox D35
- Page 1 APRIL 2021 05-1008-000 ® D35 Scanner Xerox Scanner User Guide for Mac OS X®.
- Page 2 © 2021 Xerox Corporation. All rights reserved. Xerox® is a trademark of Xerox Corporation in the United States and/or other countries. Visioneer is a trademark licensee of Xerox®.BR32882 Content © 2021 Visioneer, Inc. All rights reserved. The Visioneer brand name and OneTouch®...
-
Page 3: Table Of Contents
Environmental Health and Safety Contacts ..................1-4 2 Welcome ......................... 2-1 What’s in the Box............................2-1 System Requirements ..........................2-1 Documentation............................2-2 Xerox® D35 Scanner..........................2-2 3 Scanner Setup....................... 3-1 Connect the Scanner Power Supply....................3-1 4 Installation ......................4-1 Install the Software and Connect the Scanner ................4-1 Installing the Scanner Driver ........................4-2... - Page 4 Replacing the Feed Roller.......................6-7 Replacing the Friction Roller......................6-9 Scanner Status Message Table....................6-10 Troubleshooting ............................6-11 Xerox® D35 Scanner Specifications ....................6-13 Xerox® D35 Scanner Parts List......................6-14 7 Appendix A: Regulatory Information ............7-1 Basic Regulations ............................7-1 United States (FCC Regulations) ....................7-1 Great Britain............................7-1...
-
Page 5: Safety
Equipment and supplies have been designed and tested to meet strict safety requirements. These include safety agency examination, approval, and compliance with established environmental standards. To ensure the continued safe operation of your Xerox ® Equipment, follow these safety guidelines... -
Page 6: Electrical Information
Plug the power cable directly into a correctly grounded electrical outlet. If you are not sure whether or not an outlet is correctly grounded, consult an electrician. Do not use an adapter to connect any Xerox ® Equipment to an electrical outlet that lacks a ground connection terminal. -
Page 7: Disconnect Device
® Safety Xerox D35 Scanner WARNING: This equipment must be connected to a protective earth circuit This equipment is supplied with a plug that has a protective earth pin. This plug will only fit into an earthed electrical outlet. This is a safety feature. If you are unable to insert the plug into the outlet, contact your electrician to replace the outlet. -
Page 8: Environmental Health And Safety Contacts
D35 Scanner Safety Environmental Health and Safety Contacts Contact Information For more information on Environment, Health, and Safety in relation to this Xerox ® Product and supplies, please contact the following customer help lines: North America & Europe (Phone): 1-800-ASK-XEROX North America &... -
Page 9: Welcome
What’s in the Box Before proceeding, check the contents of the box. If items are missing or damaged, contact the dealer where you purchased the scanner. Xerox® D35 Scanner Installation Guide Power Supply Plug Adapter USB Cable •... -
Page 10: Documentation
® Xerox D35 Scanner Welcome – 1 to 3 GB for each additional application A VGA OR SVGA MONITOR: • The recommended settings for your monitor are: – Color quality of 16-bit or 32-bit – Resolution set to at least 800 x 600 pixels... -
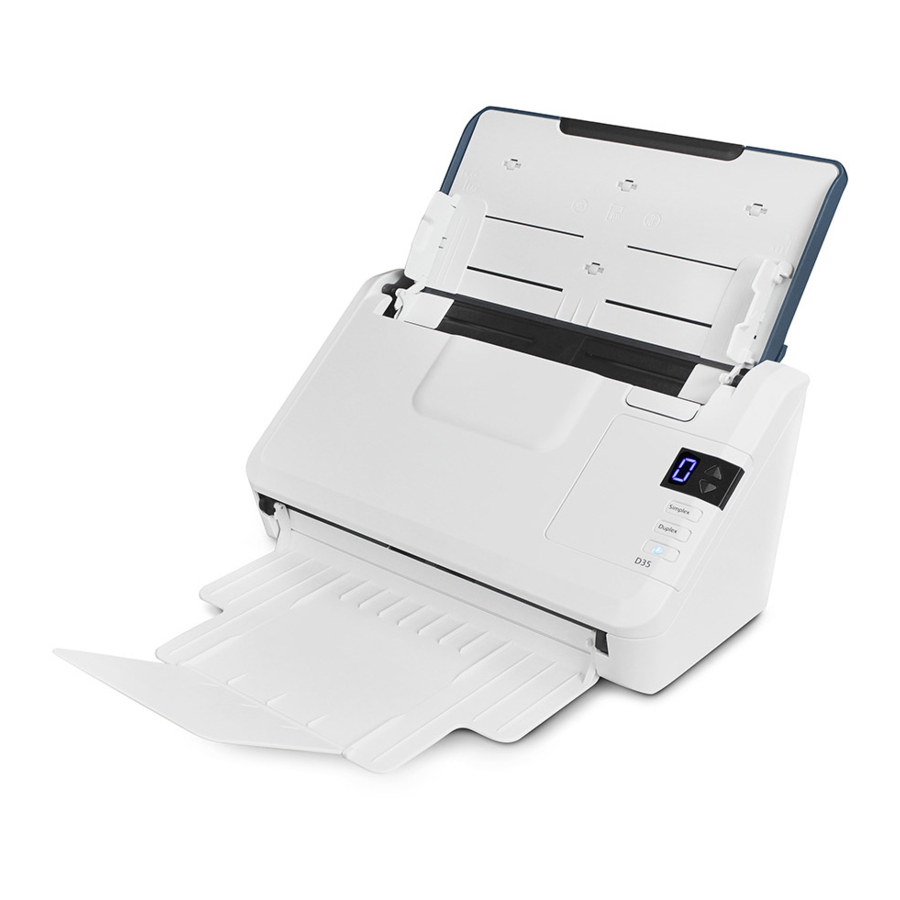
Page 11: Xerox® D35 Scanner
® Welcome Xerox D35 Scanner Xerox® D35 Scanner Input tray—Holds the documents in the Automatic Document Feeder for scanning. – Extension—Pull out to support various document lengths. – Paper Guides—Slide to adjust to document width. Exit tray—Where the documents are exited out of the scanner. Flip up an exit stopper to keep documents in the exit tray. - Page 12 ® Xerox D35 Scanner Welcome User Guide...
-
Page 13: Scanner Setup
Scanner Setup Remove the scanner from the shipping box, verify all parts listed on page 2-1 are in the box. We recommend that you keep the original packing materials in case you need them later. Remove any shipping tape from the scanner as indicated in the following illustration(s). The illustrations are for example purposes only. - Page 14 ® Xerox D35 Scanner Scanner Setup Plug the power supply into the power port on the scanner and into a wall outlet. User Guide...
-
Page 15: Installation
Installation Install the Software and Connect the Scanner Go to www.visioneer.com/macinstall. Launch the installer once the download is complete. Double-click the disc icon that appears on the desktop. Double-click the Setup file to start the driver installer. Plug the USB cable into the USB port on the scanner then into a USB port on the computer. Turn on the scanner power. - Page 16 ® Xerox D35 Scanner Installation The Select Language window opens. Click the drop-down menu arrow and select the language to use. Click OK. 10. Make sure the boxes for Scanner Driver and Visioneer Scan Utility are selected, as well as any other applications you want to install.
-
Page 17: Installing The Scanner Driver
The scanner driver installation will start first. Click Continue. On the Xerox License Agreement window, read the license agreement. Click Continue. If you accept the terms, select Agree and continue with the installation. If you choose not to accept the license agreement, close the installation window. The scanner driver will not be installed. - Page 18 ® Xerox D35 Scanner Installation Depending on your system configuration, you may be prompted to choose a location for the installation. We recommend that you select the main disc drive and click Install. If you are prompted for a password, input the name and password for a user that has permission to install software on your computer.
-
Page 19: Connect The Usb Cable And Turn On The Power
® Installation Xerox D35 Scanner Connect the USB Cable and Turn on the Power If you did not connect the scanner earlier, proceed with the instructions below. Remove any tape from the USB cable. Plug the USB cable into the USB port on the scanner then into a USB port on the computer. -
Page 20: View The User Guides
® Xerox D35 Scanner Installation If any of the Web buttons have been selected, the software will have to first be downloaded by clicking Download Now. Once all software has been downloaded, click Install now. Follow the instructions on the screen to install each of the additional applications. -
Page 21: Register Your Scanner
® Installation Xerox D35 Scanner Register Your Scanner Registering your scanner is important as it provides you with access to our free telephone support service. Registration also gives you free access to software updates for your scanner. You will need an active internet connection to register your scanner. If you do not have internet access you can contact our customer service department to register the scanner. - Page 22 ® Xerox D35 Scanner Installation User Guide...
-
Page 23: Loading Documents To Scan
Loading Documents to Scan Always remove any staples or paper clips from documents before inserting them into the scanner. Staples and paper clips can jam the feed mechanism and scratch the internal components. Also remove any labels, stickers, or Post-It™ notes that may come off during the scanning process and get stuck in the scanner. -
Page 24: Documents To Avoid Scanning
® Xerox D35 Scanner Loading Documents to Scan Documents to Avoid Scanning The documents in this list can be scanned, but please note that scanning documents of this type will reduce the life of the scanner. Maintenance will be required more often and replaceable parts will wear faster. -
Page 25: Loading Documents
® Loading Documents to Scan Xerox D35 Scanner • Bend and then flatten the document stack to make sure the horizontal edges are aligned to help prevent paper from skewing while being pulled through the scanner. • Pinch the ends to align the leading edges slantwise to help prevent multiple pages from being fed through at a single time. -
Page 26: Scanning Interfaces
® Xerox D35 Scanner Loading Documents to Scan Scanning Interfaces Every scanning application will access the scanner using a different method. Please refer to the application’s user guide for instructions on using the application and accessing the scanner. • TWAIN Interface—TWAIN is a widely recognized standard that computers use to receive images from scanners and digital cameras. -
Page 27: Maintenance
Scanner Options, Maintenance and Troubleshooting This section contains information on hardware options available for your scanner, maintenance instructions, troubleshooting, uninstalling, scanner specifications, and spare parts. Safety Precautions When servicing the scanner you should take the following precautions to ensure your safety and prevent damage to the scanner. - Page 28 ® Xerox Scanner Options, Maintenance and Troubleshooting To open the scanner hardware properties page: • Windows 7 and later—from the Windows Control Panel, open Hardware and Sound and then Devices and Printers. Right-click on the scanner and then select Scan properties from the list. Click Yes if you are prompted by the Windows User Account Control to confirm that you want make changes to the system settings.
-
Page 29: Clearing Paper Jams
® Scanner Options, Maintenance and Troubleshooting Xerox • Power off—input the number of minutes you want the scanner to wait before it turns itself off. Click the green enter button to save any changes in the power off field. Click the red reset button to reset to the default timeout value. -
Page 30: Cleaning The Scanner
® Xerox Scanner Options, Maintenance and Troubleshooting Pull on the scanner cover release and lift the lid to open the scanner. Do not attempt to remove a jammed page with the ADF door closed. Remove the jammed page from the scanner. -
Page 31: Cleaning The Adf Rollers
® Scanner Options, Maintenance and Troubleshooting Xerox • Wear protective gloves as the roller cleaning paper may irritate sensitive skin. • Only clean the rollers and scanning areas, as described in this section, with the roller cleaning paper. • Do not leave the roller cleaning paper or any of the cleaning supplies where children can access them. -
Page 32: Cleaning The Scanner Glass And Background Plates
® Xerox Scanner Options, Maintenance and Troubleshooting The following illustration shows where the rollers are located in the scanner. Use a roller cleaning paper, or the wet soft cloth with isopropyl rubbing alcohol (70%), to clean all of the rollers indicated in the illustration. -
Page 33: Cleaning The Paper Sensors
® Scanner Options, Maintenance and Troubleshooting Xerox The following illustration shows the location of the glass in the scanner. Use a soft cloth to wipe clean the glass. You can use a roller cleaning paper to clean the glass plates if there is any sticky residue on the surface. -
Page 34: Replacing The Rollers
® Xerox Scanner Options, Maintenance and Troubleshooting The following illustration shows the location of the sensors in the scanner. Using a clean, dry cotton swab, brush away any dust on the double feed detection sensors. Replacing the Rollers When replacing the rollers described in this section, you should replace all of the rollers at the same time. -
Page 35: Replacing The Feed Roller
® Scanner Options, Maintenance and Troubleshooting Xerox REPLACING THE FEED ROLLER Pull on the scanner cover release and lift the lid to open the scanner. Locate the roller cover in the body of the scanner. Pull down the paper feed roller cover, using the tab indicated in the illustration below, and gently pull it towards you holding both sides of the cover door, to access the roller. -
Page 36: Replacing The Friction Roller
® Xerox Scanner Options, Maintenance and Troubleshooting Pull up on the plastic arm holding the roller in place. Detach the right end of the paper feed roller from the scanner and remove the feed roller. Discard the roller, it cannot be repaired or reused. - Page 37 ® Scanner Options, Maintenance and Troubleshooting Xerox Locate the friction roller cover in the body of the scanner. Use the little tab to flip open the friction roller cover. Pull out the friction roller gently from the right side. Discard the roller, it cannot be repaired or reused.
- Page 38 Make sure the USB cable is plugged into the scanner and computer. Make sure the power cord is plugged into the scanner and into a wall outlet. Contact Xerox Technical Support if you experience a different blinking pattern. Error Code...
-
Page 39: Troubleshooting
Did you select another image source in the scanning software? If you use multiple imaging devices with your computer, such as a camera, all-in-one printer, or another scanner, ® you may have selected another source for images. Make sure Xerox D35 is selected as the scanner. - Page 40 ® Xerox Scanner Options, Maintenance and Troubleshooting Problem: The scanned images are of poor quality. What do I do? There are various reasons why the scanned image is of poor quality. The original document may not be of good quality or the scanner glass may be dirty.
- Page 41 Windows 7 and later: Open Programs and Features Uninstalling the scanner driver: ® In the list of installed programs click Xerox D35 driver. Click the Change or Uninstall button. Click Yes when asked to confirm that you want to remove the driver.
-
Page 42: Xerox® D35 Scanner Specifications
® Xerox Scanner Options, Maintenance and Troubleshooting Xerox® D35 Scanner Specifications Scanner Specifications Document Requirements Minimum Item Size 2.9 x 2.0 inches (74 x 52 mm) Maximum Item Size 8.5 x 14.0 inches (216 x 356 mm) Capacity 50 pages of 20lb printer paper (80 g/m... -
Page 43: Xerox® D35 Scanner Parts List
Supported Operating – Apple® Mac OS X® 10.14 11.2 Systems Scanner Drivers TWAIN, ICA Bundled Software Visioneer® Scan Utility Xerox® D35 Scanner Parts List Part Name Part Number Cleaning and 96-X333-000 Maintenance Kit • Feed (ADF) Roller 65-3212-000 • Friction Roller... - Page 44 ® Xerox Scanner Options, Maintenance and Troubleshooting User Guide 6-18...
-
Page 45: Appendix A: Regulatory Information
(1) This device may not cause harmful interference, and (2) this device must accept any interference received, including interference that may cause undesired operation. ® Changes and modifications to this equipment not specifically approved by Xerox may void the user’s authority to operate this equipment. -
Page 46: European Union
This machine is certified as Class 1 LED product. This means that this machine does not produce hazardous laser radiation. A full declaration of conformity, defining the relevant directives and referenced standards, can be obtained from your Xerox Limited representative or by contacting: Environment, Heath and Safety Xerox Corporation... - Page 47 ® Appendix A: Regulatory Information Xerox D35 Scanner Obligations or Securities of the United States Government, such as: Certificates of Indebtedness National Bank Currency Coupons from Bonds Federal Reserve Bank Notes Silver Certificates Gold Certificates United States Bonds Treasury Notes...
-
Page 48: Canada
® Xerox D35 Scanner Appendix A: Regulatory Information The above list is not all inclusive, and no liability is assumed for its completeness or accuracy. In case of doubt, consult your attorney. Canada Parliament, by statute, has forbidden the reproduction of the following subjects under certain circumstances. -
Page 49: Appendix B: Compliance Information
ENERGY STAR for the USA Energy Program Compliance ® The Xerox D35 Scanner is ENERGY STAR qualified under the ENERGY STAR Program Requirements for Imaging Equipment. User Guide... - Page 50 ® Xerox D35 Scanner Appendix B: Compliance Information The ENERGY STAR and ENERGY STAR MARK are registered United States trademarks. The ENERGY STAR Imaging Equipment Program is a team effort between U.S., European Union and Japanese governments and the office equipment industry to promote energy-efficient copiers, printers, fax, multifunction machine, personal computers, and monitors.