Xerox DocuMate 3125 User Manual
Xerox scanner user's guide
Hide thumbs
Also See for DocuMate 3125:
- User manual (200 pages) ,
- Scanning manual (65 pages) ,
- User manual (47 pages)
Table of Contents
Advertisement
Advertisement
Table of Contents
Troubleshooting

Related Manuals for Xerox DocuMate 3125


Summary of Contents for Xerox DocuMate 3125
-
Page 1: Xerox Documate
One Touch 4.6 March 2013 05-0836-200 Xerox DocuMate 3125 ® ® User’s Guide... - Page 2 Design © 2013 Xerox Corporation. All rights reserved. Xerox , Xerox and Design ® DocuMate are registered trademarks of Xerox Corporation in the United States and/or other countries. ® Content © 2013 Visioneer, Inc. All rights reserved. The Visioneer brand name and OneTouch logo are registered trademarks of Visioneer, Inc.
- Page 3 Restricted Rights Legend Use, duplication, or disclosure is subject to restrictions as set forth in contract subdivision (c)(1)(ii) of the Rights in Technical Data and Computer Software Clause 52.227-FAR14. Material scanned by this product may be protected by governmental laws and other regulations, such as copyright laws.
-
Page 5: Table Of Contents
The Xerox DocuMate 3125 Scanner ........ - Page 6 ® ® Xerox DocuMate 3125 Table of Contents Features of the One Touch Button Panel ......6-27 Changing the Button Settings .
- Page 7 ® ® Xerox DocuMate 3125 Table of Contents Selecting One Touch OmniPage OCR Options ......6-91 The OCR Tab .
- Page 8 Uninstalling Your Scanner ..........9-164 Xerox DocuMate 3125 Specifications ........9-166 Xerox DocuMate 3125 Parts List .
-
Page 9: Safety
Please read the following instructions carefully before operating the machine and refer to them as needed to ensure the continued safe operation of your machine. Your Xerox product and supplies have been designed and tested to meet strict safety requirements. These include safety agency evaluation and certification, and compliance with electromagnetic regulations and established environmental standards. -
Page 10: Electrical Information
Plug the power cable directly into a correctly grounded electrical outlet. If you are not sure whether or not an outlet is correctly grounded, consult an electrician. Do not use an adapter to connect any Xerox equipment to an electrical outlet that lacks a ground connection terminal. -
Page 11: Electrical Supply
® ® Xerox DocuMate 3125 Safety Electrical Supply • This product shall be operated from the type of electrical supply indicted on the product’s data plate label. If you are not sure that your electrical supply meets the requirements, please consult your local power company for advice. -
Page 12: Product Safety Certification
CSA 22.2 No. 60950-1 (Canada) IEC 60950-1 Environmental Health and Safety Contacts Contact Information For more information on Environment, Health, and Safety in relation to this Xerox product and supplies, please contact the following customer help lines: USA & Canada: 1-800-828-6571 Europe: +44 1707 353 434 User’s Guide... -
Page 13: Welcome
2 Welcome Your new Xerox scanner can quickly scan stacks of single-sided or double-sided pages and place their electronic images on your computer. What’s in the Box Before proceeding, check the contents of the box. If items are missing or damaged, contact the dealer where you purchased the scanner. -
Page 14: System Requirements
® ® Welcome Xerox DocuMate 3125 System Requirements Pentium 4 PC or AMD equivalent with: • A DVD-ROM drive • An available Universal Serial Bus (USB) port ® ® • Microsoft Windows operating system: Windows XP (Service Pack 1 and 2), Windows... -
Page 15: The Xerox Documate 3125 Scanner
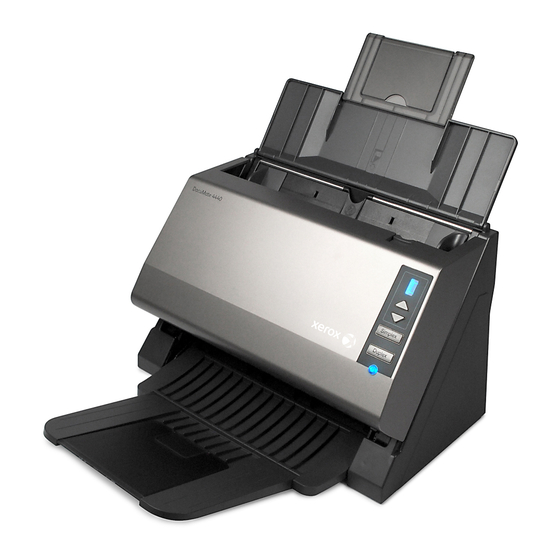
® ® Xerox DocuMate 3125 Welcome The Xerox DocuMate 3125 Scanner Input Tray Paper Guides Automatic Control Panel Document Feeder Output Tray USB Port Power Jack Input Tray—Holds the documents in the Automatic Document Feeder for scanning. Paper Guides—Guides adjust to support various document widths. - Page 16 ® ® Welcome Xerox DocuMate 3125 User’s Guide...
-
Page 17: Scanner Setup
3 Scanner Setup Unpack and Assemble the Scanner Remove the scanner from its protective foam and plastic bag. Remove any shipping tape from the scanner, input tray and output tray. Lift the input tray up from the scanner. User’s Guide... -
Page 18: Connect The Scanner Power Cord
® ® Scanner Setup Xerox DocuMate 3125 Pull the output tray down from the scanner body. It will snap in place when it is down all the way. Make sure the bottom of the tray is down all the way before scanning. If the tray isn’t fully seated in position, paper feeding from the input tray may jam in the scanner. -
Page 19: Installation
If you already have a scanner connected to your computer, it is recommended that you remove that scanner’s driver program prior to installing your Xerox scanner. You can remove these programs from the Windows Control Panel. Please refer to the user manual provided with your other scanner hardware for instructions about removing the driver and software for that unit. - Page 20 ® ® Installation Xerox DocuMate 3125 Insert the installation disc into your computer’s DVD-ROM drive. The disc automatically starts. The Select Language window opens. Click the drop-down menu arrow and select the language to use. Click OK. The disc’s Main menu window opens.
-
Page 21: Installing The Scanner Driver
The scanner driver installation will start first. The Welcome screen for the scanner driver Setup Wizard opens. Click Next. On the Xerox License Agreement window, read the license agreement. If you accept the terms, select I Agree then click Next. -
Page 22: Connect The Usb Cable And Turn On The Power
® ® Installation Xerox DocuMate 3125 Stop when you see the “Complete the installation by connecting your hardware” window. Do not click OK yet. Leave the window open and proceed to the next section. Note: If you do not see this on-screen diagram for connecting the scanner, stop and follow the instructions below. - Page 23 ® ® Xerox DocuMate 3125 Installation Turn on the scanner power. The status light comes on and flashes indicating that the scanner is receiving power. Your computer recognizes that a scanner has been plugged into the USB port and automatically loads the appropriate software to run the scanner.
-
Page 24: Installing Visioneer One Touch
® ® Installation Xerox DocuMate 3125 Click Close on the Installation Complete window to close and exit the driver installer. Installing Visioneer One Touch The Visioneer One Touch software installation will start automatically after you click Close on the driver Installation Complete window. -
Page 25: Installing Additional Applications
® ® Xerox DocuMate 3125 Installation Installing Additional Applications Your scanner includes free, additional applications as described in the table below. Return to the disc’s Main menu and click Install software. Select the additional applications you want to install, then click Install now. -
Page 26: View The User Guides
When you’re finished, click Main menu to return to the Main menu window and click Exit. Remove the installation disc and store it in a safe place. That’s it! Installation is finished and your Xerox scanner is ready to scan. Register Your Scanner Registering your scanner is important as it provides you with access to our free telephone support service. - Page 27 DocuMate 3125 Installation When the Xerox scanners web page loads click on Register Your Product. Fill in the registration form, all required fields have an asterisk (*). A valid email address is required for registration. You will be asked to enter the serial number for the scanner, it is located on the back or underside of the scanner.
- Page 28 ® ® Installation Xerox DocuMate 3125 User’s Guide 4-20...
-
Page 29: Loading Documents To Scan
5 Loading Documents to Scan This chapter illustrates scanning with the buttons on the scanner. After loading documents in the scanner, as described below, you can also scan using the One Touch Button Panel on screen, or using a scanning application. Note: Always remove any staples or paper clips from documents before inserting them into the scanner. -
Page 30: Scanning Interfaces
Scanning Interfaces If you selected the recommended installation, then you have several different options to scan with your Xerox DocuMate 3125 scanner. Each method scans equally well, so use the one with appropriate options for the item you are scanning. - Page 31 ® ® Xerox DocuMate 3125 Loading Documents to Scan • One Touch—When you press the Simplex or Duplex button on the scanner, the scanner starts scanning using the settings for the current LED number. The scanned image is then sent to a destination on your computer or network drive.
- Page 32 ® ® Loading Documents to Scan Xerox DocuMate 3125 User’s Guide 5-24...
-
Page 33: Scanning And Configuring One Touch
6 Scanning and Configuring One Touch Based on the recommended full installation of the scanner driver and the Visioneer One Touch software, One Touch is your main scanning interface for using the scanner. The One Touch Button Panel, that you see on the computer screen, shows the pre-set function for each button (such as Email) and the icon of the destination (called the Destination Application) where the images will be sent when scanning is finished. -
Page 34: Scan From The One Touch Button Panel
® ® Scanning and Configuring One Touch Xerox DocuMate 3125 If the OneTouch OmniPage Module is not installed, then the options for sending to word processing applications such as Microsoft Word will not be available. The OneTouch OmniPage module is installed automatically when you install Visioneer OneTouch from the installation disc. -
Page 35: Features Of The One Touch Button Panel
® ® Xerox DocuMate 3125 Scanning and Configuring One Touch Features of the One Touch Button Panel The One Touch panel is your on-screen set of controls for the scanner. From the panel you can access the hardware settings for your scanner and configure the Scan button. - Page 36 ® ® Scanning and Configuring One Touch Xerox DocuMate 3125 Right-click a button on the One Touch Button Panel. The One Touch Properties window opens. The One Touch Properties window will also open when you press, hold down for 3 seconds, and release a scanner button.
-
Page 37: Selecting Options For One Touch
® ® Xerox DocuMate 3125 Scanning and Configuring One Touch Select a scanning configuration in the Select configuration list. The configuration’s basic settings include: scanning mode, resolution (dpi), page size, brightness (Br), and contrast (Cr). To see a selected scan configuration’s settings, click its icon. - Page 38 ® ® Scanning and Configuring One Touch Xerox DocuMate 3125 Select Button—click the down arrow and select the button for which you want to modify the settings from the list. The options you choose in this window only apply to the button you select in this list.
- Page 39 ® ® Xerox DocuMate 3125 Scanning and Configuring One Touch • When the number of images reaches—select this option, and input a number in the box, to have a new file created each time the number of images scanned reaches the number you input in this field.
-
Page 40: Scan Configurations
® ® Scanning and Configuring One Touch Xerox DocuMate 3125 – {HH}—inserts the 24-hour clock hour with a zero added to single-digit time values (02). {m}—inserts the minute without a zero added to single-digit time values (7). – – {mm}—inserts the minute with a zero added to single-digit time values (07). - Page 41 ® ® Xerox DocuMate 3125 Scanning and Configuring One Touch Note: Use Configure Before Scan if you want to set the options manually before scanning. See Configure Before Scan on page 44. Create a new configuration: • Click the New button to create a new configuration starting with the One Touch default configuration settings.
-
Page 42: Scan Settings Tab
® ® Scanning and Configuring One Touch Xerox DocuMate 3125 Scan Settings Tab On the Scan Configuration Properties dialog box, type a name. Type a new name for the configuration. If the configuration is locked, click the Select the scan mode lock to unlock it. -
Page 43: Page Settings Tab
® ® Xerox DocuMate 3125 Scanning and Configuring One Touch Page Settings Tab The options on the Page Settings tab will be available based on either the selected color mode (Black & White, Grayscale, or Color), or based on whether or not the scanner hardware supports the feature. - Page 44 ® ® Scanning and Configuring One Touch Xerox DocuMate 3125 • Skip blank originals—select this option to have the scanner detect if a blank page has been fed through the scanner, and remove it from the final file. Typically you might use this option when scanning a stack of two-sided pages which have a number of blank sides.
-
Page 45: Advanced Settings Tab
® ® Xerox DocuMate 3125 Scanning and Configuring One Touch Advanced Settings Tab Use the Advanced Settings tab to set color correction options for Color or Grayscale scanning. Drag the sliders to the left and right to change the color settings. As you do, the image changes to show the effects of the new settings. - Page 46 ® ® Scanning and Configuring One Touch Xerox DocuMate 3125 Enable redaction—select this option to enable redaction when scanning. You might use this option if you want to remove a logo or image that appears on each page that you are scanning.
- Page 47 ® ® Xerox DocuMate 3125 Scanning and Configuring One Touch Preview—this color field shows the actual color that will fill the redaction area in the final scanned image. When scanning in color, the Preview field will match the Color field. When scanning in Grayscale, the preview field will show the gray version of the color you selected, and that color will be in the final scanned image.
-
Page 48: File Formats
® ® Scanning and Configuring One Touch Xerox DocuMate 3125 File Formats The available file formats, in the Select format panel, are based on the selected destination for scanning. For example, if scanning to the destination Transfer to Storage, all file formats are available as the files are saved directly to a folder without opening any application. - Page 49 ® ® Xerox DocuMate 3125 Scanning and Configuring One Touch Right-click on the BMP icon to access the GIF and PNG image formats. When you select either of these formats, the format panel will change the BMP icon to the selected image format icon.
- Page 50 ® ® Scanning and Configuring One Touch Xerox DocuMate 3125 JP2—the *.jpg2 (joint photographic experts group 2000) format is the new JPEG standard. This new JPG file type has improved compression for better image quality at smaller file sizes. Please refer to the official JPEG website at www.jpeg.org...
-
Page 51: Text Formats
® ® Xerox DocuMate 3125 Scanning and Configuring One Touch Right-click on the PDF icon. A menu opens. Choose the file size/image quality option for your scanned images. Minimize Size—smallest file size, lowest image quality. Normal—medium file size, some loss of image quality. -
Page 52: Configure Before Scan
® ® Scanning and Configuring One Touch Xerox DocuMate 3125 Right-click on the text format icon. The menu options depend on the type of Destination Application you select. Example menu for the Text format when Example menu for the Text format when the selected application is Microsoft’s... -
Page 53: To Scan Using Configure Before Scan
® ® Xerox DocuMate 3125 Scanning and Configuring One Touch Select the scan configuration Configure Before Scan. Click OK or Apply on the One Touch Properties window. To Scan Using Configure Before Scan Click the button you set up to use Configure Before Scan. -
Page 54: Open Scanned Document(S)
® ® Scanning and Configuring One Touch Xerox DocuMate 3125 – Yes—scanning stops and all pages scanned in this batch, up to this point, will be deleted. The TWAIN interface will close and you can restart your scan from the beginning. -
Page 55: Transfer To Storage
® ® Xerox DocuMate 3125 Scanning and Configuring One Touch Technical Note • If there is no application installed for the file format you selected, the One Touch Link Log Viewer will open when scanning is finished showing the failure. You can double-click on the log failure to open the detail view of the failed transfer. - Page 56 ® ® Scanning and Configuring One Touch Xerox DocuMate 3125 • Click the Properties button to open the One Touch Link Properties for Transfer to Storage. From this window, you can change the global default storage location and options. On initial installation of One Touch, all scan configurations use these settings. When you create new configurations, the default settings will also match what you have selected here.
-
Page 57: Setting The Folder From Windows
® ® Xerox DocuMate 3125 Scanning and Configuring One Touch Setting the Folder from Windows When One Touch was installed, a storage option was added to the right-click menu of your Windows folders. This menu option allows you to set the Transfer to Storage folder location without opening One Touch first. - Page 58 ® ® Scanning and Configuring One Touch Xerox DocuMate 3125 To scan to multiple folders, you create multiple configurations, each with a different storage location for the scanned documents. Scan one set of documents using the scan configuration with the appropriate storage location for that set. Then switch to another scan configuration and scan the next set of documents to store them in their folder.
- Page 59 ® ® Xerox DocuMate 3125 Scanning and Configuring One Touch Select the folder you created for storing the scanned documents. 10. Click OK. The selected folder will now be set as the Storage location, such as “Business Receipts.” 11. Click OK. The new configuration is now listed as a Transfer to Storage configuration.
-
Page 60: Burn To Cd-Rom
® ® Scanning and Configuring One Touch Xerox DocuMate 3125 13. You will now have multiple configurations set up for the Transfer to Storage destination, and each configuration scans documents to separate folders. The new configurations apply to the Transfer to Storage Destination Application. - Page 61 ® ® Xerox DocuMate 3125 Scanning and Configuring One Touch Select Burn to CD as the Destination Application. Choose a File Format and a Scan Configuration. Click OK. Now start scanning using the scanning button you set to scan and burn to a CD.
-
Page 62: Printer Or Fax
® ® Scanning and Configuring One Touch Xerox DocuMate 3125 Printer or Fax The availability of printers and/or faxes in the One Touch destination list depends on whether or not you have printers or faxes configured in Windows. Please refer to the Windows documentation, or your printer or fax documentation, for setting up printers and faxes. -
Page 63: Paperport
® ® Xerox DocuMate 3125 Scanning and Configuring One Touch • Fit to page, reduce image if necessary—if the scanned image is too big to be printed or faxed on a single page, the image will automatically be reduced to fit the page. - Page 64 ® ® Scanning and Configuring One Touch Xerox DocuMate 3125 Destination type—the PaperPort destination is classified as a “Document Management Link”. To make it available in the destination list, you must select Document management on the Options tab in the One Touch Properties window.
-
Page 65: Sharepoint
® ® Xerox DocuMate 3125 Scanning and Configuring One Touch Select the destination folder for Scanned Documents • Select a folder to send the scanned document(s) to when scanning to the PaperPort destination. The list of folders in this window are from the PaperPort Folder Manager. Use the PaperPort Folder Manager to add or delete folders, add other drives and network locations to this list. - Page 66 ® ® Scanning and Configuring One Touch Xerox DocuMate 3125 All configuration of the SharePoint server is done using the SharePoint settings tab in the Scan Configuration Properties window. Select SharePoint as the destination application. Open the Scan Configuration you want to modify for scanning to a SharePoint site, or create a new Scan Configuration.
-
Page 67: Sharepoint Link Log Viewer
® ® Xerox DocuMate 3125 Scanning and Configuring One Touch – The SharePoint URL would be sharepoint.site.com/IT/common The Destination folder would be shared documents – • User account—input the user account name that has privileges to save files to the specified SharePoint site and Destination folder. -
Page 68: Ftp Transfer
® ® Scanning and Configuring One Touch Xerox DocuMate 3125 Click on the Properties button to open the Log Viewer from the SharePoint One Touch Link Properties window. There are no global configuration properties for the SharePoint destination application, all configuration is done using the Scan Configuration Properties window as described in the previous section. - Page 69 ® ® Xerox DocuMate 3125 Scanning and Configuring One Touch Select FTP Transfer as the destination application. Open the Scan Configuration you want to modify for scanning to an FTP server, or create a new Scan Configuration. Select an existing configuration in which you have already specified your FTP server information, and then click on the Copy button to create a new configuration using the settings of the current configuration.
-
Page 70: Ftp Link Log Viewer
® ® Scanning and Configuring One Touch Xerox DocuMate 3125 • Destination folder—input the folder path, on the remote FTP server, where you want the scanned documents sent. This path would appear in your web browser after the host name. -
Page 71: Smtp
® ® Xerox DocuMate 3125 Scanning and Configuring One Touch SMTP The SMTP destination link allows scans to be sent directly to an email address, through an SMTP server, from One Touch. Please contact your server administrator for the server information you need to configure this link. - Page 72 ® ® Scanning and Configuring One Touch Xerox DocuMate 3125 Click on the SMTP Settings tab and fill in the fields with the information for you SMTP server. • Protocol—select which protocol you want to use to transfer the scan to the server.
-
Page 73: Smtp Link Log Viewer
® ® Xerox DocuMate 3125 Scanning and Configuring One Touch SMTP Link Log Viewer The One Touch Link Log Viewer opens automatically when scanning is complete. Click on the menu arrow next to View logs for and select SMTP Link Agent from the list to display the transfer history for the SMTP link only. - Page 74 ® ® Scanning and Configuring One Touch Xerox DocuMate 3125 Windows email application will open and ask you to configure your user information. Please contact your IT department, server administrator, or other group that provided you the email information for setup instructions. Configuring an email application and user account is outside the scope of this document.
-
Page 75: Email Properties
® ® Xerox DocuMate 3125 Scanning and Configuring One Touch Email Properties Use the Email Link Properties window to select a folder for storing a permanent copy of the scanned image, setting the color document options, and changing the email application that is in the One Touch destination list. - Page 76 ® ® Scanning and Configuring One Touch Xerox DocuMate 3125 Supported file types—the text file formats and destination applications are only available if an OCR module or application is installed. Please refer to Text Formats on page 43 to see a list of text file formats that are available when OCR is installed.
-
Page 77: Text Documents Properties
® ® Xerox DocuMate 3125 Scanning and Configuring One Touch Text Documents Properties ® These properties apply to Microsoft Word, Microsoft Excel , and any other text editing applications indicated by their icons in the list. • Add application—click this button to open the Add Text Based Link dialogue so you can add other text editing applications to One Touch. -
Page 78: Adding Text Editor Applications To One Touch
® ® Scanning and Configuring One Touch Xerox DocuMate 3125 Adding Text Editor Applications to One Touch To add another application to the list, click the Add application button. The Add Text Based Link dialog box opens. Click Browse to find the application you want to add to the list. -
Page 79: Creating An Html Web Page From Your Scanned Documents
® ® Xerox DocuMate 3125 Scanning and Configuring One Touch – Adobe searchable PDF—this is the PDF image format with a hidden searchable text layer. You will not be able to edit the text the file. The application you are adding must be able to open *.pdf files. -
Page 80: Still Image Client
® ® Scanning and Configuring One Touch Xerox DocuMate 3125 Still Image Client If you want to specify an application to use for scanning at the start of the process, you can use event forwarding. Supported file formats—you cannot select a file format when scanning to the Still Image Client as the destination application is not selected until after you start scanning. - Page 81 ® ® Xerox DocuMate 3125 Scanning and Configuring One Touch A dialog box opens for you to select the application to use for scanning. Select the application you want in the box and click OK. Now the application you selected opens and you can continue scanning using that application’s interface.
-
Page 82: Image Editors
® ® Scanning and Configuring One Touch Xerox DocuMate 3125 Image Editors Image editors include Microsoft Paint and other drawing and graphics applications. Supported file formats—the available file formats are based on the selected destination application. For example, you can scan to Microsoft’s Paint application as a BMP, GIF, PNG, or JPG, but not as TIFF or JP2 as Paint cannot open those two file types. -
Page 83: Image Documents Properties
® ® Xerox DocuMate 3125 Scanning and Configuring One Touch Image Documents Properties These properties apply to Microsoft Paint and other image processing applications. • Add application—click this button to open the Add Simple Image Link dialogue so you can add other image editing applications to One Touch. -
Page 84: Adding Image Editor Applications To One Touch
® ® Scanning and Configuring One Touch Xerox DocuMate 3125 Adding Image Editor Applications to One Touch To add another application to the list, click the Add application button. The Add Simple Image Link dialog box opens. Click Browse to find the application you want to add to the list. -
Page 85: Pdf Applications
® ® Xerox DocuMate 3125 Scanning and Configuring One Touch PDF Applications PDF destinations are applications that can open and/or edit the Adobe PDF file format. Supported file types—applications in the PDF destination group support the *.pdf file format. When the OmniPage module or software is installed, One Touch includes an option to scan as sPDF or nPDF. - Page 86 ® ® Scanning and Configuring One Touch Xerox DocuMate 3125 Click on one of the default text editors such as WordPad. Click on the Properties button. To add another application to the list, click the Add application button. The Add Text Based Link dialog box opens.
-
Page 87: Send To Application
® ® Xerox DocuMate 3125 Scanning and Configuring One Touch In Step 4 of the dialog box, select Adobe PDF format and Adobe searchable PDF. Adobe PDF format—select this option if you are adding a PDF viewing or editing application to the list. This PDF format is an image format only, it will not recognize the document using OCR, and you will not be able to search or edit the text in the final file. - Page 88 ® ® Scanning and Configuring One Touch Xerox DocuMate 3125 You must configure this destination before attempting to scan to it the first time. If you scan without configuring the link first, the One Touch log viewer will open and show that sending the image to the Send to Application link failed.
- Page 89 ® ® Xerox DocuMate 3125 Scanning and Configuring One Touch To configure a destination application for the Send to Application link: Send to Application One Touch Link Send to Application Scan Configuration Properties window Properties window Click Browse to open the Windows file browser and navigate to the location of the application’s executable (*.exe) file.
-
Page 90: Scanning To Multiple Destinations
® ® Scanning and Configuring One Touch Xerox DocuMate 3125 Configure advanced features—select this option to change the default settings for this link. Only advanced users and application developers should modify these settings. Send to Application One Touch Link Send to Application Scan Configuration... - Page 91 ® ® Xerox DocuMate 3125 Scanning and Configuring One Touch Open the One Touch Properties window and click on the Options tab. Select Enable scanning to multiple destinations, then click back on the configuration tab. Click each destination where you want to send the scanned image in the Selected destinations (#) list.
- Page 92 ® ® Scanning and Configuring One Touch Xerox DocuMate 3125 If any of the destinations you select have global configuration properties, the Properties button at the bottom of the Selected destinations list will be enabled for you to configure the destination options. Click on the Properties button to open the One Touch Link Properties window to configure the destinations.
-
Page 93: Scanning With Job Separation
® ® Xerox DocuMate 3125 Scanning and Configuring One Touch Select the scan configuration you want to use for scanning in the Select configuration list. Click on the Edit button to open the Scan Configuration Properties window to configure any destination specific scanning options. - Page 94 ® ® Scanning and Configuring One Touch Xerox DocuMate 3125 Select the Destination Application, File Format, and Scan Configuration applicable to your scanning batch. Make sure the option Create single image files is not selected. If this option is selected, the job separation features on the Options tab will be disabled.
- Page 95 ® ® Xerox DocuMate 3125 Scanning and Configuring One Touch – Sensitivity—you can adjust the sensitivity level of the blank page detection. For instance, depending on the paper weight, color mode, or image processing options selected, you might get varying results. Changing the sensitivity level allows you to fine-tune the accuracy of the blank page detection.
-
Page 96: Scanning With Optical Character Recognition (Ocr)
You can then work with the text and numbers to edit, spell check, change font or type size, sort, calculate, and so forth. Note: Xerox recommends that all OCR processing use the original factory settings for OCR scanning that came with your scanner. When scanning with other settings, use at least 300 dpi for the resolution. -
Page 97: Text Formats
® ® Xerox DocuMate 3125 Scanning and Configuring One Touch Click on OK to save the changes and close the One Touch Properties window. Press or click the One Touch button you set to scan with OCR. Your scanned pages appear in the Destination Application with the text ready for editing and other text processing. - Page 98 ® ® Scanning and Configuring One Touch Xerox DocuMate 3125 Right-click on the text format icon. Example menu for the text format when Example menu for the text format when the Destination Application is Microsoft the Destination Application is a Storage Word.
-
Page 99: Selecting One Touch Omnipage Ocr Options
® ® Xerox DocuMate 3125 Scanning and Configuring One Touch Normal PDF—the.pdf file format used by Adobe Acrobat. This format converts scanned text into a PDF with the text ready for editing in a PDF editing program. Additional options are available on the menu for the sPDF and nPDF text formats. The three image quality settings are: •... -
Page 100: The Ocr Tab
® ® Scanning and Configuring One Touch Xerox DocuMate 3125 Choose OCR Options from the menu. The OCR Properties window opens with the OCR tab selected. The OCR Tab The options shown on the OCR tab window are for spellchecking scanned text, replacing missing or unrecognized characters, and setting the speed and quality levels of the OCR processing. - Page 101 ® ® Xerox DocuMate 3125 Scanning and Configuring One Touch particular letter or symbol, a “best guess”, a “second-best guess”, and so on. This option tells the OCR engine to look through the dictionary to validate its best guess for the letters in that word;...
-
Page 102: Creating Your Own Dictionaries
® ® Scanning and Configuring One Touch Xerox DocuMate 3125 – Recognition Quality—drag the slider to the left or right to set the degree of accuracy for the OCR process. The higher the accuracy, the longer the OCR process requires to complete. - Page 103 ® ® Xerox DocuMate 3125 Scanning and Configuring One Touch The User Dictionary Files window opens and shows the available dictionaries. MyDictionary is an example of a user dictionary. Click Add New. The Add New User Dictionary window opens. Click the drop-down arrow for Files of type and choose Text Files (.txt).
-
Page 104: Editing User Dictionaries
® ® Scanning and Configuring One Touch Xerox DocuMate 3125 12. Select a dictionary and click Set As Current to set it as the current dictionary for spellchecking. The label [current] is added to the name. If you don’t want to use any user dictionaries for spellchecking, click [none] at the top of the list. -
Page 105: The Format Tab
® ® Xerox DocuMate 3125 Scanning and Configuring One Touch To import a list of words from another text file, click Import. The Import Contents of User Dictionary window opens. Select the file that has the words you want to add to your user dictionary. - Page 106 ® ® Scanning and Configuring One Touch Xerox DocuMate 3125 Click the Format tab and choose the options you want for both the input and output formats. Input Format Options – Automatic—choose this option to let the OCR process determine the format of the pages.
-
Page 107: Onetouch With Visioneer Acuity Technology
OneTouch with Visioneer Acuity Technology The One Touch software you received with your Xerox scanner now includes the Visioneer Acuity technology. This application has a set of features for improving and enhancing the quality of scanned documents, especially documents that would usually produce poorer quality images. -
Page 108: The Acuity Settings
® ® Scanning and Configuring One Touch Xerox DocuMate 3125 The Acuity options appear on the Scan Configuration Properties window that you use to create a new scan configuration for your scanner. Click the Acuity Settings tab to see the new options available for your scanner. - Page 109 ® ® Xerox DocuMate 3125 Scanning and Configuring One Touch Click the Acuity Settings tab to see the new Acuity settings. Choose the Visioneer Acuity options for the scan configuration. Click the drop-down arrow to choose the type of Acuity settings to use for the new scan configuration.
-
Page 110: Hardware Properties
® ® Scanning and Configuring One Touch Xerox DocuMate 3125 – Color dropout—color dropout is the ability of your scanner to automatically remove a color from a scanned image. For example, if you are scanning a letter with a red watermark, you can choose to filter out the red so the scanned letter just shows the text and not the red watermark. -
Page 111: Device Settings
® ® Xerox DocuMate 3125 Scanning and Configuring One Touch The Hardware Properties dialog box opens and shows information about your Xerox scanner. Click the Properties button. Device Settings Please refer to Device Settings on page 145 6-103 User’s Guide... -
Page 112: Driver Settings
® ® Scanning and Configuring One Touch Xerox DocuMate 3125 Driver Settings Please refer to Driver Settings on page 146 User’s Guide 6-104... -
Page 113: Scanning From Twain And Wia
7 Scanning from TWAIN and Accessing the Scanner Interface Every scanning application will access the scanner using a different method. Below is a brief list of common applications and how to initiate a scan from within that application, including some of the applications which may have been provided with your scanner. -
Page 114: Scanning
® ® Scanning from TWAIN and WIA Xerox DocuMate 3125 A note about your scanner and Microsoft WIA (Windows Image Acquisition): The WIA platform has been developed to enable image transfer from devices using standard Windows applications, such as Paint or Windows Fax and Scan, without the need to install additional scanning software. -
Page 115: Locked Scanning Interface
® ® Xerox DocuMate 3125 Scanning from TWAIN and WIA Locked Scanning Interface If you see this locked version of the scanner’s interface you will be able to select a predefined scanning profile from the Presets list, and then click the Scan button to start scanning. - Page 116 ® ® Scanning from TWAIN and WIA Xerox DocuMate 3125 The preview window displays the scan area and the current scan region. This scan region reflects the paper size currently selected in the main interface. When you pass the mouse cursor over the scan region it will highlight for you to move or resize it.
- Page 117 ® ® Xerox DocuMate 3125 Scanning from TWAIN and WIA Click Show main UI to bring the main scanner interface in front of the preview window for you to adjust the scan settings. There are some settings in the main interface, such as brightness and contrast, which will immediately update the preview image after you adjust the setting.
-
Page 118: Scan Regions
® ® Scanning from TWAIN and WIA Xerox DocuMate 3125 When you scan, any settings you adjusted are automatically saved to the Last used settings preset. These settings are not retained in a preset until you click Save in the main interface to save the settings to the current preset, or save them to a new preset using the Save as dialogue. - Page 119 ® ® Xerox DocuMate 3125 Scanning from TWAIN and WIA Move or resize region 1 until the sample image area you want is within the scan region. Resize the region by clicking on one edge of the region outline and dragging the mouse.
- Page 120 ® ® Scanning from TWAIN and WIA Xerox DocuMate 3125 In the main scanner interface click Save to save the regions to the current preset, or save them to a new preset using the Save as dialogue. The Summary area in the main interface will indicate when custom regions have been defined in the preview window.
-
Page 121: Move, Resize, Or Delete Regions
® ® Xerox DocuMate 3125 Scanning from TWAIN and WIA Move, Resize, or Delete Regions Moving regions – to move a region, place your mouse cursor over the region you want to move. The region will highlight indicating that it is the active region under the mouse cursor. Click on the region and drag the mouse to move the region. -
Page 122: Reordering Regions
® ® Scanning from TWAIN and WIA Xerox DocuMate 3125 Deleting regions – to delete a region, place your mouse cursor over the region you want to delete. The region will highlight indicating it is the active region under the mouse cursor. Right- click on the region and select the delete option from the menu. -
Page 123: Clear All Regions
® ® Xerox DocuMate 3125 Scanning from TWAIN and WIA Make this the first region – select this option to set the region number to 1. This option is not available if the region you right-clicked on is already at position 1. After selecting this option, all other regions will have their number update automatically as appropriate. -
Page 124: Basic Options
® ® Scanning from TWAIN and WIA Xerox DocuMate 3125 Select Basic or Advanced from the list to show the basic or advanced document source configuration options as described below. Basic Options • Duplex—select this option to scan both sides of the item in the scanner. - Page 125 ® ® Xerox DocuMate 3125 Scanning from TWAIN and WIA • Color scans the document in color, creating a full color copy of an original document or photograph. Color scans have the largest file size. • Gray scans the document using varying shades of gray to reproduce the document. The grayscale scan mode is often used when scanning documents or graphics where the original color does not need to be retained, but the graphics need to be legible.
-
Page 126: Summary
® ® Scanning from TWAIN and WIA Xerox DocuMate 3125 Tip: Save the changes to a Preset when you are done selecting options for each source. Please refer to Presets for more information. Summary The Summary area displays some of the basic scan options selected in the interface. Clicking on one of the links will open the area of the interface where the setting is located. - Page 127 ® ® Xerox DocuMate 3125 Scanning from TWAIN and WIA To save a new preset: Adjust the options in the scanner interface as needed. Click on the right arrow and select Save as... from the list. After clicking on the save option, a dialogue opens for you to type in a name. Type in the name you want then click OK.
-
Page 128: Exporting Presets
® ® Scanning from TWAIN and WIA Xerox DocuMate 3125 Click Yes when prompted to confirm that you want to delete the currently selected preset. Exporting Presets Click on the right pointing arrow and select Export... from the list. Click on the browse button next to the Destination folder field to open a file browsing window. - Page 129 ® ® Xerox DocuMate 3125 Scanning from TWAIN and WIA Browse to a location and select the folder where you want the preset file to be saved. Click on Choose. Make sure to choose a location where you will be able to easily find the file.
-
Page 130: Importing A Preset
® ® Scanning from TWAIN and WIA Xerox DocuMate 3125 Select the option Do this for all conflicts to have the action you select in this dialogue be used for all conflicts found. Importing a Preset If you have previously exported presets, or another user has given you their presets files, select the import option to add those presets to your current list. -
Page 131: Document Settings
® ® Xerox DocuMate 3125 Scanning from TWAIN and WIA • Overwrite—select this option to replace the current preset with the one you selected from the list. • Keep both—select this option to keep both presets. The preset you selected will have a counting number added to the end of the preset name;... -
Page 132: Disabled Options In This Section
® ® Scanning from TWAIN and WIA Xerox DocuMate 3125 • Advanced panel—this panel contains advanced document handling options. If you select an option in this panel that also appears on the Main panel, when you return to the Main panel that option will be selected. - Page 133 ® ® Xerox DocuMate 3125 Scanning from TWAIN and WIA • Skip blank originals • Cleanup edges Scanner Model Panel Options on page 130 • Detect double feeds Resolution The resolution determines the amount of detail you can see in the scanned image. Resolution is the clarity of the image measured in dots-per-inch (dpi).
-
Page 134: Document Size
® ® Scanning from TWAIN and WIA Xerox DocuMate 3125 Document Size Standard document sizes Click the drop down menu and select a pre-defined document size from the list. The available document sizes are within the scanner's range of minimum and maximum item size. -
Page 135: Manual Feed
® ® Xerox DocuMate 3125 Scanning from TWAIN and WIA Manual Feed Select this option to enable a delay from when the last page is scanned and when the scanner stops the scan job. This allows you to scan one page at a time without having to click Scan for each page you put in the scanner. - Page 136 ® ® Scanning from TWAIN and WIA Xerox DocuMate 3125 This option is available only if the current scanner supports duplex scanning and the Duplex option is selected in the scanning interface. Merge Two Sides When scanning in duplex mode, you can enable this option to have both sides of a scanned item appear on one page in the final image file.
-
Page 137: Advanced Panel Options
® ® Xerox DocuMate 3125 Scanning from TWAIN and WIA Advanced Panel Options The options in this panel may also appear in the Main panel, but with additional settings for you to fine-tune the feature you've selected. Select the Advanced source configuration mode to show this panel. -
Page 138: Scanner Model Panel Options
® ® Scanning from TWAIN and WIA Xerox DocuMate 3125 • Crop to original—select this option to let the scanner automatically determine the size of the item being scanned. This option is only available if the scanner supports this feature. -
Page 139: Image Enhancements
® ® Xerox DocuMate 3125 Scanning from TWAIN and WIA Technical Note: If you are getting false double feed errors, try cleaning the inside of the scanner. Excessive dust on the sensor can cause false double feed errors. Refer to the maintenance section of the scanner's user guide for instructions on cleaning the scanner. -
Page 140: Disabled Options In This Section
® ® Scanning from TWAIN and WIA Xerox DocuMate 3125 Disabled Options in this Section Some options in the interface may be grayed out and cannot be selected. Grayed out options are either not appropriate for the current scanner, the software needed to enable the feature is not installed, the feature is dependent on another setting in the scanner's interface. - Page 141 ® ® Xerox DocuMate 3125 Scanning from TWAIN and WIA Choosing brightness values Adjusting the brightness level is based on how you want the image to appear and there is no standard to adhere to. Below are some recommended options for brightness image correction based on the original document quality.
- Page 142 ® ® Scanning from TWAIN and WIA Xerox DocuMate 3125 Black background scanners: Some scanners have a black background plate. A black background results in more precise cropping results and skew detection. However, when scanning thin paper, such as multipart color forms or ruled writing paper, which are less than 18lb paper weight, the background may “bleed”...
- Page 143 ® ® Xerox DocuMate 3125 Scanning from TWAIN and WIA Color image contrast examples The examples below show the original image at the default setting of 50% contrast level, 25% contrast and 75% contrast. Contrast: 25% Contrast: 50% Contrast: 75% Technical note: Most monitors have a contrast setting that is user adjustable.
-
Page 144: Invert Image
® ® Scanning from TWAIN and WIA Xerox DocuMate 3125 Adjusting the gamma level is based on how you want the image to appear and there is no standard to adhere to. Color image gamma examples The examples below show the original image at the default setting of 1.8 gamma level, then 1.0 gamma and 2.6 gamma. -
Page 145: Mirror Image
® ® Xerox DocuMate 3125 Scanning from TWAIN and WIA The following example shows the original grayscale image and the inverted image. The following example shows the original color image and the inverted image. Mirror Image The Mirror image option flips the image left-to-right. - Page 146 ® ® Scanning from TWAIN and WIA Xerox DocuMate 3125 Threshold and Dynamic threshold Threshold enables you to set what level of light or dark to look for on a page. When scanning in black and white, everything on the page is set to either white pixels or black pixels in the final image.
-
Page 147: Color Processing Panel Options
® ® Xerox DocuMate 3125 Scanning from TWAIN and WIA Bayer dither scan - Close up Color Processing Panel Options The options in this panel are for setting how the scanner should process colors in specific color modes. Color Dropout Color dropout tells the scanner and software to remove a specific color from the image. -
Page 148: Advanced Panel Options
® ® Scanning from TWAIN and WIA Xerox DocuMate 3125 • More approximate—this option removes a wider range of colors based on the pure color selected in the list or defined in the custom fields. This option is only available when scanning in grayscale or black and white. The example below shows the original text with a red watermark and the resulting image with the color removed. - Page 149 ® ® Xerox DocuMate 3125 Scanning from TWAIN and WIA Number—this is the maximum number of dots within the radius that should be considered a speckle. If this number of dots are in the circle, the dots will not be considered a speckle and remain in the image.
-
Page 150: Driver Configuration
® ® Scanning from TWAIN and WIA Xerox DocuMate 3125 White Level With this option you can set what the scanner should interpret as “white” in the final image, even though the page being scanned may have a shaded or off-white background. You may... -
Page 151: Disabled Options In This Section
® ® Xerox DocuMate 3125 Scanning from TWAIN and WIA Disabled Options in this Section Some options in the interface may be grayed out and cannot be selected. Grayed out options are either not appropriate for the current scanner, the software needed to enable the feature is not installed, the feature is dependent on another setting in the scanner's interface. -
Page 152: Hardware Properties And Interface Behavior
® ® Scanning from TWAIN and WIA Xerox DocuMate 3125 • Reset device—click this button to revert the scanner hardware back to the scanner’s firmware defaults. As this option resets the scanner hardware, you will not see a change in the interface unless the power save time has been changed. -
Page 153: Device Settings
® ® Xerox DocuMate 3125 Scanning from TWAIN and WIA Device Settings Scanner Details • Firmware version—this is the current hardware processor chip version number. • Serial number—the scanner’s unique identification number. • LLD version—the scanner’s base driver version. This is not the One Touch software revision, TWAIN or WIA driver versions. -
Page 154: Driver Settings
® ® Scanning from TWAIN and WIA Xerox DocuMate 3125 Counters • Counters—click the reset button next to the counter you want to set back to 0. You can use this option to monitor the number of scans completed since the last time a part has been replaced. - Page 155 ® ® Xerox DocuMate 3125 Scanning from TWAIN and WIA • Auto close on transfer—the interface closes automatically when scanning is complete. Force UI-less—select this option to prevent this scanner interface from opening when you • initiate a scan in the scanning application. This option will only work if your scanning application supports UI-less scanning.
- Page 156 ® ® Scanning from TWAIN and WIA Xerox DocuMate 3125 User’s Guide 7-148...
-
Page 157: Scanning From Isis
The ISIS drivers were installed correctly during the installation of your scanner. The Scanner Selection dialog box will then appear. Select Xerox DocuMate 3125 from the list of scanners and click OK. Your scanner is then ready to work with the ISIS driver. - Page 158 ® ® Scanning from ISIS Xerox DocuMate 3125 User’s Guide 8-150...
-
Page 159: Maintenance
9 Maintenance This section contains information about maintenance, troubleshooting, uninstalling, scanner specifications, and spare parts. Safety Precautions When servicing the scanner you should take the following precautions to ensure your safety and prevent damage to the scanner. Do These • Wear protective gloves when cleaning the scanner with Isopropyl rubbing alcohol. -
Page 160: Clearing Paper Jams
® ® Maintenance Xerox DocuMate 3125 Clearing Paper Jams If your scanner stops scanning due to a paper jam in the Automatic Document Feeder, a warning opens after a few moments. Open the Automatic Document Feeder cover. Remove the jammed paper and close the cover. - Page 161 ® ® Xerox DocuMate 3125 Maintenance Note: Be careful when cleaning the rollers. All of the rollers, except the free rollers, are designed to rotate in one direction only. Do NOT force the roller to rotate in the opposite direction. Forcing the roller to rotate will damage it, and cause the scanner to feed pages incorrectly.
- Page 162 ® ® Maintenance Xerox DocuMate 3125 Wipe clean the feed rollers and scanner glass in the scanner body. User’s Guide 9-154...
- Page 163 ® ® Xerox DocuMate 3125 Maintenance Wipe clean the free rollers, ADF pad, and scanner glass in the under side of the ADF door. Be careful not to snag the cloth on the spring arms of the ADF pad. Close the scanner when you’re finished.
-
Page 164: Replace The Adf Pad Assembly
The ADF pad will wear out and is designed to be a user-replaceable part. Problems with documents feeding into the ADF is an indication that the pad is wearing thin. See the Xerox DocuMate 3125 Parts List on page 167 for ordering information. Open the Automatic Document Feeder cover. -
Page 165: Replacing The Roller Assembly
® ® Xerox DocuMate 3125 Maintenance Close the scanner when you’re finished. Replacing the Roller Assembly After extended use, the feed roller may wear out. It is a user-replaceable part and can be reordered. Frequent paper jams are a symptom of a worn roller assembly. A worn roller can cause documents to feed in skewed at an angle, or multiple pages to feed at the same time. - Page 166 ® ® Maintenance Xerox DocuMate 3125 Pull the paper guide away from the scanner. The replaceable roller is located behind the paper guides. The roller is held in place with a lock tab that rotates to lock and unlock it. To unlock the tab, rotate it upward until the small lock flange is completely free.
- Page 167 ® ® Xerox DocuMate 3125 Maintenance Remove the roller from the scanner and discard it, it cannot be repaired. Before installing the new roller, clean any dust that may have gotten on it during shipping. Insert the left end of the new roller assembly into the hole in the ADF cover. Angle the roller into the scanner and align the lock tab with the slot in the scanner.
-
Page 168: Troubleshooting
• imaging devices with your computer, such as a camera, all-in-one printer, or another scanner, you may have selected another source for images. Make sure Xerox DocuMate 3125 is selected as the scanner. Problem: Why does my scanner not function after performing a system restore on Windows XP or Windows Vista? The system restore process may have corrupted some of the driver components. - Page 169 A likely cause is that some driver programs are already installed on your computer for another scanner. Or you previously had another Visioneer or Xerox scanner and that driver program is still on your computer. They are interfering with the installation and One Touch options, and you need to remove those other drivers and re-install your Xerox DocuMate 3125 scanner.
- Page 170 ® ® Maintenance Xerox DocuMate 3125 Problem: I tried to 'Repair' the One Touch application by using the 'Change' function through the Add/Remove Program within the Control Panel and was not able to repair it. How do I repair One Touch? Before attempting to repair One Touch, unplug the USB cable connected to the scanner.
-
Page 171: Error Light Troubleshooting Codes
Try cleaning the double feed detection sensor. Dust on the sensor may prevent the sensor from working properly. Error Light Troubleshooting Codes The status light indicates the current state of the scanner. Descriptions of the most common patterns are listed below. Contact Xerox Technical Support if you experience a different blinking pattern. 9-163 User’s Guide... -
Page 172: Uninstalling Your Scanner
Xerox Technical Support. Uninstalling Your Scanner To uninstall the Xerox DocuMate 3125 scanner, remove the scanner software and any other scanning software provided with the scanner. When uninstalling the scanner driver or One Touch, please leave the scanner's USB cable plugged into the computer. - Page 173 Windows XP: Double-click the Add/Remove Programs icon. Windows Vista and Windows 7: Double-click the Programs and Features icon. From the list of programs, select Xerox DocuMate 3125 Driver. Click the Change/Remove or Uninstall button. Click Yes when asked to confirm that you want to remove these software programs.
-
Page 174: Xerox Documate 3125 Specifications
® ® Maintenance Xerox DocuMate 3125 Xerox DocuMate 3125 Specifications Optical resolution 600 dpi Bit depth 24-bit color, 8-bit grayscale, 1-bit bitonal (black & white) Scan method Duplex Automatic Document Feeder (ADF) ADF specifications Maximum item size 8.5" x 38" (216 mm x 965 mm) Minimum item size 2.9"... -
Page 175: Xerox Documate 3125 Parts List
® ® Xerox DocuMate 3125 Maintenance Xerox DocuMate 3125 Parts List Please use the following part names and numbers when ordering replacements for your Xerox DocuMate 3125 scanner. Part Name Part Number Roller 57-0145-000 ADF Pad 57-0144-000 USB Cable 35-0117-000... - Page 176 ® ® Maintenance Xerox DocuMate 3125 User’s Guide 9-168...
-
Page 177: A Regulatory Information
(1) This device may not cause harmful interference, and (2) this device must accept any interference received, including interference that may cause undesired operation. Changes and modifications to this equipment not specifically approved by Xerox may void the user’s authority to operate this equipment. -
Page 178: Other Regulations
This machine is certified as Class 1 LED product. This means that this machine does not produce hazardous laser radiation. A full declaration of conformity, defining the relevant directives and referenced standards, can be obtained from your Xerox Limited representative or by contacting: Environment, Heath and Safety The Document Company Xerox... -
Page 179: Canada
® ® Xerox DocuMate 3125 Regulatory Information Bonds. (U.S. Savings Bonds may be photographed only for publicity purposes in connection with the campaign for the sale of such bonds.) Internal Revenue Stamps. (If it is necessary to reproduce a legal document on which there is a canceled revenue stamp, this may be done provided the reproduction of the document is performed for lawful purposes.) -
Page 180: Other Countries
® ® Regulatory Information Xerox DocuMate 3125 Obligations or securities of a government or bank. Exchequer bill paper or revenue paper. The public seal of Canada or of a province, or the seal of a public body or authority in Canada, or of a court of law. -
Page 181: B Compliance Information
Product Recycling & Disposal USA & Canada If you are managing the disposal of your Xerox product, please note that the product may contain lead, mercury, Perchlorate, and other materials whose disposal may be regulated due to environmental considerations. The presence of these materials is fully consistent with global regulations applicable at the time that the product was placed on the market. -
Page 182: Energy Star For The Usa
® ® Compliance Information Xerox DocuMate 3125 Energy Star for the USA Energy Program Compliance ® ® The Xerox DocuMate 3125 is E qualified under the E Program NERGY NERGY Requirements for Imaging Equipment. The E and E are registered United States trademarks. The... -
Page 183: Index
Index Actual size, 6-55 Delete button, 6-29 Add Application, 6-70, 6-76, 6-78 Despeckle, 7-132, 7-140 ADF pad assembly Destination Application replace, 9-156 text file format, 6-89 Advanced device settings, 6-55 Destination application, 6-25, 6-29, 6-40, 6- Advanced Settings tab, 6-37 47, 6-55 Apply button, 6-29 Burn to CD, 6-53... - Page 184 ® ® Index Xerox DocuMate 3125 Flip back side, 7-127 Manual Feed Mode, 6-36 flowing page, 6-99 Mask, 7-141 Format tab, 6-97 Maximize Quality, 6-42, 6-43 Merge two sides, 7-128 Microsoft Internet Explorer, 6-71 Microsoft Outlook, 6-30 Gamma, 6-37, 7-135...
- Page 185 ® ® Xerox DocuMate 3125 Index Screen Resolution, 6-67, 6-75 Searchable PDF, 6-90 Page Settings tab, 6-35 Select Button, 6-30 Page size, 7-126 Select configuration, 6-29 paper jam, 9-157 Properties, 6-34 Paper size, 6-35 Select destination, 6-30 PaperPort, 4-17 Select format, 6-28...
- Page 186 ® ® Index Xerox DocuMate 3125 White Level, 7-142 Word Document, 6-90 xls file format, 6-90 User’s Guide I-178...