Table of Contents
Advertisement
Quick Links
Advertisement
Table of Contents

Related Manuals for Audiovox MS4150RS


Summary of Contents for Audiovox MS4150RS
- Page 1 Model MS4150RS AM/FM/CD/CD-ROM Navigation Radio Owner’s and Installation Guide...
-
Page 3: Table Of Contents
SAFETY AND WARNINGS ....... . . 1 INSTALLATION INSTRUCTIONS ......3 GENERAL INFORMATION . - Page 4 CONTENTS C-IQ – INTELLIGENT CONTENT ON DEMAND ..... . . 31 C-IQ - Your key to map, traffic and travel information ....31 NAVIGATION .
-
Page 5: Safety And Warnings
Notes about the Operation Guide The following reading aids are used to simplify this Operation Guide: requests you to do something. shows the unit’s reaction. provides additional information – identifies a list. Safety instructions and warnings contain important information for the safe use of the unit. - Page 6 If you use the remote control exclusively in the holder, we recommend removing the batteries. In case you have any further question about the use or operation of this AUDIOVOX Navigation Radio or if there is anything which you do not understand, please contact an authorized AUDIOVOX dealer or the AUDIOVOX Technical support.
-
Page 7: Installation Instructions
IMPORTANT INFORMATION Only trained specialists may install the unit. Observe automotive industry quality standards. Fire hazard! When drilling, care must be taken not to damage concealed wiring harnesses, the fuel tank and fuel lines. Never drill into supporting or safety-relevant body parts. Only install in vehicles with 12V on-board voltage and negative earth. - Page 8 INSTALLATION INSTRUCTIONS Connection overview, ISO chamber A, Fig. 2: Note: The cable colors correspond to the VDO Dayton standard. Wire color Connection Orange Input speedometer signal / SDVC Green Switch input reversing signal (+12 volts) Purple Switch input telephone mute function Red/Yellow + 12 V permanent positive;...
- Page 9 C2. For information about setting the telephone attributes, refer to “INITIALIZATION” Blue connector C3 (CD changer): You can connect a digital AUD IOVOX CD changer to the unit. For further information call AUDIOVOX technical support. INSTALLATION INSTRUCTIONS Page 29.
- Page 10 INSTALLATION INSTRUCTIONS Installing the GPS antenna, Fig. 7 The GPS antenna may be installed in the passenger compartment, for example on the dashboard or the rear shelf. The antenna needs to have unrestricted “visual contact” to the sky. – Clean the mounting surface and attach the antenna with the double-sided adhesive tape.
- Page 11 Initial operation, Fig. 12 1. Reconnect the battery. 2. Restore complete functioning of the electrical system (clock, trip computer, alarm sys - tem, airbag, immobiliser, etc.). 3. Switch on the ignition. 4. Insert the map CD in the radio. To register the system and enable map, travel and/or traffic info, see the operating instructions, Section “C-IQ”, 5.
- Page 12 INSTALLATION INSTRUCTIONS Drive through several intersections and monitor the current vehicle position in the “ Car Position ” information menu. Once the displayed position agrees with the actual car position, calibration is complete. Note: The system can also be calibrated without enabling the contents of the C-IQ. However, no directional information will be provided.
-
Page 13: General Information
Route & Sound – Navigating and listening to an audio CD With the new generation of our navigation radio units, you may insert a map CD, plan your route, then insert an audio CD and the system will still guide you to your intended destination. The navigation computer saves the road system in a defined area around the planned route (corridor) in its main memory. -
Page 14: The Digital Road Map
GENERAL INFORMATION Comments After transport of the vehicle by train or ferry, the navigation system may require a few minutes for exact positioning. After disconnecting the vehicle battery, up to 15 minutes may be required for exact positioning. For this, the vehicle must be outdoors and the system must be switched on in order to receive transmissions from the GPS satellites. -
Page 15: Safety
SAFETY The system has the following safety functions to prevent theft: Security code The navigation radio can be protected against theft with a security code. The unit is disabled as soon as it is disconnected from the voltage supply (e.g. if it is stolen). It can only be reactivated by entering the security correct code. -
Page 16: Preface
PREFACE RDS (Radio Data System) Many FM stations transmit RDS information. The navigation radio evaluates the RDS telegram and offers the following advantages: – PS (Program Service Name): Display of station name, – PTY (Program TYpe): Station selection by program type, –... -
Page 17: Operation
Control elements MUTE RADIO MS 4150 CD.C SOUND POWER VOLUME 1 o ... . Release button for operating panel 2 SOUND ..Opens the “ 3 POWER/VOLUME . -
Page 18: Displays
OPERATION Displays In radio mode: Time Waveband Frequency Program (Station) name (only with RDS stations) In CD player mode: Time CD title (if entered) With CD Text available: Artist Track number Elapsed track time In CD changer mode: Time CD title (if entered) With CD Text available: Artist Track number Elapsed track time... -
Page 19: Inserting A Cd
Inserting a CD 1. Open the front panel. 2. Insert the CD into the drive (printed side up). For audio CDs, playback starts automatically. 3. Close the front panel. Removing a CD 1. Open the front panel. 2. Press the eject button. 3. -
Page 20: Menu Operation
OPERATION Menu operation Cursor The currently selected line or field on the screen is designated as the cursor. The cursor is identified by an inverse field (bright letters on black background). Move the cursor by turning the right rotary con - trol. -
Page 21: Entering Letters
Entering letters Characters are entered by selecting letters from a list. In the following, this type of entering will simply be called “keyboard”. Move the cursor to the desired letter by turning the right rotary control. Confirm by pressing the right rotary control. Non-selectable letters are displayed as dots and will be passed over automatically by the cursor. -
Page 22: Information" Menu
“INFORMATION” MENU The “INFORMATION” menu The “ ” menu allows you to configure the type and amount of information the unit will receive via the radio data system (RDS). The RDS-based functions may not be available in certain areas of the U.S. Press INFO. - Page 23 Behavior of TMC and TA If you switch on TMC Scan, you ensure that the radio will only search for stations transmitting TMC data during the automatic search. If the reception quality of the TMC station deteriorates drastically, the unit will indicate this by outputting a warning message.
-
Page 24: Sound Settings
SOUND SETTINGS The “SOUND” menu In the “ ” menu, you can set your navigation radio’s sound and several other sound reproduction parameters to your own preferences. The sound settings for bass and treble/tone are valid for the currently active sound source (radio, CD or CDC). - Page 25 Sound Setup Setting one of the following functions: – : Reset the sound setting to the factory-set values and switch off loudness. – Activate this function to equalize volume differences between the various sound sources. – Set the enhancement of low tones at loudness. –...
-
Page 26: Radio
RADIO Radio Listening to radio If the unit is not yet in radio mode: Press RADIO. Select waveband In radio mode: Press RADIO again. Select the desired waveband and press the right rotary control. The following wavebands are available: FM A, FM B, FM AST (Autostore). Six stations can be stored for each waveband. -
Page 27: The "Radio" Menu
Presets You can store 6 stations for each waveband on the preset buttons from 1 to 6. Tune to the desired waveband and station. Press the desired preset button until you hear a confirmation tone. The station selected is stored on the preset button. Stations cannot be stored manually in the FM AST and MW AST wavebands, these are used exclusively for the Autostore function. - Page 28 RADIO PTY search (only on FM) This function allows you to search for stations of the desired program type. Select the desired program type from the list. Press the right rotary control to start the PTY search. PTY is not supported by all RDS-stations and is not available in all countries. Radio Setup Set one of the following functions.
-
Page 29: Cd Player
CD player You can play 12 cm audio CDs on your CD player. We strongly recommend only playing 12 cm CDs. Please do not use 8 cm CDs (neither with nor without adapter). ON NO ACCOUNT must unusually-shaped CDs be inserted into the player. If you ignore these recommendations, you risk damaging your unit. -
Page 30: The "Cd" Menu
CD PLAYER The “CD” menu In CD player mode: Press MENU. The “ ” menu is displayed. The following functions are available: Random Activate this function to listen to the tracks on the currently selected CD in random order. Repeat Track Activate this function to repeat the current track. -
Page 31: Cd Changer
CD changer (accessories) A digital AUDIO VOX CD changer can be connected to the navigation radio. We strongly recommend only playing 12 cm CDs. Please do not use 8 cm CDs (neither with nor without adapter). ON NO ACCOUNT must unusually-shaped CDs be inserted into the player. If you ignore these recommendations, you risk damaging your unit. -
Page 32: The "Cd Changer" Menu
CD CHANGER The “CD CHANGER” menu In CD changer mode: Press MENU. The “ ” menu is displayed. The following functions are available: Random Activate this function to listen to the tracks on the currently selected CD in random order. Repeat Track Activate this function to repeat the current track. -
Page 33: Initialization
The “INITIALIZATION” menu Select “ menus: “ ”, “ ”. The “ The “ ” menu allows you to adjust the navigation radio to your needs. The following functions are available: Telephone Adapt your unit’s telephone input to your car phone: –... - Page 34 INITIALIZATION Scan Time: The playing time for the scan function for the radio (station) and CD/CD changer (title). Choose 5, 10 or 15 seconds. On Off logic Activate this function to limit the operation of the device to one hour after the ignition key is removed.
-
Page 35: C-Iq - Intelligent Content On Demand
C-IQ - Your key to map, traffic and travel information Your navigation radio is supplied with a CD containing the latest version of the map software along with travel and traffic information (for dynamic navigation). The information on the CD is encrypted and can be partially or completely activated for a defined period with the aid of an access code. - Page 36 C-IQ – INTELLIGENT CONTENT ON DEMAND Activating products Once you have received your enable code, enter it into the system. In the main menu, select “ The cursor appears automatically on the first digit of the code. Press the right rotary control to activate each digit in the code.
- Page 37 Preview Together with your map and travel information software you will also receive the opportunity to inspect different products free of charge before ordering them. You can have the system display the status of this preview: Select “ ” in the “ You will see the status of your preview options.
-
Page 38: Navigation
NAVIGATION Main menu A map CD must be inserted into the CD player for some of the functions in navigation mode. If the unit is not yet in navigation mode: Press NAV. The navigation main control is displayed. The following items are available in the main control: Destination input Opens the “... -
Page 39: Destination Input
Destination input Destinations may be entered in several ways: – Entering city, road and house number or intersection by means of the “keyboard.” See the following page. – Loading an address stored in the personal address book. See page 49. –... - Page 40 NAVIGATION Entering a new address An input wizard will help you enter a new address. It will lead you step by step through all the necessary entries such as country, city, road, house number or intersection and required routing criterion. step: City or zip code Select “...
- Page 41 step: Road Once the city has been entered the input wizard automatically jumps to the “ ” input menu. Enter the name of the road using the “keyboard” or select a name from the list using step: House number or intersection If house numbers are available for a selected road, they can be entered with a separate input menu.
-
Page 42: Points Of Interest (Pois)
NAVIGATION Points of interest (POIs) You may also input the destination address by selecting special facilities (POI = Points of Interest) stored in the database. These include e.g.: – airports, – hotels, – petrol station, – car repair garages, – car parks, etc. - Page 43 Special facilities in the vicinity of the current position You may also set a destination address by selecting a special facility in the vicinity of the current vehicle location. Select “ A list of categories of special facilities is shown. Select the required category.
-
Page 44: Via Point Input
NAVIGATION Via point input If you wish to visit other locations en route to the entered destination address, these can be stored as via points. The navigation system then plans the route to include the via points in the given sequence before the destination address is reached. - Page 45 NAVIGATION Delete via points not reached Via point which you have not reached or which are no longer desirable to you must be deleted from the via point list so that the navigation system may plan the route to the next via point or to the final destination.
-
Page 46: Guidance
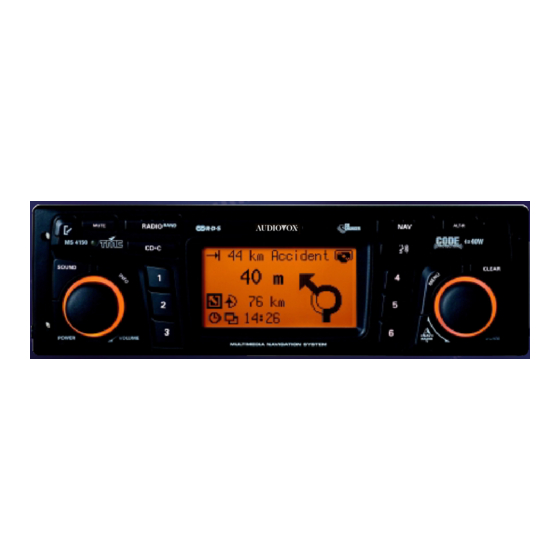
NAVIGATION Guidance The guidance screen appears as soon as you activate the guidance. The guidance screen displays the following information: 1 Road direction arrow: The arrow indicates the course of the road. 2 Simplified presentation of the next turn-off prompt. 3 Turn-off prompt: A graphic display of the next intersection or turn-off. -
Page 47: Audible Messages
Audible messages During guidance, the navigation radio will provide acoustic routing information in addition to the symbols on the guidance screen. Commonly, the directive to turn into another road consists of two voice messages: an early warning e.g. “Right turn ahead” the instruction to turn e.g. - Page 48 NAVIGATION On longer route segments without turnoffs or intersections, an arrow is displayed indicating the course of the road over the next 300 ft. In addition, a reduced diagram of the next turn-off prompt appears on the left, above the route direction arrow. Thus, the driver is always warned in advance of the next change of direction.
- Page 49 Route selection During guidance, you may also modify the route criterion and activate or deactivate dynamic route planning. The system will then plan a new route taking into account the new setting of the current position of your car. In the guidance screen, select the symbol for route selection (on the basis of the set- ting in the destination input U, V, W or X).
-
Page 50: Information During Guidance
NAVIGATION Information during guidance During guidance, you can call up several information screens: Move the cursor to the The list of information menus appears. The following information menus are available: Route list This option is available as soon as a route has been planned. - Page 51 Displaying/deleting via points If via points have been entered for the current destination, the “ The number of via points still to be reached also appears. Select the required via point from the list in order to view details or delete it. Destination Display of current destination address with Name (if entered), country code, city, road, and intersection.
-
Page 52: Alternative Route
NAVIGATION Alternative route During guidance, you can cause the navigation system to plan an alternative route. Use this function if, for example, you want to avoid stationary traffic reported via traffic announcements or if you wish to plan an alternative route. The alternative route will be calculated for a selectable distance from the current position of the car. -
Page 53: Address Manager
Address manager The navigation radio offers the opportunity of storing at least 30 destination addresses in a personal address book. In the address book, you can store your destinations separately under the categories “Private” and “Business”. The “Home” and “Work” shortcuts, which can be programmed with your home address and business address respectively, are also available here. - Page 54 NAVIGATION Store current loc. Would you like to store a favorite restaurant in the destination memory? You can store the current position of your car as follows: Select “ Select which address books the address should be stored in (private, business, home or work).
-
Page 55: Emergency Menu
Emergency menu In the main control, select “ The “ ” menu is displayed. The following options are available in the “ ” menu: GPS position Display of the current geographic vehicle location as calculated by the Global Positioning System. Longitude, altitude and elevation above sea level (provided adequate GPS reception is available) will be displayed. -
Page 56: System Settings
NAVIGATION System settings To customise the navigation functions to your own needs, you can change several settings. In the main control, select “ The “ The following information screens are available: Speed In the “ ” menu, you can configure the following settings: Speed correction The navigation radio uses an average cruising speed to calculate the remaining travel time and the estimated time of arrival. - Page 57 Guidance screen Here you can select the information which should appear on the guidance screen. Show event Select whether traffic obstructions on your route should appear in the top line of the guidance screen or not. This feature is not available in the U.S. Remain.
-
Page 58: Default Settings
NAVIGATION Default settings Select this option in order to reset all user-defined settings to their default values. All entries in the address book will remain stored. Mounting angle To adapt the navigation computer to the mounting angle of the radio in the dashboard (gyro-sensor compensation). -
Page 59: Loading Software Updates
Loading software updates In order to extend the range of functions provided by the unit, you can load new software versions from a software update CD, if available for your navigation radio: Switch on the radio. Open the front and remove the CD if still inserted. Insert the software update CD into the CD player. -
Page 60: Troubleshooting
TROUBLESHOOTING Troubleshooting In rare instances, your navigation radio may not function the way you expect it to. Before calling the service department, please read the operating instructions thoroughly and go through the following check list; it may be possible to quickly remedy an apparent malfunction. - Page 61 Symptoms Navigation Display shows “Please insert map CD”. System reacts very slowly to entries or requires a long time for calculation. “Stand-by” is the only option selectable from the main menu. The number of satellites in the “GPS / Compass” information menu is 0.
-
Page 62: Specifications
SPECIFICATIONS CEA Power Ratings Power Output: 13 watts RMS X 4 channels into 4-ohms @ < 1% THD+N Signal to Noise Ratio @ 1kHz: 70dBA below reference. (Reference: 1 watt, 4-ohms) Dynamic Power: 26 watts @ 4-ohms x 4 channels Frequency Response: 20Hz to 20kHz (-3dB) Reference Supply Voltage: 14.4VDC CD Player... - Page 64 © 2004 Audiovox Electronics Corp., 150 Marcus Blvd., Hauppauge, N.Y. 11788 128-7211...