VeriFone UX 301 Quick Reference Manual
Direct connect
Hide thumbs
Also See for UX 301:
- Installation manual (42 pages) ,
- User manual (19 pages) ,
- Installation manual (14 pages)

Related Manuals for VeriFone UX 301


Summary of Contents for VeriFone UX 301
- Page 1 UX 301 Direct Connect Quick Reference Guide Software Version: DC 4.xx Documentation Version: 1.0 Documentation Date: 2 March 2021...
-
Page 2: Table Of Contents
Connect the Power Supply ......................... 7 2.3.4 Connect UX301 to the PC / ECR ......................7 Configuring the UX 301 for the first time ................... 8 Preparing your firewall ........................8 Setting up PC / ECR communication ....................8 Syncing with Moneris ........................9 Validating account information ....................... -
Page 3: Introduction
1 Introduction Use this guide to understand how your UX 301 unattended solution works, including: The various hardware components How the hardware components are connected; How to set up communication with your electronic cash register (ECR) ... -
Page 4: Ux 301 Hardware
1.3 UX 301 hardware These are the hardware components that make up the UX 301 unattended solution. Item Part number and description M159-100-00-CAB UX 100 Display with Canadian keypad M159-301-000-WWA UX 301 Card reader M159-401-000-WWC UX 401 Contactless reader PWR159-002-01-A... - Page 5 Ux301/Ux401 Communication cable CBL159-302-03-A, RJ-45 Cable 0.5M Ux301/Ux401 Communication cable 26264-02-R RS-232 Serial Cable. Connects the UX 301 to PC/ECR. Other options are USB cable and Ethernet cable. CBL000-045-01-A USB Cable to connect UX 301 to UX 100 Getting Started Guide - Moneris UX 301 with Direct Connect...
-
Page 6: Understanding The Ux 301 Components
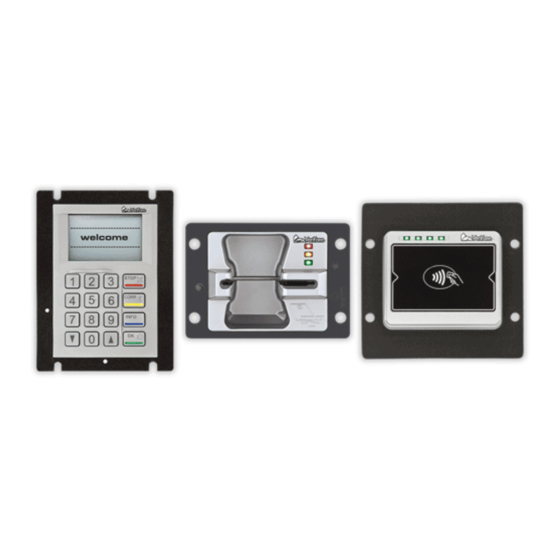
2 Understanding the UX 301 components 2.1 Main hardware modules The VeriFone UX 301 hardware set consists of these 3 modules: the UX 100 PINpad and screen the UX 301 Card Reader / Controller, and the UX 401 Contactless Reader (optional) 2.2 Securing the PINpad and the card reader... -
Page 7: Connecting The Components
Connect the UX301 to the UX100, as shown in the following illustration, using the USB cable (CBL000- 045-01-A) provided. There are 2 USB ports next to the LAN port on the UX 301. Use the USB port that is further away from the LAN port. -
Page 8: Connect The Power Supply
Note: The Moneris power cable has a 4-pin connector. 2.3.4 Connect UX301 to the PC / ECR Connect the UX 301 to your PC / ECR using an RS232 Serial cable, USB cable, or LAN cable. Getting Started Guide - Moneris UX 301 with Direct Connect... -
Page 9: Configuring The Ux 301 For The First Time
Note: Only production hardware can connect to the production host. Development hardware must be used to connect to the development host. The UX 301 solution will connect to these URLs and IP addresses in the production environment. System Description IP Addresses (Site 1) -
Page 10: Syncing With Moneris
4. To return to the Setup Menu, press the CANC key on the UX100 PINpad. 2.7 Syncing with Moneris The UX 301 is designed to sync with Moneris in order to retrieve configuration information. This can be done through the “Sync with Moneris” function on the Setup Menu. - Page 11 Sync with Moneris ECR COM Language 3. Enter your 13-digit merchant ID (MID) which starts with 00, then press the OK key. The UX 301 will synchronize its settings and configuration with Moneris TMS. ENTER 13-DIGIT MID Syncing with Moneris Please wait ...
- Page 12 To validate the merchant account information retrieved during synchronization, go to 3.4.2 Validating account information below. To proceed with processing transactions, press the CANC key. The OPEN-OUVERT screen appears. Getting Started Guide - Moneris UX 301 with Direct Connect...
-
Page 13: Validating Account Information
2. On the INFO menu, select each menu item (Merchant ID, ECR ID…) and press the OK key on the UX 100 keypad to view the information. INFO Merchant ID ECR ID PED ID Merchant name Merchant address IPGATE URL TMS URL ECR COM PCI reboot time Getting Started Guide - Moneris UX 301 with Direct Connect... -
Page 14: Restarting The Application
During the start-up process, if you miss the 2 second window to get into the Setup menu, you can restart the application by following these steps. 1. On the back of the UX 301, press the service button. 2. On the UX 100 keypad, press the CANC key once. -
Page 15: Troubleshooting
Please confirm your TID and matching MID, then re-enter the correct MID. 61420 This error indicates there is an issue trying to reach TMS. Check your network connection and ensure that your Ethernet cable is connected correctly to the Ux301. Getting Started Guide - Moneris UX 301 with Direct Connect... -
Page 16: Merchant Support
4 Merchant support To obtain support for the UX 301 unattended solution, follow these directions. Situation Directions The UX 301 is not working as Contact your integration provider. Most of the UX301 functions and expected. configuration settings are controlled by your integration provider. - Page 17 MONERIS, MONERIS BE PAYMENT READY & Design and MERCHANT DIRECT are registered trade-marks of Moneris Solutions Corporation. All other marks or registered trade-marks are the property of their respective owners. © 2021 Moneris Solutions Corporation, 3300 Bloor Street West, Toronto, Ontario, M8X 2X2. All Rights Reserved. This document shall not wholly or in part, in any form or by any means, electronic, mechanical, including photocopying, be reproduced or transmitted without the authorized consent of Moneris Solutions Corporation.