Table of Contents
Advertisement
Quick Links
Advertisement
Table of Contents

Related Manuals for NEFF B57VS24.0B


Summary of Contents for NEFF B57VS24.0B
- Page 1 Oven [en] User manual and installation instructions B57VS24.0B...
-
Page 2: Table Of Contents
en Safety ¡ Keep the instruction manual and the Table of contents product information safe for future refer- ence or for the next owner. ¡ Do not connect the appliance if it has been USER MANUAL damaged in transit. Safety .............. 2 1.2 Intended use Preventing material damage ....... - Page 3 Safety en on the oven door, as they may scratch the Loose food remnants, fat and meat juices surface. may catch fire. The hinges on the appliance door move when ▶ Before using the appliance, remove the the door is opened and closed, which could worst of the food residues and remnants trap your fingers.
-
Page 4: Safety
en Safety and remnants from the cooking compart- WARNING ‒ Risk of suffocation! ment and accessories. Children may put packaging material over The outside of the appliance gets very hot their heads or wrap themselves up in it and when the cleaning function is in progress. suffocate. -
Page 5: Preventing Material Damage
Preventing material damage en 2 Preventing material damage If the seal is very dirty, the appliance door will no 2.1 General longer close properly during operation. This may dam- ATTENTION! age the front of adjacent kitchen units. Objects on the cooking compartment floor at over Keep the seal clean at all times. - Page 6 en Environmental protection and saving energy Use dark-coloured, black-coated or enamelled baking tins. ¡ These types of baking tin absorb the heat particu- larly well. Open the appliance door as little as possible during operation. ¡ This will maintain the temperature in the cooking compartment and eliminate the need for the appli- ance to reheat.
-
Page 7: Familiarising Yourself With Your Appliance
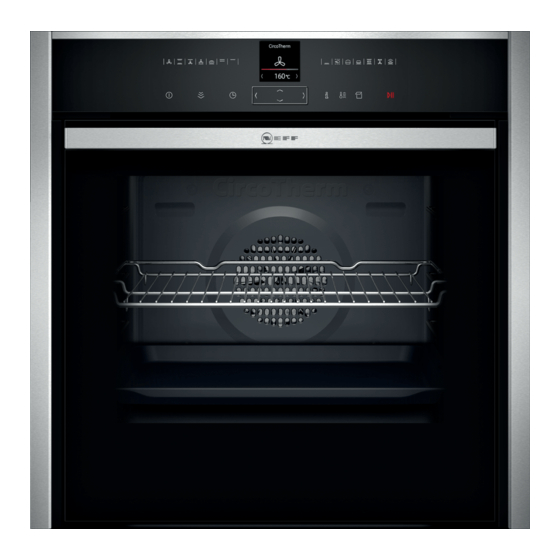
Familiarising yourself with your appliance en 4 Familiarising yourself with your appliance 4.1 Control panel You can use the control panel to configure all functions of your appliance and to obtain information about the operat- ing status. Display Buttons Control element 4.2 Buttons The buttons are touch-sensitive areas. - Page 8 en Familiarising yourself with your appliance Button Name Left Navigate to the left on the display Right Navigate to the right on the display Navigate upwards on the display Down Navigate downwards on the display 4.4 Main menu The main menu provides an overview of your appliance's functions. Press the button to open the main menu.
- Page 9 Familiarising yourself with your appliance en Symbol Heating function Temperature Dough proving 2 settings For proving dough and culturing yoghurt. Dough will prove more quickly than at room temperature. The surface of the dough will not dry out. Defrost 30 - 60 °C For gently defrosting frozen food. Keep warm 60 - 100 °C For keeping cooked food warm.
-
Page 10: Accessories
en Accessories Tank cover Opening for filling and emptying Handle for removing and inserting 5 Accessories Use original accessories. These have been made espe- cially for your appliance. Note: Accessories may become deformed if they get hot. Deformation has no effect on function. As the ac- cessory cools down, it will regain its original shape. -
Page 11: Before Using For The First Time
You will find a comprehensive range of products for your appliance in our brochures and online: www.neff-international.com Accessories vary from one appliance to another. When purchasing accessories, always quote the exact product number (E no.) of your appliance. -
Page 12: Basic Operation
en Basic operation Setting Water hardness in German hardness in French hardness °fH mmol/l °dH 0 (softened) 1 (soft) Up to 1.5 Up to 8.4 Up to 15 2 (moderately hard) 1.5-2.5 8.4-14 15-25 3 (hard) 2.5-3.8 14-21.3 25-38 4 (very hard) Above 3.8 Above 21.3 Above 38... -
Page 13: Steam
Steam en Notes 7.5 Changing the temperature ¡ In the basic settings, you can specify whether the You can also change the temperature once you have heating functions or the main menu should appear started the appliance. when you switch on the appliance. Use the button to select the temperature → "Basic settings", Page 20... - Page 14 en Steam 8.2 Refilling the water tank WARNING ‒ Risk of burns! The water tank may heat up while the appliance is in When "Fill water tank" appears on the display, you operation. must refill the water tank. Wait until the water tank has cooled down from the ▶...
- Page 15 Steam en Use the or button to select the required reheating 8.5 After every steam operation time. The remaining water is pumped back into the water Press to start the reheating process. tank after every operation with steam. Then empty and → "Pausing operation", Page 13 dry the water tank and the cooking compartment.
-
Page 16: Time-Setting Options
en Time-setting options Dry the cooking compartment with a sponge. ATTENTION! Press to switch the appliance on. If there is water on the cooking compartment floor Press . when operating the appliance at temperatures above Use the or button to set "Dry" . 120 °C, this will damage the enamel. -
Page 17: Baking And Roasting Assistant
Baking and roasting assistant en Changing the cooking time Set a heating function and a temperature. Press . Press . Use the or button to select the required cooking Use the or button to change the cooking time. time. a The setting will then be applied. - Page 18 en Steam programs Use the button to navigate back to the recommen- Note: Some programs allow you to extend the cook- ded settings. ing time. Use the button to adjust the temperature or cook- → "Extending the cooking time", Page 18 ing time, if required. If you are happy with the cooking result, use the Use the button to select the temperature...
- Page 19 Childproof lock en 12 Childproof lock You can secure your appliance to prevent children Press to switch the appliance on and then start it from accidentally switching it on or changing the set- tings. 12.4 Deactivating the automatic childproof 12.1 Locks lock Your appliance has two different locks: Press and hold the button until "Childproof lock deactivated"...
- Page 20 en Sabbath mode 13.2 Activating the "Rapid heat-up" function 13.4 Activating the "PowerBoost" function Set Top/bottom heating and a temperature of at Place the food on a single level in the cooking com- least 100 °C. partment. Press to start. Set CircoTherm hot air or the Bread-baking set- ting ...
-
Page 21: Steam Programs
Home Connect en Press . Basic setting Selection Use the or button to select "MyProfile" . Button tone ¡ Off (except for ) Use the button to navigate to the next row. ¡ On Use the or button to select a setting. Display brightness 5 settings Use the... - Page 22 en Home Connect Open the Home Connect app and scan the follow- 16.1 Setting up Home Connect ing QR code. Requirements ¡ The appliance is connected to the power supply and is switched on. ¡ You have a smartphone or tablet with a current ver- sion of the iOS or Android operating system.
- Page 23 16.5 Remote diagnostics 16.7 Declaration of Conformity Customer Service can use Remote Diagnostics to ac- Constructa Neff Vertriebs-GmbH hereby declares that cess your appliance if you contact them, have your ap- the appliance with Home Connect functionality meets pliance connected to the Home Connect server and if...
- Page 24 en Cleaning and servicing Remove all food remnants from the cooking com- New sponge cloths contain residues from production. ▶ partment and the appliance door before you next Wash new sponge cloths thoroughly before use. ▶ heat up the appliance. Suitable cleaning agents Only use cleaning agents that are suitable for the differ- ent surfaces on your appliance.
- Page 25 Cleaning functions en Area Suitable cleaning agents Information Rails ¡ Hot soapy water Soak any heavily soiled areas and use a brush or steel wool. Note: To clean thoroughly, detach the rails. → "Rails", Page 28 Accessories ¡ Hot soapy water Soak any heavily soiled areas and use a brush or steel wool. Enamelled accessories are dishwasher-safe.
- Page 26 en Cleaning functions Allow the appliance to cool down. Detach the shelf supports and remove them from ▶ Keep children at a safe distance. the cooking compartment. ▶ → "Rails", Page 28 Note: The oven light will not be lit while the cleaning Remove coarse dirt from the cooking compartment. function is running.
- Page 27 Cleaning functions en Remove limescale with a cloth soaked in vinegar. 18.2 EasyClean cleaning aid Then wipe with clean water and rub dry with a soft You can use the "EasyClean" cleaning aid to clean light cloth (including under the door seal). soiling from the cooking compartment between full If there is any stubborn dirt that you are unable to cleans.
- Page 28 en Rails Press to start the descaling process. a Once the rinse cycle has run through to the end, an a The descaling process will start. The duration will audible signal will sound. count down on the display. Running the second rinse cycle a Once the descaling process has run through to the Open the control panel and remove the water tank.
- Page 29 Appliance door en Pull the whole rail to the front and remove it. First, push the rail into the middle of the rear socket until the rail rests against the cooking compartment wall, and then push this back . Push the rail into the front socket until the rail also rests against the cooking compartment wall, and then press this downwards...
- Page 30 en Appliance door Open the appliance door approx. 45° wide. ATTENTION! Opening and closing the appliance door when it is in the lock position damages the door hinges. Never force the appliance door open or closed. ▶ If the door hinge has been damaged, call the ▶...
- Page 31 Appliance door en 20.2 Attaching the appliance door WARNING ‒ Risk of injury! If the door locks are unsecured, the appliance door Tip: Ensure that the appliance door is not wedged may become detached. at an angle and that it is properly fitted in place. After attaching the appliance door, close the left- ▶...
- Page 32 en Appliance door Push down on the intermediate pane lightly in the 20.4 Fitting the door panes area of , and carefully lift the retainer until you are able to pull it out. WARNING ‒ Risk of injury! If a door pane or appliance door has not been installed correctly, this is dangerous.
-
Page 33: Troubleshooting
Troubleshooting en Push down lightly on the first intermediate pane Insert the inner pane into the fixing rail at an angle around , slide the retainer in at an angle and towards the back push down until it clicks into place. Push the inner pane from above until it locks into place ... - Page 34 en Troubleshooting Fault Cause and troubleshooting Appliance will not start or cuts Malfunction out during operation. Call the after-sales service. ▶ → "Customer Service", Page 36 The appliance is not heating; Demo mode is activated in the basic settings. appears on the display. Briefly disconnect the appliance from the power supply by switching the cir- cuit breaker in the fuse box off and then on again.
-
Page 35: Disposal
Next time, set lower or higher values. ▶ Tip: A lot of information about the food preparation and corresponding set- ting values can be found on our website www.neff-international.com. 22 Disposal Find out here how to dispose of old appliances cor- This appliance is labelled in accord- rectly. -
Page 36: Customer Service
en Customer Service 23 Customer Service If you have any queries on use, are unable to rectify 23.1 Product number (E-Nr.) and production faults on the appliance yourself or if your appliance number (FD) needs to be repaired, contact Customer Service. You can find the product number (E-Nr.) and the pro- Function-relevant genuine spare parts according to the duction number (FD) on the appliance's rating plate. -
Page 37: How It Works
How it works en General information about roasting in cookware Baking on two or more levels Shelf position ¡ Use heat-resistant, ovenproof cookware. 3 levels ¡ Place the cookware on the wire rack. ¡ Baking tray ¡ Glass cookware is best. ¡ Universal pan ¡... - Page 38 en How it works 24.5 List of foods Recommended settings for a variety of foods, sorted into food categories. Recommended settings for various types of food Food Accessories/cook- Shelf pos- Heating Temperature in Steam in- Cooking time ware ition function °C tensity in mins → Page 8 Victoria sponge cake...
- Page 39 How it works en Food Accessories/cook- Shelf pos- Heating Temperature in Steam in- Cooking time ware ition function °C tensity in mins → Page 8 Leg, bone-in Wire rack 160 - 170 25 + 25 Leg, bone-in, 1.5 kg Wire rack 180 - 190 Added 80 - 90 steam,...
- Page 40 en How it works Food Accessories/cook- Shelf pos- Heating Temperature in Steam in- Cooking time ware ition function °C tensity in mins → Page 8 Chicken, whole, 1.5 kg Wire rack 180–190 Added 65–75 steam, medium Yoghurt Individual moulds Cooking 300 - 360 compart- ment floor Preheat the appliance.
- Page 41 How it works en Proving dough Use the recommended settings when configuring ‒ the appliance settings. Always allow dough to prove in two steps: Once in their Do not open the appliance door while the dough ‒ entirety (1. - dough fermentation) and a second time is proving, otherwise moisture will escape.
- Page 42 en How it works 24.7 Test dishes The information in this section is provided for test institutes to facilitate testing of the appliance in accordance with EN 60350‑1. Baking ¡ The setting values apply to food that is placed into a Baking tray: Shelf position 1 cold cooking compartment.
-
Page 43: Installation Instructions
Installation instructions en Recommended settings for grilling Food Accessory/cookware Shelf posi- Heating Temperature in °C Cooking time tion function in mins → Page 8 Toasting bread Wire rack 4–6 Do not preheat the appliance. 25 Installation instructions Observe this information when installing the appliance. ¡... - Page 44 en Installation instructions ▶ Only use adapters approved by the manu- 25.3 Installation below a worktop facturer. Observe the installation dimensions and the installation instructions when installing below a worktop. ATTENTION! Carrying the appliance by the door handle could break it. The door handle cannot sup- port the weight of the appliance.
- Page 45 Installation instructions en ¡ The power cable must be plugged in at the rear of 25.5 Installation in a tall unit the appliance until you hear a clicking sound. A 3 m Observe the installation dimensions and the installation power cable can be obtained from the after-sales instructions when installing in a tall unit.
- Page 46 en Installation instructions If required, you can adjust the gap between the ap- If required, you can adjust the height of the appli- pliance door and the panels using the adjustment ance door using the adjustment screws on the left screws on the left and right. and right.
- Page 48 Valid within Great Britain: Imported to Great Britain by BSH Home Appliances Ltd. Grand Union House Old Wolverton Road Wolverton, Milton Keynes MK12 5PT United Kingdom *9001613192* 9001613192 Constructa-Neff Vertriebs-GmbH Carl-Wery-Straße 34 010421 81739 München GERMANY...