Nautilus E618 Assembly Manual / Owner's Manual
Hide thumbs
Also See for E618:
- Assembly manual / owner's manual (48 pages) ,
- Service manual (137 pages)
Table of Contents
Advertisement
Advertisement
Table of Contents

Related Manuals for Nautilus E618


Summary of Contents for Nautilus E618
- Page 1 E618 / E628 ™ ASSEMBLY MANUAL / OWNER’S MANUAL...
-
Page 2: Table Of Contents
Changning District, Shanghai, China 200042, www.nautilus.cn - 86 21 6115 9668 | outside U.S. www.nautilusinternational.com | Printed in China | © 2019 Nautilus, Inc. | Nautilus, the Cam logo, Nautilus E618, Nautilus E628, DualTrack, Suspension Adjust, law in the United States and other countries. Polar ®... -
Page 3: Important Safety Instructions
• If replacement parts are necessary, use only genuine Nautilus replacement parts and hardware. Failure to use genuine replacement parts can cause a risk to users, keep the machine from operating correctly and void the warranty. - Page 4 This icon means a potentially hazardous situation which, if not avoided, could result in death or serious injury. Before using this equipment, obey the following warnings: Read and understand the complete Manual. Keep the Manual for future reference. Read and understand all warnings on this machine. If at any time the Warning labels become loose, unreadable or dislodged, replace the labels.
-
Page 5: Safety Warning Labels / Serial Number
SAFETY WARNING LABELS AND SERIAL NUMBER WARNING! • Injury or death is possible if caution is not used while using this machine. • Keep children and pets away. • Read and follow all warnings on this machine. • Refer to the Owner’s Manual for additional warnings and safety information. -
Page 6: Grounding Instructions
Grounding Instructions (for a 120V AC system ) This product must be grounded. If it should malfunction or break down, grounding provides a path of least resistance for electric current to reduce the risk of electric shock. This product is equipped with a cord having an equipment-grounding conductor and a grounding plug. - Page 7 SPECIFICATIONS 158.8 kg (350 lbs.) Maximum User Weight: Power Requirements: 120V 220V Operating Voltage: 120V AC 220V - 240V AC, 50/60Hz 170 cm Operating Current: (66.9”) Heart Rate Chest Strap: 1 CR2032 battery 1 CR2032 battery Machine Weight: Total Surface Area (footprint) of equipment: Maximum Pedal Height - with full incline: 185.5 cm (73”)
-
Page 8: Parts
PARTS A decal has been applied to all right (“ R ”) and left (“ L ”) parts to assist with assembly. Item Description Item Description Console Mast Left Pedal Console Junction Cover Frame Console Front Stabilizer Static Handlebar Lower Right Handlebar Arm Water Bottle Holder Shroud, Right Upper Right Handlebar Arm Water Bottle Holder... -
Page 9: Hardware
HARDWARE / TOOLS Item Description Item Description Wave Washer Thread Lock) Serrated Washer, M8 Lock Washer, M8 Wide Washer, M8 Pivot Sleeve Note: Select pieces of Hardware have been provided as spares on the Hardware Card. Be aware that there may be remain- ing Hardware after the proper assembly of your machine. -
Page 10: Assembly
ASSEMBLY 1. Attach Front Stabilizer to Frame Note: Hardware (*) is pre-installed and not on the Hardware Card. - Page 11 2. Attach Rail Assembly to Frame Assembly Note: Hardware (*) is pre-installed and not on the Hardware Card. Separate the Rail mount plates (11a) and lift to align the holes and install the hardware. The plastic scratch guard strips on the Rails help to protect the finish during assembly.
- Page 12 3. Connect the Cables and Attach the Console Mast to Frame Assembly NOTICE: Put the Console Mast through the opening in the Upper Shroud. Before you connect the cables, remove the wire tie that holds the Frame cables in place on the mount plate. Do not crimp cables. Fully tighten the hardware.
- Page 13 4. Attach Legs to Frame Assembly...
- Page 14 5. Install Water Bottle Holder on the Console Mast NOTICE: in the Water Bottle Holder Shroud. Do not crimp cables. Repeat on the right side. Install hardware and Water Bottle Holder. Push down until it snaps in place.
- Page 15 6. Install Arm Pivot Rod and Lower Handlebar Arms to Frame Assembly Note: Be sure to put Wave Washers (F) on Arm Pivot Rod before attaching the Lower Handlebar Arms. 13 mm...
- Page 16 7. Attach Left Pedal to Leg and Lower Handlebar Arm NOTICE: Attach the Pedal to the Leg first. Make sure the Pivot Sleeve (H) engages the Handlebar knuckle cover. Repeat step on opposite side with the Right Pedal (Item 23 ).
- Page 17 8. Attach the Upper Handlebar Arms to Frame Assembly NOTICE: Hardware (*) is pre-installed and not on the Hardware Card. Do not crimp the cables. Make sure the Upper Handlebar Arms are secure before you exercise.
- Page 18 9. Remove Hardware from Console Note: Hardware (*) is pre-installed and not on the Hardware Card. If desired, apply the French Canadian overlay to the Console face. 10. Route Console Cables through the Static Handlebar and Attach Static Handlebar to the Console NOTICE: Carefully place the Console face down on a padded surface.
- Page 19 11. Connect Cables and Install the Static Handlebar Assembly to the Console Mast NOTICE: Hardware (*) is pre-installed and not on the Hardware Card. Align the clips on the cable connectors and make sure the connectors lock. Do not crimp cables. allow pivot clearance.
- Page 20 13. Connect Console Mast Cables to Cables from Handlebar Arms and Attach Rear Handlebar Shrouds NOTICE: Connect the cables. Route the wire through the 3 guides inside the rear Handlebar Shroud and fit the connectors inside the cavity as shown. Do not crimp cables. Make sure the inner edge of the Handlebar Shroud is seated in the Water Bottle Holder Shroud.
- Page 21 14. Attach Front Handlebar Shrouds and Install Screws NOTICE: Do not crimp cables.
- Page 22 15. Connect the Power Cord to Frame Assembly Connect this machine to a properly grounded outlet only (see Grounding or Earthing Instructions). 16. Final Inspection Inspect your machine to ensure that all hardware is tight and components are properly assembled. Note: Remove the plastic scratch guard strips from Rails.
-
Page 23: Moving The Machine
BEFORE YOU START Moving the Machine The machine may be moved by one or more persons depending on their physical abilities and capacities. Remove the power cord. Use the Transport Handle to carefully lift the machine onto the transport rollers. Push the machine into position. -
Page 24: Leveling The Machine
Leveling the Machine Place the machine in your workout area. Do not adjust the levelers to such a height that they detach or unscrew from the machine. Injury to you or damage to the machine can occur. Adjust until the machine is level. Tighten the locking nuts. -
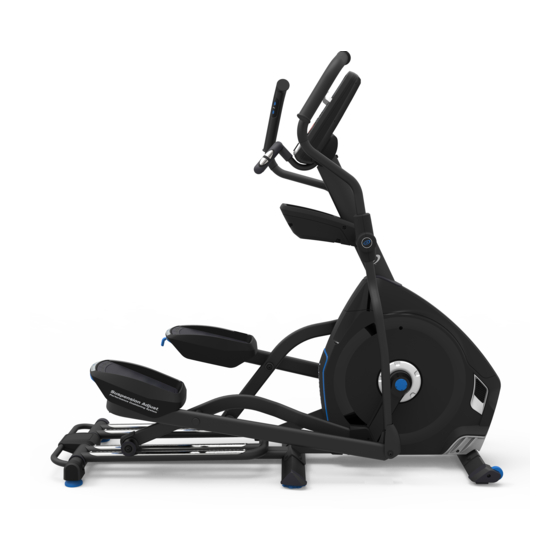
Page 25: Features
FEATURES Console Water Bottle Holder Static Handlebar Remote Resistance Controls Contact Heart Rate (CHR) Sensors Telemetry Heart Rate (HR) Receiver Upper Handlebar USB Port Remote Incline Controls MP3 Input Fully Shrouded Flywheel Media Tray Adjustable Foot Pedal Rail Speakers Transport Handle Bluetooth Connectivity (not shown) ®... -
Page 26: Console Features
Console Features The Console provides important information about your workout and lets you control the resistance levels while you ™ display with touch control buttons to navigate you through the Note: Though your machine is Bluetooth enabled, it is unable to receive input (possibly from a Bluetooth enabled ®... - Page 27 Incline Level Quick Buttons- Shifts the incline level to the setting quickly during a workout Achievement Indicator Lights- when an achievement level is reached or a result is reviewed, the achievement indicator light will activate ™ Nautilus DualTrack Display Program Display User Display...
- Page 28 User Display Achievement Display The Achievement Display activates when a workout goal is reached or a workout milestone is surpassed from past workouts. The Console display will congratulate and inform the User of their achievement, along with a celebratory sound. Lower Display Data section of this manual).
- Page 29 You may need to lightly wet the contact areas. Check that the curve of the transmitter is oriented upward. If no signal appears or you need further assistance, call your Nautilus Representative.
-
Page 30: Bluetooth
Remote Heart Rate Monitor Monitoring your Heart Rate is one of the best procedures to control the a Heart Rate Chest Strap Transmitter that operates in the 4.5kHz - 5.5kHz range. Note: The heart rate chest strap must be an uncoded heart rate strap from Polar Electro or an uncoded POLAR ®... -
Page 31: Remote Resistance And Incline Controls
rate in that target zone for over 20 minutes. The longer you maintain your target heart rate, the more fat your body will burn. The graph is a brief guideline, describing the generally suggested target heart rates based on age. As noted above, your optimal target rate may be higher or lower. -
Page 32: Operations
OPERATIONS What to Wear How Often Should You Exercise Consult a physician before you start an exercise program. Stop exercising if you feel pain or tightness in your chest, become short of breath, or feel faint. Contact your doctor before you use the machine again. Use the values calculated or measured by the machine’s computer for reference purposes only. -
Page 33: Power Up / Idle Mode
Power-Up / Idle Mode The Console will enter Power-Up / Idle Mode if it is plugged into a power source and the Power Switch turned on, any but- ton is pushed, or if it receives a signal from the RPM sensor as a result of pedaling the machine. Power Calibration This elliptical is calibrated at the factory for power accuracy. - Page 34 Note: The workout results are recorded to the current User Profile. User Profiles The Console lets you store and use 4 User profiles. The User profiles automatically record the workout results for each workout, and allow the workout data to be reviewed. The User profile stores the following data: •...
- Page 35 The default is “ON”. Push the OK button to set the Telemetry Heart Rate Receiver to active. 8. The Console display shows the EDIT LOWER DISPLAY prompt. This option allows you to customize which Workout Values are displayed during a workout. shows the active value setting: “ON”...
- Page 36 Note: Be sure that the workout space you are utilizing has adequate height clearance, taking into consideration the Profile Programs (Fun Rides, Mountains, and Challenges). Note: Categories. FUN RIDES Rolling Hills Ride in the Park Easy Tour Stream Crossing MOUNTAINS Pike’s Peak Mount Hood Pyramids...
- Page 37 Workout Profile and Goal Program the Goal value. 1. Stand on the machine. 3. Push the Programs button. 4. Push the Left( ) or Right( ) buttons to select a Category of Workout. 5. Push the Increase( ) or Decrease( ) buttons to select a Profile Workout, and push OK. 6.
- Page 38 The display will continue to show “RELAX” and your heart rate until the goal reaches 00:00. The console will then calcu- late your recovery score. The higher the Recovery Test score value, the quicker your heart rate is returning to a more restful state and is an indica- When you select the Recovery Test Program and there is no heart rate signal or display, the Console will show “NEED HEART RATE”.
- Page 39 Custom Program The Custom Program lets you set the resistance level for each interval and select type of Goal (Distance, Time or Calo- 1. Sit on the machine. 3. Push the Programs button. 4. Push the Increase( ) or Decrease( ) buttons to select Custom Program, and push OK. 5.
-
Page 40: Pausing Or Stopping
Increase or Decrease buttons. Note: The Resistance Level Quick buttons are disabled during the workout. CONSTANT POWER (Time or Distance goal) The CONSTANT POWER program lets the user set a target watts value for a set length of time or distance. 1. -
Page 41: Results / Cool Down Mode
You can push PAUSE/END to stop the Results / Cool Down period and go back to Power-Up Mode. If there is no RPM or HR signal, the Console automatically goes into Sleep Mode. GOAL TRACK Statistics (and Achievements) The Nautilus DualTrack Console shows the Goal Track workout Statistics on the Lower Display in three channels: ™... - Page 42 3. Push the Increase( ) button the calories burned on the display (50 calories per segment) for the previous seven days, along with the workout value totals. Use the Left( ) or Right( ) buttons to move through all the workout statistic channels. 4.
-
Page 43: Console Setup Mode
To go into the Console Setup Mode: - For the later version of the E618 and all E628, hold down the PAUSE/END button and Increase( ) button together for 3 seconds while in the Power-Up Mode. - For the earlier version of the E618, hold down the PAUSE/END button and Left( ) button together for 3 seconds while in the Power-Up Mode. -
Page 44: Maintenance
MAINTENANCE Read all maintenance instructions fully before you start any repair work. In some conditions, an assistant is required to do the necessary tasks. Equipment must be regularly examined for damage and repairs. The owner is responsible to make sure that regular maintenance is done. -
Page 45: Maintenance Parts
4. Discard the old battery. Dispose of in accordance with local regulations and/or at approved recycling centers. 5. Inspect your chest strap to ensure function. Do not use until the equipment has been fully assembled and inspected for correct performance in accordance with the Owner’s Manual. Maintenance Parts E618:... - Page 46 Console Shroud, Left GG Drive Belt Heart Rate (HR) Cable Handlebar Shroud, Outer Drive Pulley Handlebar, Static Handlebar Shroud, Inner Speed Sensor Magnet Data (I/O) Cable, Upper Data (I/O) Cable, Lower RPM (Speed) Sensor Arm Pivot Rod Incline Adjuster Assembly Flywheel Console Mast Frame Assembly...
- Page 47 E628:...
- Page 48 Console Shroud, Left GG Drive Belt Heart Rate (HR) Cable Handlebar Shroud, Outer Drive Pulley Handlebar, Static Handlebar Shroud, Inner Speed Sensor Magnets (8) Data (I/O) Cable, Upper Data (I/O) Cable, Lower RPM (Speed) Sensor Arm Pivot Rod Incline Adjuster Assembly EMS Engine Console Mast Frame Assembly...
-
Page 49: Troubleshooting
TROUBLESHOOTING Condition/Problem Things to Check Solution No display/partial display/ Check electrical (wall) Make sure unit is plugged into a functioning wall outlet. unit will not turn on outlet Check connection at front Connection should be secure and undamaged. Replace of unit adapter or connection at unit if either are damaged. - Page 50 Be sure cable from left Upper Handlebar and cables to Console are secure and undamaged. connection (requires handlebar shroud removal) (E618 only) If magnets move, adjust until they are within the proper range. Replace Servo Motor if not functioning properly. Check Servo Motor...
- Page 51 Condition/Problem Things to Check Solution Check electrical (wall) Make sure unit is plugged into a functioning wall outlet. sleep mode) while in use outlet Check connection at front Connection should be secure and undamaged. Replace adapter or connection at unit if either are damaged. of unit Check data cable integrity All wires in the cable should be intact.
- Page 52 Consult your device to be sure that the Bluetooth wireless ® ® feature has been enabled on it. Fitness App is compatible. Contact appsupport@nautilus.com (if inside US/Canada) or your local distributor (if outside US/Canada) for further assis- tance.
-
Page 55: Warranty (Us/Canada Only)
Expirations If the warranty has expired, Nautilus, Inc. may assist with replacements or repairs to parts and labor, but there will be a charge for these services. Contact a Nautilus office for information on post-warranty parts and services. Nautilus does not guarantee availability of spare parts after expiration of warranty period. - Page 56 ™ ™ Nautilus Schwinn ™ ™ ™...