
Related Manuals for Hyundai HYYW70


Summary of Contents for Hyundai HYYW70
- Page 1 YARD WEEDER HYYW70 Instruction Manual YOU MUST read and understand the full safety instruction manual first.
- Page 2 USING THE MACHINE. Keep for future reference and pass it on if the machine is loaned or sold to another user. This manual has been produced by Hyundai Power Products and should be kept with the product. Please read and understand these instructions before you use your product. Failure to do this may result in personal injury or damage to the product.
-
Page 3: Table Of Contents
Contents Useful Information.........31 Features............4-5 Our YouTube Channel......31 Unboxing............6 Warranty..........31 Unboxing Safety........6 Manual Updates........31 Box Contents..........6 Returning Your Product......31 Leaving A Review.........31 Assembly.............6-11 Ordering Spare Parts......31 Assembly Safety........6 Assemble Handle Bars......7 Contact Us.............32 Attach Clutch Handle......7 Mount The Wheels.........8 Product Information........33 Attach The Brushes........8 Information...........33 Mount The Gas Lever......9... -
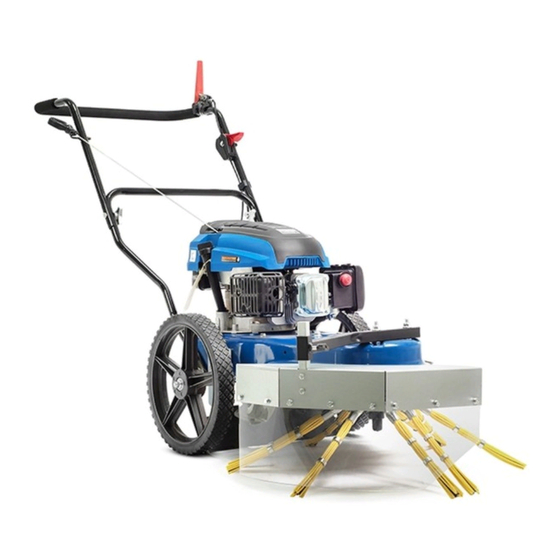
Page 4: Features
Features HYYW70 Features... - Page 5 Features HYYW70 Feature Explanations Brush Activation Handle Control rotating brush. Throttle Lever Control engine speed. Handle Knob Use this to adjust and tighten the handle bars. Fuel Tank Cap Fill fresh unleaded petrol here. Primer Button Injects fuel directly into the carburettor for cold starts.
-
Page 6: Unboxing
• HYYW70 Assembly Safety CAUTION - This guide is meant to serve as a quick reference for operating your HYUNDAI machine. We always advise reading the manual in full before operation. CAUTION - For OUTDOOR use ONLY. Petrol machines produce carbon monoxide –... -
Page 7: Assemble Handle Bars
Assembly Step 1 : Assemble Handle Bars Mount lower handlebar with 4 bolts on the console. After that mount the upper handlebar. The spacers need to be on the inside (as shown). Step 2 : Attach Clutch Handle Attach the clutch handle on the handlebar, (as shown). -
Page 8: Mount The Wheels
Assembly Step 3 : Mount The Wheels Mount the wheels with the bolts (as shown). The spacers need to be between the wheel and the console. Step 4 : Attach The Brushes Attach the brushes using the bolts and lock washers as shown. 19 8... -
Page 9: Mount The Gas Lever
Assembly Step 5 : Mount The Gas Lever Mount the throttle lever on the handle, as shown. -
Page 10: Mount The Protection Frame
Assembly Step 6 : Mount The Protection Frame Attach the transparent cover to the frame with bolts (image 1). Mount the frame on the machine as shown (image 2). -
Page 11: Mount The Start Cord
Assembly Step 7 : Mount The Start Cord In Holder Pull the start cord gently from the engine. Attach the starter grip on the holder on the handlebar. -
Page 12: Preparation
Preparation Adding Oil Oil Type : SAE 30 or 15w40 Engine Oil Oil Capacity : 600ml NOTE - The machine is delivered without oil in the engine. All machines are tested and inspected so there may be some residual oil left in the machine so please fill with caution. Remove the oil filler cap. -
Page 13: Adding Fuel
Preparation Adding Fuel Make sure you read the fuel safety before handling fuel. Fuel Type : Fresh Straight Unleaded Petrol Fuel Capacity : 1L NOTE - The machine is delivered without petrol. All machines are tested and inspected so there may be some residual petrol left in the machine so please fill with caution. -
Page 14: Starting / Stopping
Starting / Stopping Before Each Use YOU MUST read and understand the full safety instruction manual before starting the machine. CAUTION - For OUTDOOR use ONLY. Petrol machines produce carbon monoxide – poisonous, colourless and odourless gas that can cause serious injury or death. Petrol is highly flammable, always handle with extreme care and in a well ventilated area. -
Page 15: Starting
Starting / Stopping Starting Pump the primer bulb 3-6 times. See below. Set the throttle lever to the max. position. Pull the start cord to start the engine. Always feed the start cord back into the engine by hand. Activate the brush activation handle. -
Page 16: Stopping
Starting / Stopping Stopping Release the brush activation handle. Set the throttle lever to the stop position. CAUTION - Vibrations may travel up into the handle during use. We therefore recommend taking a break every two hours. After Each Use Examine the machine for damage. -
Page 17: Operating
Operating Brush Height Adjustment It is possible to adjust the height on the brush headdown in several positions as the brushes get worn. To adjust the height, you have to loosen the two 4mm screws shown below. Then you can adjust the brush head up and down. -
Page 18: Maintenance
Maintenance Maintenance Safety IMPORTANT - Routine and accurate maintenance is essential for maintaining original machine safety and performance levels. WARNING - Before cleaning or doing maintenance work, you need to stop the engine, disconnect the spark plug cable and read the relevant instructions. You need to wear proper clothing and protective gloves whenever your hands are at risk. -
Page 19: Maintenance Schedule
Maintenance Maintenance Schedule Routine and accurate maintenance is essential for maintaining original machine safety and performance levels. It is recommended that the following maintenance schedule is followed. Maintenance Before After Each Every 3 Every 6 Every Every Two Each Use Months Or Months Or Year Or... -
Page 20: Cleaning
Maintenance Cleaning CAUTION - DO NOT use a hose pipe or pressure washer to clean the engine. Water can damage the engine or contaminate the fuel system. NOTE Engine must be switched off and spark plug lead disconnected. After Each Use •... -
Page 21: Transportation
Maintenance Transportation Whenever the machine is to be handled, lifted, transported or tilted, you must: Wear sturdy work gloves. Hold the machine at the points that offer a safe grip, taking into account the weight and relative distribution of the same. Use an appropriate number of people for the weight of the machine and the characteristics of the vehicle or the place where it must be placed or collected. -
Page 22: Storage
Maintenance Storage Where To Store Store in a cool, dry place away from sources of ignition and varying changes in temperature. Store on a flat and level surface with all wheels on the ground. DO NOT stack other items on top of the machine when in storage. Store the machine in a safe place, out of the reach of children or anyone who is not familiar with operation. - Page 23 Maintenance Long Term If storing the machine for a period of 30 days or more, you must follow proper storage and winterisation guidelines to avoid any possible issues with the machine. Incorrect storage can lead to possible fueling or engine issues that will not be covered by the warranty. Allow the engine to fully cool down.
-
Page 24: Spark Plug
Maintenance Spark Plug For good performance, the spark plug must be properly gapped and free of deposits. You MUST allow the engine to cool down before carrying out any maintenance. Always replace with the same model spark plug as fitted. To check spark plug, remove spark plug cap. -
Page 25: Air Filter
Maintenance Air Filter CAUTION - A dirty air filter will restrict the air flow to the carburettor, which will reduce engine efficiency. When using the machine in very dusty areas you must clean or replace the air filter more often. Never operate the machine without the air filter being fitted it can cause damage to the engine which is not covered by warranty. -
Page 26: Troubleshooting
Troubleshooting Problem Possible Cause Possible Solution Spark plug disconnected. Connect spark plug. Engine not primed. Prime engine. Defective or incorrectly gapped spark Inspect or replace spark plug. plug. Add fuel. Fuel tank empty or low. Clean carburettor or fuel line. Engine does Dirty carburettor or fuel line. -
Page 27: Technical Data
Technical Data Specifications Model HYYW70 Engine Type IC175 Engine Size 173cc Engine Power Max. Engine Speed 2800rpm Fuel Tank Capacity & Fuel Type 1L Unleaded Petrol Oil Capacity & Oil Type 600ml SAE30 or 15W40 Rated Speed 2800rpm Drive Type... -
Page 28: Spare Parts
Technical Data Spare Parts Only use original spare parts: The use of non-original and/or incorrectly fitted parts will jeopardize the safety of the machine, may cause accidents or personal injuries for which the Manufacturer is under no circumstance liable or responsible. Part Part Number Wheel... -
Page 29: Recycling And Disposal
Recycling And Disposal Recycling And Disposal We do not offer a takeback scheme for the recovery of Waste Electrical Electronic Equipment (WEEE) & Batteries. Instead the responsibility to dispose of WEEE and/or Batteries is passed onto you by us. So when it becomes necessary to dispose of your machine you must take it to your local Civic Amenity Site. -
Page 30: Our Product Range
Our Product Range Generators Mini Dumpers Leisure Inverter, Petrol, Diesel And Built-In 4-Wheel Drive Mini Dumpers And Tracked Motorhome Generators Dumpers Pressure Washers Yard Sweeper Petrol, Diesel And Electric Pressure Washers Self Propelled Yard Sweeper Power Brush Water Pumps Scarifiers Submersible, Clean And Dirty Water And Petrol Lawn Scarifier And Aerator Professional Chemical Water Pumps... -
Page 31: Useful Information
Go to www.hyundaisupport.co.uk or search ‘Hyundai Power Products’ in YouTube. Warranty Proof of purchase will be required before you make a warranty claim. Full warranty terms and conditions can be found on the HYUNDAI POWER PRODUCTS website: www.hyundaipowerproducts.co.uk Manual Updates Our manuals are constantly being reviewed and updated. -
Page 32: Contact Us
Need Help? Talk To Our Experts Contact Us Our friendly aftersales team will be more than happy to help you. Phone Call our team on 01646 687880, open Monday-Friday 8.30am-5pm. Email aftersales@hyundaipowerproducts.co.uk Online Live Chat Go to www.hyundaipowerproducts.co.uk Live chat is open Monday-Friday from 8.30am-5pm. Post Genpower Limited, Isaac Way, Pembroke Dock, Pembrokeshire, SA72 4RW, UK. -
Page 33: Product Information
Product Information Information As soon as you have purchased the machine, we recommend that you fill out the following. If you need to contact an authorised dealer or customer service for information on servicing, you may need to provide the following information. The model number and serial number can be found on the grey specification sticker on your machine. -
Page 34: Notes
Notes... -
Page 35: Declaration Of Conformity
104dB(A) 2800 Weeder Product Details: Brand: Hyundai Model: HYFT60SP, HYYW70 Description: Petrol Rotary Trimmer Name and address of technical documentation holder and EU distributor: Genpower Ltd, Isaac Way, Pembroke Dock, Pembrokeshire, SA72 4RW, UK. Signed by: Roland Llewellin, Managing Director... - Page 36 Isaac Way, London Road, Pembroke Dock, UNITED KINGDOM, SA72 4RW T: +44 (0) 1646 687 880 F: +44 (0) 1646 686 198 E: info@hyundaipowerproducts.co.uk www.hyundaipowerproducts.co.uk Imported/Distributed by Genpower Ltd for The United Kingdom & Ireland Licensed by Hyundai Corporation, Korea...