Advertisement
Available languages
Available languages
Quick Links
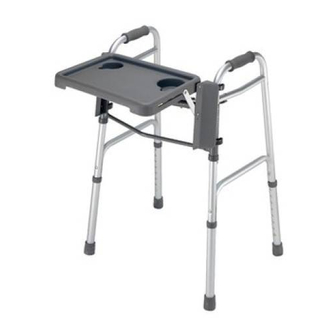
Walker Tray
Assembly, Installation and Operating Instructions
Model No. 6007
SAVE THESE INSTRUCTIONS
NOTE: Check all parts for shipping damage. In case of
damage, DO NOT use. Contact Dealer/Carrier for
further instructions.
SAFETY SUMMARY
SAFETY SUMMARY
SAFETY SUMMARY
SAFETY SUMMARY
SAFETY SUMMARY
The following recommendations are made for the
safe installation and use of the WALKER TRAY on
Single Release or Dual Release walkers:
GENERAL WARNINGS
GENERAL WARNINGS
GENERAL WARNINGS
GENERAL WARNINGS
GENERAL WARNINGS
DO NOT install or use this equipment
without first reading and understanding
these instructions. If you are unable to
understand the Warnings, Cautions or
Instructions, contact a healthcare profes-
sional, dealer or technical personnel before
attempting to install this equipment -
otherwise, injury or damage may occur.
Each individual should always consult
with their physician or therapist to
determine proper adjustment and usage.
DO NOT carry or place weight exceeding
five (5) pounds in or on the walker tray
when attached to walker. This may cause
the walker to tip forward.
NEVER use the walker tray, walker basket
and the walker pouch at the same time.
NEVER use the walker tray as a means of
support.
DO NOT sit or push down on the walker
tray when in use. This may cause the tray
to collapse.
Always test to see that the walker and
attachments are properly and securely
locked in place before using.
NOTE: Not recommended for use with heavy duty walkers.
INSTALLING THE TRAY SIDE
INSTALLING THE TRAY SIDE
INSTALLING THE TRAY SIDE
INSTALLING THE TRAY SIDE
INSTALLING THE TRAY SIDE
BRACES (FIGURE 1)
BRACES (FIGURE 1)
BRACES (FIGURE 1)
BRACES (FIGURE 1)
BRACES (FIGURE 1)
NOTE: Refer to the WARNINGS in the SAFETY
SUMMARY of this instruction sheet.
NOTE: There is NO right or left tray side brace.
NOTE: BEFORE installing tray side braces onto the
walker for the first time, soak them in hot water for
five (5) minutes.
1. Make sure the openings in the tray side
braces are pointing in towards the center
of the walker.
Part No. 1089635
NOTE: The tray side braces attach differently on dual
release walkers than single release walkers.
2. Perform one (1) of the following:
DUAL RELEASE WALKERS - Position
the openings in the tray side braces
ABOVE and BELOW the pivot brace.
SINGLE RELEASE WALKERS -
Position both openings in the tray side
braces above the pivot brace.
3. Snap the tray side braces onto the walker
at the points determined in STEP 2.
NOTE: If necessary, use a rubber mallet to snap the
tray side braces onto the walker.
4. Perform one (1) of the following:
DUAL RELEASE WALKERS - Proceed
to INSTALLING THE O-RINGS ONTO
THE TRAY LINKS in this instruction sheet.
SINGLE RELEASE WALKERS - Proceed
to INSTALLING SNAP SUPPORTS - SINGLE
RELEASE WALKERS ONLY in this instruction
sheet.
STEP 1
STEP 2 - POSITIONING THE SIDE
BRACES
DUAL RELEASE
WALKERS
Position Tray Side
Braces HERE
Pivot Brace
FIGURE 1 - INSTALLING THE TRAY
SIDE BRACES
1
Openings in Tray Side Brace
Tray Side
Brace
SINGLE RELEASE
WALKERS
WALKER TRAY
Advertisement

Related Manuals for Invacare 6007


Summary of Contents for Invacare 6007
- Page 1 Walker Tray Assembly, Installation and Operating Instructions Model No. 6007 NOTE: The tray side braces attach differently on dual SAVE THESE INSTRUCTIONS release walkers than single release walkers. NOTE: Check all parts for shipping damage. In case of 2. Perform one (1) of the following: damage, DO NOT use.
- Page 2 INSTALLING SNAP SUPPORTS INSTALLING SNAP SUPPORTS INSTALLING SNAP SUPPORTS Walker Tray INSTALLING SNAP SUPPORTS INSTALLING SNAP SUPPORTS Short - SINGLE RELEASE WALKERS - SINGLE RELEASE WALKERS - SINGLE RELEASE WALKERS - SINGLE RELEASE WALKERS - SINGLE RELEASE WALKERS Tray ONLY (FIGURE 2) ONLY (FIGURE 2) ONLY (FIGURE 2) ONLY (FIGURE 2)
- Page 3 STEP 1 DETAIL "A" ADJUSTING THE WALKER ADJUSTING THE WALKER ADJUSTING THE WALKER ADJUSTING THE WALKER ADJUSTING THE WALKER NOTE: Short Tray TRAY (FIGURE 5) TRAY (FIGURE 5) TRAY (FIGURE 5) TRAY (FIGURE 5) TRAY (FIGURE 5) Single Link Release NOTE: Refer to the WARNINGS in the SAFETY Long Tray Link Walker is...
-
Page 4: Limited Warranty
This warranty gives you specific legal rights and you may also have other legal rights which vary from state to state. Invacare warrants its product to be free from defects in materials and workmanship for the lifetime of the product for the original purchaser. If within such warranty period any such product shall be proven to be defective, such product shall be repaired or replaced, at Invacare's option. -
Page 5: Résumé Des Consignes De Sécurité
Plateau Pour Marchette Instructions pour l'assemblage, l'installation et l'utilisation Modéle No. 6007 NOTE: Les liens de support latéral se fixent différemment CONSERVEZ CES INSTRUCTIONS sur les marchettes à déclenchement double et simple. NOTE: Vérifier TOUTES les pièces pour s’assurer qu’elles 2. - Page 6 Plateau de la INSTALLER LES SUPPORTS À INSTALLER LES SUPPORTS À INSTALLER LES SUPPORTS À INSTALLER LES SUPPORTS À INSTALLER LES SUPPORTS À marchette ENCLENCHEMENT - ENCLENCHEMENT - ENCLENCHEMENT - ENCLENCHEMENT - ENCLENCHEMENT - Lien court MARCHETTES À MARCHETTES À MARCHETTES À...
- Page 7 ÉTAPE 1 RÉGLER RÉGLER RÉGLER LE PLATEAU POUR LE PLATEAU POUR LE PLATEAU POUR LE PLATEAU POUR RÉGLER RÉGLER LE PLATEAU POUR SCHÉMA "A" MARCHETTE (FIGURE 5 MARCHETTE (FIGURE 5 MARCHETTE (FIGURE 5) ) ) ) ) MARCHETTE (FIGURE 5 MARCHETTE (FIGURE 5 Lien Court NOTE: La...
-
Page 8: Garantie Limitée
Cette garantie vous donne des droits légaux spécifiques. D'autres droits variant d'un État à l'autre peuvent se rajouter. INVACARE garantit ce produit à vie contre tout défaut de fabrication ou défaut dans le matériel et ce, pour l'acheteur initial. Si, durant cette période, ce produit devait s'avérer défectueux, ce dernier sera réparé... - Page 9 Bandeja Para Andador Instrucciones de Ensamble, Instalación y Operación Modelo No. 6007 NOTA: NO hay afianzadores de lado derecho o GUARDE ESTAS INSTRUCCIONES izquiedo para la bandeja. NOTA: Inspeccione todas las piezas por cualquier NOTA: ANTES de instalar los afianzadores por daño durante el envío.
- Page 10 1. Instale los cuatro (4) anillos en las puntas NOTA: Si es necesario, use un martillo de goma para de las extensiones de la bandeja, según se enganchar los afianzadores al andador. muestra en la FIGURA 3. 4. Haga uno (1) de los siguientes: Bandeja ANDADORES DE DOBLE Extensión...
- Page 11 PASO 1 SCHÉMA "A" AJUSTANDO LA BANDEJA AJUSTANDO LA BANDEJA AJUSTANDO LA BANDEJA AJUSTANDO LA BANDEJA AJUSTANDO LA BANDEJA Extensión (FIGURA 5) (FIGURA 5) (FIGURA 5) (FIGURA 5) (FIGURA 5) NOTA: No se Corta muestra el NOTA: Refiérase a las ADVERTENCIAS en el andador de Extensión Larga SUMARIO DE PRECAUCIONES de esta hoja de...
- Page 12 Invacare le proveerá un número de registro con el cual autorizará el retorno del mismo. La unidad o pieza defectuosa, bajo garantía, debe ser retornada para inspección usando el número de serie que identifica el producto, cuando aplica, dentro de treinta (30) días después de la fecha en que se expidió...