Table of Contents
Advertisement
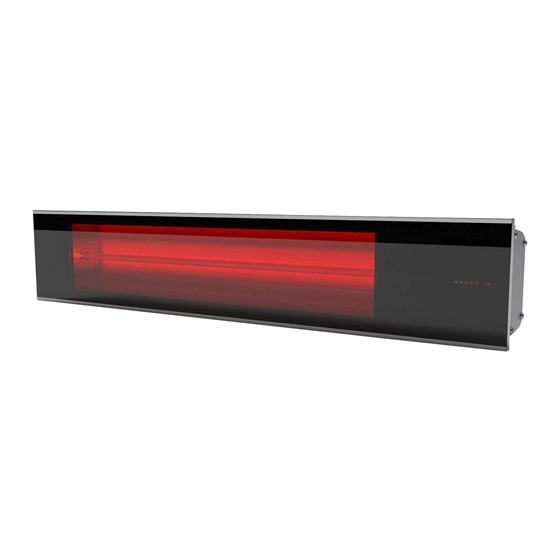
Heater Installation
HOW TO OPERATE THE HEATER:
What's included with your Dimplex DIR Series Heater
• IR Heater
• Operating and Installation Instructions
• One small box containing 2 sets of brackets and mounting hardware
• One remote controller
Figure 1
Schott Nextrema
:
®
glass panel
MODEL NAME
DIR15A10GR
Voltage
120V 60Hz
Rated power
1500
(Watts)
Wall-mounted
Installation
Mounting height
Ceiling-mounted
Minimum
2.4 M (7.9 ft.)
Electric protection
I
class
Outdoor Rated
Yes
Unit
dimensions
902 x 170 x 128
LxWxH (mm / in)
35-1/2 x 6-3/4 x 5
(without bracket)
6
Brackets for wall or ceiling mounting
DIR18A10GR
DIR22A10GR
240V 60Hz
240V 60Hz
1800
2200
Wall-mounted
Wall-mounted
Ceiling-mounted
2.4 M (7.9 ft.)
2.4 M (7.9 ft.)
I
I
Yes
Yes
902 x 170 x 128
902 x 170 x 128
35-1/2 x 6-3/4 x 5
35-1/2 x 6-3/4 x 5
Terminal box
Remote control
Power/On
Low
Med
High
1hr
2hr
Timer
on
Standby
DIR30A10GR
240V 60Hz
3000
Wall-mounted
2.4 M (7.9 ft.)
I
Yes
1286 x 170 x 128
50-5/8 x 6-3/4 x 5
dimplex.com
Advertisement
Table of Contents

Related Manuals for Dimplex DIR Series


Summary of Contents for Dimplex DIR Series
- Page 1 Heater Installation HOW TO OPERATE THE HEATER: What's included with your Dimplex DIR Series Heater • IR Heater • Operating and Installation Instructions • One small box containing 2 sets of brackets and mounting hardware • One remote controller Figure 1...
-
Page 2: Heater Installation
Heater Installation 2. Within USA, electrical installation RISK OF FIRE/ shall be made in accordance with EXPLOSION the National Electrical Code. 3. Within Canada, electrical This heater should not be installation shall be made used in potentially explosive according to the provisions of atmospheres. - Page 3 The adjustable angle enables into a bathtub, pool, spa, or other the heater to be installed on water container. horizontal and inclined surfaces. 10. Do not install the heater directly near a bathtub, shower or swimming pool. Any switches dimplex.com...
-
Page 4: Wiring Instructions
Wiring Instructions WIRING INSTRUCTIONS: DIR15A10GR is to be wired to a 120V circuit while DIR18A10GR, DIR22A10GR and DIR30A10GR are to be wired to a 240V circuit. These heaters must be wired to the this circuit in such a way that the heater can be turned off directly at the circuit breaker in the event of an emergency. -
Page 5: Site Selection
11. to direct the heat in a downwards or outwards direction. WARNING: DO NOT install the heater vertically. Failure to follow these instructions can cause the heating element within the tube to sag and cause premature burnout. dimplex.com... - Page 6 Site Selection Minimum clearances when mounting the heater parallel with a ceiling. CEILING Fans, lights and 165mm sprinkler fittings (6.5") MUST NOT Min. be below heater 600mm 600mm (23.6") (23.6") CEILING Min. Min. 910mm (35.4") Min. to surfaces (ie. table tops, etc.) 2100mm (82.7") Min.
-
Page 7: Installation
500 mm ±50 mm (19.7" ± 2.0") minimum recommended bracket DIR18A10GR 500 mm ±50 mm (19.7" ± 2.0") distance “B”. Ensure brackets are DIR22A10GR 500 mm ±50 mm (19.7" ± 2.0") level and not slanted diagonally. DIR30A10GR 650 mm ±50 mm (25.6" ± 2.0") dimplex.com... - Page 8 Installation 6. Set the adjustable angle mounting brackets to the desired angle and fasten brackets with an adjustable wrench. For ceiling-mounted installation, the available mounting angles are restricted to 0° and 30° only. For wall-mounted installation, the available mounting angles are restricted to 30°...
-
Page 9: Electrical Installation
1. DIR15A10GR (1500W) is designed for connection to the 120V~ 60Hz electric mains equipped with a grounding wire. 2. DIR18A10GR (1800W), DIR22A10GR (2200W) and DIR30A10GR (30000W) heater is designed for connection to the 240V~ 60Hz electric mains equipped with a grounding wire. dimplex.com... - Page 10 Electrical Installation WIRING INSTRUCTIONS 4. Remove the screws holding the junction box cover. Make the 1. Check product label for correct electrical connections using wire voltage and wattage. Make sure nuts (not supplied). The green power source conforms to the wire connects to the ground.