Table of Contents
Advertisement
Quick Links
Advertisement
Table of Contents

Related Manuals for THORLABS LEDD1


Summary of Contents for THORLABS LEDD1
- Page 1 & accessories T-CUBE LED DRIVER Model Number LEDD1...
- Page 2 THORLABS About the Company Thorlabs has been an active member of the Photonics community for over 15 years. We strive to be the ultimate resource for the photonics community-a place to find the products you need to enable your experiments, as well as the information you need to get your application working.
-
Page 3: Table Of Contents
Contents 1 For Your Safety ..................3 Safety Information ......................3 Warnings Relating To The LEDD1 Driver ............... 3 General Precautions Relating To LED Safety ..............4 Declarations Of Conformity .................... 4 For Customers in Europe ..................4 For Customers In The USA ..................4 Waste Electrical and Electronic Equipment (WEEE) Directive ........ - Page 4 4 Operation ....................15 Introduction ........................15 Front Panel Controls and Indicators ................15 Operation From The Front Panel ................. 16 Appendices Rear Panel Connector Pinout Details ............17 Rear Panel LED Connector ..................17 Preventive Maintenance ................18 Safety Testing ......................18 Cleaning ........................
-
Page 5: For Your Safety
The unit must be connected only to a DC supply of 15V, 1A regulated as detailed in Section 3.3. Thorlabs offer a compact, multi-way power supply unit (TPS008), allowing up to eight Driver T-Cubes to be powered from a single mains outlet. A single way wall plug supply (OPS001) for powering a single Driver T-Cube is also available. -
Page 6: General Precautions Relating To Led Safety
Mercury Vapor lamps, the same precautions should be taken as those applying to Mercury Vapour lamps. • When Thorlabs High Power LED's are used in other applications, they should be used in accordance with CEI IEC 62471. Cautions •... -
Page 7: Waste Electrical And Electronic Equipment (Weee) Directive
Fig. 1.1 Crossed out "wheelie bin" symbol As the WEEE directive applies to self contained operational electrical and electronic products, this "end of life" take back service does not refer to other Thorlabs products, such as •... -
Page 8: Waste Treatment On Your Own Responsibility
1.5.2 Waste treatment on your own responsibility If you do not return an "end of life" unit to Thorlabs, you must hand it to a company specialized in waste recovery. Do not dispose of the unit in a litter bin or at a public waste disposal site. -
Page 9: Overview And Setup
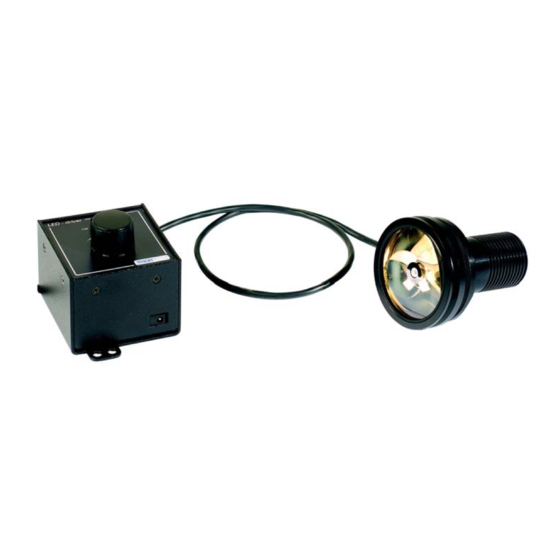
Overview and Setup 2.1 Introduction The T-Cube LED Driver (LEDD1) is a new very compact single channel controller for easy control of LED intensity. It is designed for use with Thorlabs range of collimated and mounted high power LED packages, and controls current flow to the LED by means of a single turn control knob. -
Page 10: T-Cube Controller Hub
21.5mm, 14.75” x 3.4” x 0.85”) with electrical connections located on the upper surface to accept up to six T-Cubes. Note. The LEDD1 LED Driver is a manually operated unit with no USB functionality. However if it is used on the TCH001, USB communications can be employed for any other T-Cubes in the application. -
Page 11: Getting Started
Chapter 3 Getting Started 3.1 Connect The Hardware 1) Perform the mechanical installation as detailed in Section 3.2. 2) Connect the LED to the Controller unit - see Section 3.3.1. Caution. During item (3) ensure the power supply unit is isolated from the mains before connecting to the T-Cube unit. -
Page 12: Mechanical Installation
Chapter 3 Getting Started 3.2 Mechanical Installation 3.2.1 Environmental Conditions Warning. Operation outside the following environmental limits may adversely affect operator safety. Location Indoor use only Maximum altitude 2000 m Temperature range C to 40 Maximum Humidity Less than 80% RH (non-condensing) at 31°C To ensure reliable operation the unit should not be exposed to corrosive agents or excessive moisture, heat or dust. -
Page 13: Removing The Baseplate
LEDD1 LED Driver T-Cube 3.2.3 Removing the Baseplate The baseplate must be removed before the rubber feet (supplied) can be fitted, or the unit is connected to the USB controller hub.. Detail A Detail B Baseplate attachment screws Baseplate removed and rubber feet fitted Fig. -
Page 14: Electrical Installation
The LED device is connected via the M8 4-pin connector, which is compatible with all Thorlabs light generating LED assemblies (refer to Appendix A for details of pin outs). A standard BNC connector allows an externally generated signal (0 to 5V) to be connected to the unit, thereby allowing the LED device to be controlled externally. -
Page 15: Using The Tch001 Controller Hub
The TCH001 USB Controller Hub provides power distribution for up to six T-Cubes, and requires only a single power connection (from a separate supply unit TPS006 supplied by Thorlabs). Further details are contained in handbook ha0146T T-Cube Controller Hub, supplied with the unit. -
Page 16: Connecting To A Standalone Power Supply
Section 3.3. Connection to a supply of a different rating may cause damage to the unit and could result in injury to the operator. Thorlabs offers a compact, multi-way power supply unit (TPS008), allowing up to eight T-Cube Controllers to be powered from a single mains outlet. -
Page 17: Operation
Chapter 4 Operation 4.1 Introduction The T-Cube LED Driver (LEDD1) is a new very compact single channel controller for easy control of LED intensity. It is designed for use with Thorlabs range of collimated or mounted high power LED packages. -
Page 18: Operation From The Front Panel
The following brief tutorial guides the user through a typical series of operations. 4.3.1 Preparation 1) Connect an LED device (e.g. a Thorlabs MRMLED) to the ‘LED’ connector on the rear panel of the unit. 2) Connect the unit to a +15V DC power supply unit (PSU) - see Section 3.3.4. -
Page 19: Rear Panel Connector Pinout Details
Appendix A Rear Panel Connector Pinout Details A.1 Rear Panel LED Connector The ‘LED’ connector provides connection to the LED device. The pin functions are detailed in Fig. A.1. viewed looking into the rear panel M8 socket Description LED +ve LED -ve Not Connected Not Connected... -
Page 20: Preventive Maintenance
Only personnel authorized by Thorlabs Ltd and trained in the maintenance of this equipment should remove its covers or attempt any repairs or adjustments. Maintenance is limited to safety testing and cleaning as described in the following sections. -
Page 21: Specifications And Associated Products
Appendix C Specifications and Associated Products C.1 Specifications Maximum Flash Frequency: 10kHz Minimum Strobe Pulse Width: 50µs Strobe Turn-On / Turn-Off Time: <25µs Operating Temperature: 0 to +40°C Storage Temperature: -40 to +70°C Input Power Requirements (OPS001 included) Voltage: 15V Regulated DC Current: 700mA Steady State General Data Housing Dimensions (W x D x H): 60 x 60 x 47mm (2.4"... -
Page 22: Associated Products
Appendix C Specifications and Associated Products C.2 Associated Products Part Product Name Number T-Cube Controller USB Hub TCH001 Power Supply for Controller USB Hub TPS006 Single Way Power Supply OPS001 8-way Power Supply TPS008 Collimator Assembly for Olympus BX & IX Microscopes LEDC1 Collimator Assembly for Leica DMI Microscopes LEDC2... - Page 23 Products and Customer Support Optical and Opto-mechanical Technical Support Components Thorlabs provide a comprehensive after Optical mounts and rails sales service. Contact us through your local representative, or at the address Lenses, prisms and filters below: Polarization-optics Laser diodes Thorlabs Ltd...
- Page 24 THORLABS © Thorlabs 2007 Printed in UK (1107) Thorlabs Ltd. Thorlabs Inc. Saint Thomas Place, Ely 435 Route 206 North Cambridgeshire CB7 4EX, Newton, NJ07860 Tel: +44 (0) 1353 654440 Tel: +1 973 579 7227 Fax: +44 (0) 1353 654444...