Table of Contents
Advertisement
Quick Links
Advertisement
Table of Contents

Related Manuals for Brady BradyPrinter A5500


Summary of Contents for Brady BradyPrinter A5500
- Page 1 User Manual...
- Page 2 Copyright and Trademarks Disclaimer This manual is proprietary to Brady Worldwide, Inc. (hereafter "Brady"), and may be revised from time to time without notice. Brady disclaims any understanding to provide you with such revisions, if any. This manual is copyrighted with all rights reserved. No portion of this manual may be copied or reproduced by any means without the prior written consent of Brady.
- Page 3 Brady’s satisfaction to have been defective at the time Brady sold it. This warranty does not extend to any persons obtaining the product from the buyer. THIS WARRANTY IS IN LIEU OF ANY OTHER WARRANTY, EXPRESS OR IMPLIED, INCLUDING, BUT NOT LIMITED TO, ANY IMPLIED WARRANTY OF MERCHANTABILITY OR FITNESS FOR A PARTICULAR PURPOSE, AND OF ANY OTHER OBLIGATIONS OR LIABILITY ON BRADY’S PART.
- Page 4 You will need the printer’s serial number, located on the back of the unit, to register your product. To register your printer go to: • www.bradycorp.com/register Repair and Return If for any reason you need to return the product for repair, please contact Brady Technical Support for repair and replacement information. BradyPrinter A5500...
-
Page 5: Table Of Contents
File Location ......................14 Load Software and Connect Printer............... 15 Installing the Driver .....................15 Wi-Fi ........................15 Search to Connect ..................15 Connect Manually ..................16 Configure Networking on the Printer ............16 Connect with a USB Cable .................16 Load Label Supply....................17 BradyPrinter A5500... - Page 6 About ......................33 Maintenance ....................33 Import Files ....................33 Creating, Printing, and Applying Flagged Labels..........35 Transfer Print Jobs from one BradyPrinter A5500 to Another ......36 Import Print Jobs ....................37 Running a File Using a Barcode Scanner ............37 6 • Maintenance Cleaning........................39 Before You Begin ....................39...
- Page 7 Batteries Directive 2006/66/EC ..............60 Turkey .........................60 China ........................60 Wireless Regulatory Information ................61 United States ......................61 Canada .......................62 Mexico .........................62 European Union ....................62 International ......................63 B • Licensing End User License Agreement for Microsoft Windows CE© ........ 64 BradyPrinter A5500...
-
Page 8: Introduction
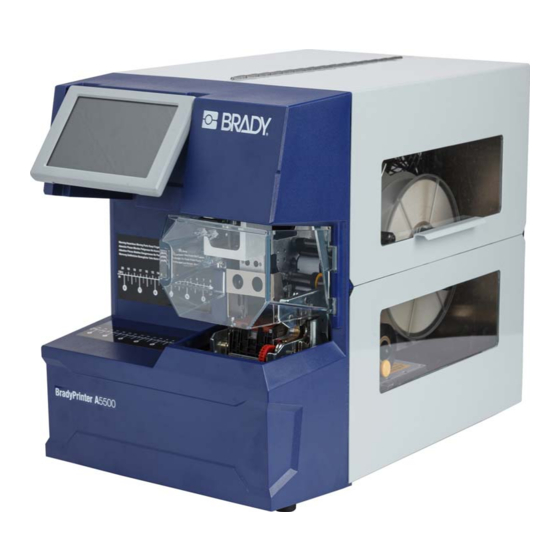
The BradyPrinter A5500 printer is a semi-automatic computerized system that integrates the print-and- apply processes used for flag labels on wire and cable. Design labels on your computer using Brady Workstation software. Transfer the label files to the BradyPrinter A5500 printer for printing and applying flag labels on a variety of wires and cables. -
Page 9: Technical Specifications
(4.0" / 101.6 mm maximum printable height) • One-year warranty • Accepts USB drives for added storage capability and standalone operation. USB drives must be formatted with FAT, FAT32, or exFAT file systems. The BradyPrinter A5500 printer does not support NTFS. Physical Dimensions Physical Metric Units U.S. -
Page 10: Electrical Specifications
Current 50/60 Hz Frequency Fuse UL listed 3 Amp, 5 mm by 20 mm SLO-BLO fuse, Brady part number Y949020. System Requirements Following are the recommended requirements for the computer on which you install the BradyPrinter A5500 Windows Driver: •... -
Page 11: Safety
2 Safety This section contains safety information necessary for the safe operation of the BradyPrinter A5500 printer. Be sure to read this section prior to setting up or operating the unit. Always be sure to adhere to the safety standards regulating your operating environment. Also adhere to the following safety rules included in or in addition to your specific standards: Do not wear loose clothing—such as long sleeves or scarves—that... -
Page 12: Side Door
Do not disable the front or side door auto-stop mechanisms. Doing WARNING! so may cause injury. Electrical Safety CAUTION! Make sure the power outlet is grounded. Turn off power and unplug unit before performing any service or WARNING! maintenance on the BradyPrinter A5500 printer. BradyPrinter A5500 User Manual... -
Page 13: Component Locations
4. Front Door: Clear plastic safety cover—shown in open position—protects the jaws of the unit. The unit is designed to automatically stop all moving parts when the front door is open. 5. Viewing Window: Allows you to view the material path while the printer is running. BradyPrinter A5500 User Manual... - Page 14 Component Locations The following figure shows the external parts located on the back of the BradyPrinter A5500 printer. 1. Exhaust Fans: Exhaust fans run continually when the BradyPrinter A5500 printer is powered on to keep operating components cool. 2. Remote PLC Mode Connector: Port for operating the machine remotely. This is generally used in third-party systems that combine the BradyPrinter A5500 printer with other devices.
- Page 15 European Power Cord: IEC60320 C13 plug, 3-conductor cord, with a CEE(7) Type 7 plug (European Standard) and connects with a standard outlet supplying 230 VAC, 50 Hz power. Users outside of these countries may be required to supply their own power cord. BradyPrinter A5500 User Manual...
-
Page 16: Installation And Preparation
1. The BradyPrinter A5500 printer comes in a cardboard box banded to a pallet. Cut the band. 2. Lift the top cover off the base. 3. Lift the BradyPrinter A5500 printer out of the protective foam surrounds and place the unit on a flat, level surface. -
Page 17: Remove Shipping Materials Inside Housing
Installation and Preparation Unpack and Set Up the Printer Remove Shipping Materials Inside Housing CAUTION! Do not power on the BradyPrinter A5500 printer before following these steps. Note: Save all shipping materials. These will be needed if you must ship the printer. -
Page 18: Bolt Printer To Work Surface (Optional)
Bolt Printer to Work Surface (Optional) The BradyPrinter A5500 printer comes with threaded bolt holes on the bottom for table top mounting. If the work surface vibrates or the printer will be placed on a moving cart, you may wish to stabilize it. -
Page 19: Power Up The Printer
1. Obtain a suitable alternate power cord if the one provided with the printer doesn’t match your country’s standard. 2. Connect the power cord to the back of the BradyPrinter A5500 printer and into an outlet. CAUTION! Make sure the outlet is grounded. -
Page 20: Date And Time
In Auto mode, the printer automatically advances to the next label after a print and flag cycle. This is the typical mode of operation. • In Manual mode, you must advance the printer to the next label using the navigation buttons on the Run (Printing) page. See “Run” on page BradyPrinter A5500 User Manual... -
Page 21: Wrapper Tension
Internal Memory: use when the printer is directly connected to the computer with a USB cable or on a network. • External USB: choose this option when transferring files from one BradyPrinter A5500 printer to another using a USB drive. 4. Return to the home screen. -
Page 22: Load Software And Connect Printer
Install labeling software on your computer, set up the network connection to the printer, then use the software to design labels and send them to the printer. Brady Workstation software provides a variety of apps to simplify label creation for specific purposes. It also provides easy-to-use apps for custom label design. -
Page 23: Connect Manually
You may need information from your IT department to complete the settings. 6. Return to the home screen. Connect Manually This section describes how to configure the computer and BradyPrinter A5500 printer to communicate via an Ethernet (TCP/IP) connection. Configure Networking on the Printer To configure network settings on the printer: 1. -
Page 24: Load Label Supply
The following figure shows the BradyPrinter A5500 printer’s material path. The material path is the route a roll of labels takes through the printer. Open the side cover of the BradyPrinter A5500 unit to see the material path. - Page 25 Installation and Preparation Load Label Supply 1. On the BradyPrinter A5500 home screen, tap Load Supplies. 2. Tap Load Supply. Note: The print/flag assembly automatically slides back for easy access during loading process. 3. Lift the side door on the printer.
-
Page 26: Remove Previously Used Material
8. Place the new label supply roll on the spool. 9. Turn flange (A) counter-clockwise to rotate the label roll so the touch memory cell is securely positioned in the reader clip (B). Figure 4-2. Flange and Reader Clip BradyPrinter A5500 User Manual... - Page 27 13. Continue to thread the label over the second drive roller (E) and under the second nip roller (F). 14. Thread the labels under the take-up bar (A1). 15. Turn the take-up spool lock lever (B1) clockwise to close it. 16. Rotate the take-up spool (C1) to remove slack. BradyPrinter A5500 User Manual...
- Page 28 18. Position guide rings (B) snug to the label liner. Leave minimal gap between the guides and the labels. Make sure the label material is not distorted by overly tight adjustments. 19. Pull out the yellow knobs to engage the nip rollers. BradyPrinter A5500 User Manual...
- Page 29 CAUTION! Be sure to remove the dispensed label. Failure to do so will jam the print mechanism. 21. Close the side door of the printer. 22. On the touch screen, tap Done to move the print assembly forward to the home position. 23. Return to the home page. BradyPrinter A5500 User Manual...
-
Page 30: Load The Printer Ribbon
Installation and Preparation Load the Printer Ribbon Load the Printer Ribbon Follow the steps below to load a ribbon in the BradyPrinter A5500 printer. Use the ribbon path shown below as your guide. Figure 4-4. Ribbon Path Parts Feed Spool... -
Page 31: Remove The Old Ribbon
Installation and Preparation Load the Printer Ribbon 1. On the BradyPrinter A5500 home screen, tap Load Supplies. 2. Tap Load Ribbon. 3. Lift the side door of the printer. Note: Ribbon threading instructions are also located on the inside of the side door. - Page 32 Note: Make sure that the ribbon roll is installed flush to the back flange and routed. 8. Close the side door of the printer. 9. On the touch screen, tap Done. This moves the print assembly forward into the home position. 10. Return to the home screen. BradyPrinter A5500 User Manual...
-
Page 33: General Operation
Using the Touch Screen The BradyPrinter A5500 printer includes a touch screen that you use to control the unit. Tap the screen with your finger to make a selection from the menus. The screen is hinged so that you can adjust the viewing angle up or down. -
Page 34: Status Bar
The printer is receiving data from the software. blinking The printer cannot read the memory cell on the ribbon. Ribbon may not be installed, may be installed incorrectly, or the memory cell may be corrupted. The printer is not connected to Wi-Fi. BradyPrinter A5500 User Manual... -
Page 35: Functions
Count resets the number to zero. If the printer is set to repeat printing the same file, click Close Job to stop printing this Close Job file and go to the next file in the print queue. Enter button. BradyPrinter A5500 User Manual... -
Page 36: Print Jobs
For help, see “Print Queue” on page The printer runs the print job and the touch screen displays the Printing page. Note: With Auto Queue enabled you do not have to manually add jobs to the queue. BradyPrinter A5500 User Manual... -
Page 37: Deleting A Job
Move Down moves the selected print job down one position in the queue. Apply Only Tap Apply Only to flag a wire or cable with pre-printed label media. Leave the wire diameter on the auto setting or change to a specific diameter. BradyPrinter A5500 User Manual... -
Page 38: Load Supplies
Connection Use to set the printer name (see “Printer Name” on page 13) and configure network communication with the printer (see “Load Software and Connect Printer” on page 15). BradyPrinter A5500 User Manual... -
Page 39: System Configuration
The cycle count cannot be edited or reset. This value is used to determine when to perform maintenance on the printer. To restore the factory value for any of these settings, except cycles, tap Reset Default. BradyPrinter A5500 User Manual... -
Page 40: Print Queue
Y & B values are included in a database of label and ribbon part information that enables the printer to work optimally with various supplies. Update Y & B values periodically to make sure the printer has data for any new label supplies. Also, update if you have ordered a custom label supply from Brady BradyPrinter A5500 User Manual... - Page 41 1. On a computer, go to the technical support website for your region. See “Technical Support and Registration” on page iv. 2. Find firmware updates and the most recent BradyPrinter A5500 database (Y and B) update. 3. Download the database update. 4. Save the downloaded file to a USB flash drive.
-
Page 42: Creating, Printing, And Applying Flagged Labels
Creating, Printing, and Applying Flagged Labels Creating, Printing, and Applying Flagged Labels When you print labels to the BradyPrinter A5500 printer from your labeling software, the printer does not immediately print the labels. Instead, the labels are sent to the printer’s internal memory. -
Page 43: Transfer Print Jobs From One Bradyprinter A5500 To Another
Transfer Print Jobs from one BradyPrinter A5500 to Another If you have one BradyPrinter A5500 printer connected to a computer, and another that does not have access to a computer, use a USB drive to transfer print jobs from the connected printer to the other. -
Page 44: Import Print Jobs
Set Up the Scanner Connect a USB scanner to the BradyPrinter A5500 printer. We recommend the Brady Code Reader scanner configured for USB. - Page 45 2. Scan the print job barcode. If everything is set up correctly, it will open the print job specified by the barcode. 3. Insert a wire or cable into the printer jaws to print and flag as you normally would. (For more information see “Run” on page 28.) BradyPrinter A5500 User Manual...
-
Page 46: Maintenance
Before You Begin Prior to performing any cleaning or maintenance on the BradyPrinter A5500 printer, you must perform the following steps: 1. On the touch screen, tap Load Supplies and then tap Load Supply. -
Page 47: Cleaning The Flagger Surface
5. Dip a cotton swab in the Isopropyl alcohol and use to clean the flagger surface, making sure the flagger is free of dust, debris, and label adhesive built-up. CAUTION! Failure to remove adhesive build-up will cause labels to jam on the flagger surface. 6. Close the front door. BradyPrinter A5500 User Manual... -
Page 48: Cleaning The Print Head
3. Dip a cotton swab in the Isopropyl alcohol. 4. Use the moistened swab, thoroughly clean the top surface of the print head. 5. Use a second swab dipped in Isopropyl alcohol to clean the o-rings. 6. Close the side door. O-rings Print Head BradyPrinter A5500 User Manual... -
Page 49: Cleaning The Rollers
Note: Drive rollers can be advanced manually for cleaning by turning the large pulley behind the label rewind hub. Note: Use as many swabs as necessary so that you are always using a fairly clean swab. 5. Close the side door. BradyPrinter A5500 User Manual... -
Page 50: Cleaning The Sensors
2. Open the front and side doors of the printer. 3. Locate the notch sensor using the graphic below as your guide. 4. Clean the label notch sensor with a clean swab dipped in Isopropyl alcohol. BradyPrinter A5500 User Manual... - Page 51 The flagger sensor is located inside the front door to the right of the flagger. You will need to rotate the flagger so that its opening is near the sensor. • The shuttle sensor is located in front of the printer mechanism. BradyPrinter A5500 User Manual...
- Page 52 The tilt sensor is located behind the printer mechanism on the upper right-hand side. • The ribbon out sensor is located behind the ribbon path. The ribbon sensor should rarely, if ever, require cleaning. 6. Close the unit doors. BradyPrinter A5500 User Manual...
-
Page 53: Cleaning The Fan Filter
The fan filter is a replacement part that can be ordered. Lubrication Some BradyPrinter A5500 printer parts will need occasional lubrication in order to keep the unit running smoothly. It is recommended that you check the following items for proper lubrication every 6 months to a year. - Page 54 • Manually shuttle the slide track forward until the back inside oiler is exposed. 8. If dry, add a few drops of light machine oil to each oiler. 9. Close the side door. BradyPrinter A5500 User Manual...
-
Page 55: Clean And Grease The Flagger Hub
1. On the touch screen, tap Load Supplies and then tap Load Supply. This shuttles the print mechanism back. 2. Power off and unplug the printer. You must power off and unplug the BradyPrinter A5500 printer WARNING! prior to performing any cleaning or maintenance! 3. -
Page 56: Replace Flagger Block Assembly
1. On the touch screen, tap Settings and select Maintenance. 2. Tap Replace Tarp. 3. Power off and unplug the printer. You must power off and unplug the BradyPrinter A5500 printer WARNING! prior to performing any cleaning or maintenance! 4. Open the front (clear) cover on the printer. - Page 57 12. Replace the retaining post, making sure that the end of the post goes inside the smallest coil of the spring and that the new flagging block is held tightly against the mounting surface. 13. Close the front cover. BradyPrinter A5500 User Manual...
-
Page 58: Replace Print Head Assembly
1. On the touch screen, tap Load Supplies and then tap Load Supply. This shuttles the print mechanism back. 2. Power off and unplug the printer. Power off and unplug the BradyPrinter A5500 printer prior to WARNING! performing any cleaning or maintenance! 3. -
Page 59: Installing An Upgrade
5. Connect the USB drive to the USB port on the printer. The printer recognizes the upgrade file and displays a message on the touch screen. 6. Follow the instructions on the touch screen. When the upgrade is complete, the printer restarts. BradyPrinter A5500 User Manual... -
Page 60: Troubleshooting
“Load Label Supply” on page 17. If the encoder roller does not rotate, send the printer for service. Notch sensor is dirty. Clean the notch sensor following the directions in the section “Cleaning the Sensors” on page BradyPrinter A5500 User Manual... - Page 61 A wire diameter larger than 0.6 Only flag wires between 0.060" (1.524 mm) Flagger stalls during is being used. minimum and 0.600" maximum. application. Wire is curved, bent or kinked. Ensure that the wire inserted into the flagger mechanism is straight. BradyPrinter A5500 User Manual...
- Page 62 If the contacts are bent or damaged, the printer will need to be sent in for service. Wire diameter is 0.5 or greater. This is normal. No corrective action needed. Wire hits flagger frame. BradyPrinter A5500 User Manual...
-
Page 63: Mounting Dimensions
Bolt Printer to Work Surface The BradyPrinter A5500 printer comes with threaded bolt holes on the bottom for table top mounting. If the work surface vibrates or the printer will be placed on a moving cart, you may wish to stabilize it. - Page 64 Mounting Dimensions Bolt Printer to Work Surface Figure 8-1. Bottom View for Mounting Printer BradyPrinter A5500 User Manual...
- Page 65 Mounting Dimensions Bolt Printer to Work Surface Figure 8-2. Side View for Mounting Printer BradyPrinter A5500 User Manual...
-
Page 66: A Regulatory Compliance
Waste Electrical and Electronic Equipment Directive In accordance with the European WEEE Directive, this device needs to be recycled in accordance with local regulations. BradyPrinter A5500 User Manual... -
Page 67: Batteries Directive 2006/66/Ec
Turkish Ministry of Environment and Forestry (Directive on the Restriction of the use of certain hazardous substances in electrical and electronic equipment). Türkiye Cumhuriyeti: EEE Yönetmeliğine Uygundur China Find RoHS Declaration information for this product at www.bradyid.com/A5500compliance. BradyPrinter A5500 User Manual... -
Page 68: Wireless Regulatory Information
Antenna Type \ Antenna Gain PCB trace antenna \ -3.06 dBi Environmental Operation -40 to 85° C (-40° to 185° F) Note: Be mindful of Brady host printer user guide for maximum operating temperatures Environmental Storage -55 to 125° C (-67° to 257° F) -
Page 69: Canada
Radio Equipment Directive (RED) 2014/53/EC a. Frequency band(s) in which the radio equipment operates; 2.401GHz to 2.483GHz b. Maximum radio-frequency power transmitted in the frequency band(s) in which the radio equipment operate; < +20dBm EIRP (100mW) BradyPrinter A5500 User Manual... -
Page 70: International
Wireless Regulatory Information International The WiFi radio module used in Brady host printers comply with internationally recognized standards covering human exposure to electromagnetic fields, i.e. EN 62311 "Assessment of electronic and electrical equipment related to human exposure restrictions for electromagnetic fields (0 Hz - 300 GHz)". -
Page 71: B Licensing
© End User License Agreement for Microsoft Windows CE You have acquired a device that includes software licensed by Brady Worldwide, Inc. from Microsoft Licensing or its affiliates (“MS”). Those installed software products of Microsoft origin, as well as associated media, printed materials, and “online” or electronic documentation (“SOFTWARE”) are protected by international intellectual property laws and treaties. - Page 72 SOFTWARE, including the U.S. Export Administration Regulations, as well as end-user, end-use, and country destination restrictions issued by U.S. and other governments. For additional information on exporting the SOFTWARE, see http://www.microsoft.com/exporting. BradyPrinter A5500 User Manual...