Harman JBL BAR 9.1 Owner's Manual
True wireless surround with dolby atmos
Hide thumbs
Also See for JBL BAR 9.1:
- User manual ,
- Quick start manual (40 pages) ,
- Owner's manual (4 pages)
Table of Contents
Advertisement
Advertisement
Table of Contents

Related Manuals for Harman JBL BAR 9.1


Summary of Contents for Harman JBL BAR 9.1
- Page 1 BAR 9.1 TRUE WIRELESS SURROUND WITH DOLBY ATMOS ® OWNER’S MANUAL...
-
Page 2: Important Safety Instructions
IMPORTANT SAFETY INSTRUCTIONS Verify Line Voltage Before Use The JBL Bar 9.1 True Wireless Surround with Dolby Atmos ® (soundbar, detachable speakers and subwoofer) has been designed for use with 100-240 volt, 50/60 Hz AC current. Connection to a line voltage other than that for which your product is intended can create a safety and fire hazard and may damage the unit. -
Page 3: Table Of Contents
TABLE OF CONTENTS 7. PLAY 7.1 POWER-ON/AUTO STANDBY/AUTO WAKEUP/POWER- SAVING MODE IMPORTANT SAFETY INSTRUCTIONS 7.2 PLAY FROM THE TV SOURCE 7.3 PLAY FROM THE HDMI IN SOURCE 7.4 PLAY FROM THE BLUETOOTH SOURCE 1. INTRODUCTION 7.5 PLAY THROUGH CHROMECAST 7.6 PLAY THROUGH AIRPLAY 7.7 MULTI-ROOM PLAYBACK 2. -
Page 4: Introduction
1. INTRODUCTION 2. WHAT’S IN THE BOX Thank you for purchasing the JBL Bar 9.1 True Wireless Surround Unpack the box carefully and ensure that the following parts are with Dolby Atmos (soundbar, detachable speakers and included. If any part is damaged or missing, do not use it and ®... -
Page 5: Product Overview
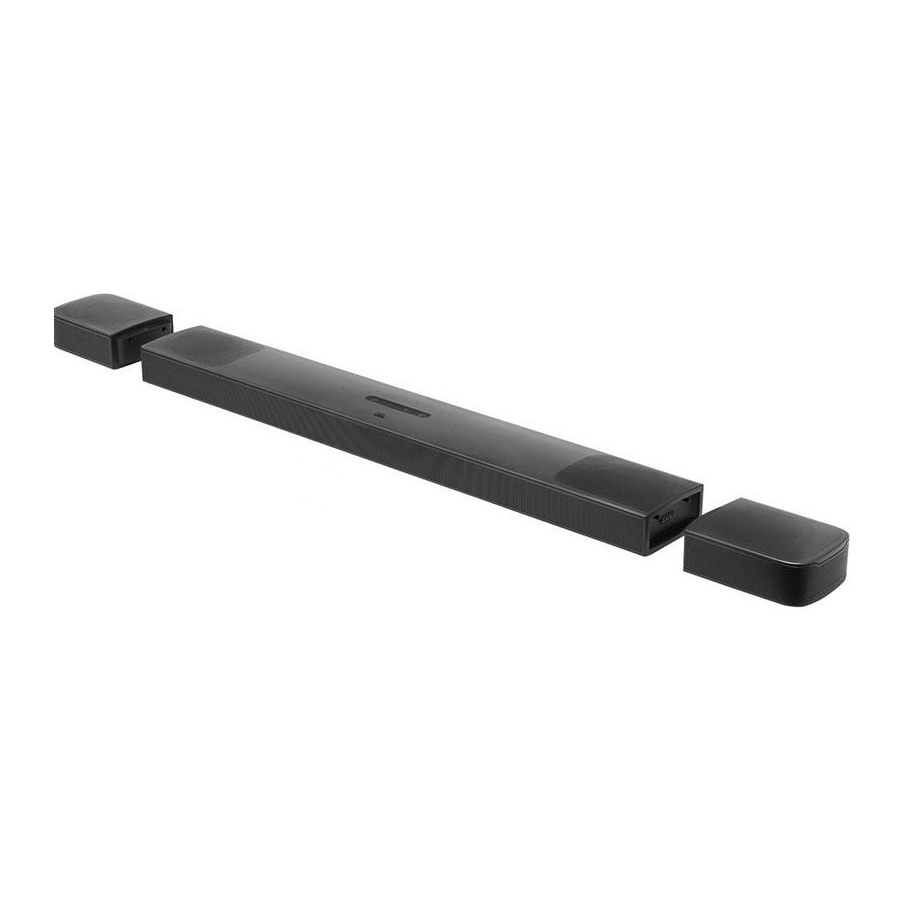
HDMI cable 3. PRODUCT OVERVIEW 3.1 Soundbar Controls Side caps** (Power) • Switch on or to standby 2) -/+ (Volume) • Decrease or increase the volume (For the soundbar) (For the detachable speakers) • Press and hold to decrease or increase the volume continuously **For some regions only. -
Page 6: Detachable Speakers
• Connect to your home network through an Ethernet cable • Connection status indicator Solid white Connected to the soundbar • Connect to the HDMI ARC / HDMI eARC input on your TV Fast flashing white Pairing mode Reconnecting or exiting the Slow flashing white •... -
Page 7: Place
4. PLACE • Switch on or to standby 4.1 Desktop placement • Select the TV source (default, for audio input from TV Place the soundbar, detachable speakers and subwoofer on a connection where the connector is flat and stable surface. Refer to the recommended distance in prioritized over the connector) the following diagram. - Page 8 A) Wall-mount the soundbar B) Wall-mount the detachable speakers as rear surround speakers ≤8 mm/ 4mm/ 0.31" 0.16" 2” (50mm) ≥30 mm/1.18" ≤8 mm/ 4mm/ 0.31" 0.16" ≥30 mm/1.18" 1. From the soundbar, remove the two detachable speakers. 2. Install the wall-mounting bracket. 1.
-
Page 9: Connect
5. CONNECT 5.1 Connection with your TV and digital devices For audio playback through the soundbar, connect the soundbar with your TV through the supplied HDMI cable or an optical cable (sold separately). An HDMI connection supports digital audio and video with a single connection. - Page 10 TV (HDMI eARC) OPTICAL HDMI OUT OPTICAL (TV ARC) OPTICAL HDMI (eARC) HDMI IN HDMI IN HDMI OUT HDMI OUT 1. Connect the soundbar with the connector on your TV by using the supplied HDMI cable. • On your TV, check that HDMI-CEC and HDMI ARC have been enabled.
-
Page 11: Bluetooth Connection
1. Connect the soundbar with your TV by using an optical cable. To reconnect the last paired device Your Bluetooth device is retained as a paired device when the 2. Use an HDMI cable (V2.0 or later) to connect your TV with your soundbar goes to standby mode. - Page 12 2. On your Android or iOS device, add the soundbar to your home Wi-Fi network. Through the Google Home app a) Connect your Android or iOS device to your home Wi-Fi network. Download the Google Home app. Sign in with your Google account.
-
Page 13: Setup
6.2 Charge the detachable speakers 6. SETUP Wi-Fi and Bluetooth connection will be off and the soundbar will enter into power saving mode when the detachable surround 6.1 Connect the detachable rear speakers and speakers are out of battery. subwoofer The first time you use the two detachable speakers, charge them for more than 3 hours to ensure sufficient battery power. -
Page 14: Sound Calibration
6.2.2 Charge through a USB cable 1) Calibrate the listening zone 100% Micro USB 1-CALIBRATION 1 DONE • Use a USB cable to connect the detachable speakers to power respectively. • For the detachable speakers, the status indicator is used for status indication of both battery power and wireless >5S connection (See “Detachable speakers”... - Page 15 2) Calibrate the speaker position 6.3.2 Dolby Atmos / DTS:X ® ® With Dolby Atmos or DTS:X, overhead audio distribution is provided for powerful 3D sound immersion. 1. To play the surround sound of DOLBY ATMOS or DTS:X, connect and play your Blu-ray player or streaming device as described under “Connection with your TV and digital devices”...
-
Page 16: Play
• the soundbar is connected to your TV through the HDMI 7. PLAY ARC connection and through the HDMI connection, is also connected to your digital device such as a set-top box, DVD/ 7.1 Power-on/Auto standby/Auto wakeup/ Blu-ray player or game console, and your digital device is switched on;... -
Page 17: Play From The Tv Source
→ “ 7.2 Play from the TV source ” is displayed on the soundbar. → “ ”: The function of the soundbar button is learnt With the soundbar connected, you can enjoy TV audio from the by your TV remote control button. soundbar speakers. -
Page 18: Play From The Bluetooth Source
7.4 Play from the Bluetooth source 7.6 Play through AirPlay Through Bluetooth, stream audio play on your Bluetooth device Through AirPlay, stream audio on your iOS device to the soundbar. to the soundbar. 1. On the soundbar, 1. Check that the soundbar has been properly connected to •... -
Page 19: Multi-Room Playback
7.7 Multi-room playback 8. SOUND SETTINGS With the multi-room playback, you can stream music on your Android or iOS device to multiple Chromecast / AirPlay speakers. Bass adjustment 1. Check that the soundbar and subwoofer are properly connected (See the “SETUP” chapter). 2. -
Page 20: Restore Factory Settings
9. RESTORE FACTORY SETTINGS 10. SOFTWARE UPDATE By restoring the default settings defined at factories. you remove For optimal product performance and your best user experience, all your personalized settings from the soundbar. JBL may offer software updates for the soundbar system in the future. -
Page 21: Re-Connect The Subwoofer
3. To enter the software update mode, press and hold and - on 11. RE-CONNECT THE SUBWOOFER the soundbar for more than 10 seconds. → “ ” is displayed. The soundbar and subwoofer are paired at factories. After → “ ”: Software updating underway power-on, they are paired and connected automatically. -
Page 22: Product Specifications
• 5G Wi-Fi frequency range: 5.15 - 5.35 GHz, 5.470-5.725 GHz, 12. PRODUCT SPECIFICATIONS 5.725 - 5.825 GHz • 5G Wi-Fi Max. transmitting power: 22 dBm (EIRP) General specification: • Modulation Type: QPSK, BPSK, 16QAM, 64QAM, 256QAM • Model: BAR 9.1 CNTR (soundbar unit), •... -
Page 23: Troubleshooting
13. TROUBLESHOOTING Wi-Fi Never try to repair the product yourself. If you have problems Failed to connect to Wi-Fi. using this product, check the following points before you request • Make sure that Wi-Fi is turned on. services. • Make sure that you have selected the right network and System entered the correct password. -
Page 24: Trademarks
® owned by the Bluetooth SIG, Inc. and any use of such marks by HARMAN International Industries, Incorporated is under license. Other trademarks and trade names are those of their respective owners. Apple... -
Page 25: Open Source License Notice
© 2020 HARMAN International Industries, Incorporated. Incorporated 8500 Balboa All rights reserved. Boulevard, Northridge, CA 91329 JBL is a trademark of HARMAN International Industries, Incorporated, registered in the United States and/or other countries. Features, specifications and appearance are www.jbl.com subject to change without notice.