Pride Mobility Victory Series Manual
Hide thumbs
Also See for Victory Series:
- Owner's manual (52 pages) ,
- Owner's manual (35 pages) ,
- Owner's manual (36 pages)
Table of Contents
Advertisement
Advertisement
Table of Contents

Related Manuals for Pride Mobility Victory Series


Summary of Contents for Pride Mobility Victory Series
- Page 1 Manuale Utente ATTENTION: Read everything in this manual before operating your Scooter Victory XL-8 Victory XL Victory 3 Wheel Il Massimo della Prestazione e dello Stile ® Via della Tecnica, 14 Prato della Corte 00065 Fiano Romano Roma- Italia www.pridemobility.com...
- Page 2 WARNING! Failure to heed the warnings in this owner’s manual may result in personal injury. CAUTION! Failure to heed the cautions in this owner’s manual may result in damage to your Scooter. Copyright ©2000 Pride Mobility Products Italia s.r.l. Victory...
-
Page 3: Table Of Contents
C O N T E N T S INTRODUCTION ......................... 4 SAFETY ............................6 III. SPECIFICATIONS ........................11 IV. YOUR VICTORY ........................16 Control Console Assembly ......................... 17 Rear Shroud ............................18 Rear Section............................18 BATTERIES AND CHARGING .................... 22 Reading Your Battery Voltage ...................... -
Page 4: Introduction
I N T R O D U C T I O N Welcome to Pride Mobility Products Italia s.r.l. (Pride). Congratulations on the purchase of your new Victory Scooter. The Victory design combines the most advanced state-of-the-art components with modern, attractive styling. - Page 5 I N T R O D U C T I O N PRIDE OWNERS CLUB As a Pride product owner, you are invited to register your product’s warranty and enroll in the Pride Owners Club. You may do so by filling out and returning your enclosed registration card or by visiting Pride’s web site at www.pridemobility.com.
-
Page 6: Safety
I I . S A F E T Y SAFETY PRECAUTIONS You must read, understand, and follow all of the safety precautions and product information contained in this manual before operating your Scooter for the first time. Below are some safety tips designed to help you become accustomed to operating your new Scooter safely. - Page 7 I I . S A F E T Y Tyres WARNING! Make certain that your Scooter tyres are properly inflated (30 psi). Overinflating a tire can cause it to explode, possibly resulting in personal injury and/or damage to your Scooter. WARNING! When changing a tire, remove only the center lug nut, then remove the tire.
- Page 8 I I . S A F E T Y Lift/Elevation Products If you are going to be traveling with your Scooter, you may find it necessary to use a lift/elevation product to aid in transportation. Pride recommends that you review closely the instructions and specifications set forth by the manufacturer of the lift/elevation product for use of that product.
- Page 9 I I . S A F E T Y Doors n Determine if the door opens toward or away from you. n Use your hand to turn the knob or push the handle or push-bar. n Drive slowly forward to push the door open or drive slowly backward to pull the door open. Elevators Modern elevators have a door-edge safety mechanism that, when pushed, reopens the elevator door(s).
- Page 10 I I . S A F E T Y Controlled tests show that, when you approach an incline, it is best to lean forward. See figures 4 and 5. This shifts the center of gravity of you and your Victory toward the front of the Scooter for improved stability. WARNING! Even though your Scooter is capable of climbing slopes greater than those illustrated in this section, do not, under any circumstances, exceed the incline guidelines or any other specifications presented in this manual.
-
Page 11: Specifications
I I I . S P E C I F I C A T I O N S 39 cm 19 cm 46 cm - 51 cm 11.5 cm Figure 6. Victory Dimensions 117 cm Length (3 Wheel) 46 cm Length 119 cm (4 Wheel) - Page 12 I I I . S P E C I F I C A T I O N S Figure 7. Victory XL and XL-8 Dimensions Victory...
- Page 13 I I I . S P E C I F I C A T I O N S Victory 3 and 4 Wheel Specifications 3 Wheel: 117 cm Length: 4 Wheel: 119 cm Width: 61 cm Type: Pneumatic Tyres: Front: 10 cm x 25 cm Rear: 10 cm x 25 cm Weight Capacity: 135 kg maximum...
- Page 14 I I I . S P E C I F I C A T I O N S Victory XL Specifications Length: 150 cm Width: 65 cm Type: Pneumatic Tyres: Size: 10 cm x 33 cm Weight Capacity: 135 kg maximum Two 12V, 32 AH or two 12V, 40 AH, U-1 type, sealed lead-acid;...
- Page 15 I I I . S P E C I F I C A T I O N S Victory XL-8 Specifications Length: 150 cm Width: 65 cm Type: Pneumatic Tyres: Size: 10 cm x 33 cm Weight Capacity: 135 kg maximum Two 12V, 32 AH or two 12V, 40 AH, U-1 type, sealed lead-acid;...
-
Page 16: Your Victory
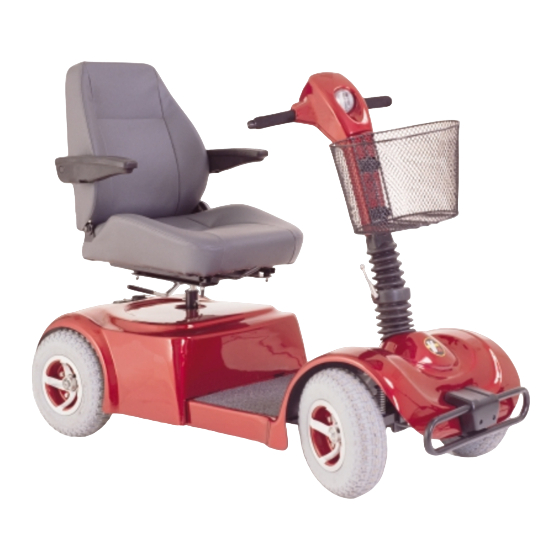
I V . Y O U R V I C T O R Y Your Victory is an indoor/outdoor, motorized electric Scooter designed to enhance your personal mobility. For easy transportation or storage, you can disassemble your Scooter into seven components. See figures 8, 9, and 10. SEAT SEAT REAR SECTION... -
Page 17: Control Console Assembly
I V . Y O U R V I C T O R Y CONTROL CONSOLE ASSEMBLY The control console assembly located on the front section houses all of the controls you need to operate your Scooter. See figure 11. WARNING! Do not expose the control console assembly to moisture. -
Page 18: Rear Shroud
I V . Y O U R V I C T O R Y Turn Signal Buttons Use these buttons to turn on the left and right turn signal lights. n Press the appropriate turn signal button once to activate it. n The turn signals are timed to shut off automatically. - Page 19 I V . Y O U R V I C T O R Y BATTERIES ONBOARD BATTERY CHARGER ELECTRONIC CONTROLLER MODULE CHARGER POWER CORD MAIN CIRCUIT BREAKER RECEPTACLE (RESET BUTTON) MANUAL FREEWHEEL LEVER MOTOR/TRANSAXLE ASSEMBLY ANTI-TIP WHEELS Figure 12. Victory 3 and 4 Wheel Rear Section BATTERIES ONBOARD BATTERY CHARGER ELECTRONIC CONTROLLER...
- Page 20 I V . Y O U R V I C T O R Y Electronic Controller Module The electronic controller module is located behind the batteries and at the forward left corner of the rear section. It receives electrical signals from the console controls and sends power to the motor, the brakes, and the lighting system.
- Page 21 I V . Y O U R V I C T O R Y Manual Freewheel Lever Whenever you need or want to push your Scooter for short distances, you can put it in manual freewheel mode. The manual freewheel lever is located on the end of the motor/transaxle assembly at the rear of your Scooter. WARNING! It is important to remember that when your Scooter is in manual freewheel mode, the braking system is disengaged.
-
Page 22: Batteries And Charging
B A T T E R I E S A N D C H A R G I N G Your Victory requires two long-lasting, 12-volt, deep-cycle batteries that are sealed and maintenance free. Three important points to remember are: n Charge the batteries with the supplied onboard battery charger prior to using your Scooter for the first time. -
Page 23: Frequently Asked Questions (Faq’S)
B A T T E R I E S A N D C H A R G I N G FREQUENTLY ASKED QUESTIONS (FAQ How does the charger work? When battery voltage is low, the charger works harder and sends more electrical current to the batteries to bring up their charge. - Page 24 B A T T E R I E S A N D C H A R G I N G n Plan your route to avoid as many hills, cracked, broken, or soft surfaces as possible. n Limit your baggage weight to essential items. n Try to maintain an even speed while your Scooter is in motion.
- Page 25 B A T T E R I E S A N D C H A R G I N G It may take a few days for the temperature of your batteries to stabilize and adjust to their new room or ambient temperature.
-
Page 26: Operation
V I . O P E R A T I O N PRE-RIDE ADJUSTMENTS AND CHECKS Familiarize yourself with the following checklist as some of the checks must be performed prior to getting on your Scooter. n Have you fully charged the batteries? See V. “Batteries and Charging.” n Is the manual freewheel lever in the drive (down) position? Never leave the manual freewheel lever pulled up unless you are manually pushing your Scooter. -
Page 27: Getting Off Of Your Scooter
V I . O P E R A T I O N GETTING OFF OF YOUR SCOOTER 1. Bring your Scooter to a complete stop. 2. Turn the key counterclockwise and remove it from the key switch. 3. Pull up or push down on the seat lock lever, rotate the seat until you are facing toward the side, then release the lever to lock the seat securely in place. -
Page 28: Comfort Adjustments
V I I . C O M F O R T A D J U S T M E N T S TILLER ANGLE ADJUSTMENT The tiller is equipped with a spring-loaded tiller adjustment lever, which allows you to lock the tiller in place as well as rotate and change its position. -
Page 29: Seat Rotation
V I I . C O M F O R T A D J U S T M E N T S SEAT ROTATION To lock your seat in one of eight positions: 1. Push down (3 or 4 wheel Scooter) or pull up (Victory XL or XL-8 Scooter) on the seat lock lever to unlock the seat. -
Page 30: Armrest Width Adjustment
V I I . C O M F O R T A D J U S T M E N T S ARMREST WIDTH ADJUSTMENT ARMRESTS To adjust the armrests on your Victory 3 or 4 wheel ARMREST ADJUSTMENT KNOBS Scooter seat inward or outward to a user-comfortable width: 1. -
Page 31: V I I I . D I S A S S E M B L Y A N D A S S E M B L Y
V I I I . D I S A S S E M B L Y A N D A S S E M B L Y DISASSEMBLY No tools are required to disassembly or assemble your Scooter. Always choose a level, dry surface with sufficient room for you to work and move around—approximately 1.5 meters in all directions. - Page 32 V I I I . D I S A S S E M B L Y A N D A S S E M B L Y 7. Turn the tiller adjustment lever counterclockwise until it is loose. Pull the rubber boot upward to expose the tiller release buttons.
-
Page 33: Assembly
V I I I . D I S A S S E M B L Y A N D A S S E M B L Y ASSEMBLY LOCK CAM LOCK LEVERS 1. Push forward, then pull up on the manual freewheel lever. -
Page 34: Optional Accessories
I X . O P T I O N A L A C C E S S O R I E S REAR BASKET The rear basket mounts to the back of the seat by means of the accessory bracket. The basket is equipped with a handle for use when the basket is removed from the Scooter. - Page 35 I X . O P T I O N A L A C C E S S O R I E S WALKER HOLDER The removable walker holder mounts to the back of the seat by means of the accessory bracket. It can hold a standard size walker.
-
Page 36: Troubleshooting
T R O U B L E S H O O T I N G Any electromechanical device requires occasional troubleshooting. However, most problems that arise can usually be solved with a bit of thought and common sense. Many of these problems occur because the batteries are not fully charged or because the batteries are worn down and can no longer hold a charge. -
Page 37: Care And Maintenance
X I . C A R E A N D M A I N T E N A N C E Your Scooter requires a minimal amount of care and maintenance. If you do not feel confident in your ability to perform the maintenance listed below, you may schedule inspection and maintenance with your authorized Pride provider. - Page 38 X I . C A R E A N D M A I N T E N A N C E ABS PLASTIC SHROUDS The tiller shrouds, front shroud, and the rear shroud are formed from durable ABS plastic and coated with an advanced formula urethane paint.
-
Page 39: Warranty
X I I . W A R R A N T Y TWO-YEAR LIMITED WARRANTY Structural frame components, including platform, fork, seat post, and frame welds. Drive train, including differential, motor, and brake. ONE-YEAR LIMITED WARRANTY Your Pride Scooter is fully guaranteed for twelve (12) months from the date of purchase against faults arising due to defects in manufacture or materials. - Page 40 N O T E S Victory...