
Related Manuals for Exmark 135-5271


Summary of Contents for Exmark 135-5271
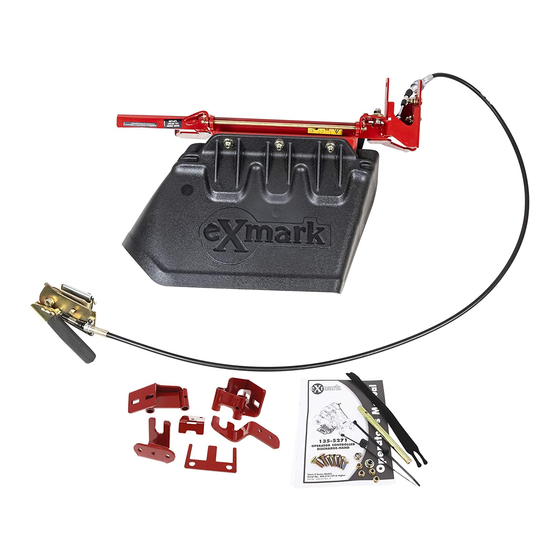
- Page 1 135-5271 OPERATOR CONTROLLED DISCHARGE-HAND Staris E-Series Models Serial No. 404,314,159 & Higher Part No. 4504-477 Rev. B...
- Page 2 State of California to cause cancer, birth defects, or other reproductive harm. Exmark reserves the right to make changes or add improvements to its products at any time without incurring any obligation to make such changes to products manufactured previously.
-
Page 3: Introduction
All Exmark parts are thoroughly tested and inspected before leaving the factory, however, attention is required on your part if you are to obtain the fullest measure of satisfaction and performance. -
Page 4: Table Of Contents
Contents Introduction ............3 Safety ..............5 Safety Alert Symbol ......... 5 General Safety ..........5 Safety and Instructional Decals ....... 6 Setup ..............7 Product Overview ..........10 Operation ..............11 Before Operation ...........11 Operation Instructions ........11 During Operation Safety.........11 After Operation..........13 Maintenance ............14 Maintenance Safety..........14 Recommended Maintenance Schedule(s) ....14... -
Page 5: Safety
Note emphasizes general information worthy of special attention. General Safety Exmark designed and tested this accessory to offer reasonably safe service; however, failure to comply with safety instructions may result in injury or death. • Read, understand, and follow all instructions and warnings in the mower and this accessory Operator’s Manuals and other training material,... -
Page 6: Safety And Instructional Decals
Exmark equipment dealer or labels. distributor or from Exmark Mfg. Co. Inc. • Replace all worn, damaged, or missing safety • Safety signs may be affixed by peeling off the signs. -
Page 7: Setup
Important: The Operator Controlled Discharge accessory comes with its own discharge deflector. When using the Operator Controlled Discharge accessory, Exmark recommends the original discharge deflector to remain installed on the machine and in the flipped up position. There are some instances... - Page 8 Setup g285870 Figure 4 1. Flip up discharge 3. Operator Controlled g285600 Figure 6 deflector Discharge accessory assembly 1. Front pin and slot 2. Mounting pin inserted 4. Rotate 2. Latch into deck tube 3. Operator Controlled Discharge accessory assembly 4.
- Page 9 Setup the deck, yet allow for release by hand. Tension can be adjusted by tightening or loosening the hardware that retains the latch. Loosen one of the jam nuts. Mount the cable through the bracket and tighten the jam nuts. If the discharge gate does not close flat against the discharge opening, see the Discharge Gate Adjustment section in Adjustments.
-
Page 10: Product Overview
Product Overview Product Overview Attach the center front cable bracket to the frame. g285735 Figure 9 1. Front bracket Route the cable under the hood shield, along the left side of the machine, and under the front panel and frame as shown in Figure 10. Use velcro g285613 straps to secure. -
Page 11: Operation
The pedal allows the discharge gate to perform the job. Only use on machines approved be held in any position from fully closed to fully open. by Exmark. Important: Make sure the mower is in neutral • Wear appropriate personal protective equipment before operating the handle of the discharge gate. - Page 12 Operation – Before checking, cleaning or working on the mower. – After striking a foreign object or abnormal vibration occurs (inspect the mower for damage and make repairs before restarting and operating the mower). – Before clearing blockages. – Whenever you leave the mower. WARNING Hands, feet, hair, clothing, or accessories can become entangled in rotating parts.
-
Page 13: After Operation
Operation Unlock the assembly and pivot it away from the mower deck. Lift the Operator Controlled Discharge accessory (and the adapter, if applicable) out of the deck mounting tube. Lower the existing discharge deflector. Important: Reinstall the original discharge deflector if it was removed during the Operator Controlled Discharge accessory installation. -
Page 14: Maintenance
While maintenance or adjustments are being to the original equipment or failure to use made, someone could start the engine. original Exmark parts could lead to serious Accidental starting of the engine could seriously injury or death. Unauthorized changes to the injure you or other bystanders. -
Page 15: Adjustments
Maintenance Adjustments the discharge gate so it closes properly and completely. Note: Disengage PTO, shut off engine, wait for all moving parts to stop, engage parking brake, and remove key before servicing, cleaning, or making any adjustments to the unit. Handle Adjustment The handle allows the gate to be held in any position. - Page 16 Maintenance Adjust the cable nuts (see Figure 16). Turn Stop engine, wait for all moving parts to stop, nuts until desired gate position is achieved. and remove key. Engage parking brake. Place the handle in the closed position, refer to Opening the Discharge Gate in the Operation section.
-
Page 17: Troubleshooting
Important: It is essential that all operator safety mechanisms be connected and in proper operating condition prior to mower use. The following table lists some of the common causes of trouble. If assistance is needed, contact your Exmark Service Dealer. Problem Possible Cause Corrective Action Discharge gate does not open and/or close. -
Page 18: California Proposition 65 Warning Information
While the exposure from Exmark products may be negligible or well within the “no significant risk” range, out of an abundance of caution, Exmark has elected to provide the Prop 65 warnings. Moreover, if Exmark does not provide these warnings, it could be sued by the State of California or by... - Page 19 Service Record Date: Description of Work Done: Service Done By:...
- Page 20 Place Model No. and Serial No. Date Purchased Label Here (Included in the Literature Pack) or Fill in Below Model No. Serial No. ©2019 Exmark Mfg. Co., Inc. Part No. 4504-477 Rev. B 2101 Ashland Ave (402) 223-6375 Beatrice, NE 68310 Fax (402) 223-5489...