Table of Contents

Related Manuals for Hohner UNIVERSAL 52/8 S

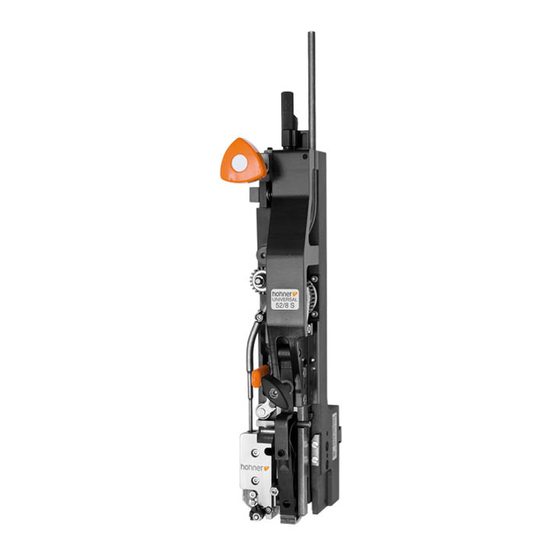
Summary of Contents for Hohner UNIVERSAL 52/8 S
- Page 1 Operating-Instructions Page: Spare parts list Special staples Options Opt. 1 UNIVERSAL 52/8 S Narrow Stitching Head Edition 04/2010 Hohner Maschinenbau GmbH Gänsäcker 19, 78532 Tuttlingen, Telefon 07462/9468-0, Telefax 07462/9468-20...
- Page 2 HK 52/8 S Hohner Maschinenbau GmbH...
- Page 3 Customer Entries Stitching head no: ......Machine manufacturer: ......Type of manufacturer: ......Manufacturer' s Address Company name: Hohner Maschinenbau GmbH Street: Gänsäcker 19 Town: D-78532 Tuttlingen Telephone: +49 (0) 7462 / 9468-0 Fax: +49 (0) 7462 / 9468-20 Email: info@hohner-postpress.com...
-
Page 4: Table Of Contents
Exchangeable parts – Changeover (stitch type) ............38 3.10.1 Exchangeable parts ....................39 3.11 Procedure - Converting from standard to loop stitching..........41 3.12 Adapting the stitch and leg length settings ..............41 4 SERVICING Lubrication ........................43 HK 52/8 S Hohner Maschinenbau GmbH... - Page 5 Replacing the circular knife ................51 4.2.4.3 Adjusting the circular knife ................51 4.2.5 Replacing the clincher....................53 5 FAULTS Causes and elimination of faults.................. 54 7 LIST OF SPARE PARTS 8 SPECIAL STAPLES 9 OPTIONS Opt. 1 Hohner Maschinenbau GmbH HK 52/8 S...
-
Page 6: Safety Information
These will help you to use all of the functions of the machine in an optimal manner. This symbol requires you to take action. • This sign serves as a symbol for listing items. HK 52/8 S Hohner Maschinenbau GmbH... -
Page 7: Obligation And Liability
All safety and danger signs on the machine should be maintained in a legible condition and should be renewed where necessary. 1.9 Staff training Only trained and instructed personnel may install, operate, set and maintain the stitching head. Hohner Maschinenbau GmbH HK 52/8 S... -
Page 8: Parts Of The Equipment Which Are Particularly Dangerous
Substances and materials used (e.g. solvents and lubricants) must be handled correctly and disposed of in an environmentally friendly manner. HK 52/8 S Hohner Maschinenbau GmbH... - Page 9 Safety Information Hohner Maschinenbau GmbH HK 52/8 S...
-
Page 10: Description Of The Stitching Head
Description of the Stitching Head 2 Description of the Stitching Head Fig. 1 HK 52/8 S Hohner Maschinenbau GmbH... -
Page 11: General Overview
2,6 kg / 5.73 lbs Quality of the stitching wire Only use perfect quality classes, in normal or steel strength as required. Pay attention to abrasion resistance, as heavy abrasion will clog the wire-guidance parts. Hohner Maschinenbau GmbH HK 52/8 S... -
Page 12: Normal Stitch
Nr. I – III 0,70 x 0,35 mm (0.028 x 0.014 in.) 0,75 x 0,55 mm (0.030 x 0.022 in.) Possible distances between wire stitches and stitch thicknesses in mm With holding down device HK 52/8 S Hohner Maschinenbau GmbH... -
Page 13: Loop Stitch
Max. stitch thickness Stitching wire coil: No. 24 - 26 Ø 0.60 - 0.50 mm Ø 0.024 - 0.020 in. Possible distances between wire stitches and stitch thicknesses in mm With holding down device Hohner Maschinenbau GmbH HK 52/8 S... - Page 14 Description of the Stitching Head Fig. 2 HK 52/8 S Hohner Maschinenbau GmbH...
-
Page 15: Dimensional Sheet
46 00 033 Torx screwdriver T20 46 00 039 Torx screwdriver T10 46 00 044 Adjusting handle 94 61 230 Wire guide, complete according to machine manufacturer Clincher box, complete according to machine manufacturer Hohner Maschinenbau GmbH HK 52/8 S... -
Page 16: Operation
Operation 3 Operation Fig. 4 Middle of Staple Fig. 5 HK 52/8 S Hohner Maschinenbau GmbH... -
Page 17: Installation Of The Stitching Head
Unscrew the upper or lower grub screw to adjust the angle of inclination. - Remove stitching head. - Adjust set screws - Fit stitching head. - Correct if necessary. Hohner Maschinenbau GmbH HK 52/8 S... - Page 18 Operation Fig. 6 HK 52/8 S Hohner Maschinenbau GmbH...
-
Page 19: Fitting The Wire Guide
- Align wire guide to wire roller , in order to ensure perfect wire guidance. - Tighten knurled screw in order to fix the wire guide Hohner Maschinenbau GmbH HK 52/8 S... - Page 20 Operation Fig. 7 HK 52/8 S Hohner Maschinenbau GmbH...
-
Page 21: Fitting The Clincher Box
. Slightly screw down clincher box using slotted screws and clamping nuts - Slide clincher box beneath the center of the stitching head. - Fix clincher box by tightening the locking nuts (and locking screws). Hohner Maschinenbau GmbH HK 52/8 S... - Page 22 Operation Fig. 8 HK 52/8 S Hohner Maschinenbau GmbH...
-
Page 23: Adjusting The Clincher Box
- Loosen locking nuts (or clamping screws) (and locking screws). - Move clincher box until it is precisely aligned with the center of the bender. - Fix clincher box by tightening the locking nuts (or clamping screws) (and locking screws). Hohner Maschinenbau GmbH HK 52/8 S... - Page 24 Operation Fig. 9 HK 52/8 S Hohner Maschinenbau GmbH...
-
Page 25: Feeding The Stitching Wire
(Torx screw) and remove wire guide tube - Disentangle wire and remove from wire guide tubes. - Press adjusting disk on wire return lock downwards in order to eliminate its clamping effect and pull wire out. Hohner Maschinenbau GmbH HK 52/8 S... - Page 26 Operation Fig. 10 HK 52/8 S Hohner Maschinenbau GmbH...
-
Page 27: Straighten The Stitching Wire
(possible by “levering” the rocker - Turn eccentric fixing of the wire alignment roller with the screwdriver until the stitching wire runs absolutely straight out of the circular knife. Hohner Maschinenbau GmbH HK 52/8 S... - Page 28 Operation Fig. 11 HK 52/8 S Hohner Maschinenbau GmbH...
-
Page 29: Setting The Stitch Length
Fine adjustment of the wire length is performed by means of test stitches. If the stitch is not the required length, more wire can be fed by turning knob (+), or less wire can be fed by turning the knob (-) (cf. scale Hohner Maschinenbau GmbH HK 52/8 S... - Page 30 Operation Fig. 12a Fig. 12b HK 52/8 S Hohner Maschinenbau GmbH...
-
Page 31: Setting The Leg Length Of The Stitch
The notch at the scale pin marks the set value of the stitch thickness in mm for normal staples. The end of the scale pin marks the set value of the stitch thickness in mm for loop-stitching clamps (-L6-). Hohner Maschinenbau GmbH HK 52/8 S... - Page 32 Operation View X Fig. 13 Fig. 14 Fig. 15 HK 52/8 S Hohner Maschinenbau GmbH...
-
Page 33: Setting The Former
To adjust: - Loosen locknut - Turn grub screw until it is perfectly aligned. - Tighten locknut When changing the stitching wire thickness, the former setting should be checked and corrected if necessary. Hohner Maschinenbau GmbH HK 52/8 S... - Page 34 Operation Fig. 16 Fig. 17 HK 52/8 S Hohner Maschinenbau GmbH...
-
Page 35: Adjustment Of The Bender
- Tighten locknut after adjustment. - Run unit and check whether the latch is unlatched. Repeat procedure – if necessary – until perfect functioning is ensured. - Refit former (see 4.2.1). Hohner Maschinenbau GmbH HK 52/8 S... - Page 36 Operation correct incorrect incorrect Fig. 18 incorrect correct Fig. 19 Fig. 19a Fig. 19b HK 52/8 S Hohner Maschinenbau GmbH...
-
Page 37: Spine Centering Parts
- Shift the centering prism until it is aligned with the slide prism - Correct if necessary after having carried out test stitches. Hohner Maschinenbau GmbH HK 52/8 S... -
Page 38: Exchangeable Parts - Changeover (Stitch Type)
Operation 3.10 Exchangeable parts – Changeover (stitch type) Converting the stitching head (standard stitch / loop stitch) Fig. 20a Fig. 20b Fig. 20 HK 52/8 S Hohner Maschinenbau GmbH... -
Page 39: Exchangeable Parts
Or a set of exchangeable parts loop stitch L8, Art.-no. 0522 942, consisting of: Bender -L8-, cpl. Art.-no. 9963 458 Former -L8-, cpl. Art. no. 9963 455 Former lever -L- Art. no. 9963 840 Hohner Maschinenbau GmbH HK 52/8 S... - Page 40 Operation Fig. 21 HK 52/8 S Hohner Maschinenbau GmbH...
-
Page 41: Procedure - Converting From Standard To Loop Stitching
3.12 Adapting the stitch and leg length settings As the loop stitch requires a longer wire piece, a new setting is required for the stitch and leg length (cf. 3.6 Setting the stitch length). Hohner Maschinenbau GmbH HK 52/8 S... -
Page 42: Servicing
Servicing 4 Servicing Fig. 22 HK 52/8 S Hohner Maschinenbau GmbH... -
Page 43: Lubrication
Guideway oil with viscosity class 65-70 (ISO- viscosity class in accordance with DIN 51 519). 4.1.2 Lubrication plan Date Operating hours Oil or grease used Performed by: status - display on Name stitching unit Signature Hohner Maschinenbau GmbH HK 52/8 S... -
Page 44: Installation And Replacement Of Parts
Servicing 4.2 Installation and replacement of parts Fig. 23 Fig. 24 HK 52/8 S Hohner Maschinenbau GmbH... -
Page 45: Replacing The Former
90° to the left (anticlockwise) and tilt upwards. - Remove former to the front. Installation is performed in the reverse. The gripping yoke is locked in horizontal position and unlocked in vertical position. - Adjust former according to Chap. 3.7. Hohner Maschinenbau GmbH HK 52/8 S... - Page 46 Servicing Fig. 25 Fig. 26 Fig. 27 HK 52/8 S Hohner Maschinenbau GmbH...
-
Page 47: Replacing The Bender
- Pull out bender downward (arrow A) Installation is performed in the inverse order. Press the latch slightly into the bender while the bender is being pushed into the stitching head. Hohner Maschinenbau GmbH HK 52/8 S... - Page 48 Servicing Fig. 28 HK 52/8 S Hohner Maschinenbau GmbH...
-
Page 49: Exchanging The Driver
90° to the left (anticlockwise) and tilt upwards. - Remove former to the front. - Unscrew the two threaded bolts in the driver and pull out driver downwards. Installation is performed in the inverse order. Hohner Maschinenbau GmbH HK 52/8 S... - Page 50 Servicing Fig. 29 Fig. 30 Fig. 31 Fig. 32 Fig. 33 HK 52/8 S Hohner Maschinenbau GmbH...
-
Page 51: Replacing The Knife
"carefully levering" with a screwdriver. - Tighten clamping screw If the distance between the knives is set too close the knife slider may block and cause a wire jam. Hohner Maschinenbau GmbH HK 52/8 S... - Page 52 Servicing Fig. 34 HK 52/8 S Hohner Maschinenbau GmbH...
-
Page 53: Replacing The Clincher
Remove clincher pusher downwards. Turn clincher upwards in the clincher box remove from retention pin . Push new clincher onto retention pin and turn to the center of the clincher box. Replace clincher pusher. Hohner Maschinenbau GmbH HK 52/8 S... -
Page 54: Faults
4.2.3. - Shoe tongue pressure too weak: remove obstructing pieces of wire or replace pressure spring in shoe tongue. - Align clincher box, cf. 3.1.4. HK 52/8 S Hohner Maschinenbau GmbH... - Page 55 - Weak spring pressure on former. pieces fall out: - Wire not aligned, cf. 3.5. - Former set incorrectly, cf. 4.2.1. Remedy for faults: You will find most faults and their causes in the loop stitching preceding section. Hohner Maschinenbau GmbH HK 52/8 S...