Table of Contents
Advertisement
Advertisement
Table of Contents

Related Manuals for Ryobi OWS1870


Summary of Contents for Ryobi OWS1870
- Page 1 ORIGINAL INSTRUCTIONS Cordless Garden Sprayer 7.5L OWS1870...
- Page 2 Important! It is essential that you read the instructions in this manual before assembling, operating, and maintaining the product. Subject to technical modification.
-
Page 3: Intended Use
Safety, performance, and dependability have been given ■ When operating a power tool outdoors, use an top priority in the design of your weed sprayer. extension cord suitable for outdoor use. Use of a cord suitable for outdoor use reduces the risk of electric shock. -
Page 4: Additional Safety Warnings
■ Maintain power tools. Check for misalignment or WARNING binding of moving parts, breakage of parts and any Keep spray materials away from eyes. If spray materials other condition that may affect the power tool’s come in contact with the eyes, wash them immediately operation. -
Page 5: Filling The Container
■ Do not spray where spark, flame, or other source of FILLING THE CONTAINER ignition is present. ■ Stand the sprayer on a level surface, do not fill the ■ Do not spray in the direction of people or animals. container above the maximum mark. -
Page 6: Transportation And Storage
TRANSPORTATION AND STORAGE WARNING ■ Remove the battery pack. To avoid serious personal injury, always remove the battery pack from the product when cleaning or ■ Ensure that all parts are clean and dry. performing any maintenance. ■ Clean all foreign materials from the product. ■... -
Page 7: Symbols On The Product
The following signal words and meanings are intended to SYMBOLS ON THE PRODUCT explain the levels of risk associated with the product: DANGER Safety alert Indicates an imminently hazardous situation, which, if not avoided, will result in death or serious injury. Read and understand all instructions WARNING before operating the product, follow all... -
Page 8: What's In The Box
WHAT’S IN THE BOX... -
Page 9: Know Your Product
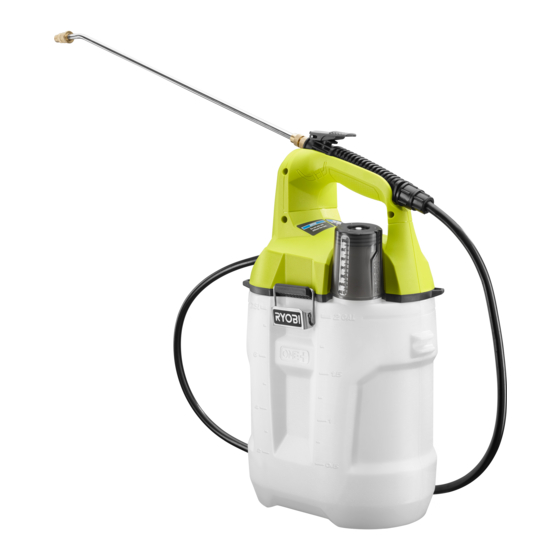
KNOW YOUR PRODUCT 1. Nozzle 7. Motor housing 2. Spray wand 8. Latch (x2) 3. Battery port 9. Hose 4. Trigger with lock-on 10. Tank 5. Spray wand handle 6. Spray tank cover/measuring cup... -
Page 10: Getting Started
GETTING STARTED Always wear safety goggles or safety glasses with side Connect the spray wand to the handle. shields when operating the product. Wear non-skid, 1. Insert the spray wand into the handle. protective footwear that will protect your feet and improve 2. - Page 11 GETTING STARTED GETTING STARTED Attach the hose to the handle. Attach the hose to the spray tank. Filling the tank. thoroughly clean and rinse these items after use. If 1. Insert the hose end into the opening on the threaded 3.
- Page 13 OVERVIEW Using the sprayer Cleaning the sprayer p.12 p.14 Cleaning the nozzle Storing the sprayer p.17 p.18...
-
Page 14: Operation
OPERATION USING THE SPRAYER WARNING: Do not smoke, eat, or drink while using the product. Do not spray in the direction of people or animals. Always spray downwind. 1. Install the battery pack. 2. Press the on/off button. NOTE: The spray wand may be used with the hose extended or with the handle resting in the cradle. - Page 15 OPERATION 3. Adjust the spray nozzle. The spray nozzle can be adjusted from a stream to a fan spray. ● Turn the spray nozzle counter- clockwise for a stream. ● Turn the spray nozzle clockwise for a fan spray. 4. Turn the sprayer on. ●...
-
Page 16: Cleaning The Sprayer
MAINTENANCE CLEANING THE SPRAYER 1. Remove the battery pack. 2. Lift up and release the latches on each side of the product. 3. Remove the motor housing from the tank. 4. Turn the tank cover counter-clockwise and remove it from the spray tank. Drain the contents of the spray tank through the fill area. - Page 17 MAINTENANCE 5. Fill the spray tank about one-third full with clean water. A small amount of mild household detergent may be added. Re-attach the tank cover and turn it clockwise. 6. Re-attach the motor housing to the spray tank. 7. Re-attach the latches on each side of the product.
- Page 18 MAINTENANCE 9. Turn on the product. 10. Make sure to direct the spray toward an area that will not be damaged by the liquid. A container may be used to catch the sprayed liquid. Press the trigger to start the flow of liquid. NOTE: Spray until the tank has been completely emptied.
-
Page 19: Cleaning The Nozzle
MAINTENANCE CLEANING THE NOZZLE 1. Remove the battery pack. 2. Remove the adjustable nozzle from the spray wand. 3. Push a small wire through the cross holes to clear any debris. 4. Rinse the cross holes and nozzle with clean water. NOTE: Wipe the nozzle and cross holes with a clean dry cloth and reinstall the nozzle. -
Page 20: Storing The Sprayer
STORAGE STORING THE SPRAYER 1. Remove the battery pack. 2. Wipe the outside of the spray tank with a clean, dry cloth. 3. Wrap the hose around the spray tank and secure it using the holders. 4. Store the product in a cool, dry, and well-ventilated place that is inaccessible to children. -
Page 21: Product Specifications
PRODUCT SPECIFICATIONS Model OWS1870 Pump type Diaphragm pump Spray valve Integral grip lever Tank capacity 7.5 L Dimension (WxLxH) 175 x 280 x 430 mm Gross mass (empty) 1.97 kg (without battery) Gross mass (full) 9.4 kg Rated voltage 18 V DC... - Page 24 Imported by: Techtronic Industries Australia Pty Ltd 31 Gilby Road, Mount Waverley, VIC 3149 Melbourne, Australia Techtronic Industries N.Z. Limited 2 Landing Drive, Mangere Auckland, 2022, New Zealand 960087314-01...