
Related Manuals for Alcatel-Lucent 8029s


Summary of Contents for Alcatel-Lucent 8029s
- Page 1 OpenTouch® Suite for MLE 8039s Premium DeskPhone 8029s Premium DeskPhone User Manual 8AL90354USAAed01-1824...
- Page 2 Premium DeskPhone 2 /65 8AL90354USAAed01...
- Page 3 Premium DeskPhone Introduction Thank you for choosing an Alcatel-Lucent phone. This model offers enhanced ergonomic features for more effective communication. This document describes the services offered by the following sets connected to an OmniPCX Enterprise system: • Alcatel-Lucent 8039s Premium DeskPhone (8039s).
-
Page 4: Table Of Contents
1.1 8039s Premium DeskPhone 1.1.1 Phone description 1.1.2 Main screen and navigation keys 1.1.3 Call management screen 1.2 8029s Premium DeskPhone 1.2.1 Phone description 1.2.2 Main screen and navigation keys 1.2.3 Call management screen 1.2.4 Changing or updating the paper label 1.3 Welcome screens... - Page 5 Premium DeskPhone 2.17 Consulting your voice mailbox 2.18 Sending a text message to an internal contact 2.19 Consulting text messages 2.20 Lock / unlock your telephone During a conversation 3.1 Making a second call during a conversation 3.1.1 Other methods for calling a second contact 3.1.2 Release the second call and recover the call on hold 3.2 Answering a second call during a conversation 3.3 Switching between calls (Broker call)
- Page 6 Premium DeskPhone Programming your telephone 7.1 Initializing your voice mailbox 7.2 Customizing your voice greeting 7.3 Modify the password for your phone set 7.4 Modify the password for your voice mailbox 7.5 Adjusting the audio functions 7.5.1 Choose the tune 7.5.2 Adjusting the ringer volume 7.5.3 Activate/deactivate silent mode 7.5.4 Activate/deactivate meeting mode (progressive ringing)
- Page 7 10.3.1 List of supplies 10.3.2 Installation 10.3.3 Connect the device 10.4 Wall mounting kit 10.5 Connect a 3 pole jack headset 10.6 Alcatel-Lucent Enterprise Application Partner Program Technical specifications Ordering information Guarantee and clauses 13.1 Safety Instructions 13.2 Regulatory Statements...
-
Page 8: Getting To Know Your Telephone
Premium DeskPhone Getting to know your telephone 1.1 8039s Premium DeskPhone This phone is part of digital phone range. With its color display associated to 10 dedicated functions keys, and an intuitive navigation key, the 8039s Premium DeskPhone provides a rich digital communications experience and a great conversations comfort with an outstanding audio quality either in hands free or using the comfort handset. -
Page 9: Call Management Screen
Premium DeskPhone Back/Exit key: Use this key to go back to the previous step. Use this key to go back to the homepage (long press). Manage your call forwarding by pressing the key associated with the forward icon. • Stationary white icon: No forwarding activated. •... -
Page 10: 8029S Premium Deskphone
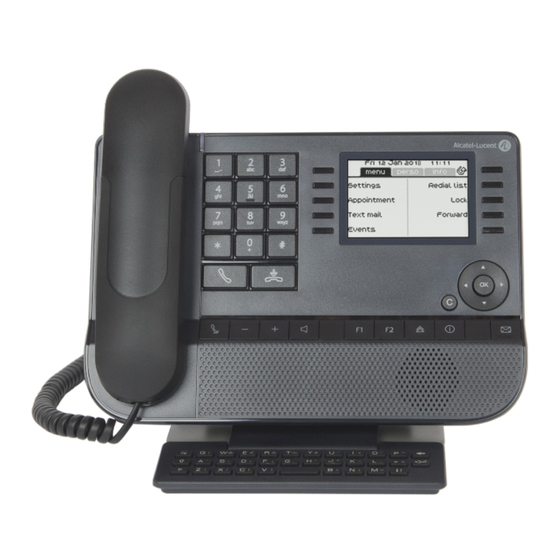
This phone is part of digital phone range. In addition to a clear monochrome display associated to 6 dedicated function keys and an intuitive navigation key, the 8029s Premium DeskPhone provides 4 programmable keys as a smart add-on module, for a quick access to your favorite contacts or features. It offers a rich digital communications experience and a great conversations comfort with an outstanding audio quality either in hands free or using the comfort handset. -
Page 11: Call Management Screen
Premium DeskPhone 1.2.3 Call management screen Tabs: Incoming call, Call in progress, Call on hold, … Softkeys: actions available depending on the call status (when presentation screen is Notification (popup) of not displayed) incoming call Each tab corresponds to a call, the status of which is symbolized by its icon (in progress, call on hold, arrival of new call). -
Page 12: Welcome Screens
Premium DeskPhone 1.3 Welcome screens 8039s 8029s 1.3.1 Homepage description You can access all of your phone's features from these screens. The default display has three pages that you can access by pressing to the page tabs at the top of the screen. The selected page is highlighted. -
Page 13: Permanent Features Keys
Premium DeskPhone Call icons Incoming call icon. Call in progress icon. Call holding icon. Your contact ended the conversation. 1.5 Permanent features keys They are located just above the loudspeaker. • Mute and interphony key. During a call, press this key to stop your contact from hearing you. When idle, press this key to switch the phone to interphony mode. -
Page 14: Keyboard
Premium DeskPhone 1.6 Keyboard 1.6.1 Magnetic alphabetic keyboard Your set is provided with a magnetic alphabetic keyboard. The keyboard depends on your country and languages. The magnetic keyboard is automatically fixed on the base of the set. It is connected to the corresponding connector behind the phone. -
Page 15: Description Of The Connectors
Premium DeskPhone 1.7 Description of the connectors Various connections to allow phone extensions. 8039s, 8029s Jack connector - CTIA standards A Microphone B Ground C Audio (right) D Audio (left) 8039s 8029s Add-on module connector (SATA type). RJ 11 connector for external ringer and audio active envelop indicator. -
Page 16: Add-On Module
Premium DeskPhone 1.8 Add-on module Depending on your DeskPhone, phone capabilities can be extended with add-ons: 8039s 8029s Premium Add-on 10 keys modules Premium Smart display 14 keys module Premium add-on 40-key modules 1.8.1 Install the add-on to the deskphone •... -
Page 17: Install More Than One Add-On Module
Premium DeskPhone 1.8.2 Install more than one add-on module It is possible to connect up to three add-on modules (Premium Smart Display 14 keys, Premium Add-on 40 keys). To attach another add-on, affix and connect the new add-on to the one that is already connected: o The first add-on is connected to the deskphone. -
Page 18: Changing Or Updating The Paper Label
Premium DeskPhone 1.8.4 Changing or updating the paper label • Premium Add-on 10 keys (with paper labels) o Remove the protective cover (1): Insert a thin object (or your fingernail) in the slot (a) to lift the protective cover. Carefully remove the cover at the first notch (b). The cover is held in place by small notches, take care not to break the plastic cover near the notches. -
Page 19: Using Your Telephone
Premium DeskPhone Using your telephone 2.1 Identify the terminal you are on The number of your telephone is displayed on the 'Info' page. 2.2 Consulting the call log At any time, you can consult all answered and unanswered incoming and outgoing calls. •... -
Page 20: Making A Call
Premium DeskPhone 2.3 Making a call Use one of the following: • Dial the destination number. The hands-free mode is activated automatically. • Unhook the handset Dial the destination number. • Press the Off-hook key of the headset Dial the destination number. If your headset has no Off- hook/On-hook key, use the phone keys and switch on the audio on the headset ( •... -
Page 21: Switching Between Audio Modes
Premium DeskPhone 2.5 Switching between audio modes During the conversation, you can switch between different audio modes (handset, loudspeaker, hands- free or headset, if connected) by pressing the loudspeaker/hands-free key until the desired audio mode is displayed: . This feature depends on connected devices. The key is lit when the loudspeaker or hands-free mode is selected. -
Page 22: Making Calls By Name (Company Directory)
Premium DeskPhone 2.7 Making calls by name (company directory) This feature depends on the system configuration. If necessary, contact your administrator. • Enter the name of your contact: 'last name' or 'initials' or 'last name first name'. • Select the type of search you want (last name, last name and first name or initials) Display of all the contacts matching the search criteria. -
Page 23: Callback Requests
Premium DeskPhone 2.10 Callback requests The messaging key flashes when you have a callback request. • The messaging key flashes when you have a callback request. • Callback / xx Callbacks • Select a callback request in the list if there is more than one. If there is only one callback request, it is displayed directly. -
Page 24: Requesting Automatic Callback If Internal Number Is Busy
Premium DeskPhone • Select the type of call: xx Non replied internal calls xx Non replied external calls • Use one of the following: Select an entry Delete all / Delete Press the key associated with the trash icon. 2.12 Requesting automatic callback if internal number is busy •... -
Page 25: Mute, So That Your Contact Cannot Hear You
Premium DeskPhone 2.15 Mute, so that your contact cannot hear you You can hear your contact but he/she cannot hear you: 2.15.1 From the set • During a conversation. • Disable microphone The key lights up • Resume the conversation The key is no longer lit 2.15.2 From the headset •... -
Page 26: Consulting Text Messages
Premium DeskPhone Sending a message to complete • To complete • Select a predefined message to complete. • Complete your message. • Apply Sending a new message • To create (Msg to create) • Write your message. • Apply Sending the previous message •... -
Page 27: During A Conversation
Premium DeskPhone During a conversation 3.1 Making a second call during a conversation • During a conversation. • Use one of the following: o New call The first call is on hold. Hold • Number of second contact. 3.1.1 Other methods for calling a second contact •... -
Page 28: Switching Between Calls (Broker Call)
Premium DeskPhone 3.3 Switching between calls (Broker call) During a conversation, a second call is on hold. Use one of the following: • Select the call on hold icon from the conversation screen. • Select the tab which is displaying the call on hold Retrieve •... -
Page 29: Talk Simultaneously To More Than 2 Contacts
Premium DeskPhone 3.6 Talk simultaneously to more than 2 contacts This feature depends on the system configuration. If necessary, contact your administrator. You are in a conference call with 2 contacts. To add another participant to the conference: • • Dial the number of your contact (dial, directories, last numbers dialed...). -
Page 30: Placing An Outside Call On Hold (Parking)
Premium DeskPhone 3.8 Placing an outside call on hold (parking) You can place an outside call on hold and recover the call on another telephone: • During a conversation. • Park the call • Enter the number of the parking destination phone. Retrieve the call from the parking destination phone: •... -
Page 31: Sharing
Premium DeskPhone Sharing 4.1 Answering the general bell When the operator is absent, outside calls to the operator are indicated by a general bell. To answer: • Reach the 'Menu' page. • Settings My services Consultation Call pick up services Night service call pick up 4.2 Manager/Assistant filtering System configuration allows 'Manager/Assistant' groups to be formed, so that the manager's calls can be directed to one or more assistants. -
Page 32: Hunting Groups
Premium DeskPhone 4.4 Hunting groups Hunting group call: Certain numbers can form a hunting group and can be called by dialling the group number. Temporary exit from your hunting group: • Reach the 'Menu' page. • Settings My services Consultation (Consult) Additional services Leave hunting group •... -
Page 33: Calling A Contact On His/Her Loudspeaker
Premium DeskPhone 4.7 Calling a contact on his/her loudspeaker Your internal contact does not answer. If authorised, you can remotely activate her/his phone: • Your contact does not reply. • LS announce (Announce) You are connected to the loudspeaker on your contact's phone (if he/she has the hands-free function). -
Page 34: Keep In Touch
Premium DeskPhone Keep in touch 5.1 Forwarding calls to another number (immediate forward) The number can be your home, mobile, voice mailbox or an internal extension (operator, etc.). • Select the forward icon. • Immediate forward (Immediate / Imm fwd / Immediate fwd) •... -
Page 35: Forwarding Calls To Your
Premium DeskPhone To deactivate the Do not disturb feature: • Select the forward icon. • Deact DND • Enter code to activate the feature. • Apply 5.4 Forwarding calls to your pager Callers will thus be able to contact you while you are moving around the company •... -
Page 36: Cancelling All Forwards
Premium DeskPhone • Select the number to forward Principal line selection Second line selection • Number receiving forward. • 5.7 Cancelling all forwards • Use one of the following: Select the forward icon. o Reach the 'Menu' page Forward • Deactivate Deactivate forward To cancel all forwards, you can programme another type of forward too. -
Page 37: Managing Your Charges
Premium DeskPhone Managing your charges 6.1 Charging your calls directly to business accounts You can charge the cost of your outside calls to business account numbers. • Reach the 'Menu' page. • Settings My services Consultation Additional services Business account code •... -
Page 38: Programming Your Telephone
Premium DeskPhone Programming your telephone 7.1 Initializing your voice mailbox • Light flashes. • • Enter your personal code then record your name according to voice guide instructions. Your personal code is used to access your voice mailbox and to lock your telephone. A weak personal code will be rejected by the system: •... -
Page 39: Modify The Password For Your Voice Mailbox
Premium DeskPhone 7.4 Modify the password for your voice mailbox • • Voice mail / new voice message / x new voice messages • Enter your personal code. • Perso options Password • New code (4 digits). • Apply • As long as your voice mailbox has not been initialized, personal code is 0000. -
Page 40: Activate/Deactivate Silent Mode
Premium DeskPhone 7.5.3 Activate/deactivate silent mode • More options Silent mode To activate. Silent mode To deactivate. • End / To adjust other audio features. 7.5.4 Activate/deactivate meeting mode (progressive ringing) • More options Progressive ringing To activate. Progressive ringing To deactivate. -
Page 41: Selecting Language
Premium DeskPhone 7.8 Selecting language • Reach the 'Menu' page. • Settings Phone Language • Enter your password (if required) and apply. • Select the language of your choice. • • 7.9 Programming keys for call numbers and functions (Perso page/add-on keys) Depending on your deskphone, you can program: •... -
Page 42: Delete A Programmed Key
Premium DeskPhone Reach the 'Menu' page Settings Phone Key program Prog perso page • Select the key to modify. • Enter your password (if required) and apply. • Modify • 7.11 Delete a programmed key • Use one of the following: Reach the 'Menu' page Settings Phone Key program Prog perso page •... -
Page 43: Call The Associated Set
Premium DeskPhone 7.13 Call the associated set The number of another set can be associated with your set number (see Modify the associated number). To call it: • Reach the 'Menu' page. • Settings My services Consultation (Consult) Associate services Call associate 7.14 Forward your calls to the associated number If you have previously defined an associated number, you can forward your calls to this number. -
Page 44: Create, Modify Or Consult Your Interphony List (Max. 10 Numbers)
Premium DeskPhone 7.17 Create, modify or consult your interphony list (max. 10 numbers) • Reach the 'Menu' page. • Settings My services Interphony • Enter your password. • Select an entry. • Follow the on-screen instructions. 7.18 Install a jack accessory (headset, hands-free, loudspeaker) By default, the audio jack of your telephone can be used to connect a headset, hands-free kit or loudspeaker. -
Page 45: Contacting Your Administrator (Technical Support)
Premium DeskPhone 7.19 Contacting your administrator (Technical support) If necessary you may need to contact your administrator. Before contacting your administrator, make sure you have information such as your phone's codes and software version to hand. 7.19.1 Date code (right) / Technical code (left) The codes are located under the backshell of the phone. -
Page 46: Meet Me' Conference
Premium DeskPhone 'Meet me' conference The 'Meet me' function is used to set up a conference with a maximum of 29 persons (maximum value is configured in OXE system, it can be 7, 15 or 29). 8.1 Initiate a 'Meet me' conference In order for the participants to join the conference, you must first decide on a meeting time for the conference and send them the access code. -
Page 47: Acd: Agent Set/ Supervisor Station
Premium DeskPhone ACD: Agent set/ Supervisor station 9.1 Agent set A call center solution allows optimum distribution of calls to agents according to their availability and skills. 9.2 Open an agent session (LogOn) – Agent set • Reach the 'Menu' page. •... -
Page 48: Close An Agent Session (Logoff)
Premium DeskPhone loading or playback of a welcome message. Access to welcome message configuration involves entering the agent identifier number and a password. • ACR manage. The agent can act on the distribution of the ACD calls by assigning or not assigning expertise areas. -
Page 49: Supervision Or Acceptance Of An Assistance Request
Premium DeskPhone 9.8 Supervision or acceptance of an assistance request The supervisor has access to the supervision functions either by accepting an assistance request from an agent or by pressing the 'Help ' function key in the 'Perso ' page. •... -
Page 50: Accessories
Quick Disconnect (QD) - Cables Jack 3,5 mm, 4-pole and 3-pole • Corded Monaural 3BN78815AB (Plantronics C215). Cables Jack 3,5 mm, 4-pole and 3-pole 10.1.2 Conference module • Alcatel-Lucent 8125 Audioffice usb. • Alcatel-Lucent 8115 Audioffice usb. 10.1.3 EHS interface • External ringing interface module (MWS 3GV28050AA). -
Page 51: 8115/8125 Audioffice
Premium DeskPhone 10.2 8115/8125 Audioffice 8039s 8029s The accessory is supported by the following sets This section describes how to use the conference module 8115/8125 Audioffice with your deskphone. For more information about 8115/8125 Audioffice see the user manual of the device. -
Page 52: Description
Premium DeskPhone 10.2.2 Description 8115 Audioffice 8125 Audioffice Mute Mute Adjust volume. Adjust volume. Receive and End a call. Receive and End a call. Bluetooth pairing. 10.2.3 Set-up Once installed, to benefit from the best sound quality avoid placing any objects (walls or cumbersome objects) within a range of 20cm. -
Page 53: Connect Your Devices
Bluetooth device paired. Long push the volume button until you hear a sound signal. A 'Pairing mode: waiting for connection' message allows you to pair your Alcatel-Lucent 8125 Audioffice in your device Bluetooth menu. A final sound confirms the pairing. -
Page 54: Use Your Device
Audioffice volume button to use it as a conference device. To end the call, hang up the call from the phone. Muting a call can be done with the Audioffice Mute button or thru the Alcatel-Lucent Deskphone Mute key. Adjusting the volume Turn the volume button to regulate the volume coming from the speakers. -
Page 55: Use The 8125 Audioffice With Your Mobile
Premium DeskPhone 10.2.7 Use the 8125 Audioffice with your mobile You can connect your mobile to the conference module by using the Lightening, 30 pin and micro-USB adapters. A Bluetooth® connection is needed to place and receive your mobile calls on the Alcatel- Lucent 8125 Audioffice. -
Page 56: External Ringing Interface Module (Mws 3Gv28050Aa)
Premium DeskPhone 10.3 External ringing interface module (MWS 3GV28050AA) 8039s 8029s The accessory is supported by the following sets The external ringing interface module allows driving an external system (like a ring or a lamp), following the ring tone cadence of the phone set connected on the telephone line. A switch on the electronic board allows selecting between 2 operation modes. -
Page 57: Connect The Device
Premium DeskPhone 10.3.3 Connect the device Phone set connected over IP and to an external power suply Connected to the DC power jack of the deskphone by using DC Japan cable. Connected to the power supply of the device. Connected to the RJ11 connector of the deskphone, by using the RJ11 cable. -
Page 58: Wall Mounting Kit
Premium DeskPhone 10.4 Wall mounting kit 1. Rotate the metal foot to flat. 2. Remove the rubber cover on phone back shell each side. 1. Drill two holes on the wall 1. Put the support on the back side of the (separation=90mm, diameter=6mm). -
Page 59: Connect A 3 Pole Jack Headset
Premium DeskPhone 10.5 Connect a 3 pole jack headset Your phone is equipped with a 3.5 mm, 4 pole jack. If your headset is not compatible (3 pole jack), you have to use adapters. Contact the manufacturer of your headset to find the appropriate adapter. Use the following kit which contains a 3 pole to 4 pole jack adapter and a RJ11 to SATA adapter: 80x8S SATA-RJ11 &... -
Page 60: Alcatel-Lucent Enterprise Application Partner Program
Premium DeskPhone 10.6 Alcatel-Lucent Enterprise Application Partner Program The mission of the Alcatel-Lucent Enterprise Application Partner Program is to support a broad ecosystem of developers and partners throughout the deskphone Lifecycle. In this context, certification tests are made between applications or devices of partners and Alcatel-Lucent Enterprise’s platforms. It certifies proper inter-working with applications or devices of the partner. -
Page 61: Technical Specifications
Premium DeskPhone Technical specifications 8039s 8029s Width 252 mm (9,92 in) 252 mm (9,92 in) Depth on a table 200 mm (7,87 in) 200 mm (7,87 in) Depth with wall mounting kit, and handset Height 204 mm (8,03 in) 204 mm (8,03 in) - Page 62 Premium DeskPhone External ringing interface module 8115 Audioffice 8125 Audioffice (MWS 3GV28050AA) Maximum distance between the phone 3 m (10 feet) set and the device Width 124 mm (1,2 in) 290 mm (11,4 in) 290 mm (11,4 in) Depth on a table 130 mm (5 in) 114 mm (4,5 in) 114 mm (4,5 in)
-
Page 63: Ordering Information
Premium DeskPhone Ordering information 8029s Premium Deskphone 3MG27202xx 8039s Premium Deskphone 3MG27203xx 8028/8029 paper labels (x50) 3MG27114AA Premium Add-on 10 keys module 3MG27105AB Premium Add on 10 key modules paper labels (x64) 3MG27115AA Premium Smart display 14 keys module with clip... -
Page 64: Guarantee And Clauses
Premium DeskPhone Guarantee and clauses 13.1 Safety Instructions • Changes or modifications to the equipment not expressly approved by the party responsible for compliance could void the user's authority to operate the equipment. • Magnets could affect the functioning of pacemakers and implanted heart defibrillators. Keep a safe distance between your pacemaker or implant defibrillator and the handset which includes magnetic elements: 4 centimeters (1,6 inches) at least. -
Page 65: Regulatory Statements
Other languages for these Safety and Regulatory Instructions and User Documentation are available at the following Web site: https://www.al-enterprise.com/products. The Alcatel-Lucent name and logo are trademarks of Nokia used under license by ALE. To view other trademarks used by affiliated companies of ALE Holding, visit: www.al-enterprise.com/en/legal/trademarks-copyright. - Page 66 Welcome screens You can access all of your phone's features from these screens. The default display has three pages that you can access by pressing to the page tabs at the top of the screen. The selected page is highlighted. •...
- Page 67 Call Switching between calls (Broker call) Dial the number directly or dial the number after pressing a Select the call on hold icon from the conversation Do not disturb line key (an off-hook key or hands-free key). screen. Select the forward icon. DoNotDisturb (DND) Call by name (Company directory) To cancel your second call and recover the first...