Table of Contents
Advertisement
Available languages
Available languages
X52 manual(ok)(24/11/04)
2004.12.22
9:05 PM
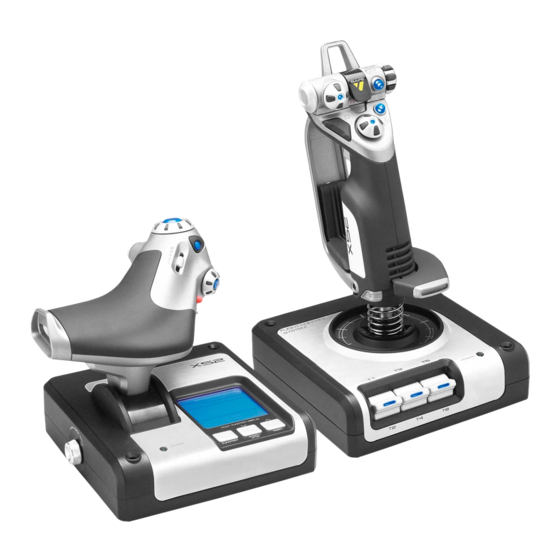
SAITEK X52 FLIGHT CONTROL SYSTEM - PRODUCT TOUR
Joystick
5-position adjustment
2-Stage metal trigger
to suit all hand sizes.
Destroy the enemy with the aid of a
precise and durable, cool-touch trigger.
Two-stages can be programmed with
separate fire functions.
Cool-touch
metal pinkie
switch can be
assigned shift
functionality to
double up on
programmable
commands.
3D Rudder Twist
handle on
joystick for
precise rudder
control; includes
integrated rudder
lock mechanism.
Precision centering mechanism
Non-contact technology on x and
y axes and constant spring force
reduce free play, improve control
and increase durability.
Page 3
3 toggle switches
Spring loaded and conveniently
positioned on the base for an
extra 6 programmable flight
commands.
Missile Launcher
Flip up the spring-loaded
safety cover to activate
missile launches.
Mode selector switch
2 x 8-way hat switches
3-position rotary switch with tri-
-1 pre-defined as point
state LED to indicate program
of view; select from
mode.
multiple view
3 Fire Buttons
perspectives and
assign frequently used
Backlit buttons
commands.
conveniently
positioned on
joystick head for
instant access in the
heat of the battle.
General Features
Backlighting
Illuminated buttons and Multi-Function Display (MFD) - ideal for
low light environments, guaranteed to stand out from the crowd.
Adjust brightness via Windows control panel.
Metal parts
Part metal construction for increased durability and maximum
comfort during extended gameplay.
3
Advertisement
Table of Contents

Related Manuals for Saitek X52


Summary of Contents for Saitek X52
- Page 1 X52 manual(ok)(24/11/04) 2004.12.22 9:05 PM Page 3 SAITEK X52 FLIGHT CONTROL SYSTEM - PRODUCT TOUR Joystick 5-position adjustment 2-Stage metal trigger 3 toggle switches to suit all hand sizes. Destroy the enemy with the aid of a Spring loaded and conveniently precise and durable, cool-touch trigger.
-
Page 2: Getting Started
At the Driver Setup screen, click Next to test your controller. When the Saitek Controller screen appears, try out all your controllerÕs buttons and controls to show that it is working properly. When you have finished, click OK. For more information on the use of the control panel, please see the Maintaining your Controller Settings section of this manual. - Page 3 Saitek Magic Mouse, HID-compliant mouse, Saitek Magic Keyboard and HID Keyboard Device (these are what XP calls the various elements of your Saitek controller). Continue to click on Next and Finish to accept the installation until the Registration screen appears.
- Page 4 MAINTAINING YOUR CONTROLLER SETTINGS Your Saitek X52 Flight Control System (FCS) is supplied ready for use. However, we want you to use it in the way that suits you best. We've therefore included the facility for you to change various settings on your stick and throttle units.You can, for example, vary the brightness of the LED buttons, check your stick is working correctly or change the way the date is displayed on your Multi-Functional Display (MFD).
- Page 5 X52 manual(ok)(24/11/04) 2004.12.22 9:05 PM Page 10 Click the Test tab. The controller features that you can test are displayed below. Test each feature as required. The way you do this varies, depending on what the feature does. It may, for example, involve pressing the corresponding button, or turning the corresponding rotary control.
- Page 6 Deadzones from the popup list of options displayed. Repeat this to link the pairs of sliders again. You can clear existing deadzones for an axis by right-clicking anywhere in the white box and selecting Clear Deadzone. You can maintain deadzones for the following features of the Saitek X52 FCS:...
- Page 7 Maintaining your LED brightness The authenticity of the flight control experience provided by your Saitek X52 FCS is enhanced by a number of LEDs on the throttle unit and flight stick. You can control the appearance of these LEDs, making them brighter or dimmer according to your preference.
- Page 8 Click a point on the scale itself, to move the slider in graduated steps along the scale. Maintaining MFD settings Your Saitek X52 FCS flight stick unit includes an MFD, or Multi-Functional Display. You can control the way information is displayed in your MFD by...
- Page 9 You can change some of the settings that determine the way your MFD works. For example, you may want to increase the brightness of the display, or change the way the date is shown. You do this in the MFD tab of the Saitek X52 Flight Stick Properties window. See Maintaining MFD settings in the section Maintaining your controller settings for more information.
- Page 10 If you've created profiles, you can view the names you've given to buttons in the selected mode in the current profile. If not, the standard name assigned to each button is displayed. The standard name reflects the function assigned to each button when your Saitek X52 FCS is supplied.
- Page 11 You can change the way the clutch button works via the MFD tab of the Saitek X52 Flight Stick properties window. See Changing the way your clutch button works in Maintaining your controller settings for details.
- Page 12 Built-in channel browser to help you find other chatters Disclaimer: Roger Wilco is the property of GameSpy Industries and as such Saitek plc accepts no responsibility for this product. Any queries relating to this product should be directed to GameSpy Industries.
- Page 13 IMPORTANT INFORMATION Important notice for Windows¨ XP users If you have updated Windows XP to Service Pack 2 the following screen will appear when installing the Saitek Magic Mouse and Keyboard: At this point we recommend that you select the No, not this time option and then click on Next to carry on with the installation.
- Page 14 How Do I Program My Controller? After getting to know your controller, you can start creating your own personal Profiles with the Saitek Smart Technology programming software (SST). This software has virtually unlimited programming capabilities and allows you to customize the controller to your exact gaming needs.
-
Page 15: Technical Support
If you do not have access to the internet, or if the website cannot answer your question, please contact your local Saitek Technical Support Team. We aim to offer quick, comprehensive and thorough technical support to all our users so, before you call, please make sure you have all the relevant information at hand. - Page 16 This Class B digital apparatus complies with Canadian ICES-003. Cet appareil numŽrique de la classe B est conforme ˆ la norme NMB-003 du Canada. CONTROLEUR DE VOL SAITEK X52 - VUE GENERALE DU PRODUIT JOYSTICK Ajustement de la prise ˆ 5 DŽtente ˆ...
- Page 17 Cliquez sur Suivant dans les deux fen•tres suivantes et ˆ l'Žcran de mise ˆ jour des drivers, cliquez sur Suivant pour tester votre contr™leur Lorsque l'Žcran de contr™le Saitek appara”t, essayez tous les boutons de votre contr™leur, ainsi que les contr™les, afin de vous assurer qu'ils fonctionnent correctement. Lorsque vous avez terminŽ, veuillez cliquer sur OK.
- Page 18 9:05 PM Page 36 invitŽ(e) ˆ installer des fonctions telles que la souris Saitek Magic Mouse ou le clavier Saitek Magic Keyboard (c'est le nom que XP donne aux diffŽrents ŽlŽments de votre contr™leur Saitek). Cliquez toujours sur Suivant, Continuer de toute fa•on et Terminer pour accepter l'installation jusqu'ˆ...
- Page 19 LED, vŽrifier si votre joystick fonctionne correctement ou modifier la fa•on dont la date est affichŽe sur votre affichage multi-fonctions (MFD). Pour cela, il vous suffit de changer les rŽglages de votre contr™leur dans la fen•tre de propriŽtŽs Saitek X52 Flight Stick. Vous pouvez ouvrir cette fen•tre de deux fa•ons diffŽrentes : ¥...
- Page 20 X52 manual(ok)(24/11/04) 2004.12.22 9:05 PM Page 40 Testez les caractŽristiques ˆ Žvaluer. Pour cela, tout dŽpend de la caractŽristique en question et de ses fonctions. Vous devrez, par exemple, parfois appuyer sur la touche correspondante ou tourner la commande rotative correspondante.
- Page 21 X52 manual(ok)(24/11/04) 2004.12.22 9:05 PM Page 42 Tester les touches, les commutateurs et les commutateurs de mode Vous pourrez vous assurer que lorsque vous appuyez sur une touche ou un bouton, cette action est bien dŽtectŽe par les pilotes. Appuyez, l'un apr•s l'autre, sur chaque touche de votre joystick ou de votre manette des gaz que vous dŽsirez tester.
- Page 22 La simulation de vol est rendue d'autant plus crŽdible gr‰ce aux diffŽrentes diodes LED situŽes sur la manette des gaz et sur le joystick de votre contr™leur de jeu Saitek X52. Vous pouvez modifier l'apparence de ces diodes LED, en rendant l'intensitŽ...
- Page 23 Gestion des rŽglages de l'affichage multi-fonctions (MFD) Votre contr™leur de simulation de vol Saitek X52 comprend un MFD, ou Affichage multi-fonctions. Vous pouvez contr™ler la fa•on dont les informations sont affichŽes dans votre MFD en modifiant les diffŽrents rŽglages dans l'onglet MFD : Qu'est-ce que le MFD ? Le MFD est un Žcran qui affiche diffŽrentes informations,...
- Page 24 Pour cela, cliquez sur l'onglet MFD dans la fen•tre de propriŽtŽs Saitek X52 Flight Stick. Pour de plus amples informations, voir le chapitre intitulŽ Gestion des rŽglages du MFD dans la partie Gestion des rŽglages de votre contr™leur.
- Page 25 ˆ faire fonctionner le chronom•tre. Travailler avec les modes Le contr™leur Saitek X52 vous offre des possibilitŽs tr•s importantes pour configurer votre contr™leur de la fa•on dont vous dŽsirez qu'il fonctionne. Vous y parviendrez en crŽant des profils ˆ l'aide du logiciel de programmation SST.
- Page 26 Saitek X52 Flight Stick. Pour de plus amples informations, voir le chapitre intitulŽ Gestion des rŽglages de votre contr™leur dans la partie Gestion des rŽglages de votre contr™leur. NB : Vous ne pouvez pas afficher les noms des boutons si la fen•tre de propriŽtŽs Saitek X52 Flight Stick est ouverte. Changer le profil actuel Vous pouvez utiliser le MFD pour changer rapidement le profil actif.
- Page 27 X52 manual(ok)(24/11/04) 2004.12.22 9:05 PM Page 54 sŽlectionner les autres fuseaux horaires disponibles et le format dans lequel l'heure est affichŽe. Voir Gestion des rŽglages de l'horloge dans la partie Gestion des rŽglages de votre contr™leur pour une explication de cette procŽdure.
- Page 28 Navigateur de canal intŽgrŽ pour vous aider ˆ trouver d'autres interlocuteurs Avertissement : Roger Wilco est la propriŽtŽ de GameSpy Industries et, en tant que tel, Saitek plc n'acceptera aucune responsabilitŽ pour ce produit. Ainsi, toutes les questions relatives ˆ ce produit devront •tre adressŽes ˆ GameSpy Industries.
- Page 29 De temps ˆ autre, il peut y avoir des mises ˆ jour du pilote et du logiciel de programmation pour ce produit. Vous pouvez vous tenir informŽ(e) des toutes derni•res mises ˆ jour en vous rendant sur le site Internet de Saitek et en cliquant sur TŽlŽchargements.
- Page 30 MalgrŽ un degrŽ de sophistication jusqu'ici inŽgalŽ sur le marchŽ, le logiciel reste cependant simple et facile ˆ utiliser gr‰ce ˆ la technologie intelligente dŽveloppŽe par Saitek. Pour un guide complet sur la programmation de votre contr™leur Saitek, veuillez visiter le site web Saitek ˆ l'adresse suivante : www.saitek.com.
- Page 31 Afin d'obtenir la rŽparation d'un produit sous cette garantie, veuillez prŽsenter le produit et sa preuve d'achat (c'est ˆ dire le ticket de caisse ou une facture) au Centre de Support Technique Saitek agrŽŽ (la liste vous est fournie sur une feuille sŽparŽe se trouvant Žgalement dans l'emballage du produit), en ayant au prŽalable payŽ...
- Page 32 X52 manual(ok)(24/11/04) 2004.12.22 9:05 PM Page 64 SAITEK X52 FLIGHT CONTROL SYSTEM - PRODUCT TOUR Joystick 2-Stufen-Auslšser aus Metall 5-Positionen- 3 Umschalter Griffanpassung fŸr alle Vernichten Sie den Feind mithilfe eines Abgefedert und praktisch am prŠzisen und dauerhaften Cool-Touch- Handgrš§en GehŠuse angeordnet, ermšglichen...
- Page 33 Klicken Sie in den folgenden Fenstern auf Weiter, um die Installation fortzusetzen. Nachdem Sie im Fenster Treiber-Installation auf Weiter klicken, kšnnen Sie Ihren Controller testen. Wenn das Saitek Controller Fenster erscheint, probieren Sie bitte alle Knšpfe und Achsen aus, um zu sehen, ob Ihr Joystick ordnungsgemŠ§ funktioniert. Nach dem Test klicken Sie bitte auf OK.
- Page 34 Nach der Installation haben Sie die Option, den Profil-Editor zu starten, der Ihnen die Programmierungsumgebung Ihres Controllers in einer dreidimensionalen Ansicht zeigt. Wenn Sie dies nicht wŸnschen, entfernen Sie das HŠkchen in der Box und klicken Sie auf Installation fertigstellen. Ihr Saitek Controller ist nun zum Einsatz bereit.
- Page 35 Falls die SST-Programming-Software installiert ist, das Saitek X52-Flight Stick-Profilsymbol in der Taskleiste rechts anklicken und die Option Systemsteuerung aus der Popup-Liste auswŠhlen. Das Eigenschaftenfenster des Saitek X52-Flight Sticks besteht aus fŸnf verschiedenen Leisten. Sie kšnnen in jeder Leiste verschiedene Controller-Einstellungen einsehen und abŠndern. Die vornehmbaren Einstellungen werden in den folgenden Abschnitten beschrieben.
- Page 36 X52 manual(ok)(24/11/04) 2004.12.22 9:05 PM Page 72 Achsen testen Sie kšnnen die folgenden Achsen und Steuerelemente testen: Funktion ErlŠuterung X-/Y-Achsen Bewegen Sie den Flight Stick nach hinten und nach vorne bzw. von links nach rechts. Das + Symbol bewegt sich in der X-/Y-Achsen-Zelle um anzuzeigen, dass die Treiber die Bewegung des Sticks korrekt registrieren.
- Page 37 Bewegung des PrŠzisionsschiebers auf dem Schubregler. LED-Helligkeit einstellen Die LebensnŠhe des Flugssteuerungserlebnisses mit Ihrem Saitek X52 wird durch eine Anzahl von LEDs auf dem Schubregler und dem Flight Stick verbessert. Sie kšnnen das Erscheinungsbild dieser LEDs einstellen, indem Sie diese...
- Page 38 Eine Stelle direkt auf der Skala anklicken, um den Schieber schrittweise die Skala entlang zu bewegen. MFD-Einstellungen vornehmen Ihr Saitek X52 Flight Stick verfŸgt Ÿber eine MFD oder Multifunktionsanzeige. Durch Anpassung unterschiedlicher Einstellungen in der MFD-Leiste kšnnen Sie festlegen, wie Informationen auf Ihrer MFD dargestellt werden.
- Page 39 X52 manual(ok)(24/11/04) 2004.12.22 9:05 PM Page 78 Passen Sie die Helligkeit Ihrer MFD an, indem Sie den Schieber entlang der Skala bewegen. Um den Schieber zu bewegen, kšnnen Sie entweder: ¥ Den Schieber anklicken und die Skala entlang ziehen. oder ¥...
- Page 40 Sie kšnnen einige der Einstellungen anpassen, die die Funktionsweise der MFD festlegen. Angenommen, Sie mšchten z. B. die Helligkeit der Anzeige erhšhen oder das angezeigte Datumsformat Šndern. Diese Einstellung kšnnen sie in der MFD-Leiste des Fensters Eigenschaften des Saitek X52-Flight Sticks vornehmen. Weitere Informationen finden Sie in MFD-Einstellungen vornehmen im Abschnitt Controllereinstellungen vornehmen.
- Page 41 Kupplung so eingestellt, dass Sie sie gedrŸckt halten mŸssen, solange die Tasten im aktiven Spiel deaktiviert bleiben sollen. Sie kšnnen die Funktionsweise des Kupplungsschalters Ÿber die MFD-Leiste des Eigenschaftenfensters des Saitek X52-Flight Sticks Šndern. Weitere Informationen finden Sie im Abschnitt Funktionsweise des Kupplungsschalters Šndern.
- Page 42 X52 manual(ok)(24/11/04) 2004.12.22 9:05 PM Page 84 Ihre Profile zu scrollen. Dabei werden die Profilnamen in der unteren Zeile des mittleren Bereichs der MFD angezeigt. Hinweis: Sie kšnnen die MFD dazu verwenden, um auf jedes Verzeichnis auf Ihrem Computer zuzugreifen. Um ein Verzeichnis zu šffnen, bewegen Sie die POV nach rechts (Osten).
- Page 43 Eingebauter Channel-Browser ermšglicht es Ihnen, andere Chatter zu finden. Haftungsausschluss: Roger Wilco ist das Eigentum von GameSpy Industries, und als solches Ÿbernimmt Saitek Plc keine Verantwortung fŸr dieses Produkt. Ein Link zur Webseite von GameSpy Industries wird zur VerfŸgung gestellt - alle Anfragen zu diesem...
- Page 44 ANMERKUNGEN ZUR TREIBER-AKTUALISIERUNG Falls notwendig werden neuere Versionen der Treiber und der Programmier-Software fŸr dieses Produkt veršffentlicht. Sie erhalten jeweils die aktuellste Software auf der Saitek Website unter der Rubrik Downloads unter dem MenŸpunkt Treiber + Software. NUR F†R BENUTZER VON WINDOWS¨ XP ; DYNAMISCHE UPDATES: Wenn Sie die SST Programmiersoftware benutzen, besorgen Sie sich die aktuellste Version, um mit den neuesten Treibern, die Sie beim Windows Update runtergeladen haben, zu arbeiten.
- Page 45 ¥ Programmierung komplexer Eingaben mit umfangreichen Zeiteinstellungen ¥ Vorgefertigte Einstellungen fŸr spezielle Spiele sind als "Profile" auf der Saitek Webseite und auf der Smart Technology CD- ROM hinterlegt ¥ Die aktuellste Version der Saitek Smart Technology Software finden Sie zum Download auf der Saitek Homepage.
- Page 46 Sollten Sie trotzdem noch Probleme haben oder kein Internetanschluss haben, dann stehen Ihnen unsere Produktspezialisten im Saitek Technical Support Team zur VerfŸgung, die Sie telefonisch um Rat und Hilfe bitten kšnnen. Wir mšchten, dass Sie viel Freude an Ihrem GerŠt haben. Bitte rufen Sie uns an, falls Sie Probleme oder Fragen haben.
- Page 47 X52 manual(ok)(24/11/04) 2004.12.22 9:05 PM Page 94 SISTEMA DI CONTROLLO DI VOLO SAITEK X52 - DATI SUL PRODOTTO JOYSTICK Grilletto metallico a 2 stadi Regolazione a 5 3 interruttori Toggle posizioni per mani di Distruggete il nemico con l'aiuto di un Con molla di richiamo e grilletto preciso e durevole, freddo al tatto.
- Page 48 INSTALLAZIONE PER UTENTI DI WINDOWS¨ 2000 A) Soltanto Driver per gli utenti tipici Con il computer acceso, chiudere tutti i programmi in esecuzione e inserire il CD Saitek Smart Technology nel drive del CD-ROM. Quando appare la schermata introduttiva, seleziona Installa software per continuare.
- Page 49 INSTALLAZIONE PER GLI UTENTI DI WINDOWS¨ 98 E ME A) Soltanto Driver per gli utenti tipici Con il computer acceso, chiudere tutti i programmi aperti e inserire il CD Saitek Smart Technology nel lettore di CD- ROM. Nel momento in cui appare la schermata Introduzione, fai clic su Installa software per continuare. Se il CD non si avvia automaticamente, seleziona Avvio dalla barra delle applicazioni di Windows¨, poi Esegui e digita...
- Page 50 MANTENIMENTO DELLE IMPOSTAZIONI DELLA PERIFERICA Il Saitek X52 Flight Control System (FCS) • fornito pronto per l'uso. Vogliamo tuttavia che possiate utilizzarlo nel modo che soddisfa meglio le vostre esigenze. Abbiamo perci˜ incluso la funzionalitˆ per consentirvi di modificare varie impostazioni del joystick e del throttle.
- Page 51 X52 manual(ok)(24/11/04) 2004.12.22 9:05 PM Page 102 Verificate ciascuna funzionalitˆ secondo le esigenze. Il modo in cui le verificate varia a seconda della funzionalitˆ: ad esempio, pu˜ comportare premere il pulsante corrispondente o la rotazione del comando rotativo corrispondente. Le funzionalitˆ che potete controllare sono spiegate nelle sezioni che seguono.
- Page 52 Mantenimento della luminositˆ dei LED L'autenticitˆ dell'esperienza del controllo di volo fornita dal Saitek X52 FCS • accresciuta da una serie di LED sul throttle e sul joystick. Potete controllare l'aspetto di questi LED, rendendoli pi• o meno luminosi secondo le vostre preferenze.
- Page 53 Mantenimento delle impostazioni del display multifunzionale (MFD) Il joystick X52 FCS per la simulazione di volo comprende un display multifunzionale (MFD). Potete controllare il modo in cui sono visualizzate le informazioni nel display multifunzionale modificando varie impostazioni nella scheda MFD: Cos'•...
- Page 54 X52 manual(ok)(24/11/04) 2004.12.22 9:05 PM Page 108 Modifica della luminositˆ del display multifunzionale (MFD) Fate clic sulla scheda MFD. Nella parte superiore della scheda visualizzate la scala con cursore Luminositˆ. Cambiate la luminositˆ del display MFD spostando il cursore lungo la scala. Per spostare il cursore potete: ¥...
- Page 55 MFD. Ad esempio potete aumentare la luminositˆ del display, o modificare il modo in cui visualizzate la data. Potete farlo nella scheda MFD della finestra Proprietˆ - Saitek X52 Flight Stick. Vedere ulteriori informazioni in Mantenimento delle impostazioni del display multifunzionale (MFD) nella sezione Mantenimento delle impostazioni della periferica.
- Page 56 Page 112 Utilizzo dei Modi Il Saitek X52 FCS vi permette di configurare la periferica esattamente nel modo che preferite. Lo fate creando dei profili, utilizzando il software di programmazione SST. (Vedere i particolari nel Manuale del software di programmazione SST.) All'interno di ciascun profilo, potete creare un massimo di sei modi diversi che determinano le azioni eseguite quando premete i pulsanti del joystick per la simulazione di volo e del throttle.
- Page 57 Modifica del modo di funzionamento del pulsante della frizione nella sezione Mantenimento delle impostazioni della periferica. NB: Non potete visualizzare i nomi dei pulsanti se la finestra delle proprietˆ del Saitek X52 Flight Stick • aperta. Modifica del profilo attuale Potete utilizzare il display multifunzionale per modificare il profilo 'al volo'.
- Page 58 Browser di canali incorporato per assistervi a trovare altri chatter Esonero: Roger Wilco appartiene a GameSpy Industries e come tale Saitek plc declina qualsiasi responsabilitˆ per questo prodotto. Rivolgere perci˜ qualsiasi richiesta di informazioni relativa a questo prodotto a GameSpy Industries.
- Page 59 INFORMAZIONI IMPORTANTI AVVISO IMPORTANTE PER GLI UTENTI WINDOWS¨ XP Se avete aggiornato Windows XP con il Service Pack 2, installando il Magic Mouse e la tastiera Saitek apparirˆ la seguente finestra: A questo punto raccomandiamo di selezionare lÕopzione No, not this time e poi fare click su Next per proseguire lÕinstallazione.
- Page 60 Nonostante un livello di sofisticatezza mai visto prima sul mercato e grazie alla presenza della Saitek Smart Technology all'interno, il software • semplice e intuitivo da usare. Per una guida completa sulla programmazione della periferica Saitek, visitate il sito web Saitek a www.saitek.com.
- Page 61 Saitek plc. Gli obblighi di Saitek saranno limitati alla riparazione o sostituzione con la stessa unitˆ o con un'unitˆ simile, a scelta di Saitek. Per ottenere le riparazioni ai sensi della presente garanzia, presentare il prodotto e la prova d'acquisto (ad es.
- Page 62 X52 manual(ok)(24/11/04) 2004.12.22 9:05 PM Page 124 SISTEMA DE CONTROL DE VUELO SAITEK X52: PERSPECTIVA GENERAL JOYSTICK Ajuste de 5 posiciones para Disparador met‡lico de 2 fases 3 interruptores de palanca Destruya al enemigo con la ayuda de un adaptarse a todos los Accionados por resorte y tama–os de mano.
- Page 63 En la pantalla de Software Setup haga clic en Next y siga las instrucciones de pantalla. En esta fase se le pedir‡ instalar prestaciones como el Rat—n m‡gico de Saitek y el Teclado m‡gico de Saitek (esto es lo que XP denomina los diferentes elementos del controlador de Saitek).
- Page 64 Si se le pide instalar Microsoft¨ DirectX¨ 8.1, haga clic en Instalar y siga las instrucciones de pantalla y luego reinicie el ordenador cuando as’ se le solicite. Asegœrese de dejar el CD de Saitek en la unidad cuando reinicie el sistema.
- Page 65 MANTENIMIENTO DE LOS VALORES DEL CONTROLADOR El sistema de control de vuelo (FCS) Saitek X52 se suministra listo para utilizar. No obstante, deseamos que lo utilice de la manera m‡s apropiada para usted. Consecuentemente, hemos incluido una prestaci—n para que cambie varios valores de las unidades de palanca de vuelo y palanca de gases.
- Page 66 X52 manual(ok)(24/11/04) 2004.12.22 9:05 PM Page 132 Pruebe cada funci—n segœn se requiera. La forma de hacer esto var’a en funci—n de lo que haga la prestaci—n. Podr’a, por ejemplo, tener que pulsar el bot—n correspondiente o girar el control rotatorio correspondiente.
- Page 67 Mantenimiento del brillo de los LED La autenticidad de la experiencia de control de vuelo proporcionada por el Saitek X52 FCS se mejora mediante una serie de LED en la unidad de la palanca de gases y en la palanca de vuelos. Puede controlar el aspecto de estos LED,...
- Page 68 Hacer clic en un punto de la misma escala para mover la regleta en pasos graduales a lo largo de la escala. Mantenimiento de los valores MFD La unidad de la palanca de vuelo Saitek X52 FCS incluye una visualizaci—n multifuncional (MFD). Puede controlar la forma en que se visualiza la informaci—n en el MFD...
- Page 69 Puede hacer esto en la pesta–a de MFD de la ventana de Propiedades de Saitek X52 Flight Stick. Para m‡s informaci—n, consulte el apartado Mantenimiento de los valores de MFD de la secci—n Mantenimiento de los valores del...
- Page 70 Trabajar con modos El Saitek X52 FCS ofrece amplias oportunidades de configuraci—n del controlador para que opere como usted desee. Puede hacer esto mediante la creaci—n de perfiles utilizando el software de programaci—n SST. (Consœltese el Manual del software de programaci—n SST para los detalles.) En cada perfil puede crear hasta seis modos diferentes que...
- Page 71 Saitek X52 Flight Stick. Para los detalles, consulte Cambio de la forma de funcionamiento del bot—n de embrague en la secci—n de Mantenimiento de los valores del controlador. Nota: No puede ver los nombres de los botones si est‡ abierta la ventana de propiedades de Saitek X52 Flight Stick. Cambio del perfil actual Puede utilizar el MFD para cambiar el perfil actual "sobre la marcha".
- Page 72 X52 manual(ok)(24/11/04) 2004.12.22 9:05 PM Page 144 procedimiento, consulte Mantenimiento de los valores de reloj en la secci—n Mantenimiento de los valores del controlador. Visualizaci—n de la fecha La fecha se visualiza en la esquina inferior derecha del MFD. Por defecto, se muestra en el formato MMDDAA. Puede cambiar el formato de fecha a, por ejemplo, DDMMAA.
- Page 73 Sintonizador de canales integrado para ayudarle a buscar a otros comunicantes. Declinaci—n de responsabilidad: Roger Wilco es propiedad de GameSpy Industries y por lo tanto Saitek plc no acepta responsabilidad por este producto. Por lo que cualesquiera cuestiones relacionadas con este producto se deber’an dirigir a GameSpy Industries.
- Page 74 De tiempo en tiempo podr’a haber actualizaciones de controladores y software de programaci—n de este producto. Puede comprobar si hay actualizaciones visitando el sitio web de Saitek y haciendo clic en Descargas. Aparecer‡ una ventana desplegable. Seleccione Controladores y software.
- Page 75 Un Perfil es una configuraci—n espec’fica para un mejor juego, que consiste en un conjunto de comandos preasignados a los botones o ejes del controlador. El disco que acompa–a al producto o el sitio de web de Saitek (www.saitek.com) incluyen m‡s de doscientos perfiles preestablecidos. Si requiere perfiles nuevos o mejorados, s’rvase consultar el sitio de web, que se actualiza peri—dicamente...
- Page 76 Saitek en el producto o modificaci—n de este producto de cualquier manera o la incorporaci—n de este producto en cualesquiera otros productos o da–os causados por accidente, incendio, inundaci—n, rayos o fuerza mayor o por cualquier uso que...
- Page 77 X52 manual(ok)(24/11/04) 2004.12.22 9:05 PM Page 154...