
Related Manuals for iOptron AZ Mount Pro


Summary of Contents for iOptron AZ Mount Pro
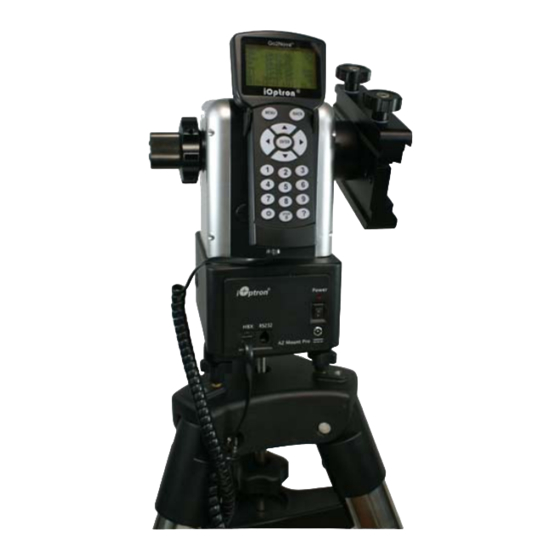
- Page 1 ® ® iOptron AZ Mount Pro Altazimuth Mount Instruction Manual Product #8900 and #8920...
- Page 2 This product is a precision instrument. Please read the included QSG before assembling the mount. Please read the entire Instruction Manual before operating the mount. If you have any questions please contact us at support@ioptron.com WARNING! NEVER USE A TELESCOPE TO LOOK AT THE SUN WITHOUT A PROPER FILTER! Looking at or near the Sun will cause instant and irreversible damage to your eye.
-
Page 3: Table Of Contents
Table of Content Table of Content ............................3 1. AZ Mount Pro Altazimuth Mount Overview ..................5 2. AZ Mount Pro Mount Assembly ......................6 2.1. Parts List ............................6 2.2. Identification of Parts ........................7 ... - Page 4 ® Appendix E. Go2Nova 8407 Hand Controller Star List ................. 37 IOPTRON WARRANTY ......................... 43 Rev. 1.2 2017.10 iOptron reserves the rights to revise this instruction without notice. Actual color/contents/design may differ from those described in this instruction.
-
Page 5: Az Mount Pro Tm Altazimuth Mount Overview
"level and go" intuitive GOTO setup. We call it "level and go", the term used to describe iOptron new AZ Mount Pro's simple set up routing. Using its built-in precision level indicator, the operator simply levels the mount and turns on the power;... -
Page 6: Az Mount Pro Tm Mount Assembly
#8340-Pier Level adjustment screw with center post (for using with Pier and Tri-Pier) #8345 USB to RS232 Converter with FTDI chipset ONLINE RESOURCES (click on the “Support” menu at www.iOptron.com) Quick Start Guide This instruction manual ... -
Page 7: Identification Of Parts
2.2. Identification of Parts Altitude Lock Counterweight Shaft 4. AZMP Mount Body Counterweight Shaft Lock Tripod Bolt Tripod Support Spreader 8. Dovetail Saddle Lock Screw Tripod Lock Level Adjustment Screw Tripod Knob 12. Hand Controller hanger Bubble Level 13. Vixen/Losmandy Dual Saddle 14. -
Page 8: Go2Nova 8407 Hand Controller
® 2.3. Go2Nova 8407 Hand Controller DEC+ DEC- Serial Port Port ® Figure 2. Go2Nova 8407 hand controller ® The Go2Nova 8407 hand controller (HC) shown in Figure 2 is the standard controllers that used for the AZMP mount. It has an integrated temperature controller that ensures it can be operated as low as -20ºC (-4ºF). -
Page 9: The Lcd Screen
Serial port (i.e., RS232 port): connect the HC to a Computer for HC firmware upgrade via a RS232-RJ9 cable. 2.3.2. The LCD Screen The 8407 HC has a large 8-line, 21-character per line LCD screen, which displays all the information as shown in Figure 3. -
Page 10: Check Hand Controller Battery
SDRL: mount is tracking at a sidereal speed; Solar: mount is tracking at a solar speed; Lunar: mount is tracking at a lunar speed; King: mount is tracking at a King speed; CSTM: mount us tracking at a customer defined speed. 12. -
Page 11: Az Mount Pro Tm Mount Assembly
A slowly flashing battery status LED indicates the battery is low, which you still have about 30 minutes of operation time. You may keep using the mount by plugging in the battery charger. NEVER use the mount this way when it is below 0°C. iOptron is NOT responsible for any damages and consequences caused by misuse. -
Page 12: Attach Mount
3.3. Attach Mount Carefully position telescope mount onto the tripod by aligning the three holes on the bottom of the mount base to the three level adjustment screws on the top of the tripod. Figure 5 Attach mount Thread the tripod bolt into the bottom of the mount while holding the mount with your hand. Slightly tighten the tripod bolt by turning the tripod bolt lock knob. -
Page 13: Install Counterweight
rotated freely when the altitude lock knob is released. Fully tighten the altitude lock knob afterwards. Tighten two dovetail saddle lock screws to secure the telescope. Figure 8 Install the telescope along the arrow direction on dovetail saddle NOTE: Push the CW shaft out first if a counterweight is needed. 3.7. Install Counterweight Make sure the altitude lock knob is tightened. -
Page 14: Balance Payload
3.8. Balance Payload After attaching scope and accessories, the mount needs to be balanced. To balance in altitude direction, release the altitude lock knob, rotate the scope to horizontal position. Move the telescope back and forth to find the balance point and lock the altitude lock knob. CAUTION: The telescope may swing freely when the altitude lock knob is released. -
Page 15: Connect Cable
3.9. Connect Cable ® Connect the Go2Nova 8407 Hand Controller to the HBX port on the mount panel using the supplied coiled control cable. Put the hand controller onto the hand controller hanger. 3.10. Install Second Telescope An optional secondary saddle (#8953) is available for dual balanced OTAs. To install a secondary dovetail saddle, loose the CW shaft lock and push the CW shaft out to a desired length. -
Page 16: Az Mount Pro Tm Mount Operation
4. AZ Mount Pro Mount Operation 4.1. Power the Mount and GO Assemble your mount. Make sure the mount is leveled. Just flip the power switch ON and wait! The mount will first perform an Assistant Alignment Wizard which will determine the Zero Position, i.e. the South and Zenith. Then the mount will pick up GPS signal. -
Page 17: Set Up The Mount Manually
The mount will start to perform self calibration by rotating in both altitude and azimuth directions to find the Zero Position, i.e., the mount’s “S” (bubble level) facing south and the telescope tube pointing up at the zenith. When it stops, the hand controller will display your current time and site info (RIGHT screen of Figure 13). -
Page 18: Turn Off The Mount
4.9. Turn Off the Mount When you have finished your observation, simply turn the mount power off and disassemble the mount and tripod. -
Page 19: Complete Functions Of Go2Nova ® Hand Controller
® 5. Complete Functions of Go2Nova Hand Controller 5.1. Slew to an Object Press MENU => “Select and Slew.” Select an object that you would like to observe and press the ENTER key. ® The Go2Nova 8407 hand controller (HC V2 with 150429 Catalog) for an AZMP mount has a database of over 212,000 objects. -
Page 20: Custom Objects
5.1.7. Custom Objects This allows the storage of up to 60 user-defined objects, including comets. 5.1.8. Custom R.A. DEC Here you can go to a target by entering its R.A. and DEC coordinates. 5.2. Sync to Target This operation will match the telescope's current coordinates to Target Right Ascension and Declination. -
Page 21: Solar System Alignment
5.4. Settings 5.4.1. Set Time and Site The AZ Mount Pro mount is equipped with a GPS receiver which will receive the time, longitude and latitude information for your current location from satellites after a link is established. However, there are still some parameters which need to be entered to reflect your location, such as time zone information and whether daylight saving time is currently in effect. - Page 22 Set Local Time The time will be updated automatically when the GPS receiver has established its link with the GPS satellites. In the event that the GPS module is unable to establish a link to the satellites, local time can be entered manually. Use the ◄ or ► key to move the cursor _ and use the number keys to change the numbers.
-
Page 23: Set Beep
The time and site information will be stored inside the hand controller’s memory chip. If you are not traveling to another observation site, they do not need to be changed. Check Hand Controller Battery The hand controller has a real time clock (RTC) which should display the correct time every time the mount is turned on. -
Page 24: Set Altitude Limit
0°C (32°F) and shut off at 10°C. 5.4.7. Wi-Fi Option AZ Mount Pro mount has a built-in Wi-Fi adapter that allows a user to wirelessly control the mount via SmartPhone/Tablet/Computer. Set Time and Site... -
Page 25: Customer Comets
5.5.1. Customer Comets Press MENU => “Edit User Objects” to set user objects. Custom Comets Other Objects Select “Custom Comets” to add/browse/delete the user-defined comet list. Find the orbit parameters of a comet in the SkyMap format. For example, the C/2012 ISON has an orbit parameter: Name Year ω... -
Page 26: Firmware Information
Enter R.A. and DEC R.A.: 00h00m00s DEC: +00d00m00s You may enter the R.A. and DEC coordinates of the object you want to store, and press ENTER to confirm. A more useful application of this function is to store your favorite viewing objects before heading to the field. -
Page 27: Wi-Fi Operation
After connecting a computer to AZMP Wi-Fi network, launch the iOptron Commander. Select iOptron StarFi/Built-in Wi-Fi to connect the mount to your computer via Wi-Fi/Ethernet connection (Figure 15). Check the Mount Panel, as shown in Figure 15, to open iOptron Commander Mount Panel (Figure 16). -
Page 28: Mac Os
Figure 15 iOptron Commander Connection Figure 16 iOptron Commander Mount Panel Now you can use iOptron Commander to direct control the AZMP mount, or use your favorite ASCOM compatible software to control the mount. 6.2.2. Mac OS You need planetarium software that runs on Mac OS and has an embedded AZMP mount drive, such as Sky Safari. -
Page 29: Wi-Fi Configuration
Figure 17 Using Sky Safari on a SmartPhone/Tablet This procedure only needs to be performed once unless you have changed your AZMP Wi-Fi settings. Then click on the Scope icon and tap on Connect to connect the mount. Now you can perform GOTO and Slew from your SmartPhone/Tablet. -
Page 30: Maintenance And Servicing
7. Maintenance and Servicing 7.1. Maintenance The AZ Mount Pro mount is designed to be maintenance free. Do not overload the mount. Do not drop the mount as this will damage the mount and / or permanently degrade GOTO performance and tracking accuracy. -
Page 31: Appendix A. Technical Specifications
Appendix A. Technical Specifications Mount Altazimuth Mount Body material Die-cast aluminum ® System GOTONOVA Primary payload 33 lb Secondary payload 10 lb Mount weight 13 lb (including CW shaft and battery) Gear Aluminum worm wheel/Brass worm gear Motor 128X microstep stepper motor Resolution 0.1 arc seconds Transmission... -
Page 32: Appendix B. Az Mount Pro Go2Nova ® 8407 Hc Menu
® Appendix B. AZ Mount Pro Go2Nova 8407 HC MENU MENU Select and Slew Solar System Mercury Venus Mars Jupiter Saturn Uranus Neptune Moon Deep Sky Objects Named Objects Messier Catalog NGC Catalog IC Catalog PGC Catalog Caldwell Catalog Abell Catalog... - Page 33 Sync. To Target Alignment One Star Alignment Two Star Alignent Three Star Alignment Solar System Align Clear Alignment Data Settings Set Time and Site Set Beep Always On. On but Keyboard. Always Of f . Set Display Set Tracking Rate Sidereal Rate Lunar Rate SolarRate...
- Page 34 Edit User Objects Custom Comets Add a New Comet Browse Comets Delete a Comet Clear All Comets Other Objects Add a New Object Browse Objects Delete an Object Clear All Objects Firmware Inf ormation Zero Position Goto Zero Position Set Zero Position...
-
Page 35: Appendix C. Firmware Upgrade
Appendix C. Firmware Upgrade The firmware in the 8407 Hand Controller and control board can be upgraded by the customer. Please check iOptron’s website, http://www.iOptron.com, under Support > Firmware/Software for details. -
Page 36: Appendix D. Computer Control An Azmp Mount
Appendix D. Computer Control an AZMP Mount The AZ Mount Pro mount can be controlled by a SmartPhone, a tablet or a computer. It is supported by two types of computer connections: Connect to a computer via RS232 serial port. An optional RS232 to USB adapter (iOptron part #8435) is needed if your computer does not have a serial port, like most of the laptops on the market today. -
Page 37: Appendix E. Go2Nova ® 8407 Hand Controller Star List
® Appendix E. Go2Nova 8407 Hand Controller Star List Messier Catalog This table is licensed under the GNU Free Documentation License. It uses material from the Wikipedia article List of Messier objects... - Page 38 Named Star List 001 Acamar 050 Alrescha 099 Deneb el Okab 148 Lesath 002 Achernar 051 Alshain 100 Deneb Kaitos 149 Mahasim 003 Achird 052 Altair 101 Denebakrab 150 Maia 004 Acrab 053 Altais 102 Denebola 151 Marfik 005 Acrux A 054 Alterf 103 Dschubba 152 Marfikent...
- Page 39 197 Propus 213 Sadachbia 229 Suhail 245 Vindemiatrix 198 Proxima Centauri 214 Sadalbari 230 Sulafat 246 Wasat 199 Rasalas 215 Sadalmelik 231 Syrma 247 Wazn 200 Rasalgethi 216 Sadalsuud 232 Talitha 238 Wei 201 Rasalhague 217 Sadr 233 Tania Australis 249 Wezen 202 Rastaban 218 Saiph...
- Page 40 Modern Constellations Constellation Abbreviation Constellation Abbreviation Andromeda Lacerta Antlia Apus Leo Minor Aquarius Lepus Aquila Libra Lupus Aries Lynx Auriga Lyra Boötes Mensa Caelum Microscopium Camelopardalis Monoceros Cancer Musca Canes Venatici Norma Canis Major Octans Canis Minor Ophiuchus Capricornus Orion Carina Pavo Cassiopeia...
- Page 41 Double/Multi Stars RigelKentaurus A HIP 95771 105 HIP 40167 157 HIP 28790 Rigel HIP 30867 106 HIP 40817 158 HIP 4675 Gacrux HIP 35363 107 HIP 81292 159 HIP 31676 Sargas HIP 94761 108 HIP 80197 160 HIP 10176 Castor A HIP 21683 109 HIP 88060 161 HIP 25950...
- Page 42 Deep Sky Object ID No. OBJECT NGC # Messier# IC# A(Abell) U(UGC) Andromeda Galaxy Barnards Galaxy 6822 Beehive Cluster 2632 Blackeye Galaxy 4926 Blinking Planetary Nebula 6826 Blue Flash Nebula 6905 Blue Planetary 3918 Blue Snowball Nebula 7662 Box Nebula 6309 Bubble Nebula 7635...
-
Page 43: Ioptron Warranty
A. iOptron warrants your telescope, mount, or controller to be free from defects in materials and workmanship for two years. iOptron will repair or replace such product or part which, upon inspection by iOptron, is found to be defective in materials or workmanship. As a condition to the obligation of iOptron to repair or replace such product, the product must be returned to iOptron together with proof-of- purchase satisfactory to iOptron.