Table of Contents
Advertisement
Quick Links
Advertisement
Table of Contents

Related Manuals for iOptron 3322


Summary of Contents for iOptron 3322
- Page 1 ® SkyTracker™ Pro Camera Mount Instruction Manual Product #3322...
-
Page 2: Table Of Contents
Please don’t charge the battery or use USB power at or below 0°C (32°F), otherwise the rechargeable battery might be permanently damaged. Rev.1.0 iOptron Corp. reserves the rights to revise this instruction without notice. Actual color/contents/design may differ from those described in this instruction. -
Page 3: Skytracker Tm Pro Camera Mount Overview
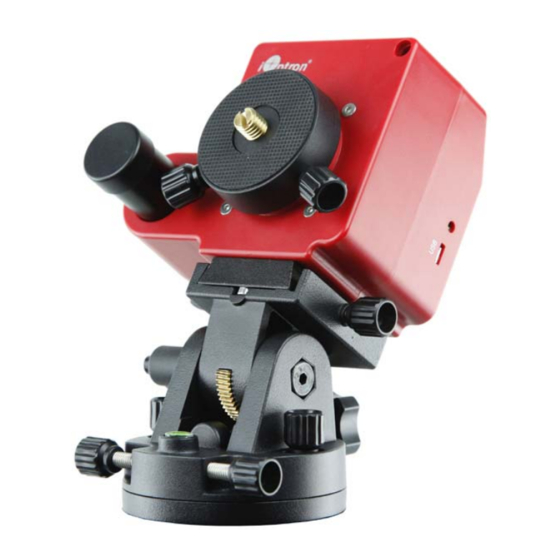
Pro -- iOptron’s next generation camera tracking device! After 4 years leading the camera tracker market, SkyTracker has been the tool of choice for photographers worldwide, ushering in the astroscape genre of outdoor photography. Now iOptron has been just pushing it to perfection. Figure 1. SkyTracker... - Page 4 Detachable alt-azi base with fine latitude and azimuth adjusters for easy polar alignment Reversible mounting post for both 3/8” and 1/4” threaded ball head mounting Includes iOptron AccuAlign dark-field illuminated polar scope Adjustable polar scope illumination with eight brightness levels 4 tracking speed (1X, 1/2X, solar and lunar).
-
Page 5: Skytracker Tm Pro Camera Mount Assembly
2. SkyTracker Pro Camera Mount Assembly 2.1. Introduction You have just purchased a tracking camera mount that is capable of taking you to a new level of astrophotography. When aligned the polar axis of the SkyTracker Pro camera mount with the celestial North Pole (CNP), or celestial South Pole (CSP), the mount will provide rotation matching the celestial sphere rotation around the Earth. -
Page 6: Assembly Terms
(https://play.google.com/store/apps/details?id=com.techhead.polarfinder) Or other application/program to calculate the pole star position. Please refer to FAQ session under Support at http://www.ioptron.com for more information. ONLINE CONTENTS (click under “Support” menu) www.iOptron.com This manual Accessories Tips for set up ... -
Page 7: Skytracker Tm Pro Camera Mount Assembly
Figure 4. Alt-azi adjusting base 14- Dovetail saddle 19- Base 15- Latitude lock 20- Latitude adjustment knob 16- Azimuth adjusting knob 21- Latitude scale 17- Dovetail locking knob 22- Leveling bubble 18- Azimuth locking knob 2.4. SkyTracker Pro Camera Mount Assembly NOTE: The SkyTracker Pro mount is a precision astronomical instrument. - Page 8 STEP 2. Install the polar scope Before installing the polar scope onto the mount, face the polar scope to a bright source, such as the sky (but not the SUN) or a lamp from a distance. Adjust the eyepiece to focus the reticle pattern.
- Page 9 Figure 8. Mounting the SkyTracker Pro to a tripod The dovetail base of the SkyTracker Pro comes with a 1/4"-3/8” thread converter, as shown in FIG 9, It fits directly to the 3305A ball head quick release plate or any other platform with 1/4” or 3/8”...
- Page 10 Figure 10. Attach a ball head to the mounting block Figure 11. Attach a camera 2. For a heavy payload (more than 1.2kg or 2.6lbs, including lens), a counterweight (CW) balance kit should be used (sold separately, #3324) as shown in Figure 12. Please retreat the polar scope by about 10 mm after the polar alignment is done, to avoid a possible interference between the CW balance kit and the polar scope.
- Page 11 Sigma Octantis). 3. Quick Polar Alignment Using iOptron’s AccuAlign dark field illuminated polar scope as shown in Figure 6 for easy and accurate polar alignment. This is achieved by making the polar axis of the mount parallel to the Earth’s axis of rotation.
- Page 12 Figure 13. Polar scope dial Figure 14. Polar scope app on an iPhone To maximize the benefits of the iOptron polar scope for polar alignment, you need to know where the Polaris is in the northern (Sigma Octantis in southern) hemisphere. You may find this information via an iPhone/iPad app (iOptron Polar Scope in Apple iTune store).
-
Page 13: Maintenance And Servicing
When mapping the Polaris position from the 24 hrs dial to iOptron polar scope, you need to divide it by 2, i.e. the reading on the dial is 10 o’clock, then you should put the Polaris in your polar scope at 5 o’clock. -
Page 14: Ioptron Customer Service
Department. Customer Service hours are 9:00 AM to 5:00 PM, Eastern Time, Monday through Friday. In the unlikely event that the mount requires factory servicing or repairing, write or call iOptron Customer Service Department first to receive a RMA# before returning the mount to the factory. -
Page 15: Appendix A. Technical Specifications
Appendix A. Technical Specifications Mount Ultra compact single axis EQ Payload (MAX) 6.6 lbs (3kg) Mount weight 685 gm with battery Mount weight with base 1150 gm (2.53 lbs) with battery Body material Die-cast aluminum with ABS cover RA shaft Φ25mm, steel Worm wheel Φ74mm, 144 teeth aluminum alloy... -
Page 16: Ioptron One Year Telescope, Mount, And Controller Warranty
Parts or product for which replacement is made shall become the property of iOptron. The customer shall be responsible for all costs of transportation and insurance, both to and from the factory of iOptron, and shall be required to prepay such costs.