Advertisement
Quick Links
Advertisement

Related Manuals for Lindhaus CHpro 38


Summary of Contents for Lindhaus CHpro 38
- Page 2 COMMERCIAL UPRIGHT VACUUM CLEANER CHpro eco FORCE 30 (12”) Mod. 03 12 02 ÷ 05 V. 220-240 / 50-60 03 12 06 V. 100 / 55 03 12 08 V. 120 / 60 CHpro eco FORCE 38 (15”) Mod. 01 15 02 ÷ 05 V. 220-240 / 50-60 01 15 06 V.
- Page 3 5. Non usare con cavo o spina damaged, left outdoors, or dropped danneggiati. Se la macchina non 6.Gerät nie am Kabel tragen oder Lindhaus. tampoco tire el cable en into the water, return it to a authorized ziehen. Das Kabel sollte nicht in 6.
-
Page 4: Position
Do not run appliance over cord. l’apparecchio per il cavo di Gerät nie über das Kabel rollen. Kabel weit pas le laisser glisser sur des angles 7. No desenchufe tirando por el Keep cord away from heated alimentazione, o tirare il cavo intorno von heissen Oberflächen fernhalten. -
Page 5: Table Of Contents
35127 PADOVA – ITALY MN 55378. Lindhaus se réserve le droit de procéder à des perfectionnements techniques dans le cadre de la gestion de ses modèles. Certain détails de la vacuum@lindhaus.it machine peuvent ainsi différer des donnés indiquées dans les prospectus info@lindhaus.com... -
Page 6: Grounding Instructions
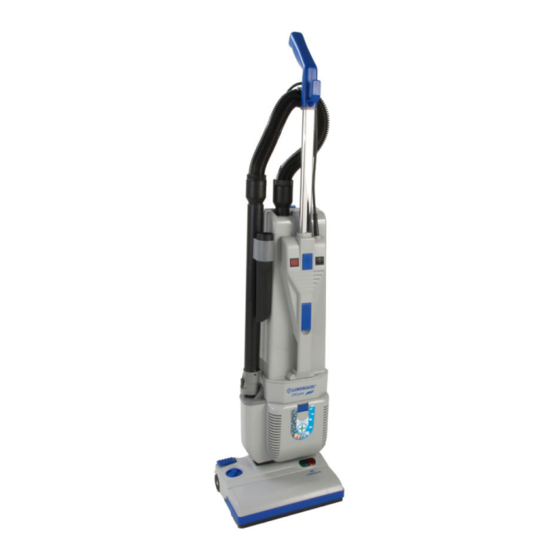
FOR U.S.A. and CANADA COMMERCIAL MARKET ONLY POUR LES ÉTATS-UNIS ET LE MARCHÉ COMMERCIAL DU CANADA Connect to a properly grounded outlet only. See grounding instructions. INSTRUCTIONS DE MISE À LA TERRE DANS LES SITUATIONS COMMERCIALES AVERTISSEMENT GROUNDING INSTRUCTIONS IN COMMERCIAL SITUATIONS Cet appareil doit être mis à... - Page 7 KNOW YOUR MACHINE CONOSCI LA TUA LERNEN SIE IHRE POUR CONNAÎRE VOTRE CONOZCA SU MÁQUINA MACCHINA MASCHINE KENNEN MACHINE Cord strain relief Gancio passacavo (parte Kabelhaken (hinter dem Griff) Crochet câble d’alimentation Gancho pasacable posterior de la (Backside of handle) posteriore dell’impugnatura) (partie postérieure de la poignée) empuñadura...
- Page 8 ASSEMBLY INSTRUCTIONS ISTRUZIONI PER LA MESSA IN MONTAGE MONTAGE INSTRUCCIONES PARA EL FUNZIONE MONTAJE Insert the chrome handle into the hole Inserire il tubo cromato nell’apposita Die verchromte Führungsstange Introduire le tube chromé dans son Introduzca el tubo cromado dentro in the top of the switch housing.
- Page 9 OPERATING INSTRUCTIONS ISTRUZIONI PER IL BEDIENUNG DER INSTRUCTIONS POUR LE INSTRUCCIONES FUNZIONAMENTO MASCHINE FONCTIONNEMENT DE FUNCIONAMIENTO Switch on the machine (power switch), depress the foot pedal (by Hauptschalter einschalten und die Mettre en marche l’aspirateur; Encienda la máquina, pulse el Accendere la macchina, premere il foot) and move the vacuum body Führungsstange durch Drücken des...
- Page 10 3 WAY SWITCH (option) 3 WAY SWITCH (option) 3 WAY SWITCH (option) 3 WAY SWITCH (option) 3 WAY SWITCH (option) Your upright vacuum cleaner can Il vostro battitappeto può essere Ihr Staubsauger kann mit einen 3- Votre aspiro-batteur peut être doté Vuestra aspiradora batidora puede be equipped with a 3 way switch.
- Page 11 Never operate the machine without Non usare mai l’apparecchio senza Gerät nie ohne einen originalen sans qu’un sac original bolsa original de Lindhaus. an original Lindhaus paper bag. un sacco filtro originale Lindhaus Lindhaus Staubbeutel benutzen. Lindhaus soit en place. all’interno.
- Page 12 Lindhaus Filter poser un nouveau filtre original 2. Saque el filtro de la rejilla y Lindhaus filter in its space (when Lindhaus facendo attenzione ad ersetzen (bei Zurückstellung des Lindhaus en faisant attention à...
- Page 13 - Den Rollendeckel rotieren bis er - Tourner le couvercle de la brosse -Girar la tapa del cepillo hasta el - Hold the pulley with one hand - Ruotate il coperchio rullo fino a sich vorne von der Basis löst. jusqu’à...
-
Page 14: Technische Daten
Si applica come un’elettrospazzola geringster Anstrengung. Der Eco À utiliser comme toutes les brosses Eco-Speader puede usarse como un to any Lindhaus machine. a qualsiasi apparecchio Lindhaus. Spreader kann einfach auf jeden électriques sur n’importe quel cepillo eléctrico adjuntándose a Lindhaus Staubsauger montiert werden. -
Page 15: Liste Der Ersatzteile
RX 1 Body brush head RX 31 Nut M4 RX 1 Bag housing cover RX 35 Frame handle LINDHAUS CH pro 30-38 Power nozzle RX 2 Brush cover RX 32 Circuit board RX 3 Grill filter holder RX 36 Foam filter intermediate... -
Page 16: Garantie
□ Prezzo covered by the warranty, all expenses incurred by Lindhaus in connection with the replacement or repair if the machine or any parts thereof shall be at the buyer’s responsibility. Any parts returned to Lindhaus for replacement shall become the property of Lindhaus. -
Page 17: Garantie
La Lindhaus ne garantit pas que ses produits puissent être en vente ou que ses appareils puissent être utilisés en tout autre but. En outre la Lindhaus ne fournit aucune autre garantie que cette garantie limitée. Aucune autre représentation ou garantie, exprimée ou implicite effectuée par le revendeur, le représentant ou l’agent de la Lindhaus qui ne soient pas précisée dans la présente, ne pourra être rejetée sur Lindhaus.