Table of Contents
Advertisement
Advertisement
Table of Contents

Related Manuals for IBM BNT


Summary of Contents for IBM BNT
- Page 1 BNT Virtual Fabric 10Gb Switch Module for IBM BladeCenter Installation Guide...
- Page 3 BNT Virtual Fabric 10Gb Switch Module for IBM BladeCenter Installation Guide...
- Page 4 Note: Before using this information and the product it supports, read the general information in Appendix B, “Warranty,” on page 45 and Appendix C, “Notices,” on page 65; and read the IBM Safety Information and the IBM Systems Environmental Notices and User...
- Page 5 Logging in to the switch module . . 33 Chapter 1. The BNT Virtual Fabric 10Gb Chapter 7. Updating the software . . . 35 Switch Module ... . 1 Determining the level of switch-module software .
- Page 6 Klasse A . . 69 Index ....71 People's Republic of China Class A warning statement . . 69 BNT Virtual Fabric 10Gb Switch Module: Installation Guide...
- Page 7 Les sikkerhetsinformasjonen (Safety Information) før du installerer dette produktet. Antes de instalar este produto, leia as Informações sobre Segurança. Antes de instalar este producto, lea la información de seguridad. Läs säkerhetsinformationen innan du installerar den här produkten. © Copyright IBM Corp. 2009, 2010...
- Page 8 Read any additional safety information that comes with the server or optional device before you install the device. This device is intended for use with UL Listed IBM BladeCenters. BNT Virtual Fabric 10Gb Switch Module: Installation Guide...
- Page 9 Statement 1: DANGER Electrical current from power, telephone, and communication cables is hazardous. To avoid a shock hazard: v Do not connect or disconnect any cables or perform installation, maintenance, or reconfiguration of this product during an electrical storm. v Connect all power cords to a properly wired and grounded electrical outlet. v Connect to properly wired outlets any equipment that will be attached to this product.
- Page 10 Laser radiation when open. Do not stare into the beam, do not view directly with optical instruments, and avoid direct exposure to the beam. Class 1 Laser Product Laser Klasse 1 Laser Klass 1 Luokan 1 Laserlaite Appareil A Laser de Classe 1 viii BNT Virtual Fabric 10Gb Switch Module: Installation Guide...
- Page 11 Statement 8: CAUTION: Never remove the cover on a power supply or any part that has the following label attached. Hazardous voltage, current, and energy levels are present inside any component that has this label attached. There are no serviceable parts inside these components.
- Page 12 BNT Virtual Fabric 10Gb Switch Module: Installation Guide...
-
Page 13: Switch Module
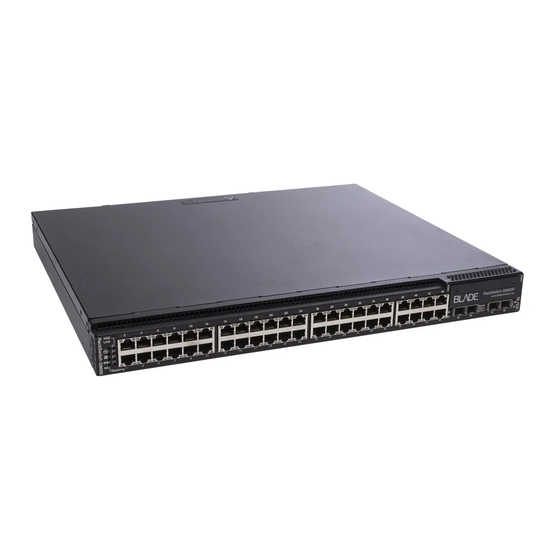
BladeCenter components, see the BladeCenter documentation that comes with these devices. To support each BNT Virtual Fabric 10Gb Switch Module that you install in the BladeCenter unit, you must also install a compatible high-speed Ethernet expansion card (also known as an Ethernet I/O card) in each blade server that you want to communicate with the switch module. - Page 14 For an illustration that shows the locations of these labels, see “Major components of the switch module” on page 5. You will need this information when you register the switch module with IBM. You can register the switch module at http://www.ibm.com/support/mysupport/.
-
Page 15: Specifications
IBM BladeCenter Advanced Management Module User’s Guide v Installation and User’s Guide for the BladeCenter unit v Safety Information v Broadcom 10 Gb 2-Port and 4-Port Ethernet Expansion Cards (CFFh) for IBM BladeCenter Installation and User's Guide v BNT Application Guide for the switch module... -
Page 16: Inventory Checklist
Inventory checklist Make sure that the shipping carton contains the following items: v One switch module v The BNT Virtual Fabric 10Gb Switch Module for IBM BladeCenter Installation Guide (this document) v One serial console cable v One filler module... -
Page 17: Major Components Of The Switch Module
For more information about the components of the information panel, see Chapter 5, “Information panels, LEDs, and external ports,” on page 23. Chapter 1. The BNT Virtual Fabric 10Gb Switch Module... - Page 18 BNT Virtual Fabric 10Gb Switch Module: Installation Guide...
-
Page 19: Chapter 2. Installing And Replacing A Switch Module
Installing a second switch module enables a redundant path and a separate connection from the blade server to the external Ethernet network. The BladeCenter unit supports a maximum of four BNT Virtual Fabric 10Gb Switch Modules. Depending on the type of BladeCenter unit that you are using, the BladeCenter unit supports a maximum of 10 or 14 expansion cards. -
Page 20: Installation Guidelines
When you are finished working on the blade server or BladeCenter unit, reinstall all safety shields, guards, labels, and ground wires. v For a list of supported optional devices for the BladeCenter unit and other IBM products, see http://www.ibm.com/servers/eserver/serverproven/compat/us/. -
Page 21: Handling Static-Sensitive Devices
You have followed the reliability guidelines in the documentation that comes with the BladeCenter unit. Cable requirements for the switch module are described in the IBM Configuration and Options Guide at http://www.ibm.com/servers/eserver/xseries/cog/. See the documentation that comes with the blade server for cable-routing information. -
Page 22: Installing A Switch Module
9. Push the release levers on the front of the switch module to the closed position. After you insert and lock the switch module, it is turned on, and a power-on self-test (POST) occurs to verify that the switch module is operating correctly. BNT Virtual Fabric 10Gb Switch Module: Installation Guide... - Page 23 Notes: a. The switch module takes approximately 60 seconds to complete the POST. When the switch module is turned on, an LED test occurs. All LEDs are lit and remain lit during POST; then, all the LEDs except the OK LED turn off.
-
Page 24: Removing Or Replacing A Switch Module
Chapter 4, “Cabling the switch module and the SFP+ module,” on page 19, the documentation that comes with the cables, and the optional network devices to which the cables have been connected. For the locations of the connectors on BNT Virtual Fabric 10Gb Switch Module: Installation Guide... -
Page 25: Chapter 3. Installing And Removing A
the BladeCenter unit, see the documentation that comes with the BladeCenter unit. Then, continue with Chapter 3, “Installing and removing a 10 Gb SFP+ module,” on page 15. Chapter 2. Installing and replacing a switch module... - Page 26 BNT Virtual Fabric 10Gb Switch Module: Installation Guide...
-
Page 27: Gb Sfp+ Module
You must first insert the module into the port before you can connect the cables. v You must remove the cable from the SFP+ module before you remove the SFP+ module from the switch module. © Copyright IBM Corp. 2009, 2010... - Page 28 Laser radiation when open. Do not stare into the beam, do not view directly with optical instruments, and avoid direct exposure to the beam. Class 1 Laser Product Laser Klasse 1 Laser Klass 1 Luokan 1 Laserlaite Appareil A Laser de Classe 1 BNT Virtual Fabric 10Gb Switch Module: Installation Guide...
-
Page 29: Installing An Sfp+ Module
Installing an SFP+ module The SFP+ module provides two fiber-optic cable connectors for connecting to external ports. To install an SFP+ module, complete the following steps: 1. Read the safety information that begins on page v and “Installation guidelines” on page 8. 2. -
Page 30: Removing An Sfp+ Module
5. Grasp the wire tab on the SFP+ module and pull it out of the port. 6. Replace the protective cap on the SFP+ module and the SFP+ module port. 7. Place the SFP+ module into a static-protective package. BNT Virtual Fabric 10Gb Switch Module: Installation Guide... -
Page 31: Chapter 4. Cabling The Switch Module And The Sfp+ Module
RS-232 serial console port of the switch module and the other end of the cable to the console device. Disconnecting the serial console cable To disconnect the serial console cable, grasp the connector and gently pull the cable from the switch module. © Copyright IBM Corp. 2009, 2010... -
Page 32: Connecting The Sfp+ Module Cable
To disconnect the SFP+ module cable, complete the following steps: 1. Squeeze the release tabs and gently pull the fiber optic cable from the SFP+ module. 2. Replace the protective caps on the ends of the fiber optic cable. BNT Virtual Fabric 10Gb Switch Module: Installation Guide... -
Page 33: Connecting The Rj-45 Cable
Connecting the RJ-45 cable The RJ-45 cable can be connected to port 11. To connect the RJ-45 connector to the switch module, push the RJ-45 cable connector into the port connector until it clicks into place, as shown in the following illustration. - Page 34 BNT Virtual Fabric 10Gb Switch Module: Installation Guide...
-
Page 35: Chapter 5. Information Panels, Leds And External Ports
One RJ-45 Ethernet port connector. Do not attach any devices to this connector other than a compatible cable. This connector is identified as port EXT11 in the I/O-module configuration menus and is labeled 11 on the switch module. © Copyright IBM Corp. 2009, 2010... -
Page 36: Information Leds
POST, and then all the LEDs except the OK LED turn off. Any errors that are detected during POST are written to the system log. For information about the command to read the system log, see the BNT Command Reference for the switch module When POST errors are written to the system log, these errors are also written to the BladeCenter management-module event log. -
Page 37: Switch-Module Status Leds
Switch-module status LEDs The following table provides descriptions of the switch-module status LEDs on the front panel of the switch module. Table 1. Switch-module status LEDs Status LED Description This green LED is at the top left of the switch module on the front OK ( ) LED panel. - Page 38 BNT Virtual Fabric 10Gb Switch Module: Installation Guide...
-
Page 39: Chapter 6. Configuring The Switch Module
Ethernet connector on the management module. The Internet protocol (IP) addresses and SNMP parameters of the switch modules can be automatically assigned by the IBM Director BladeCenter Deployment wizard (when available), or you must assign them through the BladeCenter Management and Configuration Program. -
Page 40: Establishing A Tcp/Ip Session Through The Management Module
IP subnet address of the management module, you can no longer manage the switch module from the management module. v For switch communication with a remote management station, such as an IBM Director management server, through the management-module external Ethernet port, the switch-module internal-network interface and the management-module external interface must be on the same IP subnet. -
Page 41: Enabling Management Through External Ports
The Web interface and the Telnet program provide different ways to access the same internal-switching software and configure it. v If your system application requires that you use the Web interface program, see “Configuring the switch module through the switch-module browser-based interface”... -
Page 42: Configuring The Switch Module Through The Telnet Interface
This command stores the current switch configuration and all changes in nonvolatile memory. For more information about configuring through the CLI, see the BNT 10-Port 10Gb Ethernet Switch Module for IBM BladeCenter Command Reference. BNT Virtual Fabric 10Gb Switch Module: Installation Guide... -
Page 43: Configuring The Switch Module Through The Serial-Port Interface
Configuring the switch module through the serial-port interface The serial port provides basic communication RS-232 serial-data transfer through a terminal emulation program (such as Hyperterminal). Because messages from the power-on self-test (POST) and all initialization information are transmitted through the serial port, you can use the serial port to log in to the switch module and access and configure the internal switching software. -
Page 44: Configuring The Switch Module Through The Switch-Module Browser-Based Interface
This section describes how to use the switch-module browser-based interface (BBI) to access and configure the internal switching software. For more information about the BBI, see the BNT 10-Port 10Gb Ethernet Switch Module for IBM BladeCenter Browser Based Interface Quick Guide. -
Page 45: Initial Configuration
When you restore the management module to factory defaults, the original configuration is restored. For more information about configuring and managing the switch module through the management module, see the BNT Command Reference for the switch module. Logging in to the switch module The switch module supports user-based security that enables you to prevent unauthorized users from accessing the switch or changing its settings. - Page 46 BNT Virtual Fabric 10Gb Switch Module: Installation Guide...
-
Page 47: Chapter 7. Updating The Software
2. Under Product support, click BladeCenter. 3. In the column on the left, click BladeCenter support search. 4. In the Search for field, type bnt 10 gb, and click Search. 5. In the Task field, select Download, and then click Search. -
Page 48: Upgrading The Switch-Module Software
The requirements for running a Telnet session are described in Chapter 6, “Configuring the switch module,” on page 27. 1. Log on to the management module as described in the IBM BladeCenter Advanced Management Module User’s Guide. The login window opens. -
Page 49: Resetting And Restarting The Switch Module
5. Reset and restart the switch module as described in “Resetting and restarting the switch module.” Resetting and restarting the switch module To activate the new image or images, you must reset the switch module. To reset the switch module, complete the following steps: 1. - Page 50 BNT Virtual Fabric 10Gb Switch Module: Installation Guide...
-
Page 51: Chapter 8. Parts Listing
Replaceable components are of three types: v Tier 1 customer replaceable unit (CRU): Replacement of Tier 1 CRUs is your responsibility. If IBM installs a Tier 1 CRU at your request, you will be charged for the installation. v Tier 2 customer replaceable unit (CRU): You may install a Tier 2 CRU yourself or request IBM to install it, at no additional charge, under the type of warranty service that is designated for your server. - Page 52 BNT Virtual Fabric 10Gb Switch Module: Installation Guide...
-
Page 53: Chapter 9. Solving Problems
To view POST results, complete the following steps: 1. Log on to the management module as described in the IBM BladeCenter Advanced Management Module Command-Line Interface Reference Guide. If necessary, obtain the IP address of the management module from your system administrator. - Page 54 Failure criticality 00 - 7F Base internal functions Critical 80 - 9F Internal interface failures Noncritical A0 - AF External interface errors Noncritical B0 - FE Reserved Noncritical Switch module “good” Operation indicator BNT Virtual Fabric 10Gb Switch Module: Installation Guide...
-
Page 55: Appendix A. Getting Help And Technical Assistance
If you need help, service, or technical assistance or just want more information about IBM products, you will find a wide variety of sources available from IBM to assist you. This section contains information about where to go for additional information about IBM and IBM products, what to do if you experience a problem with your system, and whom to call for service, if it is necessary. -
Page 56: Getting Help And Information From The World Wide Web
Getting help and information from the World Wide Web On the World Wide Web, the IBM Web site has up-to-date information about IBM ® systems, optional devices, services, and support. The address for IBM System x ® and xSeries information is http://www.ibm.com/systems/x/. The address for IBM BladeCenter information is http://www.ibm.com/systems/bladecenter/. -
Page 57: Appendix B. Warranty
Machine are designated in Part 3. Many features, conversions, or upgrades involve the removal of parts and their return to IBM. An IBM part that replaces a removed part will assume the warranty © Copyright IBM Corp. 2009, 2010... - Page 58 An IBM part that is added to a Machine without replacing a previously-installed part is subject to warranty effective on its Date of Installation. Unless IBM specifies otherwise, the warranty period, type of warranty, and service level of such part is the same as the Machine on which it is installed.
- Page 59 IBM or your reseller to obtain warranty service. Contact information for IBM is provided in Part 3. If you do not register the Machine with IBM, you may be required to present proof of purchase as evidence of your entitlement to warranty service.
- Page 60 Machine or provide a replacement Machine to you at its expense, unless IBM specifies otherwise. IBM is responsible for loss of, or damage to, your Machine only while it is 1) in IBM's possession; or 2) in transit in those cases where IBM is responsible for the transportation charges; and...
-
Page 61: Part 2 - Country-Unique Terms
ABOVE LIMITATION OR EXCLUSION MAY NOT APPLY TO YOU. Governing Law Both you and IBM consent to the application of the laws of the country in which you acquired the Machine to govern, interpret, and enforce all of your and IBM's... - Page 62 During the warranty period, IBM provides repair and exchange service for the Machine under the type of warranty service IBM designates for the Machine. The warranty period for the Machine is a fixed period starting on its original Date of Installation.
- Page 63 Limitation of Liability: The following is added to this section: Where IBM is in breach of a condition or warranty implied by the Trade Practices Act 1974 or other similar legislation, IBM's liability is limited to the repair or replacement of the goods or the supply of equivalent goods. Where that condition...
- Page 64 IBM pursuant to, or in any way related to the subject of this Statement of Limited Warranty, the charge paid by you for the individual Machine that is the subject of the claim.
- Page 65 Consumer Guarantees Act 1993 or other legislation which cannot be excluded or limited. The Consumer Guarantees Act 1993 will not apply in respect of any goods which IBM provides, if you require the goods for the purposes of a business as defined in that Act.
- Page 66 The words “SPECIAL” and “ECONOMIC” in item 3 in the last paragraph are deleted. EUROPE, MIDDLE EAST, AFRICA (EMEA) THE FOLLOWING TERMS APPLY TO ALL EMEA COUNTRIES: The terms of this Statement of Limited Warranty apply to Machines purchased from IBM or an IBM reseller. How to Obtain Warranty Service:...
- Page 67 Machine in any of those countries from either (1) an IBM reseller approved to perform warranty service or (2) from IBM, provided the Machine has been announced and made available by IBM in the country in which you wish to obtain service.
- Page 68 598 (2) of the Austrian Code of Civil Procedure, the parties expressly waive the application of paragraph 595 (1) figure 7 of the Code. IBM may, however, institute proceedings in a competent court in the country of installation.
- Page 69 The retail price of batteries, accumulators and power cells includes the cost of the environmental management of their waste. For proper collection and treatment, contact your local IBM representative. THE FOLLOWING TERMS APPLY TO ALL EU COUNTRIES: The warranty for Machines acquired in EU countries is valid and applicable in all EU countries provided the Machines have been announced and made available in such countries.
- Page 70 (if IBM is at fault) or of such cause, for a maximum amount equal to the charges you paid for the Machine. For purposes of this item, the term “Machine”...
- Page 71 The minimum warranty period for Machines is 12 months. In case IBM or your reseller is unable to repair an IBM Machine, you can alternatively ask for a price reduction as far as justified by the reduced value of the unrepaired Machine or ask for a cancellation of the respective agreement for such Machine and get your money refunded.
- Page 72 IBM will accept unlimited liability for death or personal injury caused by the negligence of IBM. Subject always to the Items for Which IBM is Not Liable below, IBM will accept unlimited liability for physical damages to your tangible property resulting from the negligence of IBM.
-
Page 73: Part 3 - Warranty Information
For the purposes of this section, a “Default” means any act, statement, omission, or negligence on the part of IBM in connection with, or in relation to, the subject matter of this Statement of Limited Warranty in respect of which IBM is legally liable to you, whether in contract or tort. - Page 74 Tier 1 (mandatory) or a Tier 2 (optional) CRU. Installation of a Tier 1 CRU is your responsibility. If IBM installs a Tier 1 CRU at your request, you will be charged for the installation. You may install a Tier 2 CRU yourself or request IBM to install it, at no additional charge, under the type of warranty service designated for your Machine.
- Page 75 For IBM in Canada or the United States, call 1-800-IBM-SERV (or 1-800-426-7378). For IBM in the European Union (EU), Asia Pacific, and Latin America countries, contact IBM in that country or visit the IBM Directory of Worldwide Contacts at the following IBM Internet website: http://www.ibm.com/planetwide/.
- Page 76 BNT Virtual Fabric 10Gb Switch Module: Installation Guide...
-
Page 77: Appendix C. Notices
Web sites. The materials at those Web sites are not part of the materials for this IBM product, and use of those Web sites is at your own risk. -
Page 78: Important Notes
A current list of IBM trademarks is available on the Web at “Copyright and trademark information” at http://www.ibm.com/ legal/copytrade.shtml. Adobe and PostScript are either registered trademarks or trademarks of Adobe Systems Incorporated in the United States and/or other countries. -
Page 79: Electronic Emission Notices
IBM makes no representations or warranties with respect to non-IBM products. Support (if any) for the non-IBM products is provided by the third party, not IBM. Some software might differ from its retail version (if available) and might not include user manuals or all program functionality. -
Page 80: Taiwanese Class A Warning Statement
Klasse A ein. Um dieses sicherzustellen, sind die Geräte wie in den Handbüchern beschrieben zu installieren und zu betreiben. Des Weiteren dürfen auch nur von der IBM empfohlene Kabel angeschlossen werden. IBM übernimmt keine Verantwortung für die Einhaltung der Schutzanforderungen, wenn das Produkt ohne Zustimmung der IBM verändert bzw. -
Page 81: Die Elektromagnetische Verträglichkeit Von Geräten
Dieses Gerät ist berechtigt, in Übereinstimmung mit dem Deutschen EMVG das EG-Konformitätszeichen - CE - zu führen. Verantwortlich für die Konformitätserklärung des EMVG ist die IBM Deutschland GmbH, 70548 Stuttgart. Generelle Informationen: Das Gerät erfüllt die Schutzanforderungen nach EN 55024 und EN 55022 Klasse... - Page 82 BNT Virtual Fabric 10Gb Switch Module: Installation Guide...
- Page 83 Class A electronic emission notice 67 enabling management over external fiber optic cables Common Language Equipment ports 11 installing 20 Identification (CLEI) label 5 enabling management through external removing 20 communication requirements 1, 7, 11 ports 29 © Copyright IBM Corp. 2009, 2010...
- Page 84 Telnet interface 33 host channel adapter 1 Ethernet 30 Web interface 32 options 8, 15 operating speeds on switch major components 5 SFP+ module 17 module 8 switch module 7, 10 BNT Virtual Fabric 10Gb Switch Module: Installation Guide...
- Page 85 (continued) external (continued) connecting to the switch module 31 interconnections with blade server status LEDs on Ethernet switch ServerProven list, IBM 8 and expansion card 1 module 23, 24 service levels 63 logging in status LEDs on switch module or...
- Page 86 Web site BladeCenter documentation 3, 9 compatible BladeCenter options 8 IBM product information 1 IBM ServerProven list 1, 8 product registration 2 Web-based network management 32 BNT Virtual Fabric 10Gb Switch Module: Installation Guide...
- Page 88 Part Number: 81Y1115 Printed in USA (1P) P/N: 81Y1115...