
Related Manuals for Planar PD8130


Summary of Contents for Planar PD8130
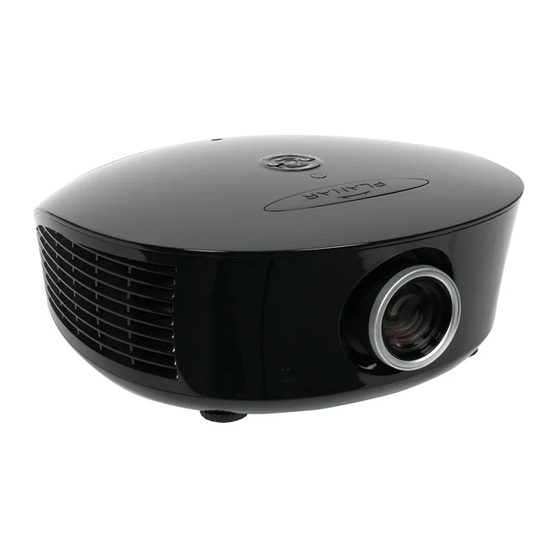
- Page 1 PD8130 PD8150 Home Theater Projector Installation & Operation Manual www.planarhometheater.com...
-
Page 3: Two Year Limited Warranty
(excluding the lamp). PARTS (not including the lamp): Planar will provide new or rebuilt replacement parts for the parts that fail due to defects in materials or workmanship for a period of two (2) years from the effective date of delivery to the end user. - Page 4 Planar Authorized Service Center, or the repair requires the unit be returned to the Planar factory, it is the owner’s responsibility to arrange for shipment of the product for repair. These arrangements must be made through the selling Planar Dealer. If this is not possible, contact Planar directly for a Return Authorization number and shipping instructions.
- Page 5 ADDITIONAL INFORMATION: To locate the name and address of the nearest Planar Authorized Service Center, or for additional information about this Limited Warranty, please call or write: PLANAR VIDEO PRODUCT INFORMATION RETAIN THIS INFORMATION FOR YOUR RECORDS ____________________________________________ Model Purchased...
-
Page 6: Important Safety Instructions
Important Safety Instructions Thank you for your purchase of this quality Planar product! For best performance, please read this manual carefully as it is your guide through the menus and operation. CAUTION RISK OF ELECTRIC SHOCK DO NOT OPEN CAUTION:... -
Page 7: Compliance Information
19. Never look directly into the lens when the lamp is on. Compliance Information DECLARATION OF CONFORMITY: Manufacturer’s Name: Planar Systems, Inc. Manufacturer’s Address: 1195 NW Compton Drive, Beaverton, OR 97006 hereby declares that the products Model Numbers: PD8130/PD8150 conform with the provisions of: Council Directive 2004/108/EC on Electromagnetic Compatibility;... - Page 8 The Technical Construction file required by this Directive is maintained at the corporate headquarters of Planar Systems, Inc., 1195 NW Compton Drive, Beaverton, OR 97006. Date of Declaration: January 2008 FCC PART 15: NOTE: This equipment has been tested and found to comply with the limits for a Class B digital device, pursuant to Part 15 of the FCC Rules.
-
Page 9: Table Of Contents
Textual and Graphic Conventions...1 Using This Manual ...2 Description, Features and Benefits ...3 Key Features and Benefits...3 Parts List ...4 PD8130/PD8150 at a Glance ...5 PD8130/PD8150 Rear Panel ...9 PD8130/PD8150 Remote Control ...11 Remote Control ...13 Notes on Batteries ...13 Notes on Remote Control Operation ...13... - Page 10 5. Maintenance and Troubleshooting ... 63 Connections to the PD8130/PD8150 ...22 Connector Panel Access ...22 Connecting Source Components to the PD8130/PD8150 ...23 RS-232 Controller Connection ...27 Connecting 12-Volt Trigger Output to External Theater Equipment ...28 Connecting an External IR Receiver...28 Connecting to AC Power ...29...
- Page 11 6. Serial Communications ... 67 7. Specifications ... 79 Planar PD8130/PD8150 Installation/Operation Manual RS-232 Connection and Port Configuration ...67 Serial Command Syntax ...67 Key Commands ...67 Operations Commands ...70 PD8130/PD8150 Specifications ...79 PD8130/PD8150 Dimensions ...82 Supported Timings ...83 Table of Contents...
- Page 12 Table of Contents Notes: Planar PD8130/PD8150 Installation/Operation Manual...
- Page 13 3-11. RS-232 Control System Connection ...27 3-12. 12-Volt Trigger Output Connection ...28 3-13. External IR Receiver Connection ...28 4-1. PD8130/PD8150 OSD Menu Structure ...36 4-2. PD8130/PD8150 Main Menu ...37 4-3. Typical PLUGE Pattern for Adjusting Brightness ...42 4-4. Typical Gray Bar Pattern for Adjusting Contrast...42 4-5.
- Page 14 List Of Figures Notes: Planar PD8130/PD8150 Installation/Operation Manual...
-
Page 15: Introduction
Planar has prepared this manual to help home theater installers and end users get the most out of the PD8130/PD8150. Planar has made every effort to ensure that this manual is accurate as of the date it was printed. However, because of ongoing product improvements and customer feedback, it may require updating from time to time. -
Page 16: Using This Manual
Use the following table to locate the specific information you need in this manual. If you need... Information about obtaining service General information about the PD8130/8150 1080p DLP Projector Installation instructions First-time configuration instructions Advanced configuration instructions... -
Page 17: Description, Features And Benefits
The Planar PD8130/PD8150 has been engineered for the top quality 1080p picture performance and installation flexibility heretofore associated with projectors costing far more. The PD8130/PD8150 Full-HD (1920 x 1080) native resolution DLP™ light engine features state-of-the-art technology for bright, pristine, high-definition images at today’s highest available resolution. -
Page 18: Parts List
Introduction Parts List ➤ Your PD8130/PD8150 is shipped with the following items. If any items are missing or damaged, please contact your Planar dealer or Planar Customer Service at (866) PLANAR1. • PD8130/PD8150 DLP Projector • Remote Control Unit and two (2), AA-size batteries •... -
Page 19: Controls And Functions
Figure 2-1 and Figure 2-2 show the key PD8130/PD8150 components. Power Button/ Status LED Exhaust Vent Focus Ring Front IR Sensor Figure 2-1. PD8130/PD8150 Front/Side View • TOP IR SENSOR Receives infrared signals from the remote control unit. • SYSTEM KEYPAD Provides an alternative to using the remote control unit to select a source or navigate the on-screen display (OSD) controls. - Page 20 • Solid red = Error that requires servicing (fan fail, Power-on self-test fail etc.) • EXHAUST VENT Warm air exits the projector through this vent. Ensure that it is not blocked. • INTAKE VENT Internal fans draw cool air into the projector through this vent.
-
Page 21: Pd8130/Pd8150 Rear/Bottom/Top View
Figure 2-2. PD8130/PD8150 Rear/Bottom/Top View Planar PD8130/PD8150 Installation/Operation Manual Controls and Functions... - Page 22 5. CEILING MOUNT HOLES Use these to attach the ceiling bracket to the projector. 6. ADJUSTABLE FEET Use these when the projector is installed in a table-top configuration to level the image and/or adjust the projection angle. 7. PROJECTION LENS The inside of the lens barrel is threaded to accommodate a standard, 72-mm lens filter.
-
Page 23: Pd8130/Pd8150 Rear Panel
Figure 2-3 shows the PD8130/PD8150 rear panel. Figure 2-3. PD8130/PD8150 Rear Panel 1. HDMI 1 (Digital) HDMI 2 (Digital) HDCP-compliant digital video inputs for connecting an HDMI or DVI source. 2. POWER INPUT (100 to 240 VAC) Connect the PD8130/PD8150 to power here. - Page 24 10. TRIGGER 1 Provides 12 (+/- 1.5) volt switched output for screen relays with 250mA current capacity and short protection. 11. RS-232 A female, 9-pin D-sub connector for interfacing with a PC or home theater automation/control system. Planar PD8130/PD8150 Installation/Operation Manual...
-
Page 25: Pd8130/Pd8150 Remote Control
Figure 2-4 shows the PD8130/PD8150 remote control, and the paragraphs that follow describe its functionality. POWER SOURCE ▲ ENTER ▼ MENU USER MEMORY GAMMA SWAP Figure 2-4. PD8130/PD8150 Remote Control 1. ON Use this button to turn the projector on. - Page 26 Press to adjust noise reduction level. 9. LIGHT Press momentarily to activate remote backlighting. Press and hold for five (5) seconds to illuminate the projector rear panel, to facilitate connecting cables in a dark room. 10. Picture-In-Picture (PIP) Controls: Press repeatedly to activate/deactivate PIP mode or select the desired PIP image source.
-
Page 27: Installation
IR signal from the remote back toward the IR receiver on the projector. In some cases, however, ambient conditions may prevent this. If so, point the remote control at the projector and try again. • If the effective range of the remote control decreases, or it stops working, replace the batteries with new ones. - Page 28 Installation • The projector’s front IR receiver has a range of approximately 40 feet (12.19 meters); the top IR receiver has a range of approximately 20 feet (6.10 meters). Figure 3-1 shows the reception angles of the front and top IR receivers.
-
Page 29: Quick Setup
Table 3-1 gives a quick overview of the PD8130/PD8150 installation process. The sections following this one provide detailed instructions. Installation should be performed by a qualified custom Note video installation specialist. Table 3-1. Installation Overview Step Procedure Choose a location for the projector... -
Page 30: Installation Considerations
Considerations Installation Type ➤ Proper installation of your projector will ensure the quality of your display. Whether you are installing a projector temporarily or permanently, you should take the following into account to ensure your projector performs optimally. Choose the installation type that best suits your needs: front or rear screen, floor mount or inverted mount. -
Page 31: Ambient Light
Screen Width (w) x Lens Throw Ratio Figure 3-2. Estimating Throw Distance The standard PD8130/PD8150 offers a throw ratio of between 1.85 and 2.40. With the optional, short-throw accessory lens, the PD8130/PD8150 offers a throw ratio of between 1.56 and 1.86. -
Page 32: Vertical And Horizontal Position
Projection Distance Figure 3-3. Projector Placement You can use the lens shift controls on the projector to center the image on the screen. Lens shift is generally expressed as a percentage of the screen height or width, as shown in Figure 3-4 and Figure 3-5. -
Page 33: Horizontal Lens Shift (Example Only)
Vertical Lens Shift: The PD8130/PD8150 provides up to 25% of upward vertical lens shift and up to 60% of downward vertical lens shift. For example, with a 100 x 56 inch (1.78:1) screen, you can shift the image up to 14.00 inches (0.36 meters) above or 33.60 inches (0.85 meters) below the screen center. -
Page 34: Folded Optics
In rear-screen applications where space behind the projector is limited, a mirror may be used to fold the optical path, as shown in Figure 3-6. The position of the projector and mirror must be accurately set. If you are considering this type of installation, contact your dealer for assistance. -
Page 35: Mounting The Pd8130/Pd8150
For fixed installations, and for those that want the projector out of sight or have a limited space for projector and audience, you can invert the PD8130/PD8150 and suspend it from the ceiling using a specially-designed ceiling mount fixture. -
Page 36: Connections To The Pd8130/Pd8150
Connections to the PD8130/PD8150 Connector Panel Access ➤ Proceed as follows to connect the PD8130/PD8150 to your video sources, external controller(s) – if present – and AC power. When connecting your equipment: • Use the correct signal cables for each source. -
Page 37: Connecting Source Components To The Pd8130/Pd8150
Connect your video sources to the PD8130/PD8150 as shown and described in the sections that follow. HDMI/DVI Connections: See Figure 3-7. Use the HDMI inputs whenever possible. This ensures the highest video quality because the signal is carried in the digital domain throughout the entire signal path, from source component output into the projector. -
Page 38: Rgb Connections
Y, Pb and Pr terminals on the COMPONENT 1/SCART input and the sync output to the VIDEO input. See Figure 3-8. Sync Green Blue DVD Player or Other SCART RGBS Source Personal Computer Figure 3-8. RGB Connections Planar PD8130/PD8150 Installation/Operation Manual... -
Page 39: Component Video Connections
Component Video Connections: Connect your component video sources to the COMPONENT 1/SCART, COMPONENT 2 (PD8150 only) or RGB inputs as shown in Figure 3-9. Figure 3-9. Component Video Connections Planar PD8130/PD8150 Installation/Operation Manual DTV Set-Top Box or Other Component (YPbPr) Source... - Page 40 Installation Composite/S-Video Connections: Connect your Composite and S-Video sources to the PD8130/PD8150 as shown in Figure 3-10. DVD Player, VCR, Satellite Receiver, Laser Disc etc. Figure 3-10. Composite and S-Video Connections Planar PD8130/PD8150 Installation/Operation Manual...
-
Page 41: Controller Connection
Connect a PC or home theater control/automation system (if present) to the RS-232 port on the PD8130/PD8150; see Figure 3-11. Use a standard, 9-pin serial cable, wired straight-through. For more information about using this connection, refer to Serial Communications on page 67. -
Page 42: Connecting 12-Volt Trigger Output To External Theater Equipment
If infrared signals from the remote control cannot reach the projector due to excessive distance or obstructions such as walls or cabinet doors, you can connect an external IR repeater system to the IR INPUT on the PD8130/PD8150 to extend the range of the remote control. See Figure 3-13. -
Page 43: Connecting To Ac Power
The PD8130/PD8150 ships with various types of AC power cords. Choose the one that is appropriate to your locale. Plug the female end of the power cord into the AC receptacle on the rear of the projector (AC 100V ~ 240V); see Figure 2-3. Then, connect the other end to your AC power source. -
Page 44: Adjusting The Picture Orientation
If this automatic inversion is not desired, select Ceiling Mode from the System Menu and set it to Off. The PD8130/PD8150 gives you a great deal of control over the picture size, position and focus. To focus the projected image, grasp the lens by the front ring and rotate it. - Page 45 Horizontal Lens Shift (PD8150 only): To shift the projected image horizontally, insert the provided hex wrench into the hole at the top of the projector. Then, turn the wrench as shown to shift the lens in the desired direction. Planar PD8130/PD8150 Installation/Operation Manual...
- Page 46 Installation Notes: Planar PD8130/PD8150 Installation/Operation Manual...
-
Page 47: Operation
Press the aspect ratio ( ) button to select the appropriate aspect ratio for the type of program material being viewed. When you turn on the PD8130/PD8150, it switches to the last selected input and looks for a valid signal. -
Page 48: Using Picture-In-Picture (Pip)
– – √ – – – √ √ √ √ √ √ √ √ on page 54) are not available as PIP Planar PD8130/PD8150 Installation/Operation Manual SWAP LIGHT √ √ √ √ √ √ √ √ √ √ √ √... -
Page 49: Using The On-Screen Menus
5. Press MENU to return to the previous menu. 6. From the Main Menu, press MENU to turn off the OSD menu. The PD8130/PD8150 OSD menus are arranged hierarchically, as shown in Figure 4-1. Depending on the selected input source and signal characteristics, some menu options may not be available. - Page 50 RGB Adjust Red / Green / Blue Gain V. Position H. Position Fine Sync Phase Tracking Sync Level Figure 4-1. PD8130/PD8150 OSD Menu Structure Source Enable PIP Position Menu Position Translucent Menu System Lamp Power Blank Screen Auto Power Off...
-
Page 51: Main
The PD8130/PD8150 Main Menu, shown in Figure 4-2, provides access to the most commonly-used projector functions. 1. For best results, Planar recommends that you set Note DynamicBlack to Off before adjusting Brightness, Contrast and other image quality settings in this menu (refer to DynamicBlack on page 50). - Page 52 ENTER; refer to Table 4-2. Aspect Ratio of With Standard Lens Source (1.78:1 Screen) Signal 16:9 16:9 Geometry of Projected Image With Anamorphic Lens (2.35:1 Screen) Planar PD8130/PD8150 Installation/Operation Manual buttons to select...
- Page 53 4:3 source has the Narrow correct aspect ratio when using an anamorphic lens. Planar PD8130/PD8150 Installation/Operation Manual Aspect Geometry of Projected Image Ratio of With Standard Lens Source (1.78:1 Screen) Signal...
- Page 54 With Standard Lens Source (1.78:1 Screen) Signal 1080i HDTV Image 16:9 720p HDTV Image 480i SDTV Image 1024x768 PC Image Planar PD8130/PD8150 Installation/Operation Manual With Anamorphic Lens (2.35:1 Screen) 1080i HDTV Image 720p HDTV Image 480i SDTV Image 1024x768 PC Image...
- Page 55 ISF Day or ISF Night memory location. You must enter a passcode to access the Save ISF Note sub-menu. The settings that are saved are the same as those saved with the Save Settings command (see above). Planar PD8130/PD8150 Installation/Operation Manual Operation...
-
Page 56: Typical Pluge Pattern For Adjusting Brightness
Select Contrast from the Main menu. Use the buttons to adjust the contrast up until the top two bars become almost the same brightness, then down just until the brightness change between these bars is consistent with the other bars. Planar PD8130/PD8150 Installation/Operation Manual... - Page 57 • Sharpness (Simple Mode): Adjust as needed, looking for white edges around the transitions from black to gray and differently-sized lines in the “sweep” patterns at the top and bottom. Lower the sharpness setting to eliminate them. Planar PD8130/PD8150 Installation/Operation Manual Operation...
- Page 58 “mosquito noise” in MPEG-compressed video signals. Set it as needed to minimize distortion around the edges of moving objects, moving artifacts around edges and/or blotchy noise patterns superimposed over the objects. button to adjust as desired, Planar PD8130/PD8150 Installation/Operation Manual...
- Page 59 Note Crop. Figure 4-6 illustrates the effect of each overscan setting for each aspect ratio. 16:9 Narrow Native (720p) Figure 4-6. Overscan Examples Planar PD8130/PD8150 Installation/Operation Manual Crop Zoom = Source Image Area = Edge Noise = Screen (16:9) Operation...
- Page 60 Resync, then press ENTER. This causes a re-acquisition of the active source and the PIP source, if present. It also changes any Fine Sync settings (described on page 51) for this timing to the default setting. Planar PD8130/PD8150 Installation/Operation Manual...
-
Page 61: Advanced
For component SDTV and EDTV resolutions, REC601 is used. For other component video resolutions, REC709 is used. • RGB: If Hsync or Vsync signals are present, the PD8130/PD8150 uses the RGB-PC color space. Otherwise, REC601 is used for SDTV and EDTV sources, and REC709 for all other sources. - Page 62 Native. The default setting, 6500K, is appropriate for most situations. Higher settings produce a “bluer” picture; lower ones impart a reddish hue to the image. Select Native to disable white point adjustment of the source signal. to select 5500K, 6500K, 7500K, 9300K or Planar PD8130/PD8150 Installation/Operation Manual...
- Page 63 DLP Frame Rate: Select DLP Frame Rate from the Advanced menu to choose the output frame rate. You can have the PD8130/PD8150 automatically determine the optimum frame rate, or you can force it to use a specific frame rate. If PIP is active, the PD8130/PD8150 converts the PIP source Note frame rate to the same frame rate as the main source.
- Page 64 (Off) the DynamicBlack actuator in the optical engine. DynamicBlack uses a dynamic iris that modulates light to the DMD based on the actual content of the video material. Planar recommends that you disable DynamicBlack before adjusting Brightness, Contrast or other image settings.
- Page 65 25 per cent of the image height up or down. • H Position: This control adjusts the horizontal position of the image within the designated image area, up to 25 per cent of the image width left or right. Planar PD8130/PD8150 Installation/Operation Manual Operation...
- Page 66 (see above) can be optimized. • Sync Level (Component sources only): Select Sync Level to adjust the voltage level of the PD8130/PD8150 Sync signal detection circuitry. Sync Level adjustment is occasionally necessary when a DVD player or HDTV source signal drops “below black”...
-
Page 67: System
Operation Use the controls in the System menu, shown in Figure 4-11, to adjust the lamp, System change the display orientation and perform other, common installation tasks. Figure 4-11. PD8130/PD8150 System Menu Planar PD8130/PD8150 Installation/Operation Manual... - Page 68 If either Component 1 or Video is enabled, SCART must be Note disabled. • S-Video: Enables or disables the S-Video source. • SCART: Enables or disables the SCART RGBS source. If SCART is enabled, both Component 1 and Video must be Note disabled. Planar PD8130/PD8150 Installation/Operation Manual...
- Page 69 PIP source and placed in a PIP area equal to half the display on the left side. This results in the right half of the image being the active source and the left half is the PIP source. The PD8130/PD8150 applies the User Memory 2 settings to the PIP image.
- Page 70 The options are Logo, Black, Blue and White. The default is Black. Auto Power Off: Set Auto Power Off to On to have the PD8130/PD8150 turn itself off after 20 minutes of inactivity (no source signal present).
-
Page 71: Control
Logo Display: This controls whether or not the Planar logo appears during startup. Power On Chime: This controls the audible chime at startup. Select Control from the Main Menu to set various options related to control of the projector. 1 Key / 2 Key / 3 Key / 4 Key / 5 Key: These menu items assign the function of the keys numbered 1 through 5 on the remote. - Page 72 Trigger 2 output. Trigger 2 operates identically to Trigger 1. Remote Code Set: Select Remote Code Set from the Control menu to specify the remote IR code set to which the PD8130/PD8150 responds. The default is Set-1. Choose Set-2 if other equipment in the theater responds to commands from the PD8130/PD8150 remote control in ways that are unexpected or undesirable.
-
Page 73: Language
Operation Select Language from the Main Menu to change the OSD Language. Language The PD8130/PD8150 can display the menus in English, French, German, Italian, Spanish, Swedish, Traditional Chinese, Simplified Chinese, Japanese, Korean, Portuguese or Russian. Press to select a language. Then, press ENTER to confirm your selection. -
Page 74: Service
• H/V Refresh Rate • Lamp Hours (number of lamp hours elapsed since the last reset) Should you ever need to contact Planar Technical Support, this information will help them answer your questions and/or resolve product performance issues. Figure 4-15. PD8130/PD8150 Service Menu You can also perform various maintenance tasks, such as resetting the lamp hour counter, from this menu. - Page 75 Test Patterns: The PD8130/PD8150 has numerous internal test patterns that are useful to technicians for advanced calibration, measurement and fault isolation purposes. To access them, select Test Patterns from the Service menu and set it to On.
- Page 76 In most cases, the default setting (Auto) will maintain the correct operating temperature. If the lamp frequently turns off due to overheating, or in certain high-altitude operating environments, you may need to change this setting to High. on the remote control Planar PD8130/PD8150 Installation/Operation Manual...
-
Page 77: Maintenance And Troubleshooting
The lamp should be replaced when it reaches the end of its life (typically between 2000 and 4000 hours depending on the Lamp Power setting), or sooner if a noticeable degradation in brightness occurs. Contact your Planar dealer to obtain a replacement lamp. -
Page 78: Troubleshooting Tips
Troubleshooting Tips Table 5-1 provides some general guidelines for troubleshooting problems you may encounter with the PD8130/PD8150. If the suggested solutions fail to resolve the problem or if you encounter an issue not described here, please contact Planar Technical Support. - Page 79 • PD8130/PD8150 internal temperature is too high. LED lights solid red. • Fans are not working properly or power-on self-test has failed. Planar PD8130/PD8150 Installation/Operation Manual Possible Cause(s) • Lower the brightness setting. • Ensure that the source outputs are connected to the correct PD8130/PD8150 input.
- Page 80 Maintenance and Troubleshooting Notes: Planar PD8130/PD8150 Installation/Operation Manual...
-
Page 81: Serial Communications
• Commands are not case-sensitive. The PD8130/PD8150 supports two types of commands: key commands and operation commands. Key commands mimic pressing a button on the remote control. Operation commands tell the projector exactly what to do. - Page 82 Bring up or cancel noise reduction slider. 0xC4 Force reacquisition of active and PIP source 0xC5 Switch to the next gamma. 0xC6 Switch to CRT gamma. 0xC7 Switch to Film gamma. 0xC8 Switch to Video gamma. Planar PD8130/PD8150 Installation/Operation Manual...
- Page 83 0x9D asp.16.9 (none) 0x9E asp.4.3 (none) 0x9F asp.lett (none) 0xA0 Planar PD8130/PD8150 Installation/Operation Manual IR Code Description Set 2 0xC9 Switch to Bright Room gamma. 0xCA Switch to PC gamma. 0xCB Switch the active source to source 1. 0xCC Switch the active source to source 2.
-
Page 84: Operations Commands
0xAC lit.tog 0xAD LIGHT Operations commands allow more flexible and direct control of the projector. The syntax for operations commands is as follows: op <operation> <command>[CR] (Precede <operation> and <command> with a space.) The command type can be one of 5 functions:... - Page 85 Table 6-2 lists the valid operations commands. For all but Execute functions, the response from the projector is the command and “= <value>” where <value> is the current value or “NA” if the value is not available. For Execute functions the response is the same command.
- Page 86 0 - 200 0 - 200 0 - 200 0 - 200 0 = Simple 1 = Advanced 0 - 200 0 - 200 0 - 200 0 = Off 1 = Crop 2 = Zoom Planar PD8130/PD8150 Installation/Operation Manual Notes...
- Page 87 (execute) color.space video.stand gamma color.temp dlp.frame color.gamut Planar PD8130/PD8150 Installation/Operation Manual Values 0 = HDMI 1 1 = HDMI 2 2 = RGB 3 = YPrPb 1 4 = YPrPb 2 5 = S-Video 6 = Video 7 = SCART...
- Page 88 2 = Bottom left 3 = Bottom right 4 = Center 0 = 0% 1 = 25% 2 = 50% 3 = 75% 0 = Black 1 = Blue 2 = White 3 = Logo Planar PD8130/PD8150 Installation/Operation Manual Notes...
- Page 89 1.key 2.key 3.key 4.key Planar PD8130/PD8150 Installation/Operation Manual Values 0 = Off 1 = On 0 = Off 1 = On 0 = Off 1 = On 0 = Off 1 = On 2 = Auto...
- Page 90 0 = Lamp 1 = 16:9 2 = Letterbox 3 = 4:3 4 = 4:3 Narrow 5 = RS232 0 = Set 1 1 = Set 2 0 = Off 1 = On <string> <string> <string> Planar PD8130/PD8150 Installation/Operation Manual Notes...
- Page 91 (execute) fact.reset (execute) blue.only pattern Planar PD8130/PD8150 Installation/Operation Manual Values 0 = HDMI 1 1 = HDMI 2 2 = RGB 3 = YPrPb 1 4 = YPrPb 2 5 = S-video 6 = Video 7 = SCART...
- Page 92 0 = English OSD language only 1 = French 2 = German 3 = Italian 4 = Spanish 5 = Swedish 6 = Chinese-Simplified 7 = Chinese-Traditional 8 = Japanese 9 = Korean 10= Portuguese 11 = Russian Planar PD8130/PD8150 Installation/Operation Manual...
-
Page 93: Specifications
Table 7-1 lists the PD8130/PD8150 specifications. Table 7-1. PD8130/PD8150 Specifications Video Support: Computer Support: Communication: (2) HDMI V1.3 with HDCP: (1) Component (3 x RCA, gold): (1) Component (PD8150 only; 3 x BNC, 75 ohm): (1) RGB (HD15): (1) S-Video (4-pin mini-DIN): (1) Composite (RCA, gold): (1) 3.5mm mini jack (PD8130):... - Page 94 Front, Rear, Ceiling (front/rear) User replaceable 180/230W HPM (selectable), 4000 hour lifetime at 180W setting Planar customized Gennum GF9450 with 10 bit independent dual channel image processing, true 1080i deinterlacing, MPEG artifact reduction (block and mosquito noise), latest motion...
- Page 95 Table 7-1. PD8130/PD8150 Specifications (continued) Dimensions: Weight (without lens): Operating Temperature: Operating Altitude: Operating Humidity: Universal Power Supply: Power Consumption: Regulatory: Menu Languages: Limited Warranty: Specifications are subject to change without notice. Planar PD8130/PD8150 Installation/Operation Manual General 20.8" (530mm) L x 17.9" (455mm) W x 7.8"...
-
Page 96: Pd8130/Pd8150 Dimensions
Specifications PD8130/PD8150 Dimensions Figure 7-1 shows the PD8130/PD8150 dimensions, in millimeters. Figure 7-1. PD8130/PD8150 Dimensions LENS CENTER LINE APPROXIMATE CENTER OF GRAVITY CEILING MOUNT HOLES M4 x 4 Planar PD8130/PD8150 Installation/Operation Manual... -
Page 97: Supported Timings
Table 7-2 lists the signal types supported by each input on the PD8130/PD8150. Table 7-2. Supported Signal Timings by Input Refresh Format Resolution Rate (Hz) 640x480 640x480 60.00 66.59 75.00 85.00 800x600 800x600 60.00 75.00 85.00 832x624 832x624 74.54 848x480 848x480 48.00... - Page 98 (kHz) 56.250 148.500 3.580 4.430 15.625 4.430 3.580 15.625 3.580 4.430 13.500 4.250/4.410 Planar PD8130/PD8150 Installation/Operation Manual Supported? (√ = Yes, – = No) Component 1 HDMI 1 Component 2 HDMI 2 √ √ √ √ √ √ – –...
- Page 100 Part No. 020-0858-00 rev. A January 2008 Planar Systems, Inc. • 1195 NW Compton Drive • Beaverton, OR 97006-1992 • +1 (503) 748-5799 / +1 (866) PLANAR1 / Fax +1 (503) 682-9441 www.planar.com...