Hilti PS 200 S Instruction Manual
Ferroscan system
Hide thumbs
Also See for PS 200 S:
- Operating instructions manual (44 pages) ,
- Manual (494 pages) ,
- Operating instructions manual (428 pages)
Table of Contents
Advertisement
Quick Links
Advertisement
Table of Contents

Related Manuals for Hilti PS 200 S


Summary of Contents for Hilti PS 200 S
- Page 1 PS 200 S English Printed: 11.11.2016 | Doc-Nr: PUB / 5313205 / 000 / 01...
- Page 2 Printed: 11.11.2016 | Doc-Nr: PUB / 5313205 / 000 / 01...
- Page 3 This symbol is intended to draw special attention to certain points when handling the product. 1.3 Product information Hilti products are designed for professional use and may be operated, serviced and maintained only by trained, authorized personnel. This personnel must be informed of any particular hazards that may be encountered.
- Page 4 2 Safety 2.1 General power tool safety warnings WARNING Read all safety warnings and all instructions. Failure to follow the warnings and instructions may result in electric shock, fire and/or serious injury. Save all warnings and instructions for future reference. Work area safety ▶...
- Page 5 ▶ If the battery is too hot to touch, it may be defective. In this case, place the power tool in a non-flammable location, well away from flammable materials, where it can be kept under observation and left to cool down. Contact Hilti Service after the battery has cooled down. English...
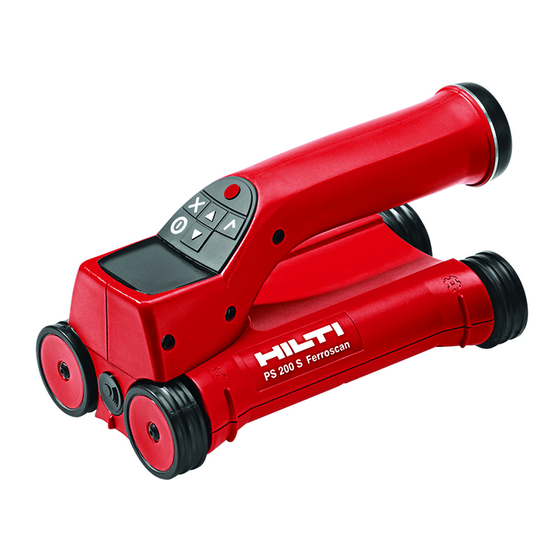
- Page 6 3 Description 3.1 Overview PS 200 S scanner PSA 80 battery PSA 60 soft pouch PUA 81 AC adapter § PSA 55 infrared adapter PUA 80 charger PSA 63 hand strap PSA 10/11 reference grid set PSA 92 USB data cable PUA 90 adhesive tape &...
- Page 7 PUA 70 marking pen set PS 250 toolbox ¡ 3.2 Intended use The product is designed to be used for locating reinforcing bars in concrete, measuring depth of concrete cover and estimating the diameter of the bars in the uppermost layer in accordance with the specifications detailed in the technical data provided in these operating instructions.
- Page 8 A report can be printed. 4 Technical data 4.1 PS 200 S technical data Maximum scanning speed 0.5 m/s (1.6 ft/s)
- Page 9 Infrared range Typically 0.3 m (0.98 ft) Infrared output power Max. 500 mW 4.2 Ambient conditions PS 200 S Operating temperature −10 ℃ …50 ℃ (14 ℉ …122 ℉) Storage temperature −20 ℃ …60 ℃ (−4 ℉ …140 ℉)
- Page 10 5.2.1 Quickscan The remaining memory for Quickscan recording is shown at the top of the screen in meters or feet (depending on the scanner type and units set). 5.2.2 Imagescan The number of Imagescans in the scanner, up to a maximum of 9, is shown at the top of the screen.
- Page 11 Backlight permanently on Backlight permanently off Backlight is controlled automatically. With this option, the backlight is switched off automatically after 5 minutes if no button is pressed during this time and is reactivated the next time a button is pressed. 5.4 Adjusting the volume Sets the volume level of the audible signal during scan- ning.
- Page 12 imperial (feet, where applicable) 5.6 Deleting data Press the Down arrow button followed by the Confirm button to delete data. Alternatively, press the Cancel button to return to the settings menu. Note Deleting memory contents presents a risk of data loss. Data that has not been transferred to the tablet before deletion will be permanently lost.
- Page 13 1. Bar depth 2. Distance traveled 3. Signal strength 4. Settings: Minimum depth, scanning direction, bar diameter, bar spacing 5.8 Quickscan detection Move the scanner over the surface. Reinforcing bars that lie at right angles to the direction of travel will be detected.
- Page 14 The bar spacing distance can be calculated automatically using the Quickscan detection function by searching for the center of the bar and pressing the red Record button when the scanner is over the mid point of the bar. Next, search for the mid point of the next bar and again press the Record button.
- Page 15 PC application, the settings help to ensure that individual Quickscan recordings are subsequently correctly displayed in Hilti PROFIS Ferroscan MAP (data evaluation and presentation application) and that the depth values correspond with the actual surface of the structure.
- Page 16 Confirm button and continue scanning. The marker will be shown as a vertical line in the scan data when viewed on the tablet or in the Hilti PROFIS Detection PC application. 5.13 Imagescan Imagescan is used to create an image of the reinforcement layout. The depth and diameter of the bars can be determined or, respectively, estimated.
- Page 17 Select Imagescan from the main menu. The Imagescan screen is displayed. A representation of the grid appears on the screen with a suggested starting point (triangle). This is always at upper left and will be suitable for most scans. Image data will be generated only for areas of the grid that have been scanned both vertically and horizontally.
- Page 18 The scanner emits a double beep at the end of the row and automatically stops recording. This procedure should be repeated for each row and column while observing the instructions shown in the display. When all rows have been completed, the columns should also be scanned in the same way.
- Page 19 Attach the reference grid in the same way as for an Imagescan. Use a PUA 70 marking pen to mark the edges or the punched holes at the end of each reference grid for the transition to the next grid, as shown below.
- Page 20 Note Install the Hilti PROFIS Detection PC application on your PC or laptop. The date and time must be set before using the PSA 55 IR adapter for the first time in order to ensure that the scan data subsequently shows the correct date and time.
- Page 21 Data can be transferred at any time when the scanner and tablet are switched on, the PS 200 S scanner is displaying the main menu and infrared data transfer is activated on the tablet. On the tablet under “Project”, select the project into which the data is to be copied.
- Page 22 Data transfer takes between 1 and 15 seconds, depend- ing on the number and length of scans contained in the scanner. This screen is displayed by the scanner when data transfer is complete: Press the Confirm button on the scanner again to end the data transfer procedure.
- Page 23 To ensure data security, data integrity and to avoid malfunctions, use only the PUA 95 Micro USB cable supplied by Hilti. The PUA 95 Micro USB data cable is used to transfer data from the adapter to the computer. The adapter can be removed once data transfer is complete.
- Page 24 PC applications as well as automated batch processing of large volumes of data. Die Hilti PROFIS Detection MAP PC application makes it possible to assemble large volumes of data as a large-area image or evaluation scan with an area of up to 45x45 m.
- Page 25 Confirm button on the scanner is pressed. If the error message reappears, the appliance will need to be sent to Hilti for repair. Indicates that the scanner or ▶ Remedy the problem by switch- adapter may be defective.
- Page 26 6.2 Troubleshooting If the trouble you are experiencing is not listed in this table or you are unable to remedy the problem by yourself, please contact Hilti Service. Trouble or fault Possible cause Action to be taken The scanner doesn't start.
- Page 27 7.2 Hilti Calibration Service We recommend that the device is checked by the Hilti calibration service at regular intervals in order to verify its reliability in accordance with standards and legal requirements. Use can be made of the Hilti calibration service at any time, but checking at least once a year is recommended.
- Page 28 Most of the materials from which Hilti tools and appliances are manufactured can be recycled. The materials must be correctly separated before they can be recycled. In many countries, your old tools, machines or appliances can be returned to Hilti for recycling. Ask Hilti Service or your Hilti representative for further information.
- Page 29 Printed: 11.11.2016 | Doc-Nr: PUB / 5313205 / 000 / 01...
- Page 30 Hilti = registered trademark of Hilti Corp., Schaan 20161019 Printed: 11.11.2016 | Doc-Nr: PUB / 5313205 / 000 / 01...