Advertisement
Quick Links
otte!
1
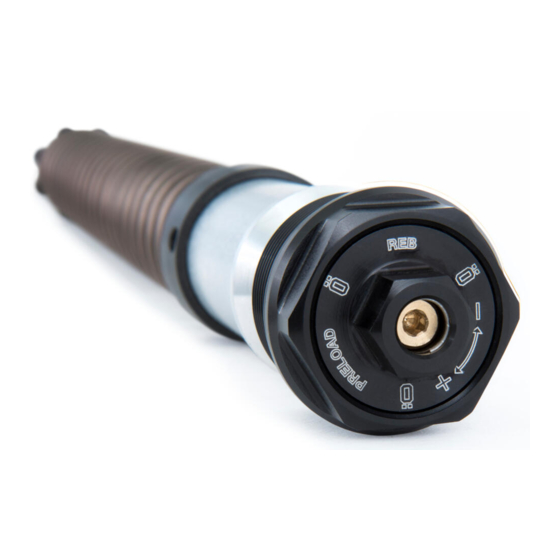
Please note that there can be small differences
between your product and the images in
these instructions.
otte!
1
Please note that during storage and transport,
especially at high ambient temperature, some
of the oil and grease used for assembly may
leak and stain the packaging. This will not cause
damage to the product, wipe off the excessive
oil or grease with a cloth.
Front Fork Kit for Yamaha TMAX
FKS 503
Mounting Instructions
Kit Conttnts
Dtscription
Front fork kit
O-ring
Sticker set Öhlins
Owner's manual
⚠
arninge!
This kit should only be installed by an authorized
Öhlins dealer. The installation procedure
requires certain tools.
otte!
1
Before you install this product, check the kit
contents. If anything is missing, please contact
an Öhlins dealer.
⚠
arninge!
Before you install this product, read the Öhlins
Owner's manual and this document. This
product is an important part of the vehicle and
the vehicle stability.
Part
o
Pcs
FKS 503
1
00576-02
2
-
-
07284-01
1
Advertisement

Related Manuals for Ohlins FKS 503


Summary of Contents for Ohlins FKS 503
- Page 1 Kit Conttnts Dtscription Part Front fork kit FKS 503 O-ring 00576-02 Sticker set Öhlins Owner’s manual 07284-01 ⚠ arninge! This kit should only be installed by an authorized Öhlins dealer. The installation procedure requires certain tools. otte! Please note that there can be small differences...
- Page 2 MOU TI G I STRUCTIO S ⚠ ⚠ arninge! arninge! We strongly recommend to let an Öhlins dealer Spring compression creates a potential danger install this product. because of the violent force that loaded springs are capable of. Beware of this when you work ⚠...
- Page 3 MOU TI G I STRUCTIO S 1 Rtmovt tht original front fork otte! The following procedure applies to both front fork legs. Front cover Put the motorcycle on a workstand so that the front wheel barely touches the ground. ⚠ arninge! Make sure the vehicle is securely supported so that it will not fall over.
- Page 4 MOU TI G I STRUCTIO S 2 Disasstmblt original front fork Rtmovt original Loosen top cap from outer tube. Slide outer tube down until it stops. Loosen and remove top cap from shaft according to vehicle service manual. Remove main spring and surrounding parts from front fork leg.
- Page 5 MOU TI G I STRUCTIO S 2.11 Pour approximately 0.5 litre Öhlins suspension fluid in front fork leg. ⚠ arninge! Fluid level must be approximately 50 mm above top of cylinder tube assembly. 2.12 Use a hex key to open compression and rebound bleed adjusters fully.
- Page 6 MOU TI G I STRUCTIO S 2.18 Install o-ring on top cap. Apply grease on o-ring and thread. [00576-02 o-ring] [00146-01 grtast] 2.19 Make sure that compression and rebound adjusters are fully open before installing top cap. Use a hex key to open compression and rebound adjusters.
- Page 7 MOU TI G I STRUCTIO S 4 Install tht front fork in tht vthiclt otte! The following procedure applies to both front fork legs. Install the front fork legs into the triple clamps at the position recommended in setup data (Front leg position).
-
Page 8: Setup Data
SETUP DATA Compression clicks Rebound clicks Suspension fluid level Front leg position Standard position Suspension fluid 01309-xx SPRI G GUIDE Make sure you choose the correct main spring for your rider weight, driving style and preferences. Below you find a general recommendation of main spring rate for your weight.