Table of Contents
Advertisement
Advertisement
Table of Contents

Related Manuals for Clarion BTS33


Summary of Contents for Clarion BTS33
-
Page 2: Table Of Contents
CONTENTS 1. FUNCTIONS 2. OPERATION 3. QUICK BUTTON DESCRIPTION 4. AUDIO SETTINGS 5. RADIO OPERATION 6. MP3,WMA & AAC (M4A) FILE OPERATION 7. USB DEVICE OPERATION 8. AUX-IN CONNECTION OPERATION 9. iPod OPERATION 10. BLUETOOTH FUNCTION 11. TECHNICAL SPECIFICATION 12. GENERAL CAUTIONS 13. -
Page 3: Operation
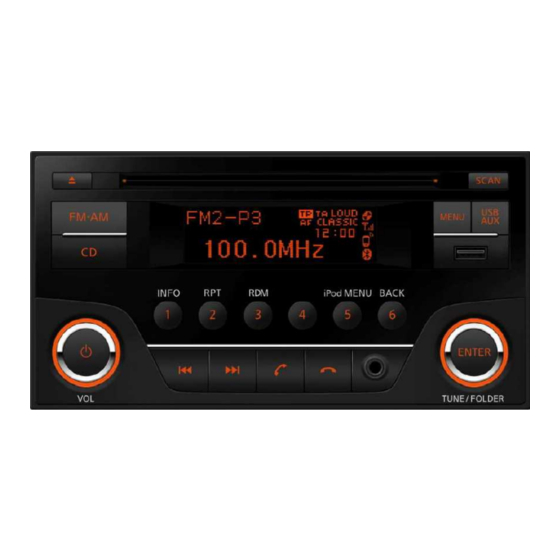
2.- OPERATION 3.- QUICK BUTTONS DESCRIPTION 1.- CD eject button, if it is loaded inside the unit. 2.- LCD digital display, full dot matrix type for display information. 3.- Insertion and ejection CD. 4.- MENU button active different functions. 5.- SCAN, scanning button of station in radio mode and tracks in CD & USB mode. 6.- FM/AM selector band frequencies on radio mode. -
Page 4: Audio Settings
16.- 6, Memory button 6 and BACK of station AM and FM radio mode and BACK menu from iPod. 17.- ENTER, FOLDER: Manual change knob of tuning in radio mode and folder change on CD & USB mode. 18.- SEEK DOWN: Automatic descending search button of station in radio mode and descending track change in, CD, USB, iPod, BT audio. - Page 5 Adjusting fader Adjust fader level, push MENU button until the display indicated FADER legend, turn the knob ENTER to left or right to adjust level desired. The level fader indicated on display R5 and F5, the display return automatically after 5 seconds last adjustment. Adjusting balance Adjust balance level, push MENU...
- Page 6 Adjusting clock This option let see the time clock in principal LCD Push MENU button the display indicated CLOCK turn the knob ENTER to left or right to clock on or clock off, after 5 seconds of the last adjustment, in the display will return to the previous mode.
-
Page 7: Radio Operation
5.-RADIO OPERATION Tuning band selection For manufactured adjusting the unit turn on in AM1 radio mode, this unit has available 3 FM and 2 AM bands with the ability to save in each 6 stations as tuned, to select and listen when you need it, see memorizing radio stations. -
Page 8: Mp3,Wma & Aac (M4A) File Operation
6.-MP3, WMA & AAC (M4A) FILE OPERATION This section describes the available commands on your unit to play control of MP3, WMA and AAC (M4A), which are available in both CD; USB; iPod devices and BT audio connection. Seek down and rewind track. If push button when the progress of the current track has not elapsed the first 3 seconds of play, the recoil will be made to the previous track, but if you press the button... - Page 9 HOW TO ASSIGN FOLDER No. AND FILE No. OF MP3/WMA AND PLAY SEQUENCE 1. Assign No. 1 to the ROOT folder. 2. Assign No. 2 to the folder which is one level below ROOT in the folder hierarchy. 3. Assign a number to the child folder of the folder No. 2. (The first child folder: No. 3) Assign numbers to the child folders in order of hierarchy level.
-
Page 10: Usb Device Operation
7.-USB DEVICE OPERATION To play (tracks) of MP3, WMA or AAC files from USB device with the unit turn on and any mode function, when you insert the USB device in the USB connector, automatically the radio change at the mode USB, and when it finish uploading information it will start playing tracks MP3/WMA or AAC starting with the files saved in the root directory and alphanumeric priority. -
Page 11: Aux-In Connection Operation
8.- AUX-IN CONNECTION OPERATION Auxiliary connector 3.5mm audio input signal. His unit has auxiliary 3.5mm in diameter to enter stereo audio signals coming from devices such as iPod, MP3 player. Note when connecting a device to the auxiliary input you can only make audio adjustments (BASS, TREB, BALANCE, FADER, EQ, LOUD VOL) signal of device through the unit. - Page 12 Fast rewind in same track The high speed playing can be activated when keeping pushed the button so is possible rewind the playing in same track. Seek up and forward track Seek up Push button in order to pass the next track. Fast forward in same track The high speed playing can be activated when keeping pushed the button so is possible...
-
Page 13: Bluetooth Function
After this, the sequence start again. 10.- BLUETOOTH FUNCTION You must go to menu mobile to the bluetooth function and select the option to add audio devices pressing CALL button, after will appear MY CAR on your phone and push connect, some cases is necessary write code which radio displayed (example KEY 00073), PAIR OK and connected to device (name device is displayed on LCD), then 1 minute if not connect device, display return last mode. - Page 14 The unit with the previously paired and connected phone, every time you turn ON, it automatically starts searching for BT devices, the unit will display the icon logo BT will be showed (BT symbol), the connection between the two devices will be automatic. Once achieved, the connection, the display of logo BT radio shows and the phone.
-
Page 15: Technical Specification
11.- TECHNICAL SPECIFICATION. GENERAL source power:...13.2 V (10.8 a 15.6 ) Current:......Max.10 A Impedance speakers: 4 ohms Tune FM Frequencies:....87,5 MHz a 108 MHz Quiet sensitivity:....<10 dB mv Stereo separation:....>22 dB, 1 kHz Signal/ noise relation:....>65 dB Tune AM frequencies.. -
Page 16: Recommendations For Usb Devices
4.- Do not introduce, strange devices in the auxiliary inputs (screwdrivers, knives, metal objects, etc.) As this may damage the equipment and this damage will not be covered by the warranty. 13.- RECOMMENDATIONS FOR USB DEVICES. When using USB devices: 1.- Use only USB certified, you can notice that USB device is certified when you have USB logo engraved or printed on the body of device of its packaging 2.-To prevent damage to the unit USB device, we recommend that before remove the USB... - Page 17 3.- When using a new disc, sometimes the excess material remains on the edge and / or center hole. 4.- When using this kind of disks, it may happen that the disc is not placed in the correct position and the unit can not operate. In this case, please use the disk after you remove the excess material at the edge and / or center hole with a piece of wood, or with a piece of pencil.
-
Page 18: Warning
9.- Do not expose discs to direct sunlight, high temperature or humidity for long periods of time. 10.- Do not stick labels, tapes or papers on the surface of the disc, neither write on them with any kind of marker. 15.- WARNING This equipment has been tested and found to comply with the limits for a Class B digital device, pursuant to part 15 of the FCC Rules. - Page 19 You are cautioned that any changes or modifications not expressly approved in this manual could void your authority to operate this equipment.