Advertisement
Quick Links
Download this manual
See also:
Owner's Manual
VIDEO IN A BAG SYSTEM WITH
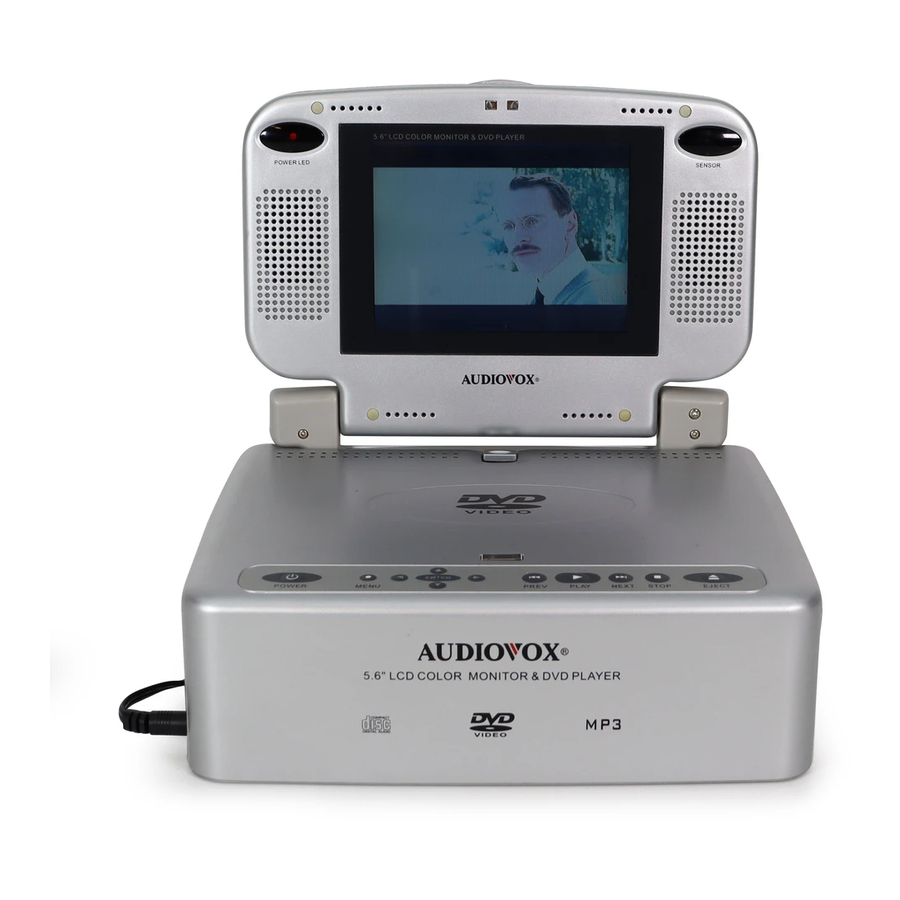
DETACHABLE 5.6" LCD MONITOR & DVD PLAYER
VBP4000
VBP4000
VBP4000
VBP4000
VBP4000
Advertisement

Related Manuals for Audiovox VBP4000


Summary of Contents for Audiovox VBP4000
- Page 1 VIDEO IN A BAG SYSTEM WITH DETACHABLE 5.6" LCD MONITOR & DVD PLAYER VBP4000 VBP4000 VBP4000 VBP4000 VBP4000...
- Page 2 A. Introduction Thank you for selecting this “Video in a Bag” System. The system's main features include a 5.6" Liquid Crystal Display (LCD) Moni- tor and a DVD Player. The system utilizes the latest state of the art electronics and is designed for use in vehicles, hotels, offices or your home.
- Page 3 from falling. The “S” hooks and all straps must be fastened cor- rectly to secure the system in the vehicle in the event of an acci- dent. Operate the “Video in a Bag” System with the Bag open to ensure proper ventilation of the monitor and the DVD Player. The system is intended to be mounted for rear seat viewing only.
- Page 4 7. Disc Do not use irregularly shaped discs such as heart or star-shaped discs as they may cause the unit to malfunction. Do not stick pa- per, tape or glue on the disc. Do not expose the disc to direct sunlight or heat sources such as hot air ducts.
- Page 5 Unzip the lower compartment of the bag and take out the AC to DC adapter. Plug one end of the AC to DC adapter into the DC 12V jack on the left side of the main unit, then plug other end into the 110V AC power receptacle.
- Page 6 The monitor can be detached from the system by depressing the button below the screen with one hand and removing the monitor with the other hand. Take the AC to DC adapter from the lower compartment, plug one end into the DC 12V jack on the right side of the monitor, then plug the other end into the 110V AC power receptacle.
- Page 7 plied through the DIN cable to the connected monitor. So there is no need for another power source to be connected to the DC 12V jack on the right side of the detached monitor. Figure 5 Figure 6 7 7 7 7 7...
- Page 8 E. Installation 1. Installing the system onto the seat back in a car (Refer to Figure 7) 1). Unfasten the rear Velcro straps of the bag. Fold inwards the rear piece of the bag and attach its end velcro strap to the middle Velcro strap on the back of the bag to form a triangle.
- Page 9 2. Installing the system between the driver/passenger seat (Refer to Figure 8) 1).Take one of the supplied straps from the lower compartment of the bag, and connect the latch to the upper metal ring on the left side of the bag. Attach the "S" hook to the same ring after looping the strap around the headrest of the driver's seat.
- Page 10 3. Installing the system on the back seat in a car (Refer to Figure 9) There is no need to remove the four straps from the bag as they are not used in this installation. Carefully place the system (front facing up) on the back seat. Guide the vehicles safety belt through the short strap sewn on the back of the bag.
- Page 11 1). Follow the installation instruction shown in Item 1, 2 or 3. 2). Detach the monitor from the main unit by depressing the but ton below the screen with one hand and remove the monitor with the other hand. Take the pouch from the rear compartment of the bag.
- Page 12 2). You can detach the monitor from the main unit by depress ing the button below the screen with one hand and removing the monitor with the other hand. Rotate the base of the monitor backward so that it may be placed on a table or other level surface.
- Page 13 1). Brightness Up/Down Thumbwheel 2). Volume Up/Down Thumbwheel 3). Headphone Input Jack # 2 4). Headphone Input Jack # 1 5). S Video Output Jack 6). DVD Video Output Jack 7). DVD Audio L Output Jack 8). DVD Audio R Output Jack 9).
- Page 14 2. Remote Control View (Refer to Figure 13) 1). Power Button 2).Display Button 3). Angle Button 4). Subtitle Button 5). Audio Button 6) Zoom Button 7). Up/Down/Left/Right/Enter Buttons 8). Menu Button 9). Return Button 10). A-B Button 11). Slow Button 12).
- Page 15 1. Basic Operation POWER OPEN/CLOSE PLAY SLOW PAUSE STOP NEXT PREVIOUS FORWARD REVERSE UP/DOWN/LEFT /RIGHT ENTER NUMBERS Return MENU REPEAT DISPLAY ANGLE SUBTITLE AUDIO ZOOM SETUP Turn on/off the unit Eject/load the disc Start Play Play at 1/2, 1/4, or 1/8 times speed Still Picture (1 time) Stop at the present playing point / (2 times) Stop playing...
- Page 16 2. Menu A DVD is divided into sections called title and chapter. When you play a DVD, a root menu of the disc will appear on the screen of your TV or Monitor. The contents of the menu vary from disc to disc.
- Page 17 (Menu 2) c. Press DISPLAY the 3rd time to display the elapsed time for the chapter. The heading will disappear automatically in about 3 seconds. (Menu 3) Press DISPLAY the 4th time to display the remaining time for the chapter. The heading will disappear automatically in about 3 seconds.
- Page 18 2). Angle During play back press ANGLE to view angles for discs con- taining multi-angles, with the current angle number (1) and the total number of angles (2) displaying. Go on to press ANGLE to select other angle, and finally exit to return to normal viewing angle.
- Page 19 4). Audio During play back press AUDIO to select the audio language you desire, with the current audio channel number (1) and the total number of audio channels (2) displayed. Press AUDIO again to select another audio language. The audio display will disappear automatically if the AUDIO button isn’t pressed again for 3 seconds.
- Page 20 6). A-B Repeat a. During play back press A-B to set the starting point A. (Menu 9) b. Press A-B to set the ending point B and the player will re- peatedly play the part between Point A and Point B. (Menu 10) c.
- Page 21 7). Repeat a. During play back press REPEAT to repeatedly play the cur- rent chapter. (Menu 12) b. During play back press REPEAT again to repeatedly play the current title. (Menu 13) 3. During play back press REPEAT a 3rd time to cancel the re- peated playing and resume normal play back.
- Page 22 4. Setup (The contents vary from disc to disc.) Press SETUP to display the main page of the setup menu on the screen. Press SETUP again to exit the SET UP menu and the unit will resume last play back or stop mode. (Menu 15) 1).
- Page 23 b. Select TV TYPE using UP/DOWN, and then press RIGHT to enter the submenu. (Menu 17) Select the video system on the screen using UP/DOWN, and press ENTER to confirm the setting. Press LEFT to return. * MULTI: The connected TV is multi system. * NTSC: The connected TV is NTSC system.
- Page 24 d. Select MAIN PAGE using UP/DOWN, and then press ENTER to return to the main page. (Menu 19) 2). When there’s no disc inside the player, select PREFERENCES using UP/DOWN, and then press ENTER to enter the prefer- ences page. (Menu 20) a.
- Page 25 (Menu 21) c. Select DISC MENU using UP/DOWN, and then press RIGHT to enter the submenu. Select the disc menu language you de- sire using UP/DOWN, and then press ENTER to confirm the setting. Press LEFT to return. (Menu 22) Note: Language selection is only available for discs recorded in above listed languages.
- Page 26 Select the parental level you desired using UP/DOWN for discs with lock-out function or multiple rating levels. It’s listed from the lowest level (1 Child) to the highest level (8 Adult). Press ENTER to enter the password verify page. (Menu 24) Input the password in 4 digits, and then press ENTER to con- firm the parental level setting.
- Page 27 Note: The default password is 3308 and this password is al- ways effective whether you’ve changed it to another new one or not, in case that you forget the new password. To avoid oth- ers using it to set the parental level and change the password, you may note this default password by other means and delete it from this manual.
- Page 28 H. Playing a Video Game (Refer to Figure 14) 1.Plug the video output from your game system into the yellow video jack and the Audio L and Audio R into the applicable jacks on the left side of the main unit, which takes priority to the built-in DVD Player.
- Page 29 1. Using MONITOR PORT (Refer to Figure 14 and Figure 15) Besides the monitor combined with the main unit, this system can drive up to 2 additional monitors (Please contact an Audiovox dealer for the additional monitors) by using the cigarette lighter adapter in the vehicle.
- Page 30 2. Using VIDEO, AUDIO L, AUDIO R outputs (Refer to Figure 14) Match the color-coded plugs to the appropriate DVD OUT jacks on the left side of the main unit: Yellow (Video) to Yellow, White (Audio L) to White, and Red (Audio R) to Red. 3.
-
Page 31: 90-Day Limited Warranty
This Warranty gives you specific legal rights and you may also have other rights which vary from state to state. U.S.A.: AUDIOVOX CORPORATION, 150 MARCUS BLVD., HAUPPAUGE, NEW YORK 11788 l 1-800-645-9944 7 7 7 7 7 CANADA: CALL 1-800-645-4994 FOR LOCATION OF WARRANTY STATION SERVING YOUR AREA ©... - Page 32 P ro d u ct In fo rm a tio n , P h o to s , FA Q ’s O w n e r ’s M a n u a ls © 2002 Audiovox Electronics Corp., Hauppauge, NY 11788 128-6291...