Table of Contents
Advertisement
Advertisement
Table of Contents

Related Manuals for Crestron Prodigy PMC2


Summary of Contents for Crestron Prodigy PMC2
- Page 1 Prodigy Prodigy System User Guide System User Guide...
- Page 2 This document was prepared and written by the Technical Documentation department at: Crestron Electronics, Inc. 15 Volvo Drive Rockleigh, NJ 07647 1-888-CRESTRON All brand names, product names and trademarks are the property of their respective owners. ©2009 Crestron Electronics, Inc.
-
Page 3: Table Of Contents
Lighting Control....................33 Recall Lighting Scenes and Other Lighting Controls ....... 33 Control Lighting in Other Rooms ............. 35 Store a Scene (PLX2, PTL4, Crestron Control App, & XPanel) ..40 Controlling a Switch or Dimmer ............41 Climate Control ....................46 Select Zone to Control .............. -
Page 5: Prodigy Media System
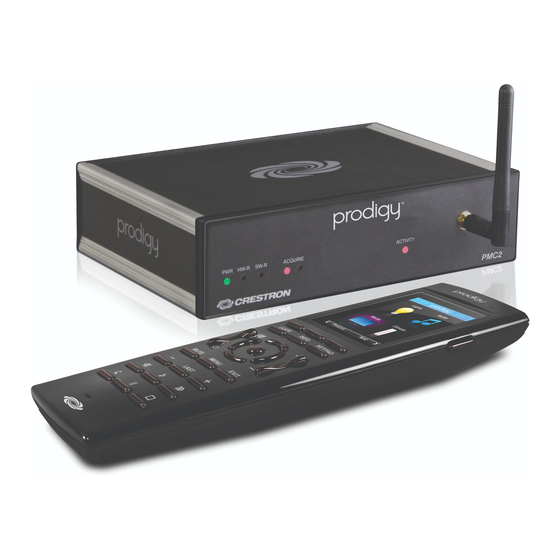
Crestron PMC2 Prodigy™ Media System Prodigy Media System Introduction Welcome to your Prodigy system. When configured, your Prodigy system is capable of controlling your home theater as well as lighting and climate throughout your home/office using a variety of control devices. -
Page 6: Prodigy Interfaces
Prodigy™ Media System Crestron PMC2 Prodigy Interfaces PLX2 Prodigy™ Wireless Remote The Prodigy Wireless Remote (PLX2) is a handheld remote with an LCD display that is used to control a Prodigy system. A PLX2 is included with the system. Up to six PLX2 remotes can be used in a Prodigy system. -
Page 7: Menu Controls
Crestron PMC2 Prodigy™ Media System Menu Controls The menu controls are located beneath the display controls and are used to navigate functions such as a DVD menu or DVR channel guide. Volume, Transport, and Numeric Keypad Buttons Under the menu controls are buttons to control the volume, media playback (DVD, DVR, etc.), and digit entry (for Tuner/DVR/Satellite and other devices... -
Page 8: Function Buttons
Prodigy™ Media System Crestron PMC2 PTL4 Touchscreen HOME Button: MEDIA Button: FUNCTION: LIGHT Button: CLIMATE Button: Press Press here to return Press here to return Describes the Press here to to the home page. to the media list. function and/or zone... -
Page 9: P-Dimrf Prodigy™ Single Button Wireless Dimmer And P-Swrf Prodigy™ Single Button Wireless Switch
Crestron PMC2 Prodigy™ Media System P-DIMRF Prodigy™ Single Button Wireless Dimmer and P-SWRF Prodigy™ Single Button Wireless Switch The Prodigy Single Button Wireless Dimmer (P-DIMRF) and Single Button Wireless Switch (P-SWRF) are optional switches that are used for local control of lights in a Prodigy system. Up to 18 switches/dimmers can be used in a Prodigy system. -
Page 10: Crestron ® Control App
Prodigy system. The Prodigy system allows one iPhone to be connected at a time. Crestron XPanel The Crestron XPanel allows remote control of the Prodigy System from a remote PC over the internet. The Prodigy system allows one remote PC to be connected. -
Page 11: System Control
Press the HOME button to display the home page. The Home Page PTL4 (if equipped) Touch to display the home page. The Home Page Crestron Control App Touch to display the home page. (if equipped) Prodigy Media System: PMC2 • 7 System User Guide – DOC. 6840A... - Page 12 Prodigy™ Media System Crestron PMC2 The Home Page XPanel (if equipped) Click to display the home page. The Home Page 8 • Prodigy Media System: PMC2 System User Guide – DOC. 6840A...
-
Page 13: Theater Control
Theater functions such as controlling a TV, projector, DVD player, DVR, etc. can be controlled by the PLX2, a PTL4 (if installed), the Crestron Control App (if using an iPhone for control), or a Crestron XPanel project (if using a PC for control). - Page 14 Touch a source name to display its controls. To control the tuner, touch TUNER. The MUTE, VOL k, and VOL j buttons will always control the mute function and system volume. Crestron Control App • Touch to display the home page and touch (if equipped) display the media page.
- Page 15 Crestron PMC2 Prodigy™ Media System NOTE: The sources shown may differ from your system. The Media Page • Touch a source name or receiver function to display its controls. The Mute, VOL +, and VOL – buttons will always control the mute function the volume in the selected room.
-
Page 16: Room Selection (If Equipped)
Prodigy™ Media System Crestron PMC2 NOTE: The sources shown may differ from your system. The Media Page Click a source name or receiver function to display its controls. To control the tuner, click TUNER. , and buttons will always control the mute function and the volume in the selected room. - Page 17 Crestron PMC2 Prodigy™ Media System Room Selection 2. Touch the room to be controlled. Crestron Control App 1. From the media page, touch Room Select to display a list of rooms (if equipped) controlled by the Prodigy system. Room Selection 2.
-
Page 18: Watch Tv (If Equipped)
Prodigy™ Media System Crestron PMC2 Room Selection 2. Click the room to be controlled. Watch TV (if equipped) PLX2 1. From the media page, press the soft button for the cable or satellite receiver to set the PLX2 for control of a cable or satellite receiver in the Prodigy system. - Page 19 Crestron PMC2 Prodigy™ Media System Cable/Satellite Control (DirectTV shown) • Touch PRESETS to recall and/or store preset stations. ⇒ To recall a preset station, touch the preset. ⇒ To store a preset station: 1. Touch and hold the preset location to be stored for approximately five seconds.
- Page 20 • Touch KEYPAD to directly access a channel with a numeric keypad. • Crestron Control App From the media page, touch the button for the cable or satellite (if equipped) receiver to display its controls. If the receiver is equipped with a DVR, transport controls will be displayed as well.
- Page 21 Crestron PMC2 Prodigy™ Media System Cable/Satellite Control (DirectTV shown) • Touch Presets to display a list of preset stations. ⇒ To recall a preset station, touch the preset. ⇒ To store a preset station: 1. Touch and hold the preset location to be stored for approximately five seconds.
- Page 22 Prodigy™ Media System Crestron PMC2 3. Touch the new channel number and touch Enter. 4. To assign a custom name to the preset, touch Edit Name to display the custom name controls. Touch the name of the preset and touch enter.
- Page 23 Crestron PMC2 Prodigy™ Media System Cable/Satellite Control (DirectTV shown) • Use the numeric keypad to directly access a channel. • Use the presets to recall and/or store preset stations. ⇒ To recall a preset station, click the preset. ⇒ To store a preset station: 1.
-
Page 24: Watch A Movie (If Equipped)
Prodigy™ Media System Crestron PMC2 To clear an icon, click CLEAR IMAGE. 4. To assign a custom name to the preset, click EDIT NAME to display the custom name controls. Click the name to be assigned to the preset and click Enter. - Page 25 Prodigy™ Media System Blu-ray Control • Use the transport and menu controls, to operate the playback device. • Crestron Control App From the media page, touch the button for a playback device to (if equipped) display its controls. Blu-ray Control •...
-
Page 26: Ipod Control (If Equipped)
Prodigy™ Media System Crestron PMC2 • XPanel (if equipped) From the media page, click the button for a playback device to display its controls. Blu-ray Control • Use the transport and menu controls, to operate the playback device. iPod Control (if equipped) PLX2 1. - Page 27 Crestron PMC2 Prodigy™ Media System the library for browsing, open the Shuffle controls, or open the Repeat controls. iPod Menu To make a selection from the iPod menu, press the soft button next to the desired function. Alternatively, you can move the...
- Page 28 Prodigy™ Media System Crestron PMC2 ⇒ To skip to the next song or video in a playlist, press • Browse Page The Browse page is used to browse through the iPod’s video and music library. Browse Page ⇒ To make a selection from the Browse page, press the soft button next to the desired function.
- Page 29 Crestron PMC2 Prodigy™ Media System ⇒ To select a shuffle mode, press the soft button next to the desired mode. Alternatively, you can move the cursor with buttons to highlight the selection and press ⇒ To return to a previous page, press •...
- Page 30 Prodigy™ Media System Crestron PMC2 Now Playing Page Touch the transport buttons and menu buttons to control the iPod. ⇒ To pause the current song or video, touch b. ⇒ To resume playback of the current song or video, touch h.
- Page 31 Crestron PMC2 Prodigy™ Media System To select a Repeat mode, touch REPEAT until the desired mode is displayed. • Browse Page The Browse page is used to browse through the iPod’s video and music library. Browse Page ⇒ To scroll through a list, touch the k or j button. To jump to the beginning of the list, touch FIRST.
- Page 32 Prodigy™ Media System Crestron PMC2 • Crestron Control App From the media page, touch the iPod button to display its controls. (if equipped) The iPod controls consist of the Now Playing page, and the Browse page. • Now Playing The Now Playing page displays the transport controls while providing information about the song or video that is currently playing.
- Page 33 Crestron PMC2 Prodigy™ Media System ⇒ Track: Tracks within a list are played in a random order. ⇒ Off: All tracks in a list are played in sequence. To select a Shuffle mode, touch Shuffle until the desired mode is displayed.
- Page 34 Prodigy™ Media System Crestron PMC2 Search Page XPanel (if equipped) From the media page, click the iPod button to display its controls. The iPod controls consist of the Now Playing page, and the Browse page. • Now Playing The Now Playing page displays the transport controls while providing information about the song or video that is currently playing.
- Page 35 Crestron PMC2 Prodigy™ Media System ⇒ To rewind a song or video to the beginning, click f. To skip to the previous song, click f twice. ⇒ To skip to the next song or video in a playlist, click e.
- Page 36 Prodigy™ Media System Crestron PMC2 ⇒ To scroll through a list, click the k or j button. To jump to the beginning of the list, click FIRST. To jump to the end of the list, click LAST. ⇒ To select an item (playlist, artist, album, song, or video) in a list, click its name on the list.
-
Page 37: Lighting Control
Lighting scenes in a theater or other controlled room can be recalled by the PLX2, a PTL4 (if installed), the Crestron Control App (if using an iPhone for control), or a Crestron XPanel project (if using a PC for control). - Page 38 2. To recall a scene, touch the scene to be recalled. Dimmers and switches in a room can also be independently controlled. For instructions, refer to page 43. Crestron Control App 1. Touch to display the home page and touch (if equipped) to display the room’s scene controls.
-
Page 39: Control Lighting In Other Rooms
Control Lighting in Other Rooms Lighting scenes in other controlled rooms can be recalled by the PLX2, a PTL4 (if installed), the Crestron Control App (if using an iPhone for control), or a Crestron XPanel project (if using a PC for control). - Page 40 Prodigy™ Media System Crestron PMC2 Scene List 2. Press the soft button labeled Rooms to display the list of controlled rooms. The currently controlled room is highlighted. To return to the list of scenes and lighting controls, press the soft button labeled Scenes.
- Page 41 Scene List, Kitchen 4. Touch the scene to be recalled. Dimmers and switches in a room can also be independently controlled. For instructions, refer to page 43. Crestron Control App 1. Touch to display the home page and touch (if equipped) to display the room’s scene controls.
- Page 42 Prodigy™ Media System Crestron PMC2 Scene List 2. Touch Room Select to display a list of controlled rooms Room List 3. To select a room, touch the name of the room to be controlled. To scroll through the list of controlled rooms, touch the k or j buttons.
- Page 43 Crestron PMC2 Prodigy™ Media System Scene List, Kitchen 4. Touch the scene to be recalled. Dimmers and switches in a room can also be independently controlled. For instructions, refer to page 44. XPanel (if equipped) 1. Click to display the room’s scene controls.
-
Page 44: Store A Scene (Plx2, Ptl4, Crestron Control App, & Xpanel)
Dimmers and switches in a room can be independently controlled. For instructions, refer to page 45. Store a Scene (PLX2, PTL4, Crestron Control App, & XPanel) The current light settings can be saved as a scene for recall at a later time. -
Page 45: Controlling A Switch Or Dimmer
Individual switches and dimmers in a room can be controlled from a P-DIMRF, a P-SWRF, a P-CBD (if installed), a PLX2, a PTL4 (if installed), the Crestron Control App (if using an iPhone for control), or a Crestron XPanel project (if using a PC for control). - Page 46 Prodigy™ Media System Crestron PMC2 1. With the mode selection switch in the RUN position, adjust the lighting level to the desired level. 2. Move the mode selection switch to the SET position. 3. Press and hold the upper part of the large button until the LED on the dimmer blinks.
- Page 47 Crestron PMC2 Prodigy™ Media System the load is fully disconnected from power. Any P-CBD devices that control the same load will not perform any function. P-CBD Button Panels P-CBD Button Panels are used in conjunction with the P-DIMRF or the (2- &...
- Page 48 ⇒ To turn the lights off, touch OFF. Crestron Control App The Crestron Control App can be used to turn the lights on or off as well as (if equipped) raise or lower the lighting level (dimmer switches only). 1. Select the room to be controlled as described in steps 1-3 on page 37.
- Page 49 Crestron PMC2 Prodigy™ Media System • Dimmer Operation ⇒ To turn the lights on or off, touch On/Off. ⇒ To raise the lighting level, touch and hold k. Release when the desired level is reached. ⇒ To lower the lighting level, touch and hold j. Release when the desired level is reached.
-
Page 50: Climate Control
When equipped, the Prodigy system can be used to control HVAC equipment. Climate can be controlled from a P-TSTATRF (required), a PLX2, a PTL4 (if installed), the Crestron Control App (if using an iPhone for control), or a Crestron XPanel project (if using a PC for control). - Page 51 2. Touch the zone name to be controlled. The climate controls for the controlled zone will be displayed. Climate Controls To select another zone, touch ROOM SELECT. Crestron Control App To select a zone to be controlled: (if equipped) 1. Touch to display the home page and touch to display the list of controlled zones.
- Page 52 Prodigy™ Media System Crestron PMC2 Zone List 2. Touch the zone to be controlled. The climate controls for the controlled zone will be displayed. Climate Controls XPanel (if equipped) To select a zone to be controlled: 1. Click to display a list of zones.
-
Page 53: Temperature Control
Crestron PMC2 Prodigy™ Media System Zone List 2. Click the zone name to be controlled. The climate controls for the controlled zone will be displayed. Climate Controls Temperature Control A controlled climate zone uses setpoints to determine when the zone will heated or cooled. - Page 54 Prodigy™ Media System Crestron PMC2 NOTE: When using a single setpoint, the controlled zone has a 20-minute change limiter to prevent system toggling. • Dual Setpoints (for use in Auto mode only): When using dual setpoints, separate heat and cool setpoints are used. When the ambient temperature drops below the heat setpoint, the controlled zone will call for heat to maintain the heat setpoint.
- Page 55 2. To lower the heating or cooling setpoint, touch the j button under the setting to be changed. To raise the heating or cooling setpoint, touch the k button under the setting to be changed. Crestron Control App To set the temperature: (if equipped) •...
-
Page 56: Set The System Mode
Prodigy™ Media System Crestron PMC2 XPanel (if equipped) To set the temperature: • Single Setpoint: Click k or j to raise or lower the temperature setting. NOTE: When using a single setpoint, there is a 20-minute change limiter to prevent system toggling. - Page 57 2. Touch MODE until the desired setting is displayed. NOTE: Not all modes are available for all HVAC zones. Crestron Control App To set a controlled zone’s system mode with the Crestron Control App: (if equipped) 1. Select the zone to be controlled as described on page 47.
- Page 58 Prodigy™ Media System Crestron PMC2 Climate Controls 2. Touch Mode until the desired setting is displayed. NOTE: Not all modes are available for all HVAC systems. Xpanel (if equipped) To set a controlled zone’s system mode with an XPanel program: 1.
-
Page 59: Fan Control
Crestron PMC2 Prodigy™ Media System Fan Control A zone’s fan can be set for automatic operation (Auto) or constant operation (On). When set to AUTO, the fan will run when the system is cooling or warming the controlled zone. When set to ON, the fan will always run. To set... - Page 60 Climate Controls 2. Touch FAN until the desired setting is displayed. Crestron Control App To set a controlled zone’s fan setting with the Crestron Control App: (if equipped) 1. Select the zone to be controlled as described on page 47.
-
Page 61: Scheduled Operation
This is typically set to an energy-saving setting. Any temperature setpoint can be held using the Hold function. The Hold function overrides any scheduled programming. The PTL4, Crestron Control App and Xpanel program can be used to set scheduled operation. Run the scheduled Program PTL4 (if equipped) 1. - Page 62 Prodigy™ Media System Crestron PMC2 Climate Controls 2. Touch RUN to run the scheduled program. Crestron Control App 1. Select the zone to be controlled as described on page 47. (if equipped) Climate Controls 2. Touch Run to run the scheduled program.
- Page 63 Crestron PMC2 Prodigy™ Media System Climate Controls 2. Touch RUN to run the scheduled program. Adjust Wake, Leave, Return, Sleep, and Away Settings 1. Select the zone to be controlled as described on page 47. PTL4 (if equipped) Climate Controls 2.
- Page 64 Prodigy™ Media System Crestron PMC2 Programming Controls a. Select the time zone to set using the I or h buttons. b. Set the temperature setpoint(s). To lower the heating or cooling setpoint, touch the j button under the setting to be changed. To raise the heating or cooling setpoint, touch the k button under the setting to be changed.
- Page 65 To raise the heating or cooling setpoint, touch the k button under the setting to be changed. Crestron Control App 1. Select the zone to be controlled as described on page 47. (if equipped) Climate Controls 2.
- Page 66 Prodigy™ Media System Crestron PMC2 raise the heating or cooling setpoint, touch the k button under the setting to be changed. d. Touch Prev to return to the climate controls. 3. To set the temperature setpoint(s) for the “Away” setting, touch Away to display the away controls.
- Page 67 Crestron PMC2 Prodigy™ Media System Climate Controls 2. Click PROGRAM to display the programming controls. Programming Controls a. Click on the desired time zone. b. Set the temperature setpoint(s). To lower the heating or cooling setpoint, click the j button under the setting to be changed. To raise the heating or cooling setpoint, click the k button under the setting to be changed.
- Page 68 Touch HOLD to enable the Hold function. Touch RUN to disable the Hold function and resume the set operating schedule. Touch HOLD to enable the Hold function. Touch RUN to disable the Hold Crestron Control App (if equipped) function and resume the set operating schedule.
-
Page 69: Maintenance
Crestron PMC2 Prodigy™ Media System Maintenance Batteries PLX2 When the display shows “Battery Low”, it is time to replace the AAA batteries. The PLX2 requires four AAA batteries. Refer to the following diagram. • Observe polarity when installing batteries. •... -
Page 70: Ptl4 Recommended Cleaning
Prodigy™ Media System Crestron PMC2 • Observe polarity when installing batteries. • When you change the batteries, replace all of them at the same time with the same kind of battery. • With lithium and other battery types, do not open the batteries, expose them to flame, or in any other way violate the manufacturer's instructions. -
Page 71: Problem Solving
Crestron's award winning customer service team by calling Crestron at 1-888-CRESTRON [1-888-273-7876]. You can also log onto the online help section of the Crestron website (www.crestron.com/onlinehelp) to ask questions about Crestron products. First-time users will need to establish a user account to fully benefit from all available features. -
Page 72: Return And Warranty Policies
Purchasers should inquire of the dealer regarding the nature and extent of the dealer's warranty, if any. CRESTRON shall not be liable to honor the terms of this warranty if the product has been used in any application other than that for which it was intended or if it has been subjected to misuse, accidental damage, modification or improper installation procedures. - Page 73 Crestron PMC2 Prodigy™ Media System This page is intentionally left blank. This page is intentionally left blank. Prodigy Media System: PMC2 • 69 System User Guide – DOC. 6840A...
- Page 74 Crestron Electronics, Inc. Operations Guide – DOC. 6840A 15 Volvo Drive Rockleigh, NJ 07647 (2025541) Tel: 888.CRESTRON 08.09 Fax: 201.767.7576 Specifications subject to www.crestron.com change without notice.