
Related Manuals for Samsung ML-551 Series


Summary of Contents for Samsung ML-551 Series
- Page 1 ML-551x Series ML-651x Series User’s Guide imagine the possibilities Thank you for purchasing a Samsung product.
-
Page 2: Copyright 2
This user’s guide is provided for information purposes only. All information included herein is subject to change without notice. Samsung Electronics is not responsible for any direct or indirect damages, arising from or related to use of this user’s guide. -
Page 3: Table Of Contents
contents COPYRIGHT Safety information Regulatory information About this user’s guide Features of your new product INTRODUCTION Machine overview Front view Rear view Control panel overview Understanding the control panel Status LEDs Introducing the useful buttons Menu button Eco button Stop/Clear button Power button GETTING STARTED Setting up the hardware... - Page 4 contents Quiet Mode Entering characters using the number keypad Entering alphanumeric characters Correcting numbers or names Using the power saving mode Setting job time-out Auto continue Changing the font setting MEDIA AND TRAY Selecting print media Guidelines to select the print media Media sizes supported in duplex mode Changing the tray size Loading paper in tray...
- Page 5 contents Printing a document Changing printer settings Printing multiple pages on one sheet of paper Printing on both sides of paper Linux printing Printing from applications Printing files Configuring Printer Properties UNIX printing Proceeding the print job Changing the printer settings USING USB MEMORY DEVICE About USB memory device Printing from a USB memory device...
- Page 6 Cleaning the inside Storing the toner cartridge Handling instructions Use of non-Samsung and refilled toner cartridge Estimated cartridge life Tips for moving & storing your machine TROUBLESHOOTING Redistributing toner Tips for avoiding paper jams Clearing paper jams In tray 1...
- Page 7 From the Start Screen From the Desktop Screen 114 Uninstalling the driver From the Start Screen From the Desktop Screen 114 Using Samsung Printer Experience Understanding the Samsung Printer Experience Adding/Deleting Printers Printing from Windows 8 117 Accessing management tools...
-
Page 8: Safety Information
safety information These warnings and precautions are included to prevent injury to you and others, and to prevent any potential damage to your machine. Be sure to read and understand all of these instructions before using the machine. Use common sense for operating any electrical appliance and whenever using your machine. Also, follow all warnings and instructions marked on the machine and in the accompanying literature. - Page 9 •If the machine gets overheated, it releases smoke, makes strange noises, or generates an odd odor, immediately turn off the power switch and unplug the machine. •The user should be able to access the power outlet in case of emergencies that might require the user to pull the plug out.
- Page 10 Be care when replacing paper or removing jammed paper. This machine's power interception device is the power cord. ► New paper has sharp edges and can cause painful cuts. ► To switch off the power supply, remove the power cord from the electrical outlet.
- Page 11 • Fuser units should only be repaired by a certified service technician. Repair by non-certified technicians could result in fire or electric shock. ► The machine should only be repaired by a Samsung service technician. Supply usage Caution Do not disassemble the toner cartridge.
- Page 12 For supplies that contain toner dust (toner cartridge, waste When changing the toner cartridge or removing jammed paper, toner bottle, imaging unit, etc.) follow the instructions below. be careful not to let toner dust touch your body or clothes. • When disposing of the supplies, follow the instructions for ►...
-
Page 13: Regulatory Information
regulatory information This machine is designed for our sound environment and certified with several regulatory statements. LASER SAFETY STATEMENT The printer is certified in the U.S. to conform to the requirements of DHHS 21 CFR, chapter 1 Subchapter J for Class I(1) laser products, and elsewhere is certified as a Class I laser product conforming to the requirements of IEC 60825-1:1993 + A1:1997 + A2:2001. -
Page 14: Ozone Safety
During normal operation, this machine produces ozone. The ozone produced does not present a hazard to the operator. However, it is advis- able that the machine be operated in a well ventilated area. If you need additional information about ozone, request your nearest Samsung dealer. MERCURY SAFETY Contains Mercury, Dispose According to Local, State or Federal Laws.(U.S.A. - Page 15 CHINA ONLY 2000m Dan hab yungh youq gij digih haijbaz 2000 m doxroengz haenx ancienz sawjyungh. CORRECT DISPOSAL OF THIS PRODUCT (WASTE ELECTRICAL & ELECTRONIC EQUIPMENT) (Applicable in the with separate collection systems) This marking on the product, accessories or literature indicates that the product and its electronic accessories (e.g. charger, headset, USB cable) should not be disposed of with other household waste at the end of their working life.
-
Page 16: Radio Frequency Emissions
STATE OF CALIFORNIA PROPOSITION 65 WARNING (US ONLY) RADIO FREQUENCY EMISSIONS FCC Information to the User This device complies with Part 15 of the FCC Rules. Operation is subject to the following two conditions: • This device may not cause harmful interference, and •... -
Page 17: United States Of America
UNITED STATES OF AMERICA Federal Communications Commission (FCC) Intentional emitter per FCC Part 15 Low power, Radio LAN type devices (radio frequency (RF) wireless communication devices), operating in the 2.4 GHz/5 GHz Band, may be present (embedded) in your printer system. This section is only applicable if these devices are present. Refer to the system label to verify the presence of wireless devices. - Page 18 Hereby, Samsung Electronics declare that this product is in compliance with the essential requirements and other relevant provisions of: ML-551x Series, ML-651x Series: R&TTE Directive (1999/5/EC) The declaration of conformity may be consulted at www.samsung.com/printer, go to Support > Download center and enter your printer (MFP) name to browse the EuDoC.
- Page 19 European Radio Approval Information (for products fitted with EU-approved radio devices) Low power, Radio LAN type devices (radio frequency (RF) wireless communication devices), operating in the 2.4 GHz/5 GHz band, may be present (embedded) in your printer system, which is intended for home or office use. This section is only applicable if these devices are pres- ent.
-
Page 20: Openssl License
OPENSSL LICENSE Copyright (c) 1998-2001 The OpenSSL Project. All rights reserved. Redistribution and use in source and binary forms, with or without modification, are permitted provided that the following conditions are met: 1. Redistributions of source code must retain the above copyright notice, this list of conditions and the following disclaimer. 2. - Page 21 CHINA ONLY Regulatory information_ 21...
- Page 22 about this user’s guide This user’s guide provides information about how to use the machine. Both novice and professional users can refer to this as a guide for installing and using the machine. • Read the safety information before using the machine. •...
-
Page 23: Finding More Information
This help provides you with help information on printer driver and instructions for setting up the options for printing (See "Using help" on page 53). Samsung website If you have Internet access, you can get help, support, machine drivers, manuals, and order information from the Samsung website, www.samsung.com/printer. Downloadable soft- You can download useful software from the Samsung website. -
Page 24: Features Of Your New Product
features of your new product Your new machine is equipped with a number of special features that improve the quality of the documents you print. SPECIAL FEATURES Print with excellent quality and speed Print in various environments • You can print with a resolution of up to 1,200 x 1,200 dpi •... -
Page 25: Features By Models
If you use the parallel port, you cannot use the USB cable. b. Depending on your country, wireless LAN cards may not be available. Contact your local Samsung dealer or the retailer where you bought your machine. (●: Included, ○: Optional, Blank: Not available) -
Page 26: Machine Overview
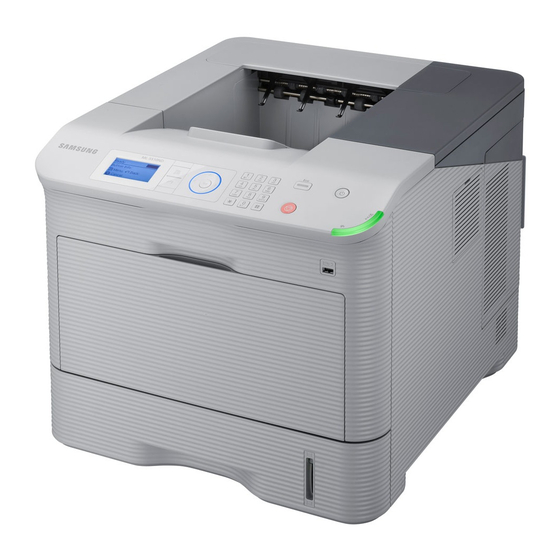
introduction This chapter gives you an overview of your machine: This chapter includes: • Machine overview • Control panel overview • Understanding the control panel • Introducing the useful buttons MACHINE OVERVIEW Front view Finisher (Stacker & Stapler) High capacity feeder (HCF) Paper level indicator Mailbox Stapler cover... -
Page 27: Rear View
USB memory port Short stand Control panel Muti-purpose tray extension Top cover Toner cartridge Imaging unit Multi-purpose tray paper width guides a. Optional device Rear view Power switch Finisher cover (Stacker & Stapler) Rear cover Network port Mailbox cover USB port and IEEE 1284 parallel connector Waste toner bottle cover IEEE 802.11 b/g/n Wireless LAN USB memory port... -
Page 28: Control Panel Overview
CONTROL PANEL OVERVIEW Shows the current status and prompts during an operation. Display screen Enters Menu mode and scrolls through the available menus (See "Machine status and advanced features" on Menu page 64). Sends you back to the upper menu level. Back Arrow Scroll through the options available in the selected menu, and increase or decrease values. -
Page 29: Understanding The Control Panel
LED is on and the printer stops printing. Samsung does not recommend using non-genuine Samsung toner cartridge such as one that is refilled or remanufactured. Samsung can- not guarantee a non-genuine Samsung toner cartridge's quality. Ser- vice or repair required as a result of using non-genuine Samsung toner cartridges will not be covered under the machine warranty. -
Page 30: Getting Started
If you are a Windows or Mac OS, install the software from the supplied CD and if you are a Linux or a UNIX OS user, download the software from the Samsung website (www.sam- sung.com/printer) and install. -
Page 31: System Requirements
SYSTEM REQUIREMENTS CONTENTS Before you begin, ensure that your system meets the following require- Windows • Printer driver: Use this driver to take full advantage of ments: your machine’s features. • PostScript Printer Driver: Use the PostScript driver ® ® Microsoft Windows to print documents with complex fonts and graphics in... - Page 32 IBM AIX 5.1, 5.2, 5.3, 5.4 From the Start menu, select Programs or All Programs > Sam- HP-UX 11i v1, 11i v2, 11i v3 (PA-RISC, Itanium) sung Printers > Uninstall Samsung Printer Software. Free HDD space Up to 100 MB Select the necessary option and follow the instructions in the win- dow.
- Page 33 6. Enter the password and click OK. created as specified as your wishes. /N”<Printer 7. The Samsung Installer window opens. Click Continue. printer name. name>” 8. Read the license agreement and click Continue. /nd or Commands not to set It indicates installed 9.
-
Page 34: Installing The Smartpanel
Linux the SetIP program. Go to the next step. You need to download the Linux software package from the Samsung web- 13. After the installation is finished, click Quit. site to install the printer software. 14. Open the Applications folder > Utilities > Print Setup Utility. - Page 35 You must log in as a super user (root) to install the machine software. If you are not a super user, ask your system adminis- trator. 3. From the Samsung website, download the Printer Setting Utility package to your computer. 4. Right click the Printer Settings Utility package and extract the package.
-
Page 36: Network Setup 36
network setup This chapter gives you step-by-step instructions for setting up the network connected machine and software. This chapter includes: • Network environment • Installing network connected machine’s driver • Introducing useful network programs • IPv6 Configuration • Using a wired network INTRODUCING USEFUL NETWORK PROGRAMS Supported optional devices and features may differ according to your model. - Page 37 2. Turn on the machine. most cases a new IP address will be automatically assigned by a DHCP 3. From the Windows Start menu, select All Programs > Samsung (Dynamic Host Configuration Protocol) server located on the network. Printers > SetIP > SetIP.
-
Page 38: Network Parameter Setting
1. Print the machine’s configuration report to find your machine’s MAC Accessories > Run. address. X:\Setup.exe replacing “X” with the letter, which represents your 2. Open the /opt/Samsung/mfp/share/utils/. CD-ROM drive and click OK. 3. Double click the SetIPApplet.html file. 3. Review and accept the installation agreements in the installation win- 4. - Page 39 Also, your machine’s IP address should have been set. 12. The message which warns that all applications will close on your com- 2. From the Samsung website, download the Unified Linux Driver pack- puter appears. Click Continue. age to your computer.
-
Page 40: Uninstalling The Printer Driver Package
4. Unpack the UNIX printer driver package archive. 9. Check the Collate option to receive copies already sorted. For example, on IBM AIX use the following commands. 10. Check the Reverse Order option to receive copies in the reverse order. cd /tmp 11. -
Page 41: Installing Printer Driver
request. • DHCPv6 Off: Never use DHCPv6 regardless of router request. 6. Press OK. Manual address configuration 1. Start a web browser such as Internet Explorer that supports IPv6 addressing as a URL (See "Connecting SyncThru™ Web Service" on page 41). For IPv4, enter the IPv4 address (http://xxx.xxx.xxx.xxx) in the address field and press the Enter key or click Go. -
Page 42: Basic Setup 42
basic setup After installation is complete, you may want to set the machine’s default settings. Refer to the next section if you would like to set or change values. This chapter gives you step-by-step instructions for setting up the machine. This chapter includes: •... -
Page 43: Correcting Numbers Or Names
Each time you press 6, the display shows a different letter, M, N, O, m, 1. Double-click the Smart Panel icon on the Windows task bar (or Notifica- n, o and finally 6. tion Area in Linux). You can also click Smart Panel on the status bar in Mac OS X. -
Page 44: Guidelines To Select The Print Media
media and tray This chapter provides information on how to load originals and print media into your machine. This chapter includes: • Selecting print media • Printing on special media • Changing the tray size • Setting the default tray and paper •... - Page 45 1. Squeeze and slide the paper width guide and paper length lever to jams. locate them in the correct paper size slot marked at the bottom of the tray to adjust to the paper size. 2. Flex or fan the edge of the paper stack to separate the pages before loading papers.
-
Page 46: Loading Paper In Tray
LOADING PAPER IN TRAY page 110.) • Flatten any curl on postcards, envelopes, and labels before loading Tray 1 / optional tray them into the multi-purpose tray. 1. Hold the handle of multi-purpose tray and pull it down to open and 1. -
Page 47: Printing On Special Media
The paper setting in the machine and driver should match to print without a paper mismatch error. To change the paper setting set in the machine, from the Samsung Easy (Switch to advanced mode) > Device Set- Printer Manager select tings. -
Page 48: Transparency
fusing temperature about 170°C (338 °F) for 0.1 second. The extra flaps Arrangement: Only use labels with no exposed backing between and strips might cause wrinkling, creasing, or jams and may even dam- them. Labels can peel off sheets that have spaces between the age the fuser. -
Page 49: Letterhead/Preprinted Paper
The paper setting in the machine and driver should match to print without a paper mismatch error. To change the paper setting set in the machine, from the Samsung Easy (Switch to advanced mode) > Device Set- Printer Manager select tings. - Page 50 3. Right-click your machine. 4. For Windows XP/2003/2008/Vista, press Printing Preferences. For Windows 7 and Windows Server 2008 R2, from context menus, select the Printing Preferences. If Printing Preferences item has ► mark, you can select other printer drivers connected with selected printer. 5.
-
Page 51: Pcl Printer Driver
printing This chapter explains common printing tasks. This chapter includes: • Printer driver features • Changing the default print settings • Basic printing • Setting your machine as a default machine • Opening printing preferences • Printing to a file (PRN) •... -
Page 52: Basic Printing
Print too will save your time for screen-captured images or printing Double-sided printing (duplex) ● the image. Click Start > All programs > Samsung Printers > (●: Supported, Blank: Not supported) your machine name > Samsung AnyWeb > Download the lat- est version to link the website where the tool is available for the download. -
Page 53: Using A Favorite Setting
4. Select the Poster Overlap value. Specify Poster Overlap in millimeters or inches by selecting the radio button on the upper right of Basic tab to If you want to search information via a keyword, click the Samsung tab in make it easier to paste the sheets together. -
Page 54: Printing Booklets
Printing booklets dars. This feature prints your document on both sides of a paper and arranges the pages so that the paper can be folded in half after printing to produce a booklet. If you want to make a booklet, you need to print on Letter, Legal, A4, US Folio, or Oficio sized print media. -
Page 55: Using Watermarks
Using watermarks Deleting a watermark The watermark option allows you to print text over an existing document. 1. To change the print settings from your software application, access For example, you use it when you want to have large gray letters reading Printing Preferences (See "Opening printing preferences"... -
Page 56: Print Mode
From the Direct Printing Utility window ment. You need to enter a password to print. 1. From the Start menu select Programs or All Programs > Samsung Store: Select this setting to save a document in the RAM disk or Printers >... -
Page 57: Using The Right-Click Menu
Using the right-click menu 1. Check the Print to file box at the Print window. 1. Right-click on the PDF file you wish to print and select Direct Printing Utility. The Direct Printing Utility window opens with the PDF file is added. 2. -
Page 58: Changing Printer Settings
Changing printer settings Store: Select this setting to save a document in the hard disk without printing. You can use advanced printing features provided by your machine. Store and Print: Select this setting to save a document in the Open an application and select Print from the File menu. The machine RAM disk or the optional hard disk and print it. -
Page 59: Linux Printing
1. From your Mac application, select Print from the File menu. 4. Change the print job properties using the following four tabs displayed at the top of the window. 2. Select Layout from the drop-down list under Orientation. 3. Select a binding orientation from Two Sided Printing option. 4. -
Page 60: Unix Printing
2. Select your machine on the available printers list and click Properties. user can select various print options. 3. The Printer Properties window opens. The following five tabs display at the top of the window: • General: This option allows you to change the printer location and name. - Page 61 Selection. • Orientation: Select the direction in which information is printed on a page. • Duplex: Print on both sides of paper to save paper. Automatic/manual duplex printing may not be available depending on models. You can alternatively use the lpr printing system or other applications for odd-even printing.
-
Page 62: Printing From A Usb Memory Device
using usb memory device This chapter explains how to use a USB memory device with your machine. This chapter includes: • About USB memory device • Backing up data • Printing from a USB memory device • Managing USB memory ABOUT USB MEMORY DEVICE PRINTING FROM A USB MEMORY DEVICE USB memory devices are available with a variety of memory capacities to... -
Page 63: Backing Up Data
Formatting a USB memory device Otherwise, press the left/right arrow to highlight No and press OK. 11. Press Stop/Clear to return to ready mode. 1. Insert a USB memory device into the USB memory port on your machine. BACKING UP DATA 2. -
Page 64: Information
machine status and advanced features This chapter explains how to browse the current status of your machine, and the method of setting for the advanced machine setup. Read this chapter carefully in order to use your machine's diverse features. This chapter includes: •... -
Page 65: Paper
ITEM DESCRIPTION ITEM DESCRIPTION <Tray X> Set the margins for print materials. The margins Paper Source Using this menu, you can set which tray you you set here will be applied when printing from want to use. the tray1 and optional trays. If you select Auto, the machine can automati- cally determine the source. -
Page 66: Emulation
Allows you to configure the settings for Printer machine from the power saving mode with the Driver and Tray placement. following actions: • General: when using the general Samsung • Pressing any button on the control panel. driver. • Loading paper in a tray. -
Page 67: Direct Usb
ITEMS DESCRIPTION ITEM DESCRIPTION 802.1x You can select the user authentication for network Maintenance This menu allows you to maintain your machine. communication. For details information consult the • Clean Fuser: Cleans the fuser by printing a network administrator. sheet. The printed sheet has toner debris on TCP/IP(IPv4) Select appropriate protocol and configure parame- •... -
Page 68: Using Syncthru™ Web Service
management tools This chapter introduces management tools provided to help you make full use of your machine. This chapter includes: • Introducing useful management tools • Using the Smart Panel program • Using SyncThru™ Web Service • Using the Unified Linux Driver Configurator INTRODUCING USEFUL MANAGEMENT TOOLS Information tab This tab gives you general information about your machine. -
Page 69: E-Mail Notification Setup
Mac, Smart Panel is installed automatically when you install the machine When you apply the changes, you can preview the result of reduced software. For Linux, you can download Smart Panel from Samsung website emission of carbon dioxide, used electricity, and the amount of and install (See "Installing the SmartPanel"... -
Page 70: Understanding Smart Panel
Or, if you are a Windows user, you can launch it from the Start menu, select machine devices. You need to install Unified Linux Driver to use Unified Programs or All Programs > Samsung Printers > your machine name > Driver Configurator (See "Installing the Linux Unified Driver" on page 34). -
Page 71: Printers Configuration
Printers configuration Classes tab Printers configuration has the two tabs: Printers and Classes. The Classes tab shows a list of available machine classes. Printers tab View the current system’s printer configuration by clicking on the machine icon button on the left side of the Unified Driver Configurator window. -
Page 72: Ports Configuration
Ports configuration In this window, you can view the list of available ports, check the status of each port and release a port that is stalled in a busy state when its owner has terminated the job for any reason. Switches to Ports configuration. -
Page 73: Monitoring The Supplies Life
maintenance This chapter provides information for maintaining your machine and the toner cartridge. This chapter includes: • Printing a machine report • Cleaning a machine • Monitoring the supplies life • Storing the toner cartridge • Using Toner Low Alert •... -
Page 74: Storing The Toner Cartridge
4. With a dry lint-free cloth, wipe away any dust and spilled toner. STORING THE TONER CARTRIDGE Toner cartridges contain components that are sensitive to light, temperature and humidity. Samsung suggests users follow the recommendations below to ensure the optimum performance, highest quality and longest life from your new Samsung toner cartridges. -
Page 75: Use Of Non-Samsung And Refilled Toner Cartridge
Use of non-Samsung and refilled toner cartridge Samsung Electronics does not recommend or approve the use of non-Sam- sung brand toner cartridges in your printer including generic, store brand, refilled, or remanufactured toner cartridges. Samsung’s printer warranty does not cover damage to the machine caused by the use of a refilled, remanufactured, or non-Samsung brand toner cartridge. -
Page 76: Tips For Avoiding Paper Jams
troubleshooting This chapter gives helpful information for what to do if you encounter an error. If your machine has a display screen, check the message on the display screen first to solve the error. If you cannot find a solution in this User's Guide or the problem consists, call for service. -
Page 77: Clearing Paper Jams
CLEARING PAPER JAMS 3. Remove the jammed paper by pulling in the direction shown. To avoid tearing the paper, pull it out gently and slowly. When a paper jam occurs, a warning message appears on the display screen. To avoid tearing the paper, pull the jammed paper out slowly and gen- tly. -
Page 78: In Optional Tray 2
5. Open and close the top cover to resume printing. 4. Pull the jammed paper straight up and out. If the top cover is not completely closed, the machine will not oper- ate. In optional tray 2 5. Insert the trays back into the machine. •... -
Page 79: In The Optional High Capacity Feeder
In the multi-purpose tray 6. Open and close the top cover to resume printing. If the top cover is not completely closed, the machine will not oper- Click this link to open an animation about clearing a jam. ate. 1. If the paper is not feeding properly, pull the paper out of the machine. 2. - Page 80 2. Pull the imaging unit out. 4. Unscrew the two screws on the guide envelope (steel plate) and lift up the guide envelope. • Do not touch the green surface of the imaging unit. 5. Remove the jammed paper by pulling in the direction shown. To avoid •...
-
Page 81: In The Exit Area
In the exit area In the duplex unit area If the duplex unit is not inserted correctly, paper jam may occur. Make sure Click this link to open an animation about clearing a jam. that the duplex unit is inserted correctly. 1. -
Page 82: In The Optional Finisher (Stacker & Stapler
In the optional finisher (stacker & stapler) 4. Pull the duplex unit out of the machine. Paper jam in front of the finisher Click this link to open an animation about clearing a jam. 1. Open the finisher’s rear cover. 5. - Page 83 Paper jam inside the finisher 3. Locate the jammed paper and remove it. The jammed paper might be inside the finisher or the machine. To avoid tearing the paper, pull Click this link to open an animation about clearing a jam. it out gently and slowly.
-
Page 84: In The Optional Multi-Bin Mailbox
Paper jam at the exit of the finisher In the optional multi-bin mailbox Click this link to open an animation about clearing a jam. Paper jam in front of the multi-bin mailbox 1. Remove the jammed paper by pulling in the direction shown. To Click this link to open an animation about clearing a jam. - Page 85 Paper jam inside the multi-bin mailbox 3. Locate the jammed paper and remove it. The jammed paper might be inside the mailbox or the machine. To avoid tearing the paper, Click this link to open an animation about clearing a jam. pull it out gently and slowly.
-
Page 86: Understanding Display Messages
UNDERSTANDING DISPLAY MESSAGES 1. Remove the jammed paper by pulling in the direction shown. To avoid tearing the paper, pull it out gently and slowly. Messages appear on the Smart Panel program window or on the control panel display to indicate machine status or errors. Refer to the tables below to understand the messages’... - Page 87 85). Fuser not compati- The fuser unit you have Install a Samsung-gen- Mailbox bin [num- Too much paper in mail- Remove the printed installed is not for your uine fuser unit, ber] full box stacker.
- Page 88 99) the printer keeps indicates the aver- cartridge life, which printing but the print- Samsung does age capacity of indicates the aver- ing quality cannot be not recom- print-outs and is age capacity of guaranteed.
-
Page 89: Solving Other Problems
Prepare a new staple cable connection cartridge between the com- puter and the Toner Not Compati- The toner cartridge you Install a Samsung-gen- machine is not have installed is not for uine toner cartridge, connected prop- your machine. designed for your erly. -
Page 90: Paper Feeding Problems
Paper feeding problems Printing problems CONDITION SUGGESTED SOLUTIONS POSSIBLE SUGGESTED SOLU- CONDITION CAUSE TIONS Paper jams during Clear the paper jam (See "Clearing paper jams" printing. on page 77). The machine The machine is not Check the power cord con- does not print. - Page 91 POSSIBLE SUGGESTED SOLU- POSSIBLE SUGGESTED SOLU- CONDITION CONDITION CAUSE TIONS CAUSE TIONS The document size Make available more hard The machine The machine cable Disconnect the machine is so big that the disk space and print the doc- prints, but the is loose or defec- printer cable and reconnect.
-
Page 92: Printing Quality Problems
POSSIBLE SUGGESTED SOLU- CONDITION SUGGESTED SOLUTIONS CONDITION CAUSE TIONS Dropouts If faded areas, generally rounded, occur ran- The print quality The resolution of Reduce the photo size. If domly on the page: of photos is not the photo is very you increase the photo size A a B b C •... - Page 93 CONDITION SUGGESTED SOLUTIONS CONDITION SUGGESTED SOLUTIONS Toner smear If toner smears on the page: Misformed charac- • If characters are improperly formed and pro- ters ducing hollow images, the paper stock may • Clean the inside of the machine (See "Clean- be too slick.
-
Page 94: Common Postscript Problems
CONDITION SUGGESTED SOLUTIONS CONDITION SUGGESTED SOLUTIONS Solid Color or • The imaging unit may not be installed prop- An unknown image Your machine is probably being used at an alti- Black pages erly. Remove the imaging unit and reinsert it. repetitively tude of 1,000 m (3,281 ft.) or above. -
Page 95: Common Windows Problems
Common Windows problems Common Linux problems CONDITION SUGGESTED SOLUTIONS CONDITION SUGGESTED SOLUTIONS “File in Use” mes- Exit all software applications. Remove all soft- The machine does • Check if the printer driver is installed in your sage appears dur- ware from the printer’s startup group, then not print. -
Page 96: Common Mac Problems
Refer to Mac User’s Guide that came with your computer for further CONDITION SUGGESTED SOLUTIONS information on Mac error messages. Some color images This is a known bug in Ghostscript (until GNU come out in unex- Ghostscript version 7.xx) when the base color pected color. -
Page 97: Available Supplies
To order Genuine Samsung supplies, accessories and, maintenance parts, Memory module Extend your machine’s mem- ML-MEM170 contact your local Samsung dealer or the authorized retailer where you pur- ory capacity (512 MB). chased your machine. You can also visit www.samsung.com/supplies, Optional tray If you are experiencing paper •... -
Page 98: Maintenance Parts
Maintenance Kit Consists of maintenance parts. ML-PMK65K a. Depending on your country, wireless LAN cards may not be available. Contact your local Samsung dealer or the retailer where you bought your machine. 2. Remove the new toner cartridge from its bag. -
Page 99: Replacing The Imaging Unit
3. Thoroughly shake the cartridge 5 or 6 times to distribute the toner evenly 6. Close the top cover. Make sure that the cover is securely closed. inside the cartridge. Thoroughly roll the cartridge to assure maximum copies per cartridge. Save the box and the plastic bag for shipping. -
Page 100: Necessary Precautions To Take When Installing Accessories
2. Pull the imaging unit out. locks into place completely. 3. Remove the new imaging unit from its bag. • Do not touch the green surface of the imaging unit. • To prevent damage to the imaging unit, do not expose it to light •... -
Page 101: Installing A Wireless Network Interface Card
INSTALLING A WIRELESS NETWORK INTER- FACE CARD Depending on your country, wireless LAN cards may not be available. Contact your local Samsung dealer or the retailer where you bought your printer. The machine is equipped with a network interface which allows you to use your machine on a network. -
Page 102: Configuring The Machine's Wireless Network
Configuring the machine’s wireless network Custom mode 1. Enter the SSID when Edit SSID appears on the top line of the dis- Before starting you will need to know the network name(SSID) of your wire- play, the name that identifies a wireless network. SSID is case-sensi- less network and the network key if it is encrypted. -
Page 103: Upgrading A Memory Module
(See "Available accessories" on page 97). We recommend the use of only genuine Samsung DIMM's. You may void your warranty if it is determined that your machine problem is being caused by third party DIMM's. -
Page 104: Installing A Hard Disk
INSTALLING A HARD DISK 5. Fasten down the hard disk with the screws supplied with your new hard disk. Installing the hard disk allows the data from your computer to be sent to the print queue of the printer hard disk. This decreases the workload of the com- puter. -
Page 105: From The Printer Driver
From the printer driver File Policy After installing the optional memory or HDD, you can use advanced printing You can choose the file policy for generating file name before you proceed features, such as proofing a job and specifying of printing a private job in the with the job through optional HDD or enabled Ram disk. -
Page 106: Deleting Residual Image Data
1. Create or open a document containing text or an image for use in a If you select Enable for Manual, the machine asks if the overwrite new form file. feature should starts now. Press the left/right arrow to select Yes or No. - Page 107 2. Pull the stapler unit out. 6. Slide the stapler unit in until it locks in place. 3. Lift the empty staple cartridge from the stapler unit. 7. Close the stapler cover. 4. Unpack the new staple cartridge. Make sure that all tape and packing materials are removed from inside the staple cartridge.
-
Page 108: Specifications
Hardware specifications • Environmental specifications • Electrical specifications • Print media specifications The specification values are listed below, specification are subject to change without notice. See www.samsung.com/printer for possible changes in infor- mation. HARDWARE SPECIFICATIONS ITEM DESCRIPTION Dimension Height 420 mm (16.54 inches) Depth 540 mm (21.28 inches) -
Page 109: Electrical Specifications
ELECTRICAL SPECIFICATIONS Power requirements are based on the country/region where the device is sold. Do not convert operating voltages. Doing so might damage the device and void the product warranty. ITEM DESCRIPTION 110 volt models AC 110 - 127 V Power rating 220 volt models AC 220 - 240 V... -
Page 110: Print Media Specifications
PRINT MEDIA SPECIFICATIONS PRINT MEDIA WEIGHT/CAPACITY TYPE SIZE DIMENSIONS TRAY1 / OPTIONAL TRAY MULTI-PURPOSE TRAY Plain paper Letter 216 x 279 mm (8.5 x 11 inches) 70 to 90 g/m (19 to 24 lbs bond) 70 to 90 g/m (19 to 24 lbs bond) •... - Page 111 PRINT MEDIA WEIGHT/CAPACITY TYPE SIZE DIMENSIONS TRAY1 / OPTIONAL TRAY MULTI-PURPOSE TRAY Transparency Refer to the Plain paper Refer to the Plain paper section • 100 sheets for tray1. 138 to 146 g/m (35 to 39 lbs section bond) • Not available in optional trays.
-
Page 112: Understanding The Screen
• Only use a USB cable no longer than 3 meters (118 inches). • Samsung Printer Experience app can only be used in the Start UNDERSTANDING THE SCREEN screen when V4 driver is installed. The V4 driver is automatically downloaded from the Windows Update if your computer is con- nected to the Internet. -
Page 113: From The Desktop Screen
Machine that do not support networking will not be able to use this • Samsung Printer Experience app can only be used in the Start feature (see "Rear view" on page 27). screen when V4 driver is installed. The V4 driver is automatically •... -
Page 114: From The Desktop Screen
UNINSTALLING THE DRIVER From the Start Screen 1. Make sure that the machine is connected to your computer and powered 2. Click on the Uninstall Samsung Printer Software tile in the Start screen. 3. Follow the instructions in the window. -
Page 115: Adding/Deleting Printers
This section is for the users with multi-functional printers. Adding/Deleting Printers If you do not have any printer added to the Samsung Printer Experience, or if you want to add/delete a printer, follow the instructions below. You can only add/delete network connected printers. - Page 116 Using the sharing feature Samsung Printer Experience allows you to print from other applica- tions installed on the computer using the sharing feature. This feature is only available for printing jpeg, bmp, tiff, gif, and png file formats.
-
Page 117: Accessing Management Tools
ACCESSING MANAGEMENT TOOLS Samsung provides a variety of management tools for Samsung printers. For more information on each tool, refer to "Management tools" on page 68. 1. From the Charms, select Search > Apps. 2. Find Samsung Printers. 3. Under Samsung Printers, you can see installed management tools. -
Page 118: Contact Samsung Worldwide
If you have any comments or questions regarding Samsung products, contact the Samsung customer care center. Country/Region Customer Care Center WebSite ANGOLA 91-726-7864 www.samsung.com ARGENTINA 0800-333-3733 www.samsung.com ARMENIA 0-800-05-555 www.samsung.com AUSTRALIA 1300 362 603 www.samsung.com AUSTRIA 0810-SAMSUNG (7267864, € 0.07/min) www.samsung.com... - Page 119 0180 5 7267864* (*0,14 €/Min. aus dem dt. Festnetz, aus dem Mobilfunk max. 0,42 €/Min.) GEORGIA 8-800-555-555 www.samsung.com GHANA 0800-10077 www.samsung.com 0302-200077 GREECE 80111-SAMSUNG (80111 726 7864) only from land line www.samsung.com (+30) 210 6897691 from mobile and land line GUATEMALA 1-800-299-0013 www.samsung.com/latin (Spanish) www.samsung.com/latin_en (English) HONDURAS 800-27919267 www.samsung.com/latin (Spanish) www.samsung.com/latin_en (English)
- Page 120 080 100 2255 www.samsung.com NAMIBIA 8197267864 www.samsung.com NIGERIA 0800-726-7864 www.samsung.com NETHERLANDS 0900-SAMSUNG (0900-7267864) (€ 0,10/min) www.samsung.com NEW ZEALAND 0800 SAMSUNG (0800 726 786) www.samsung.com NICARAGUA 00-1800-5077267 www.samsung.com/latin (Spanish) www.samsung.com/latin_en (English) NORWAY 815-56 480 www.samsung.com OMAN 800-SAMSUNG (726-7864) www.samsung.com/ae (English) www.samsung.com/ae_ar (Arabic)
- Page 121 Country/Region Customer Care Center WebSite SWITZERLAND 0848-SAMSUNG (7267864, CHF 0.08/min) www.samsung.com/ch www.samsung.com/ch_fr/ SYRIA 18252273 www.samsung.com/Levant (English) TADJIKISTAN 8-10-800-500-55-500 www.samsung.com TAIWAN 0800-329-999 www.samsung.com 0266-026-066 TANZANIA 0685 88 99 00 www.samsung.com THAILAND 1800-29-3232 www.samsung.com/th 02-689-3232 TRINIDAD & TOBAGO 1-800-SAMSUNG (726-7864) www.samsung.com TURKEY 444 77 11 www.samsung.com...
-
Page 122: Control Panel
glossary client. BOOTP enables 'diskless workstation' computers to obtain an IP The following glossary helps you get familiar with the product by address prior to loading any advanced operating system. understanding the terminologies commonly used with printing as well as mentioned in this user’s guide. 802.11 Charge Coupled Device (CCD) is a hardware which enables the scan job. -
Page 123: Fuser Unit
DIMM Emulation Dual Inline Memory Module (DIMM), a small circuit board that holds Emulation is a technique of one machine obtaining the same results as memory. DIMM stores all the data within the machine like printing data, another. received fax data. An emulator duplicates the functions of one system with a different system, so that the second system behaves like the first system. -
Page 124: Mac Address
ITU-T Hard Disk Drive (HDD), commonly referred to as a hard drive or hard The International Telecommunication Union is an international disk, is a non-volatile storage device which stores digitally-encoded data organization established to standardize and regulate international radio on rapidly rotating platters with magnetic surfaces. and telecommunications. -
Page 125: Printer Driver
Modified Modified READ (MMR) is a compression method Portable Document Format (PDF) is a proprietary file format developed recommended by ITU-T T.6. by Adobe Systems for representing two dimensional documents in a device independent and resolution independent format. Modem PostScript A device that modulates a carrier signal to encode digital information, and also demodulates such a carrier signal to decode transmitted PostScript (PS) is a page description language and programming... -
Page 126: Toner Cartridge
UNC Path between nodes on a network. It also provides an authenticated Inter-process communication mechanism. Uniform Naming Convention (UNC) is a standard way to access network shares in Window NT and other Microsoft products. The format of a UNC path is: \\<servername>\<sharename>\<Additional directory> SMTP Simple Mail Transfer Protocol (SMTP) is the standard for e-mail transmissions across the Internet. - Page 127 XML Paper Specification (XPS) is a specification for a Page Description Language (PDL) and a new document format, which has benefits for portable document and electronic document, developed by Microsoft. It is an XML-based specification, based on a new print path and a vector-based device-independent document format.
-
Page 128: Index
index job timeout setting accessing Entering management tools 117 using the number keypad 42 language accessories error message ordering 97 LCD display acking browsing the machine status 64 changing the display language 42 adjusting favorites settings, for printing tray size 49 features power saver 29 auto continue setting... - Page 129 Windows 52 estimated life 75 setting up 36 Mac 58 handling instructions 74 wired network 36 Windows 54 non-Samsung and refilled 75 UNIX 60 N-up printing redistributing toner 76, 98 using direct printing utility 56 storing 74 Mac 58 printing a document...
- Page 130 common Windows problems 95 driver installation for network connected 38, 32, 113, 112, 113 printing 51 supplied software 31 using SetIP 37 Windows 8 driver uninstallation 114 network driver installation 113 USB cable driver installation 112 wireless driver installation 113 Index_ 130...