
Related Manuals for Teac DRHN200


Summary of Contents for Teac DRHN200
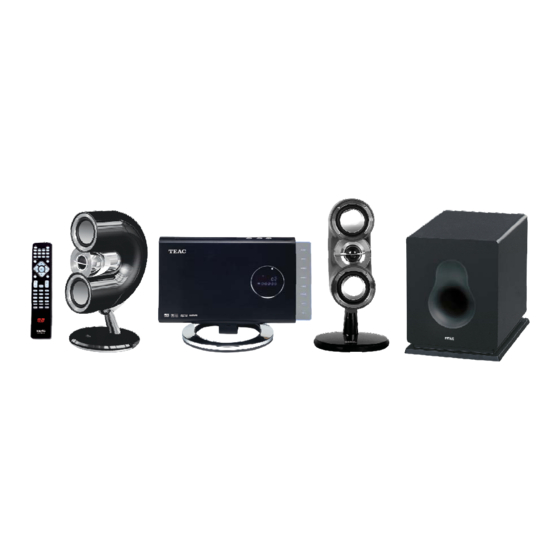
- Page 1 TEAC DRHN200 2.1CHANNEL DVD HI-FI SYSTEM USER MANUAL IMPORTANT ! WARRANTY INFORMATION INSIDE. PLEASE READ www.teac.com.au...
-
Page 2: Warranty Registration
The warranty does not cover freight or insurance. In all cases of transit damage or lost, a claim must be filed against the carrier by the purchaser, even if shipment is arranged by TEAC. TEAC in- home service may also be available at a fee upon request. - Page 3 *Your nearest Authorised TEAC Service Centre is listed in your Owners Manual 10. No one is authorised to assume any liability on behalf of TEAC or impose any obligation on it, in connection with the sale of any equipment other than as stated in this warranty and outlined above.
- Page 4 Dealer’s Address Postcode Please ensure that your product is packed appropriately upon return to the service centre. If you have any other queries regarding service or warranty please contact the TEAC Customer Care Centre below: service@teac.com.au www.teac.com.au 1800 656 700...
-
Page 5: Table Of Contents
T T T T T able of Contents able of Contents able of Contents able of Contents able of Contents Before Connection ..........................2 3 For your safety ..............................2 Precautions ................................2 Wall Mounting Instructions ........................... 4 Main Set ................................4 Connection .............................. -
Page 6: For Your Safety
Before Connection Before Connection Before Connection Before Connection Before Connection Thank you for purchasing this DVD 2.1 channel component system, in order to fully utilize this system, please read this instruction book carefully before use it. For your safety For your safety For your safety For your safety For your safety... -
Page 7: Before Connection
Before Connection Before Connection Before Connection Before Connection Before Connection 8. Do not use this product near water, for example near a bath tub, wash bowl, kitchen sink, or laundry tub; in a wet basement; or near a swimming pool and the like. 9. -
Page 8: Wall Mounting Instructions
W W W W W all Mounting Instructions all Mounting Instructions all Mounting Instructions all Mounting Instructions all Mounting Instructions Main Set Main Set Main Set Main Set Main Set 1. Connect all cables and secure into place. 2. Fix the wall bracket in place using two screws ensuring the locking pin hole is facing upwards. Then screw the second part of the bracket in place using the two screws, ensuring the locking pin hole is facing upwards. -
Page 9: Connecting The Tv
Connection Connection Connection Connection Connection Caution: Caution: Caution: Caution: Caution: Please turn off all the equipment power before connecting. Connecting the TV Connecting the TV Connecting the TV Connecting the TV Connecting the TV Terminal board for the DVD player 1. -
Page 10: Connecting The Antenna
Connection Connection Connection Connection Connection Connecting the Antenna Connecting the Antenna Connecting the Antenna Connecting the Antenna Connecting the Antenna 1. Using the supplied wire Antenna. 2. Using the coaxial type connector . A 75Ohm antenna with coaxial type connector should be connected to the FM 75 ohm coaxia terminal. 3. -
Page 11: Connection
Connection Connection Connection Connection Connection Connecting the Speakers Connecting the Speakers Connecting the Speakers Connecting the Speakers Connecting the Speakers Connect the speaker cords between the terminals as shown below. Connect the cords with a red line to the (+) (L) (R) terminals and cords with a silver line to the (-) (G) terminals. Right Speaker Box Back View Left Speaker Box Back View Connection precautions... -
Page 12: Dvd Player (Main Set)
C C C C C ontrol Section ontrol Section ontrol Section ontrol Section ontrol Section DVD Player (main set) DVD Player (main set) DVD Player (main set) DVD Player (main set) DVD Player (main set) Face View Face View Face View Face View Face View T T T T Top V... -
Page 13: Control Section
Control Section Control Section Control Section Control Section Control Section Remote Control Remote Control Remote Control Remote Control Remote Control Standby Button DVD Function Button Tuner Function Button Dim Button Preset Equalizer Button Subtitle Button Title Button Setup Button Direction Button ( , , , ) Enter Button Clock Button Next Button (... -
Page 14: Use The Discs
Normal playing Normal playing Normal playing Normal playing Normal playing Use the Discs Use the Discs Use the Discs Use the Discs Use the Discs Operate the keys on the unit Operate the keys on the unit Operate the keys on the unit Operate the keys on the unit Operate the keys on the unit In power on mode, press the function button (... - Page 15 Normal playing Normal playing Normal playing Normal playing Normal playing 7. In play mode, press the title button ( ) to go back to the title menu. TITLE TITLE TITLE TITLE TITLE 8. Press the setup button ( ) to set the function of this unit. SETUP SETUP SETUP...
- Page 16 Normal playing Normal playing Normal playing Normal playing Normal playing When playing a CD disc, this function can be used to play a track or folder repeatedly. Repeatedly press the mode button, the screen shows orderly: When playing MP3 disc, this function can be used to play a track or folder repeatedly. Repeatedly press the mode button, the screen shows orderly: 15.
- Page 17 Normal playing Normal playing Normal playing Normal playing Normal playing 22. When playing a the Video CD, you can choose MONO (LEFT MONO, RIGHT Mono), “STEREO” audio output by pressing vocal mode select button ( AUDIO AUDIO AUDIO AUDIO AUDIO When playing DVD disc recorded with several languages, you can repeatedly press the language select button ( ) to select one of languages to play.
-
Page 18: Playing Picture Cd Disc
Normal playing Normal playing Normal playing Normal playing Normal playing Note: Note: Note: Note: Note: Use the 1-9,10+ buttons to input the sequence number which you want to program playing (the first selection is title and the second selection is chapter of the programs menu.). -
Page 19: Normal Playing
Normal playing Normal playing Normal playing Normal playing Normal playing Note: Note: Note: When playing a picture CD, press the L button to enter the “THUMBNAIL MODE”, use the Note: Note: , , , buttons to move the cursor to illuminate the “MENU” then press the ENTER ENTER ENTER button to enter the ENTER... -
Page 20: Listening To Radio Broadcasts
Listening to Radio Broadcasts Listening to Radio Broadcasts Listening to Radio Broadcasts Listening to Radio Broadcasts Listening to Radio Broadcasts Caution: Caution: Caution: Caution: Caution: Before listening to the radio, please check if FM antenna is correctly connected. Press the function select button on the unit or the button on the remote control FUNCTION... -
Page 21: Setting The Clock
Clock/T Clock/T Clock/Timer Functions Clock/T Clock/T imer Functions imer Functions imer Functions imer Functions Setting the Clock The built-in clock shows the correct time in the display. - In standby mode, press the clock button ( ) , the hour indicator will blink. CLOCK CLOCK CLOCK... -
Page 22: Clock/Timer Functions
Clock/T Clock/T Clock/T Clock/T Clock/Timer Functions imer Functions imer Functions imer Functions imer Functions T T T T T o cancel the daily timer setting o cancel the daily timer setting o cancel the daily timer setting o cancel the daily timer setting o cancel the daily timer setting In standby mode, repeatedly press the timer button ( ) until the “ON”... -
Page 23: Menu Function Setup
DVD Menu Options DVD Menu Options DVD Menu Options DVD Menu Options DVD Menu Options Caution: Caution: The content of this chart is for reference only. If something has changed, please take the The content of this chart is for reference only. If something has changed, please take the Caution: Caution: Caution: The content of this chart is for reference only. -
Page 24: Video Setup Page
DVD Menu Options DVD Menu Options DVD Menu Options DVD Menu Options DVD Menu Options Video Setup Page Video Setup Page Video Setup Page Video Setup Page Video Setup Page Component Component Component Component Component You can setup this according to TV video output type. Note: Note: Note:... -
Page 25: Dvd Menu Options
DVD Menu Options DVD Menu Options DVD Menu Options DVD Menu Options DVD Menu Options Preference Page Preference Page Preference Page Preference Page Preference Page Note: Note: Note: Note: Note: Preference features can be selected only during “NO DISC” condition or full STOP mode. TV T TV T TV Type... -
Page 26: Protect The Disc
Protect the Disc Protect the Disc Protect the Disc Protect the Disc Protect the Disc 1. To keep the disc clean, please do not touch the disc’s surface when you are holding it. You should hold the edge. 2. If the disc is dirty, it will affect the sound quality. Please use the clean and soft cloth to wipe the disc from inside to outside. - Page 27 Specification Specification Specification Specification Specification Power Supply ..............~240V AC / 50 Hz Power Consumption ............75W Operating Temperature ............-10~40 Video Output ..............1 VP-P 75Ω, Negative synchronism Video System..............Multi/PAL/NTSC Horizontal Definition ............576 lines (DVD) Frequency Response (Line Out)........20Hz-20kHz(±3dB) Distortion ................
-
Page 28: Specification
Specification Specification Specification Specification Specification Amplifier Amplifier Amplifier Amplifier Amplifier Output Power Output Power Output Power Output Power Output Power Subwoofer(100Hz,10%THD) ..........100W L/R (1KHz,10%THD) ............50W Frequency Response Subwoofer (40-170HZ)............- 6 ± 2 dB L/R..................100Hz - 60dB, 20KHz - 3dB Remote Remote Remote... - Page 29 Name Address Phone Associated Electronics 7 Molonglo Mall FYSHWICK 2609 (02)62 80 4698 (02)62 80 5437 TEAC Perth Service Centre 273 Great Eastern Highway BELMONT 6104 (08)94 79 6499 (08)94 79 6544 Inpulse Electronics 3 Sloane Street MARIBYRNONG 3032...
- Page 30 Name Address Phone Videotel Unit 1/17 Quinns Lane SOUTH NOWRA 2541 (02)44 21 5250 (02)44 23 3280 Ideal Electronics 145 Woodward Street ORANGE 2800 (02)63 62 8270 (02)63 62 8270 Parkes Sight 'n' Sound 67 Clarinda Street PARKES 2870 (02)68 62 4475 (02)68 63 4209 Vickery Sound 171 Brisbane Water Drive...
- Page 31 Name Address Phone The Television Workshop Shop 4 Elder St Centre ALICE SPRINGS 0870 (08)89 52 8555 (08)89 52 5557 New Age Electronics Unit 1/21 Delatour Street COCONUT GROVE 0810 (08)89 48 1755 (08)89 48 1766 Eletech Service 13 Sandalwood Ave NHULUNBUY 0880 (08)89 87 3828...
- Page 32 (08)98 81 2148 (08)98 81 3129 Proton 21A Charles Street NORTHAM 6401 (08)96 22 3168 (08)96 22 3168 TEAC Perth Service Centre 273 Great Eastern Highway BELMONT 6104 (08)94 79 6499 (08)94 79 6544 Charles Hunt Electronics 25 Brodie Court...
- Page 33 TEAC CUSTOMER CARE CENTRE (TCCC) Free call: 1800 656 700 Between Monday to Friday – EST 9AM to 5PM...