
Related Manuals for Teac GF-680


Summary of Contents for Teac GF-680
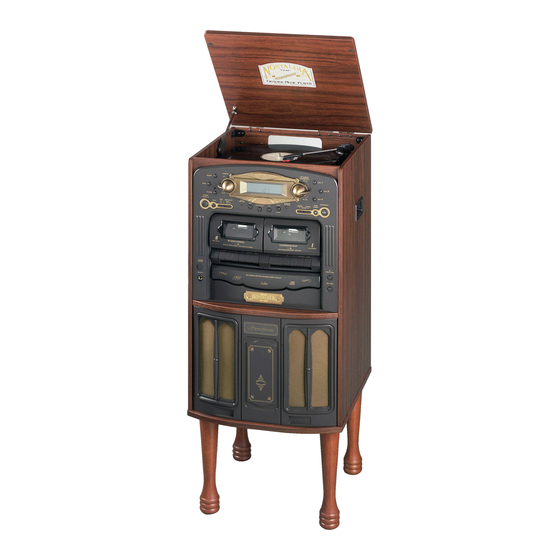
- Page 1 9A09897000 GF - 680 Compact Hi-Fi Stereo System OWNER’S MANUAL MANUEL DU PROPRIÉTAIRE...
-
Page 2: Important Safety Instructions
• Consult the dealer or an experienced radio/TV technician for help. CAUTION Changes or modifications to this equipments not expressly approved by TEAC CORPORATION for compliance will void the user's warranty. For CANADA AC POWER CORD CONNECTION CAUTION: TO PREVENT ELECTRIC SHOCK, MATCH WIDE BLADE OF PLUG TO WIDE SLOT, FULLY INSERT. - Page 3 This product has been designed and manufactured according to FDA regulations “title 21, CFR, chapter 1, subchapter J, based on the Radiation Control for Health and Safety Act of 1968“, and is classified as class 1 laser product. There is not hazardous invisible laser radiation during operation because invisible laser radiation emitted inside of this product is completely confined in the protective housings.
-
Page 4: Table Of Contents
Contents Thank you for choosing TEAC. Read this manual carefully to get the best performance from this unit. Important Safety Instructions ......2 Contents . -
Page 5: Discs
< Copy-protected discs and other discs which do not conform to the CD standard may not play back correctly in this player. If you use such discs in this unit, TEAC Corporation and its subsidiaries cannot be responsible for any consequences or guarantee the quality of reproduction. -
Page 6: Cassette Tape
Tape Selection Metal and chrome (cobalt) tapes have identification holes. < This unit can play normal (Type!) tape only. Tape Handling Use your finger or a pencil to turn the cassette's hub and take up any slack tape. < Avoid touching the tape. Fingerprints attract dust and dirt. Do not store tapes in the following places: <... -
Page 7: Handling Records
爪部(内側) The replacement stylus for this GF-600 is a STL-103. Please contact TEAC Parts at (323) 726-0303, extension 840 to order. Or call our automated Service Agency Locator at: (800) 447-TEAC for the closest authorized repair company that can replace the... -
Page 8: Connection
Connection LINE OUT DVD, CD-R, etc. Installing the legs Bottom of the unit... -
Page 9: Remote Control Unit
CAUTION Turn off the power of all the equipment before making connections. Read instructions of each component you intend to use with this unit. < Be sure to insert each plug securely. To prevent hum and noise, do not bundle the connection cords with the power cord. - Page 10 Remote control unit...
-
Page 11: Names Of Each Control (Front Panel/Remote Control Unit)
Names of Each Control (Front Panel/Remote Control Unit) STANDBY indicator This indicator lights when the unit is in the standby mode. When the unit is turned on, the light goes off. POWER Press this switch to turn the unit on or off (standby). The equipment draws a nominal amount of power from the AC outlet even with its POWER switch in the OFF position. -
Page 12: Names Of Each Control (Turntable)
turntable screw fixing the turntable for transportation Before use, completely loosen the screw by turning it clockwise with a coin or screwdriver. When you transport the unit, turn the screw counterclockwise to fix the turntable. cue-lever Use this lever to lift the tone arm. tone arm holder tone arm speed selector... -
Page 13: Basic Operation
Press the POWER switch to turn the unit on. The standby indicator goes off. < When the unit is turned on, the MUTING indicator lights momentarily. This is not a malfunction. Select a source by pressing the corresponding button. < When using the remote control unit, press the FUNCTION button repeatedly until the desired source appears on the display. -
Page 14: Listening To A Record
Before use, completely loosen the transportation screw by turning it clockwise with a coin. Detach the stylus guard (white plastic cover). Press the AUX/PHONO button. Gently open the turntable cover. Be careful not to pinch your finger. Listening to a Record transportation screw adaptor Select the speed. - Page 15 Move the tone arm gently to the edge of the record (or the starting point of a track). The turntable will begin to turn. Gently lower the tone arm by slowly releasing the cue lever. You can lower the tone arm manually if the cue lever has not been raised.
-
Page 16: Listening To Cds
Press the CD button (or the FUNCTION button of the remote control unit) to select "CD". Press the OPEN/CLOSE button. Place a disc on a tray with the printed label face up. carousel disc number < Never place more than one disc on a tray. <... - Page 17 To suspend playback temporarily (pause mode) Press the PLAY/PAUSE button during playback. Playback stops at the current position. To resume playback, press the PLAY/PAUSE button again. To stop playback Press the STOP button to stop playback. To skip to the next or a previous track During playback, tap the SKIP knob up or down repeatedly until the desired track is found.
-
Page 18: Programmed Playback
Up to 20 tracks from 3 discs can be programmed in the desired order. Shuffle, Repeat and Intro check functions don’t work during programmed playback. Press the CD button or the FUNCTION button to select "CD". Press the PROGRAM button. "TRACK", "MEMORY", and the current disc number blinks on the display. -
Page 19: Intro Check
To check the programmed order In the stop mode, press the PROGRAM button repeatedly. The track number and program number will be shown on the display. To add a track to the end of the program In the stop mode, press the PROGRAM button repeatedly until "00"... -
Page 20: Shuffle Playback
Shuffle Playback The tracks can be played randomly. Press the SHUFFLE button during playback. (In the stop mode, press the SHUFFLE button and the PLAY/PAUSE button.) When the shuffle playback of all the tracks of the currently selected disc has been finished, the unit goes to the next disc. When the shuffle playback of all the discs has been finished, the unit stops and the shuffle playback mode is cancelled. -
Page 21: Listening To The Radio
FM MODE Select "TUNER" by pressing the TUNER(BAND) button or the FUNCTION button. Select AM or FM by pressing the TUNER(BAND) button. Select the station you want to listen to (auto selection). Hold the TUNING knob up or down until the frequency display begins to change. -
Page 22: Preset Tuning
You can store FM and AM stations into preset channels 1 to 20 respectively. Press the TUNER(BAND) button or the FUNCTION button to select "TUNER". Select AM or FM by pressing the TUNER(BAND) button. Select the station you want to listen to. Press the PROGRAM button. -
Page 23: Listening To Tapes
TAPE TAPE Press the TAPE button or the FUNCTION button to select "TAPE" . Load a pre-recorded cassette tape. Press the STOP/EJECT button to open the cassette holder, load a cassette tape with its exposed side facing down, and close the holder. <... -
Page 24: Extended Playback
Extended Playback 4 2 4 TAPE Press the TAPE button or the FUNCTION button to select "TAPE" . Load cassette tapes into TAPE Press the PLAY button of TAPE Press the PAUSE and the PLAY button of TAPE When TAPE stops, TAPE starts playback automatically. -
Page 25: Dubbing (Copy From Tape ! To Tape @ )
Dubbing (Copy from TAPE I to TAPE II) Load a pre-recorded cassette tape into TAPE recordable cassette tape into TAPE < You can use normal (Type ) tape only. Press the TAPE button or the FUNCTION button to select "TAPE". Select the dubbing speed by pressing the DUB SPEED button. -
Page 26: Setting The Clock
CLOCK ADJ knob < If the unit is on, press the POWER switch to turn it off, or press the DISPLAY button once or twice to display the clock (":" will blink). Press the CLOCK ADJ button. The "hour" value blinks. Hold up or down the knob to set the current hour. -
Page 27: Setting The Timer 1
DISPLAY Adjust the clock before setting the timer. Press the DISPLAY button repeatedly until "TIMER ON" indicator appears on the display. INTRO REPEAT SHUFFLE REMAIN TRACK MEMORY TAPE TUNER Within 5 seconds, press the CLOCK ADJ button. INTRO REPEAT SHUFFLE REMAIN TRACK MEMORY... -
Page 28: Timer Playback
Setting the Timer 2 Hold up or down the knob to set the stop time(hour), and press the CLOCK ADJ button. INTRO REPEAT SHUFFLE REMAIN TRACK MEMORY TAPE TUNER The "minutes" value starts flashing. Hold up or down the knob to set the stop time(minutes), and press the CLOCK ADJ button. -
Page 29: Timer Recording
Timer Recording Set the start time and stop time (see 27 page). Load a recordable cassette tape into TAPE Select a source to be recorded by pressing the corresponding button. < Don’t select "TAPE". < When you select "TUNER", tune in a station. Press the TIMER button. -
Page 30: Troubleshooting
If you have problems with your system, look through this chart and see if you can solve the problem yourself before calling your dealer or TEAC service center. No power e Check the connection to the AC power supply. Check and make sure the AC source is not a switched outlet and that, if it is, the switch is turned on. -
Page 31: Specifications
AMPLIFIER section Output Power ........15W+15W Input Sensitivity ........220mV Frequency Response. -
Page 32: Sommaire
Sommaire Nous vous remercions pour l’achat d’un appareil TEAC. Lire ce manuel avec attention pour obtenir les meilleures performances possibles de cet appareil. Sommaire..........32 Avant l'utilisation . -
Page 33: Disques
Disques pouvant être lus avec ce lecteur : • CD audio classiques, portant le logo CD-DA sur l’étiquette : • Disques CD-R correctement finalisés Note : < Selon la qualité du disque et/ou la qualité de l’enregistrement, certains disques CD-R risquent de ne pas pouvoir être lus. <... -
Page 34: Bandes
Choix de bande Pour que le choix automatique de bande fonctionne correctement, les bandes métals ou chromes (cobalt) doivent posséder des trous d’identification. < Cet appareil permet d' utiliser des cassettes Normales (type!). Manipulation des bandes Utiliser un doigt ou un crayon pour tourner le moyeu de la cassette et rattraper le jeu de la bande. -
Page 35: Manutention Des Disques
Plusieurs systèmes de nettoyage de disque sont disponibles chez plusieurs marchands et sur ligne. TEAC n'endorse pas aucun produit spécifique mais, dépendemment de la condition de la collection de vos disques, çelà peut s'avérer être un bon choix. -
Page 36: Branchement
Branchement LINE OUT DVD, CD-R, etc. Installation des pieds Fond de l'unité... -
Page 37: Boîtier De Télécommande
ATTENTION Mettre tous les éléments de votre chaîne hors tension avant de procéder au raccordement de cet appareil. Lire attentivement le mode d'emploi de chacun des éléments que vous souhaitez utiliser avec cet appareil. < Assurez vous que chaque fiche est bien enfoncée. Pour éviter tout ronflement ou bruit parasite, ne pas regrouper les fils de connexion avec le cordon d'alimentation ou avec les fils des enceintes. - Page 38 Télécommande...
-
Page 39: Nomenclature (Panneau Avant/Télécommande)
Nomenclature (Panneau avant/Télécommande) Témoin STANDBY Ce témoin s'allume quand l'appareil est en mode d'attente (Standby). Quand l'appareil est allumé ce témoin est éteint. POWER Appuyez cette touche pour allumer ou éteindre l'appareil (standby) L’appareil tire de la prise secteur une puissance faible mais non nulle lorsque l’interrupteur POWER est sur la position OFF. -
Page 40: Nomenclature (Table Tournante)
table tournante Visse tenant en place la table tournante pour le transport Avant l'utilisation, déserrer la visse en la tournant vers la droite avec une pièce de monnaie ou tournevisse. Quand vous transportez l'appareil, tournez la visse vers la gauche pour tenir en place la table tournante. levier de repérage Utilisez ce levier pour soulever le bras appui... -
Page 41: Opération De Base
Appuyez sur la touche POWER pour allumer l'appareil. Le témoin d'attente (standby) s'éteint. < Quand l'appareil est allumé, le témoin MUTING (SOURDINE) s'allume momentanément. Ceci n'est pas un mauvais fonctionnement. Choisir une source en appuyant sur la touche correspondante. < Quand vous utilisez la télécommande, appuyez sur la touche FUNCTION répététivement jusqu'à... -
Page 42: Écoute De Disque
Avant l'utilisation, déserrer complètement la visse de transport en la tournant vers la droite utilisant une pièce de monnaie. Détachez le protecteur de l'aiguille (couvercle plastique blanc) Appuyez sur le bouton PHONO. Doucement soulever le couvercle. Prendre soin de ne pas coincer vos doigts. - Page 43 Doucement déplacer le bras vers le bord du disque (ou le point de départ d'une piste). La table tournante commence à tourner. Doucement abaisser le bras en relâchant doucement le levier de re-pérage. Vous pouvez abaisser le bras manuellement si le levier de repérage n'a pas été...
-
Page 44: Écoute De Cd
Appuyez sur la touche CD (ou la touche FUNCTION de la télécommande) pour choisir "CD". Appuyez la touche OPEN/CLOSE Déposez un disque dans le tirroir avec l'étiquette vers le haut. carousel numéro du disque < Ne jamais déposer plus d'un disque dans le tirroir. <... - Page 45 Pour suspendre la lecture momentanément (mode pause) Appuyez sur la touche PLAY/PAUSE durant la lecture. La lecture s'arrête à la position en cours. Pour continuer la lecture, appuyez sur la touche PLAY/PAUSE de nouveau. Pour arrêter la lecture Appuyez la touche STOP pour arrêter la lecture. Pour sauter vers la piste précédante ou suivante Durant la lecture, poussez vers le haut ou le bas la touche...
-
Page 46: Lecture Programmée
Jusqu'à 20 pistes de 3 disques peuvent être programmer dans l'ordre désirée Lecture aléatoire, répétée et intro ne fonctionnent pas durant la lecture programmée. Appuyez la touche CD ou la touche FUNCTION pour choisir "CD" Appuyez la touche PROGRAM "TRACK", "MEMORY" et le numéro du disque courant clignotent sur l'afficheur. -
Page 47: Intro
Vérification de l'ordre de programmation En mode d'arrêt, appuyez la touche PROGRAM répététivement. Le numéro de piste et du programme sont affichés. Pour ajouter une piste à la fin du programme En mode d'arrêt, appuyez la touche PROGRAM répététivement jusqu'à temps que "00" est affiché. Choisir un numéro de piste en poussant la touche SKIP et ensuite appuyez la touche PROGRAM. -
Page 48: Répétition De La Lecture
Lecture aléatoire Les pistes sont jouées aléatoirement. Appuyez la touche SHUFFLE durant la lecture. (En mode d'arrêt, appuyez la touche SHUFFLE et la touche PLAY/PAUSE). Quand la lecture aléatoire de toute les pistes du disque choisi est terminée, la lecture du disque suivant commence. Quand la lecture aléatoire de tous les disques est terminée, l'appareil s'arrête et la lecture aléatoire est annulée. -
Page 49: Écoute De La Radio
FM MODE Choisir "TUNER" en appuyant la touche TUNER(BAND) ou la touche FUNCTION. Choisir AM ou FM en appuyant la touche TUNER(BAND). Choisir le poste que vous désirez écouter (choix automatique) Tenir la touche TUNING vers le haut ou le bas jusqu'à temps que l'affichage de la fréquence change. -
Page 50: Syntonisation Pré-Réglée
Vous pouvez entreposer dans les canaux pré-réglés de 1 à 20 postes FM et AM. Appuyez la touche TUNER(BAND) ou la touche FUNCTION pour choisir "TUNER" Choisir AM ou FM en appuyant la touche TUNER(BAND) Choisir le poste que vous désirez écouter. Appuyez la touche PROGRAM INTRO REPEAT SHUFFLE... -
Page 51: Écoute De Bandes
TAPE TAPE Appuyez la touche TAPE ou la touche FUNCTION pour choisir "TAPE" Chargez une bande pré-enregistrée Appuyez la touche STOP/EJECT pour ouvrir le compartiment de la bande, chargez la bande avec son coté exposé vers le bas et fermer le compartiment. <... -
Page 52: Lecture Continu
Lecture continu 4 2 4 TAPE Appuyez la touche TAPE ou la touche FUNCTION pour choisir "TAPE" Chargez une bande dans TAPE et TAPE Appuyez la touche PLAY de TAPE Appuyez la touche PAUSE et PLAY de TAPE Quand TAPE s'arrête, la lecture de TAPE automatiquement. -
Page 53: Copiage (Copiage De Tape ! À Tape @ )
Copiage (Copiage de TAPE I à TAPE II) Chargez une bande pré-enregistrée dans TAPE enregistrable dans TAPE < Vous pouvez utiliser des bandes standards (Type Appuyez la touche TAPE ou FUNCTION pour choisir "TAPE" Choisir la vitesse de copiage en appuyant la touche DUB SPEED. -
Page 54: Réglage De L'horloge
CLOCK ADJ knob < Si l'appareil est allumé, appuyez la touche POWER pour l'éteindre, ou appuyez la touche DISPLAY une ou deux fois pour afficher l'horloge (":" clignote) Appuyez la touche CLOCK ADJ. "heure" clignote Tenir vers le haut ou le bas le bouton pour régler l'heure. Réglage de l'horloge Appuyez la touche CLOCK ADJ. -
Page 55: Réglage De La Minuterie 1
DISPLAY Réglez l'horloge avant de régler la minuterie Appuyez la touche DISPLAY répététivement jusqu'à temps que le témoin "TIMER ON" est affiché INTRO REPEAT SHUFFLE REMAIN TRACK MEMORY TAPE TUNER En dedans de 5 secondes, appuyez la touche CLOCK ADJ. INTRO REPEAT SHUFFLE REMAIN... -
Page 56: Lecture Minutée
Réglage de la minuterie 2 Tenir vers le haut ou le bas la touche pour régler l'heure d'arrêt et appuyez la touche CLOCK ADJ. INTRO REPEAT SHUFFLE REMAIN TRACK MEMORY TAPE TUNER "minutes" clignote Tenir vers le haut ou le bas la touche pour régler les minutes d'arrêt et appuyez sur la touche CLOCK ADJ. -
Page 57: Enregistrement Minuté
Enregistrement minuté Réglez l'heure de départ et d'arrêt (voir page 55) Chargez une bande enregistrable dans TAPE Choisir une source d'enregistrement en appuyant la touche correspondante. < Ne pas choisir "TAPE" < Quand vous choisissez "TUNER", syntonisez un poste Appuyez la touche TIMER TIMER CLASSIC ON OFF... -
Page 58: Dépannage
En cas d’anomalie de fonctionnement, consultez le tableau qui suit et tentez de résoudre la question qui se pose à vous avant de faire appel au revendeur ou au service d’entretien de TEAC. N'allume pas e Assurez-vous que l'appareil est branché. Assurez-vous que la source d'alimentation n'est pas commuté... -
Page 59: Spécifications
Section AMPLIFICATEUR Puissance de sortie ......15W+15W Sensibilité d'entrée....... . . 220mV Réponse de fréquence . - Page 60 7733 Telegraph Road, Montebello, California 90640 Phone: (323) 726-0303 TEAC CANADA LTD. 5939 Wallace Street, Mississauga, Ontario L4Z 1Z8, Canada Phone: (905) 890-8008 TEAC MEXICO, S.A. De C.V Campesinos N°184, Colonia Granjas Esmeralda, Delegacion Iztapalapa, CP 09810, México DF Phone: (525) 581-5500 TEAC UK LIMITED 5 Marlin House, Croxley Business Park, Watford, Hertfordshire, WD18 8TE, U.K.