Advertisement
Table of Contents
Advertisement
Table of Contents

Related Manuals for Hyundai HYBC5200


Summary of Contents for Hyundai HYBC5200
- Page 1 BRUSH CUTTER Model HYBC5200 User Manual...
- Page 2 Page 2...
-
Page 3: Table Of Contents
TABLE of CONTENTS 1. SAFETY 3 – 8 2. SPECIFICATION 3. COMPONENT LOCATIONS 4. ASSEMBLY 11 – 14 5. FUEL 6. STARTING/STOPPING& USING MACHINE 16 – 19 7. MAINTENANCE 20 - 21 8. STORING THE MACHINE 21 -22 9. TROUBLESHOOTING 10. -
Page 4: Safety
1. SAFETY 1.1 The operator of the machine is responsible for and has a duty of care in making sure that the machine is operated safely and in accordance with the instructions in this user manual. Please note the following safety points. 1.2 The machine should never be left it in a condition which would allow an untrained or unauthorised person/s to operate this machine. - Page 5 Carbon monoxide. 1.3.1 Carbon monoxide is a colourless and odourless gas. Inhaling this gas can cause death as well as serious long term health problems such as brain damage. 1.3.2 The symptoms of carbon monoxide poisoning can include but not limited to the following;...
- Page 6 1.4.4 Hot work on tanks that have contained fuel is extremely dangerous and should not be carried out. 1.4.5 Keep work area clean and tidy. 1.4.6 Clean up all spills promptly using correct methods i.e. absorbent granules and a lidded bin. 1.4.7 Dispose of waste fuels correctly.
- Page 7 1.7.2 Noise emissions for this equipment is unavoidable. Carry out noisy work at approved times and for certain periods. Limit the working time to a minimum. For your personal protection and protection of people working nearby it is advisable for them to wear hearing protection. 1.8 Additional safety guidelines.
- Page 8 balance Do not use the machine while standing on a ladder or on any other unstable surface. 1.8.1.15 Children must not have access to the machine. 1.8.1.16 Spectators should be kept at a safe distance from the work area, and at least 15 meters. 1.8.1.17 Keep hands and feet away from the nylon cutting head or metal blade during operation.
-
Page 9: Specification
2. SPECIFICATION Model HYBC5200 Single cylinder, 2 stroke, air-cooled engine, Engine Type 1E44F-5 Engine size cc 52CC Oil Capacity Fuel tank capacity ml 1200ML Noise Level DB 115 dB 7500 rpm Rated speed rpm 2.2kw Rated power kw Start Method... -
Page 10: Component Locations
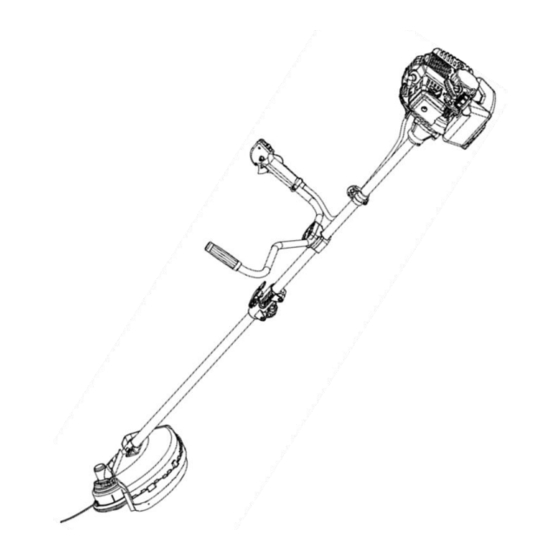
3. COMPONENT LOCATIONS 3.1. Engine. 1 – Spark plug 2 – Choke lever 3 – Exhaust 4 – Recoil starter handle 5 – Fuel tank 6 – Primer bulb 7 – Air filter 8 – Throttle cable 3.2. Machine. 1 – Engine 2 –... -
Page 11: Assembly
ASSEMBLY The engine MUST be stopped and disabled before carrying out any assembly work. 4.1. Mounting of the handle. 4.1.1. The handle MUST be assembled before use. 4.1.2. Bolt clamp (cradle) (2) to shaft. 4.1.3. Place the handle (1) into cradle (2), take top clamp cover (3) and place over handle. - Page 12 4.3. Installing the trimmer shield. 4.3.1. Take shield (1) and offer it up to the shaft (5), pass one of the fixing screws (4) through one of the holes in the clamp (3), then into shield (2) then loosely screw it into the machine.
- Page 13 machine. 4.6.2. Clean the machine completely, particularly the fuel tank and the air filter. 4.6.3. After using the appliance, all fuel should be removed. 4.6.4. Spectators should be informed how to get the users attention, otherwise it could cause an unsafe situation. 4.6.5.
- Page 14 4.7. Notes on working with the brush cutter (metal blade). 4.7.1. A metal blade with 3 teeth is delivered with the machine. This is used for cutting of bushes and weeds. The use of a saw blade with this machine is prohibited.
-
Page 15: Fuel
5. FUEL 5.1. Fuel and 2 stroke oil. 5.1.1. You MUST only use fresh unleaded fuel and 2 stroke engine oil mixture. 5.1.2. The fuel oil ratio mix is 40:1. NEVER use neat petrol in your engine. This will cause permanent engine damage and will invalidate the manufacturer's warranty of this product. -
Page 16: Starting/Stopping& Using Machine
6. STARTING/STOPPING & USING THE MACHINE 6.1. Engine - Cold start. 6.1.1. Fill the machine with fuel as described in section 5. 6.1.2. Turn the power switch (1) to the on position (I). 6.1.3. Set the machine on a firm and flat surface. 6.1.4. - Page 17 position. 6.2.5. Pull the starter rope (4) with a short stroke out until resistance is felt (about 100mm). Then pull firmly and continuously, do not let go of the starter handle instead let it return slowly. 6.2.6. Before starting work allow the engine to warm up at idle speed for about ten minutes.
- Page 18 machine, immediately stop and check the machine. 6.2.8. Never let the machine run with damaged or defective parts. 6.2.9. In trimmer mode only use for trimming grasses. 6.2.10. Never raise the nylon cutting head above knee height during operation. 6.2.11. DO NOT use the machine on a slope or uneven ground or if there is the chance of slipping or losing the stability, 6.2.12.
- Page 19 6.5.4. Once unlocked pull the reel (6) from the body (1) Remove the excess thread from reel. 6.5.5. Once the reel is removed it will reveal first washer (7), spring (8) and second washer (9), these will need to be inserted in the same order when reassembling.
-
Page 20: Maintenance
7. MAINTENANCE 7.1. Maintenance schedule. Maintenance cycle Every Every 3 Every 6 Every 12 Every 24 Component Each use month or mths or mths or mths or mths or 10 hours 15 hours 50 hours 100 hours 300 hours ○ Check Air filter ○... -
Page 21: Storing The Machine
7.2.2. Wash the air filter element with soap and water, rinse in fresh water and allow to fully dry. Never use petrol or benzene! 7.2.3. To replace the filter reverse the above process. 7.3. Spark plug. 7.3.1. To ensure the normal operation of the engine, a spark plug gap of 0.6 - 0,7mm must be maintained and be free of carbon deposits. - Page 22 8.3. Remove all fuel from the fuel tank. 8.4. After all the fuel is drained, start the engine. 8.5. Allow the engine to run in idle until engine stops alone. This allows the fuel to be removed from the carburetor. 8.6.
-
Page 23: Troubleshooting
9. TROUBLESHOOTING If troubleshooting does not solve the problem, contact your dealer or the manufacturer directly. Use only original parts approved by the manufacturer, otherwise a hazard may arise. 9.1 Difficulties in starting. Situation Cause Solution Clean the spark plug. Adjust the Carbon deposit between electrodes Spark plug gap to 0.6 ~ 0.7mm,... -
Page 24: Disposal Of Machine
10. DISPOSAL OF MACHINE 10.1. Should it become necessary to dispose of your machine please contact your local Council for the disposal advise of the device, or take unit to your local recycling center. Make sure all oil and fuel is correctly disposed of either beforehand or at amenity center. - Page 25 Page 25...
- Page 26 Page 26...
- Page 27 Page 27...
- Page 28 GENPOWER LTD Isaac Way, London Road Pembroke Dock, UNITED KINGDOM, SA72 4RW T: +44 (0) 1646 687 880 F: +44 (0) 1646 686 198 E: info@hyundaipowerequipment.co.uk www.hyundaipowerequipment.co.uk...