Table of Contents
Advertisement
Available languages
Available languages
VH-MS470BT
Manual de usuario
Micro Sistema CD
User Manual
CD Microsystem
Le rogamos que lea el manual de usuario antes de utilizar el producto y que lo guarde para futuras consultas.
La operación de este equipo está sujeta a las siguientes dos condiciones:
(1) es posible que este equipo odispositivo no cause interferencia perjudicial y (2) este equipo o dispositivo
debe aceptar cualquier interferencia, incluyendo la que pueda causar su operación no deseada.
Please read the user manual first before using the product, keep well for future referring.
Advertisement
Chapters
Table of Contents

Related Manuals for VIETA VH-MS470BT


Summary of Contents for VIETA VH-MS470BT
- Page 1 VH-MS470BT Manual de usuario Micro Sistema CD User Manual CD Microsystem Le rogamos que lea el manual de usuario antes de utilizar el producto y que lo guarde para futuras consultas. La operación de este equipo está sujeta a las siguientes dos condiciones: (1) es posible que este equipo odispositivo no cause interferencia perjudicial y (2) este equipo o dispositivo debe aceptar cualquier interferencia, incluyendo la que pueda causar su operación no deseada.
- Page 2 Esta garantía tendrá validez solamente cuando se presente la factura de compra en la cual aparece el nombre del cliente, el centro distribuidor y la fecha en la que se realiza la compra del producto. VIETA AUDIO S.A. acepta repara durante el periodo de garantía, todos aquellos productos que presenten anomalías durante su utilización normal tal y como se detalla...
-
Page 3: Table Of Contents
Índice Algunos consejos acerca de la utilizaci— n segura del equipo ............4 Observaciones importantes ......................4 Directrices de seguridad de las bater’as ..................6 Contenido del paquete ........................7 Introducci— n al producto ......................... 8 Introducci— n al mando de control remoto ..................9 Instalaci—... -
Page 4: Algunos Consejos Acerca De La Utilizaci- N Segura Del Equipo
Algunos consejos acerca de la utilización segura del equipo NO continúe manejando el equipo si tiene alguna duda Este equipo ha sido diseñado y fabricado para cumplir las normas de seguridad internacionales pero, como sobre su funcionamiento normal, o si está dañado de con cualquier otro aparato eléctrico, deberá... - Page 5 Deberá tener en cuenta los aspectos medioambientales Producto láser a la hora de deshacerse de la batería. Este producto está El enchufe no debe ser obstruido y debe ser equipado con un fácilmente accesible en todo momento. equipo láser de baja potencia.
-
Page 6: Directrices De Seguridad De Las Bater'as
Directrices de seguridad de las baterías Utilizadas correctamente, las baterías domésticas No intente recargar baterías normales, ya son una fuente segura y fiable de energía portátil. Se sea con un cargador pueden producir problemas si se utilizan mal o con o aplicándolas calor. -
Page 7: Contenido Del Paquete
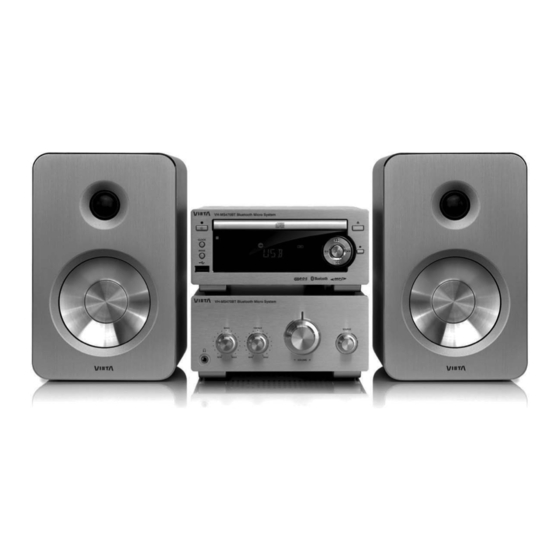
Contenido del paquete Verifique que todos estos elementos se encuentran dentro del embalaje. La unidad. Altavoces x 2. SOURCE DISPLAY Mando a distancia. Cable del altavoz x 2. PAIRING Pila incluida. Antena FM. Cable de control. Cable I/D de audio x 1. Manual de instrucciones. -
Page 8: Introducci- N Al Producto
Introducción al producto El reproductor de CD 1. Botón standby (en espera) 2. Botón reloj 3. Botón Modo 4. Conector USB 5. Indicador 6. Sensor del mando a distancia 7. Panel de la pantalla 8. Bandeja del disco 9. Botón de avance rápido ( Botón de avance de la sintonización Botón retroceder ( Botón sintonizar hacia atrás... -
Page 9: Introducci- N Al Mando De Control Remoto
Introducción al mando de control remoto 1. Botón standby 2. Botón de función del disco 3. Botón FM 4. Botón Modo (MODE) SLEE P 5. Botón Intro (INTRO) TIME R PRESET 6. Botón Volumen (LOUDNESS) 7. Botón Preajuste del Ecualizador (P-EQ) DISPLAY 8. -
Page 10: Instalaci- N De La Bater'a
Instalación de la batería Radio de acción del control remoto 1. Retire la tira de mylar aislante de la batería. Se encuentra en la parte trasera inferior del mando de control remoto. 30° 30° Max. 5 m 2. Afloje el tornillo de la tapa del compartimiento de la batería con un destornillador. - Page 11 Conexión de los altavoces Conecte las tomas AUX IN 2 de esta unidad a las tomas de salida de audio del equipo auxiliar tal y como se Conecte los cables del altavoz entre los terminales tal y muestra a continuación. como se muestra a continuación.
-
Page 12: Funciones Eco-Energ'a/Standby
Funciones ECO-Energía/Standby ENCENDIDO / APAGADO • Ajuste automático del reloj Al insertar el cable de alimentación de CA en un enchufe Cuando la emisora RDS muestra la hora, presione y de la pared, la unidad entrará en el modo de reloj. mantenga presionado el botón “Display”... -
Page 13: C- Mo Escuchar Emisoras De Radio
Cómo escuchar emisoras de radio 4. Repita los pasos anteriores del 1 al 3 para cada una Podrá escuchar emisoras FM. Podrá sintonizar las emisoras de forma manual, automática o eligiendo las de las emisoras que desee almacenar en memoria con emisoras almacenadas en memoria. -
Page 14: Funcionamiento Del Cd
Funcionamiento del CD Reproducción de CD 1. Inserte un disco y pulse el botón STOP cuando comience la reproducción. 1. Gire el botón SOURCE de la unidad o pulse el botón CD del mando a distancia. En el panel frontal se 2. -
Page 15: Reproducci- N Del Disco Mp3/Wma
Reproducción del disco MP3/WMA Repetir reproducción (disco MP3) Nota: La reproducción de música MP3/WMA desde Podrá configurar la función Repetir reproducción UNA el CD se puede ver afectada debido al tipo y formato vez, ALB y TODAS sin más que pulsar el Botón MODO. del disco o del tipo de grabación. -
Page 16: Reproducci- N Desde El Dispositivo Bluetooth
(no suministrado). 3. Busque otros dispositivos Bluetooth en su dispositivo. 2. Utilice un cable USB (no suministrado) para conectar 4. Seleccione “VH-MS470BT” en la lista de dispositivos el lector de tarjetas en la toma de la unidad. localizados. Protección de los datos en dispositivos de 5. -
Page 17: Configurar El Temporizador De Alarma
Configurar el temporizador de alarma Esta unidad se puede utilizar como reloj con alarma. Podrá seleccionar DISC, USB o TUNER como origen de la alarma. * Para desactivar el temporizador de desconexión, Nota: pulse varias veces el botón SLEEP hasta que aparezca •... -
Page 18: Resoluci- N De Problemas
Resolución de problemas Dispositivo USB no compatible Si está teniendo problemas con su unidad, revise esta lista para localizar una posible solución antes de llamar • El dispositivo USB no es compatible con la unidad. al servicio técnico. Pruebe con otro. Si no puede resolver el problema con los consejos que se dan aquí, o la unidad ha sufrido un daño físico, llame Mala recepción de las emisoras de radio... -
Page 19: Especificaciones
Especificaciones Especificación de la unidad Requisitos de alimentación eléctrica...........220 - 240 V ~ 50/60Hz Banda de sintonización FM............87,5~108 MHz Consumo de energía..............28W (ECO Standby ≤ 0,5W) Puerto USB...................5V , 500mA Potencia de salida................45W x 2 THD....................≤1% Dimensiones.................CD + Amplificador 16(An) x 15,6(Al) x 27,5(L) cm Especificación de los altavoces Impedancia...................6Ω... - Page 20 TERMS OF GUARANTEE VIETA AUDIO S.A. guarantees its products for a period of 24 months. The guarantee period starts on the date of purchase of brand new products that have never been used by the first end user. This guarantee covers any possible manufacturing flaws for any Vieta products sold on Spanish territory by authorised distributors.
- Page 21 Contents Some Dos And DonÕ t On The Safe Use Of Equipment ..............22 Battery Safety Guidelines ......................24 Pack Contents ..........................25 Product Overview ......................... 26 Remote Control Overview ......................27 Installation of Battery ........................28 Connections..........................28 ECO-Power/Standby Features ..................... 30 Setting the Clock ..........................
-
Page 22: Some Dos And Donõ T On The Safe Use Of Equipment
Some Dos And Don’t On The Safe Use Of Equipment DON’T continue to operate the equipment if you are in This equipment has been designed and manufactured to meet international safety standards but, like any any doubt about it working normally, or if it isdamaged electrical equipment, care must be taken if you are to in any way-switch off, withdraw the mains plug and obtain the best results and safety is to be assured. - Page 23 Attention should be drawn to the environmental Laser Product aspects of battery disposal. This product is equipped with The mains plug should not be obstructed or should be low power laser easily accessed during intended use. equipment. Caution: The ventilation should not be impeded by covering ...
-
Page 24: Battery Safety Guidelines
Battery Safety Guidelines Used correctly, domestic batteries are a safe and Never attempt to recharge ordinary dependable source of portable power. Problems can batteries, either in a occur if they are misused or abused — resulting in charger or by applying leakage or, in extreme cases, fire or explosion. -
Page 25: Pack Contents
Pack Contents Make sure all of the following contents are included. The Unit Speakers x 2 SOURCE DISPLAY Remote Control Speaker Cable x 2 PAIRING (battery included) FM Antenna Control Cable User Manual Audio L/R Cable x 1 Instruction Manual ENGLISH... -
Page 26: Product Overview
Product Overview The CD Player 1. Standby Button 2. Clock Button 3. Mode Button 4. USB Jack 5. Indicator 6. Remote Sensor 7. Display Panel 8. Disc Tray 9. Fast Forward Button ( Tuning Forward Button Reverse Button ( Tuning Backward Button Next Button ( AUX IN 1 AUX IN 2... -
Page 27: Remote Control Overview
Remote Control Overview 1. Standby Button 2. Disc Function Button 3. FM Button 4. Mode Button ( MODE ) 5. Intro Button ( INTRO ) SLEE P 6. Loudness Button ( LOUDNESS ) TIME R PRESET 7. Preset Equalizer Button ( P-EQ ) 8. -
Page 28: Installation Of Battery
Installation of Battery Remote Control Operation Range 1. Remove the insulating mylar strip from the battery. It is located at the bottom back side of the remote control. 30° 30° Max. 5 m 2. Loosen the screw on the battery compartment cover with a screwdriver. -
Page 29: Connecting The Speakers
Connecting the Speakers Connect the AUX IN 2 sockets on this unit to the audio output sockets on the auxiliary equipment as illustrated Connect the speaker cords between the terminals as below. shown below. The CD Player Connect the cable with a white head to the (-) terminals and cable with a red head to the (+) terminals. -
Page 30: Eco-Power/Standby Features
ECO-Power/Standby Features Powering ON/OFF • Setting the Clock Automatically When you insert the AC Power cable into a wall outlet, When the RDS station display the time, press and hold the unit will be in clock mode. the “display” button on the remote control, the clock will automatically sync time of RDS. -
Page 31: Listening To Radio Broadcasts
Listening to Radio Broadcasts To change the FM Reception Mode You can listen to FM stations. Stations can be tuned in manually, automatically or from preset memory storage. Press the Mode button to select the Stereo or Mono channel to receive the best FM reception mode. Caution: FM Display Modes Before listening to the radio, please check that the FM... -
Page 32: Cd Operation
CD Operation CD Playing 4. Press the PROG button to confirm the track number to be stored. 1. Rotate the SOURCE button on the unit or press the CD button on the remote control. The word “DISC” will 5. Repeat steps 3-4 to select and store all desired be displayed on the front panel. -
Page 33: Playing Repeatedly (Mp3 Disc)
1. Rotate the SOURCE button on the unit or press the First press : Select the start point, the words “A-” will CD button on the remote control. The word “DISC” will stay lit. be displayed on the front panel. Second press : Select the end point, the words “A-B”... -
Page 34: Play From Bluetooth Device
3. Search for other Bluetooth device with your device. 4. Press VOL +/– button on the remote 4. Select “VH-MS470BT” in the pairing list. control or on the front panel to set hour, and then press TIMER button again. 5. Enter default password “0000” if necessary. -
Page 35: Activate / Deactivate Alarm Timer
Activate / deactivate alarm timer If the surface is soiled (B) • Wipe gently with a soft, damp (water only) cloth. 1. In the standby mode, press TIMER button repeatedly. • When wiping discs, always move the cloth from the * If timer is activated, the icon is displayed. -
Page 36: Troubleshooting
Troubleshooting USB device not supported If you are having a problem with your unit, check this list for a possible solution before calling for service. • The USB device is incompatible with the unit. Try another one. If you cannot solve the problem from the hints given here, or the unit has been physically damaged, call a Poor radio reception qualified person, such as your dealer, for service. -
Page 37: Specifications
Specifications Unit Specification Power Requirements..............220 - 240 V ~ 50/60Hz FM Tuning Range................87.5~108 MHz Power Consumption..............28W (ECO Standby ≤ 0.5W) USB port..................5V , 500mA Output Power................45W x 2 THD....................≤1% Dimensions...................CD + Amplifier 160(W) x 15,6(H) x 27,5(D) cm Speaker Specification Impedance..................6Ω... - Page 40 www.vieta.es...