Table of Contents
Advertisement
Quick Links
GE Appliances
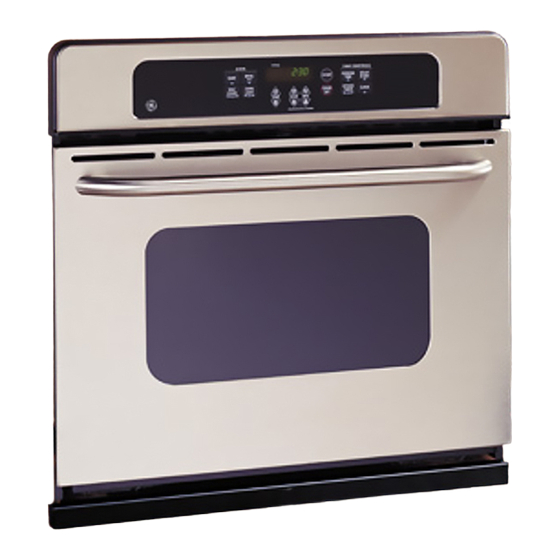
JTP25SH – GE
30" Built-In Single Oven
®
Dimensions (in inches)
Single Oven Wall-Mount or Cabinet Installation (in inches)
29-3/4
Conduit
(48-1/2"
28-1/4
long)
21
Allow minimum of 21'' for clearance
to adjacent corners, drawers, walls, or etc.
A=Allow 1" overlap of oven over top and bottom edges of cutout.
B=Allow 11/16"-3/4" for overlap of oven over side edges of cutout.
Specification Revised 2/06
320218
Cutout width
28-1/2'' MIN.
28-5/8'' MAX.
5
23-1/2'' MIN.
Cutout depth
Junction
box
location
A
B
22'' MIN.
27-1/4'' MIN.
27-5/16'' MAX.
Cutout height
Recommended
cutout location
32-1/2"
from floor
30
C L
Suitable
bracing
21-5/8"
to support
over centerline
runners
of cabinet
(Must Support 275 LBS.)
(Must support 275 lbs.)
Most 30" Wall Cabinets can be used with this unit.
Note: These ovens are not approved for stackable or side-by-side installations.
Note: Cabinets installed adjacent to wall ovens must have an adhesion spec
of at least a 194°F temperature rating.
Installation Information: Before installing, consult installation instructions packed
with product for current dimensional data.
Electric wall ovens are not approved for installation with a plug and receptacle.
They must be hard wired in accordance with installation instructions.
Listed by
Underwriters
R
Laboratories
KW Rating
240V
2 x 4 or
equivalent
208V
runners
Breaker Size
240V
208V
For answers to your Monogram,
GE Profile
®
GE
®
appliance questions, visit our website at
GEAppliances.com or call
GE Answer Center
service, 800.626.2000.
®
3.6
2.7
20 Amps
20 Amps
or
™
Advertisement
Table of Contents

Related Manuals for GEAppliances JTP25SH


Summary of Contents for GEAppliances JTP25SH
- Page 1 GE Appliances JTP25SH – GE 30" Built-In Single Oven ® Dimensions (in inches) Single Oven Wall-Mount or Cabinet Installation (in inches) Cutout width KW Rating 28-1/2'' MIN. 28-5/8'' MAX. 240V 2 x 4 or equivalent 208V runners 23-1/2'' MIN. Cutout depth...
- Page 2 GE Appliances JTP25SH – GE 30" Built-In Single Oven ® 30" Oven W/ Rad. Cktp. Optional Undercounter Installation Optional Undercounter Installation With with 36" Gas Cooktop (in inches) 30" CleanDesign or Sealed Burner Gas Cooktop (in inches) 3-1/4 1-1/2" Typical countertop Free space 2 (two) 90°elbows &...
- Page 3 GE Appliances JTP25SH – GE 30" Built-In Single Oven ® Features and Benefits • Self-Clean oven – Conveniently cleans oven cavity without the need for scrubbing. • Super large oven capacity – Provides the impressively large oven interior for cooking more dishes and large meals at one time.
-
Page 4: Installation Instructions
JTP20, JTP25, JTP28, JTP48, JTP50, JT912, Instructions JT915, JT952, JT955, ZET938, ZET958 If you have questions, call 1.800.GE.CARES or visit our website at: www.GEAppliances.com Before You Begin • Proper installation is the responsibility of the installer and product failure due to improper installation is NOT covered Read these instructions carefully and completely. -
Page 5: Important Safety Instructions
Installation Instructions IMPORTANT SAFETY INSTRUCTIONS For Your Safety Electrical Requirements • Be sure your oven is installed properly by a qualified installer or service technician. This appliance must be supplied with the • Be sure the oven is securely installed in a proper voltage and frequency, and connected cabinet that is firmly attached to the house to an individual, properly grounded branch... - Page 6 Installation Instructions Pre-Installation Checklist ALL INSTALLATION INFORMATION Door removal is not a requirement for ON THE FOLLOWING PAGES IS TO installation of the product, but is an BE USED FOR SINGLE AND DOUBLE added convenience. To remove the door: OVEN INSTALLATION! Open the oven door as far as it will go.
- Page 7 Installation Instructions Pre-Installation Checklist cont. Place the oven on a table or platform Remove the bottom trim from the top even with the cutout opening. of the oven. It will be installed at the (Platform must support 150 lbs. single, end of the installation process.
- Page 8 Installation Instructions Cutout for Single Built-In Oven Cutout Cabinet Width 30” CUTOUT Width 5” 5" WIDTH 28 1/2” Min. 28 1/2" MIN. Recommended 28 5/8” Max. 28 5/8" MAX. Minimum JUNCTION BOX Junction Box Cutout Location LOCATION Location from Floor 32 1/2”...
- Page 9 Installation Instructions Cutout for Double Built-In Oven Cutout Cabinet Width 30” CUTOUT Width WIDTH 5” 28 1/2” Min. 5" 28 1/2" MIN. Recommended 28 5/8” Max. 28 5/8" MAX. Minimum Junction Box JUNCTION BOX Cutout Location Location LOCATION from Floor 12”...
-
Page 10: Cutout For Single Built-In Oven Under Counter
Installation Instructions Cutout for Single Built-In Oven Under Counter Gas or electric cooktops may be installed over this Gas or electric cooktops may oven. See cooktop installation be installed over this oven. See cooktop installation instructions for cutout size. instructions for cutout size. Gas and electrical connections See label on top of oven for See label on top of oven for... -
Page 11: Attention Installer
Installation Instructions Electrical Connections Turn off the circuit breaker or remove ATTENTION INSTALLER fuses to the oven branch circuit. All electric wall ovens must be hard wired With the oven supported on a table or (direct wired) into an approved junction platform in front of the cabinet opening, box. - Page 12 Installation Instructions Electrical Connections cont. B3 New Construction and B4 Three-Conductor Branch Four-Conductor Branch Circuit Connection Circuit Connection When connecting to a three-conductor branch circuit, if local codes permit: • When installing in new construction, or a. Connect the bare oven ground conductor •...
-
Page 13: Securing The Oven In The Opening
Installation Instructions Securing the Oven in the Opening Sliding the Oven Into the Drilling the Pilot Holes and Opening Mounting the Oven a. Loop (do not tie) a 36” string around the conduit before the oven is slid into place. NOTE: Before drilling the pilot holes, This will keep the conduit from falling make sure the oven is pushed as far... - Page 14 Installation Instructions To install a single metal bottom trim assembly (on some models), use sections C3 and C4. To install a metal bottom trim with a plastic bottom trim (on some models), use sections C3–C5. Preparing for the Bottom Installing the Plastic Bottom Trim Installation Trim (on some models)
-
Page 15: Replacing The Oven Door
Installation Instructions Replacing the Oven Door Open the oven door as far as it NOTE: The oven door is heavy. You will open. may need help lifting the door high enough to slide it into the hinge slots. Push the hinge locks up against the Do not lift the door by the handle. -
Page 16: Operation Checklist
Installation Instructions Pre-Test Checklist Remove all protective film, if present, Check that the bottom trim is installed and any stickers. properly (see page 11). Check to be sure that all wiring is Check to be sure the mounting screws secure and not pinched or in contact are installed and flush with the side trim with moving parts. - Page 17 NOTES...
- Page 18 NOTES...
- Page 19 NOTES...