Table of Contents
Advertisement
Quick Links
A A s s s s e e m m b b l l y y M M a a n n u u a a l l
Specifications:
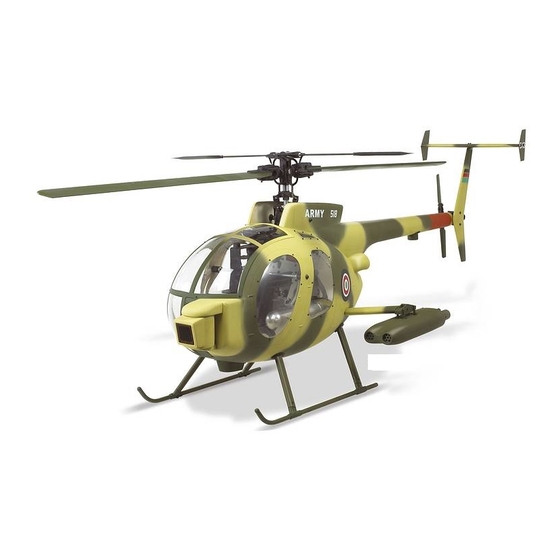
Fuselage Length (less rotor): 56" (1425mm)
Fueslage Width (less rotor): 23.5"(595mm)
Full Equipped Weight: 13~13.5 lbs (5900~6100g)
Hughes 500 MD Scale Fiberglass Fuselage (TTR3834)
Distributed in North America by Ace Hobby Distributors, Inc. • 2055 Main Street, Irvine, CA 92614
www.acehobby.com
Telephone: 949.833.0088 •
• E-mail: service@acehobby.com
Warranty
This kit is guaranteed to be free from defects in material and workmanship at the date of purchase. It
does not cover any damage caused by use or modification. The warranty does not extend beyond the
product itself and is limited only to the original cost of the kit. By the act of building this user-assembled
kit, the user accepts all resulting in liability for damage caused by the final product. If the buyer is not
prepared to accept this liability, it can be returned new and unused to the place of purchase for a refund.
Notice: Adult Supervision Required
This is not a toy. Assembly and flying of this product requires adult supervision.
Read through this book completely and become familiar with the assembly and flight of this MD-500.
Inspect all parts for completeness and damage. If you encounter any problems, call us for help.
JK6001
1
Advertisement
Table of Contents

Related Manuals for THUNDER TIGER MD500


Summary of Contents for THUNDER TIGER MD500
- Page 1 A A s s s s e e m m b b l l y y M M a a n n u u a a l l Specifications: Fuselage Length (less rotor): 56" (1425mm) Fueslage Width (less rotor): 23.5"(595mm) Full Equipped Weight: 13~13.5 lbs (5900~6100g) Hughes 500 MD Scale Fiberglass Fuselage (TTR3834) Distributed in North America by Ace Hobby Distributors, Inc.
-
Page 2: Table Of Contents
INTRODUCTION Congratulations on the purchase of one of our finest scale heli fuselage to date. This famous Hughes MD 500 (Military Defender), used as an antitank, multi-mission helicopter. Flown extensively during the Vietnam War Era performing multiple missions under extreme conditions. The venerable MD 500 has been replicated to exhibits this attack helicopters' sleek details.The light fuselage comes factory pre-painted with all necessary hardware. -
Page 3: Recommended Tools & Materials
RECOMMENDED TOOLS & MATERIALS ITEMS YOU MAY NEED Adhesives: Instant setting Cyanoacrylate adhesive (thin CA) Slow setting Cyanoacrylate adhesive (thick CA) 10 Minute Epoxy (fast) 20-30 Minute Epoxy (slow) Tools: Model knife, 1/2” MASK tape Small screwdrivers, medium screwdrivers TTR1115 - Precision Fueler Valve Scissors Long nose pliers and diagonal cutting pliers Drill and drill bits (1/16", 5/64") -
Page 4: Parts Drawings
PARTS DRAWINGS... -
Page 6: Parts Check List
PARTS CHECK LIST Kit Contents: Missile Set Left Front Window (1) Fuselage Right Rear Window (1) Wing (L,1) Fuselage (1) Left Rear Window (1) Wing (R, 1) Missile Sight (1) Right Top Window (1) Missile Pod (2) Round Plywood (S,2) Left Top Window (1) Pod Retainer (L,1) Round Plywood (L,2) -
Page 7: Assembly
Assembly Locate four Round Plywood pieces, glue the same sized pieces together as shown. Note the orientation of the wing tip and trail making sure it can fit two Wings in the wing mount. Ascertain the two wings are at same dihedral angles and the trailing/leading edge of two wings are in line with each other. -
Page 8: Strut
Repeat the same procedure on the other wing, make sure the two wings are at same dihedral angles. If you see from the top the trailing/ leading edge should be in line with each other. Fit the wing in place again, drill two 5/64"(2mm) holes through the wing mount to the wing from the inside of the fuselage. - Page 9 Assemble the Landing Skid as shown. Temporarily install the Brace under the side frame. Adjust the Landing Skid as shown and make sure it sits on the table firmly. Secure the Joiner & Skid Pipe with the furnished 3x3mm Set Screws.
-
Page 10: Fiberglass
Secure the Aluminum Strut and Brace with 2.6x14mm Trial sit on the landing skid assembly. For Raptor owner, Socket Screws. Hint: Install the left Aluminum Strut position the Front Windshield in place and check if the Assembly and Brace first ( Left side is the side of the ball links on aileron servo horn contacts the front fuselage with Optical Missile Sight). -
Page 11: Vertical
move freely. Push the sponged tube into the fuselage tail and make sure there is no binding of the pushrod movement and the heli sit on the landing brace just right. Glue the sponge inside the fuselage tail with CA. Note: do not glue sponge and tail boom in case you had to remove the heli from fuselage. -
Page 12: Silicon
Remove the damper temporarily and insert the Silicon Grommet from the inside fuselage then re-install the Trial fit the Horizontal Tail onto the vertical fin, note that damper again. Note the bigger diameter side should be flat surface should be facing up and the other side with facing the Damper. - Page 13 Locate the Joiner and insert it into the pod retainer, next Locate the FLIR and place it at the center of the tail trial fit the missile pod assembly onto the wing. Make sure section either at the top or bottom. Drill four 1/16" two missile pod are angled just right, if not then trim it (1.5mm) mounting holes and secure the FLIR with four until it will.
-
Page 14: Test Flight
Test Flight 1. When hovering you MD, try to keep rotor speed at approximately 1350~1400 RPM. The higher RPM will cause vibration at the small tip fins. 2. Check the helicopter and fuselage to see if there is any loose screw after each flight. -
Page 15: Memo
MEMO... - Page 16 RAPTOR 90 SE. Designed and engineered by the world-renowned F3C champion Mr. Shigetada Taya. Thanks to all the feedbacks provided by Raptor owners and customers worldwide, Thunder Tiger heli design team has successfully combined today's advanced technologies with previously successful designs, R90 SE is the machine that everyone has ever dreamed of.