
Related Manuals for AMERITECH AM100

Summary of Contents for AMERITECH AM100
- Page 1 User's Manual AM100 N7527-3V1 Rev B 4/99...
- Page 2 – 2 –...
-
Page 3: Table Of Contents
TABLE OF CONTENTS SYSTEM OVERVIEW ............ 4 USING DEVICE COMMANDS........24 General ..............4 PAGING FEATURE ............25 Zones ................. 4 USING THE KEYSWITCH ..........26 Burglary Protection ..........5 General ..............26 Security Codes............5 Arming/Disarming ..........26 Fire Protection ............5 SECURITY CODES ............27 Alarms .............. -
Page 4: System Overview
SYSTEM OVERVIEW General Congratulations on your ownership of an Ameritech Security System. You've made a wise decision in choosing it, for it represents the latest in security protection technology today. This system offers you three forms of protection: burglary, fire and emergency. -
Page 5: Burglary Protection
SYSTEM OVERVIEW (cont’d) Burglary Your system provides three modes of burglary protection: HOME, AWAY, and Protection INSTANT, and allows you to BYPASS selected zones while leaving the rest of the system armed. You must turn on or "arm" the burglary protection portion of your system before it will sense burglary alarms. -
Page 6: Alarms
SYSTEM OVERVIEW (cont’d) Alarms When an alarm occurs, both the keypad and external sounders will sound, and the keypad will display the zone(s) causing the alarm. If your system is connected to a central monitoring station, an alarm message will also be sent. To stop the alarm sounding, simply disarm the system. -
Page 7: Entry/Exit Delays
ENTRY/EXIT DELAYS General Your system has preset time delays, known as exit delay and entry delay. Information Whenever you arm your system, exit delay gives you time to leave through the designated exit door without setting off an alarm. Exit delay begins immediately after entering any arming command, and applies to all modes of arming protection. -
Page 8: Exit Alarms
ENTRY/EXIT DELAYS (cont’d) Exit Alarms Whenever you arm the system, the exit delay begins. If an entry/exit door or interior zone is faulted when the exit delay ends (e.g., exit door left open), the system sounds an alarm and starts the entry delay timer. If you disarm the system before the entry delay ends, the To minimize false alarm sound stops and the message "CANCELLED ALARM"... -
Page 9: About The Keypads
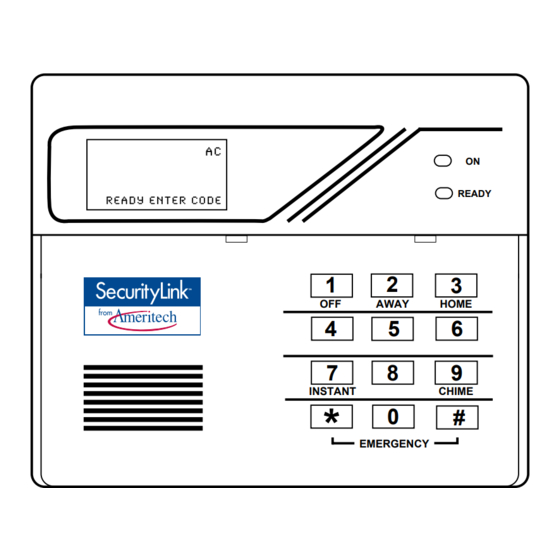
ABOUT THE KEYPADS Your keypads allow you to control all system functions. The keypads feature a General telephone style (digital) keypad and a Liquid Crystal Display (LCD) which shows I M P O R T A N T : If the the nature and location of all occurrences. - Page 10 READY READY ON AWAY AWAY HOME AWAY HOME ON HOME ON INSTANT INSTANT CHIME INSTANT CHIME EMERGENCY EMERGENCY AM6128 AM6139 FIXED-WORD KEYPAD ALPHA KEYPAD – –...
- Page 11 ABOUT THE KEYPADS (cont’d) Fixed-Word Keypad Displays AWAY: All burglary zones, interior and perimeter, are armed. HOME: Perimeter burglary zones, such as protected windows & doors, are armed. ON AWAY NO AC Perimeter burglary zones armed and entry delay is INSTANT: ON HOME CHIME...
-
Page 12: Functions Of The Keypads
FUNCTIONS OF THE KEYPADS ALPHA DISPLAY WINDOW: 2-line Liquid Crystal KEY: Permits ARMING of the system without use of Display (LCD). Displays protection point identification a security code (‘Quick Arm”). and system status, messages, and user instructions. KEYS 0-9: Used to enter your individual security access KEY: Disarms the burglary portion of the system, code(s). - Page 13 POWER/READY INDICATOR: On keypads with a “POWER” LED, primary power is on when lit. If off, system is operating on backup battery power. On keypads with a “READY” LED, system is ready to be armed if lit, while unlit indicates system is not ready (a zone is open).
-
Page 14: Checking For Open Zones
CHECKING FOR OPEN ZONES Using the Before arming your system, all protected doors, windows and other protection zones must be closed or bypassed (see BYPASSING section). Otherwise the keypad will display a "Not Ready" message. Using the [ ] key will display all zones that are faulted, making it easier for you to secure any open zones. -
Page 15: Arming Perimeter Only (Home)
ARMING PERIMETER ONLY (With Entry Delay ON) Use this key when you are staying home, but might expect someone to use the Using the entrance door later. HOME When armed in HOME mode, the system will sound an alarm if a protected door or window is opened, but you may otherwise move freely throughout the premises. -
Page 16: Arming Perimeter Only (Instant)
ARMING PERIMETER ONLY (cont’d) (With Entry Delay OFF) Use this key when you are staying home and do not expect anyone to use the Using the entrance door. INSTANT When armed in INSTANT mode, the system will sound an alarm if a protected door or window is opened, but you may otherwise move freely throughout the premises. -
Page 17: Arming All Protection (Away)
ARMING ALL PROTECTION (With Entry Delay ON) Use this key when no one will be staying on the premises. Using the When armed in AWAY mode, the system will sound an alarm if a protected door AWAY or window is opened, or if any movement is detected inside the premises. You may leave through the entrance door during the exit delay period without causing an alarm. -
Page 18: Disarming And Silencing Alarms
DISARMING AND SILENCING ALARMS Using the Use the OFF key to disarm the system and to silence alarm and trouble sounds. See "SUMMARY OF AUDIBLE NOTIFICATION" section for information which will help you to distinguish between FIRE and BURGLARY alarm sounds. IMPORTANT: If you return and the main burglary sounder is on, DO NOT enter the premises, but call the police from a nearby safe location. -
Page 19: Memory Of Alarm
DISARMING AND SILENCING ALARMS (cont’d) If an alarm occurs, the keypad displays the zone number (s) that caused the alarm Memory of Alarm and the type of alarm. These messages remain displayed until cleared by a user. To clear the display, note the zone number displayed and enter an OFF sequence (enter your security code and press the key). -
Page 20: Bypassing Protection Zones
BYPASSING PROTECTION ZONES This key is used when you want to arm your system with one or more zones Using the intentionally unprotected. Bypassed zones are unprotected and will not cause an alarm when violated while your system is armed. All bypasses are removed when an OFF sequence (security code plus OFF is performed. -
Page 21: Quick Bypass
BYPASSING PROTECTION ZONES (cont’d) Quick Bypass Your system may allow you to easily bypass all open (faulted) zones without having to enter zone numbers individually. Ask your installer if this feature is active. 6] KEY ENTER SECURITY CODE THEN PRESS [ (Security Code) Example: 7 2 9 6 then press the key. -
Page 22: Chime Mode
CHIME MODE Your system can be set to alert you to the opening of a door or window * while it is Using the 9 disarmed by using CHIME mode. When activated, three beeps will sound at the CHIME keypad whenever a protected perimeter door or window is opened. Pressing the key will display the open protection points. -
Page 23: Panic Keys
PANIC KEYS (FOR MANUALLY ACTIVATING SILENT AND/OR AUDIBLE ALARMS) Using Panic Your system may have been programmed to use special keys to manually activate panic Keys functions. The functions that might be programmed are listed below. See your installer for the function(s) that may have been programmed for your system. -
Page 24: Using Device Commands
USING DEVICE COMMANDS General Your system may be set up so that certain lights or other devices can be turned on Information or off by using the device command from the keypad. Ask your installer if this has been done in your system. If programmed for your system, some devices may activate automatically upon certain system conditions. -
Page 25: Paging Feature
PAGING FEATURE General If the paging feature has been programmed for your system, your pager will respond to certain conditions as they occur in your system. This message appears in a 7-digit format explained below. You can also send up to 16 additional digits that may consist of pin numbers, messages, reminders, etc. -
Page 26: Using The Keyswitch
USING THE KEYSWITCH General Your system is equipped with a keyswitch for use when arming and disarming. A red and green light on the keyswitch plate indicate the status of your system as follows: Green Light: This indicator lights when the system is disarmed and ready to be armed (no open zones). -
Page 27: Security Codes
SECURITY CODES General As an additional safety feature, other users who do not have a need to know your Information code can be assigned different security codes. These secondary users are identified by "user numbers," which are selected when assigning a user's security code. You can assign up to 14 additional user codes (user numbers 03-16), including the babysitter and duress codes. -
Page 28: To Add Or Change A User
SECURITY CODES (cont’d) To Add a User or Important: Temporary users of the system (e.g., babysitter, cleaning staff) should not be Change a User's shown how to use any system function they do not need to know, such as bypassing protection Code zones for example. -
Page 29: Testing The System
TESTING THE SYSTEM (TO BE CONDUCTED WEEKLY) Using the key puts your system into a test mode, which allows each protection point to be checked for proper operation. The keypad sounds a single beep every 40 seconds as a reminder that the system is in this test mode. Note: An alarm message will not be sent to your alarm monitoring company during the following tests. - Page 30 TESTING THE SYSTEM (cont’d) Walk in front of any interior motion detectors (if used) and listen for three beeps. The identification of the detector should appear on the display when it is activated. The display will clear when no motion is detected.
-
Page 31: Trouble Conditions
TROUBLE CONDITIONS The word CHECK on the Keypad's display, accompanied by a rapid "beeping" at Typical "Check" Displays the Keypad, indicates that there is a trouble condition in the system. The displays in parenthesis may appear on non-alpha keypads when the associated trouble condition is present. - Page 32 TROUBLE CONDITIONS (cont’d) 3. COMM. FAILURE (or FC) Indicates that a failure has occurred in the telephone *The beeping that communication portion of your system. CALL FOR accompanies a low SERVICE IMMEDIATELY. battery display (items 4 and 5) 4. SYSTEM LO BAT Indicates that a low system battery condition exists, can be stopped by (or BAT with no zone No.)
-
Page 33: Fire Alarm System
FIRE ALARM SYSTEM (IF INSTALLED) General Your fire alarm system (if installed) is active 24 hours a day, providing continuous protection. In the event of an emergency, the installed smoke and heat detectors will automatically activate you security system, triggering a loud, interrupted sound from the Keypad. -
Page 34: Nfpa Recommendations
NATIONAL FIRE PROTECTION ASSN. RECOMMENDATIONS ON SMOKE DETECTORS With regard to the number and placement of smoke/heat detectors, we subscribe to the recommendations contained in the National Fire Protection Association's (NFPA) Standard #74 as follows: Early warning fire detection is best achieved by the installation of fire detection equipment in all rooms and areas of the household as follows: A smoke detector installed outside of each separate sleeping area, in the immediate vicinity of the bedrooms and on each additional story of the family living unit, including basements and excluding crawl spaces... -
Page 35: Emergency Evacuation
EMERGENCY EVACUATION Establish and regularly practice a plan of escape in the event of fire. The following steps are recommended by the National Fire Protection Association: 1. Position your detector or your interior and/or exterior sounders so that they can be heard by all occupants. 2. -
Page 36: Maintaining Your System
MAINTAINING YOUR SYSTEM Taking Care of The components of your security system are designed to be as maintenance-free as Your System possible. However, to make sure that your system is in reliable working condition. 1. Test your system weekly. 2. Test your system after any alarm occurs (see TESTING THE SYSTEM) Replacing Each wireless sensor in your system has a 9-volt or 3-volt battery. - Page 37 MAINTAINING YOUR SYSTEM (cont’d) Silencing Low You can silence the keypad’s warning tones by pressing the key, but the Battery Warning Tones at the keypad's low battery message display will remain on as a reminder that you have Keypad a low battery condition in one or more of your sensors. When you replace the weak battery with a fresh one, the sensor will send a "good battery"...
-
Page 38: Quick Guide To System Functions
QUICK GUIDE TO SYSTEM FUNCTIONS FUNCTION PROCEDURE COMMENTS Do this to view faulted zones when system not ready. Check Zones Press [ ] Arm System Press #, then Do this to arm the system in the mode selected. Press arming key desired (AWAY, HOME, INSTANT) Enter code Do this to disarm the system and silences alarms. - Page 39 QUICK GUIDE TO SYSTEM FUNCTIONS (cont’d) FUNCTION PROCEDURE COMMENTS Enter master code Do this to add or change a user code. Add or Change Press [8] key a User Enter user's 2-digit user No. Enter code for that user Enter master code Do this to delete a user code from the system.
-
Page 40: Summary Of Audible Notification
SUMMARY OF AUDIBLE NOTIFICATION (ALPHA DISPLAY KEYPADS) SOUND CAUSE DISPLAY FIRE ALARM FIRE is displayed; descriptor of zone in alarm is displayed. LOUD, INTERRUPTED* Keypad & External LOUD, CONTINUOUS BURGLARY/AUDIBLE ALARM is displayed; descriptor of zone in alarm is also displayed. Keypad &... -
Page 41: Glossary
GLOSSARY The following terms are used throughout the manual. ARM/DISARM: "Armed" simply means that the burglary portion of your system is turned ON and is in a state of readiness. "Disarmed" means that the burglary system is turned OFF, and must be rearmed to become operational. However, even in a "disarmed" state, "emergency"... - Page 42 UL NOTICE: This is a "GRADE A" system. FEDERAL COMMUNICATIONS COMMISSION (FCC) Part 15 STATEMENT This equipment has been tested to FCC requirements and has been found acceptable for use. The FCC requires the following statement for your information: This equipment generates and uses radio frequency energy and if not installed and used properly, that is, in strict accordance with the manufacturer's instructions, may cause interference to radio and television reception.
- Page 43 FEDERAL COMMUNICATIONS COMMISSION (FCC) Part 68 NOTICE This equipment complies with Part 68 of the FCC rules. On the front cover of this equipment is a label that contains, among other information, the FCC registration number and ringer equivalence number (REN) for this equipment.
- Page 44 WARNING! THE LIMITATIONS OF THIS ALARM SYSTEM While this system is an advanced design security system, it does not offer guaranteed protection against burglary or fire or other emergency. Any alarm system, whether commercial or residential, is subject to compromise or failure to warn for a variety of reasons.
-
Page 45: Servicing Information
We continue to develop new and improved protection devices. Users of alarm systems owe it to themselves and their loved ones to learn about these developments. SERVICING INFORMATION Your local Ameritech dealer is the person best qualified to service your alarm system. Arranging some kind of regular service program with him is advisable. Your local Ameritech dealer is:... - Page 46 CANADIAN DEPARTMENT OF COMMUNICATIONS (DOC) STATEMENT NOTICE AVIS The Canadian Department of Communications label identifies certified L'étiquette du ministère des Communications du Canada identifie le equipment. This certification means that the equipment meets certain matériel homologué. Cette étiquette certifie que le matériel est conforme telecommunications network protective, operational and safety à...
-
Page 47: Insurance Credit Request Form
This form should be completed and forwarded to your homeowner's insurance carrier for possible premium credit. A. GENERAL INFORMATION: Insured's Name and Address: Insurance Company: Policy No.: AMERITECH’S VISTA 20AMT3 Other ________________________ Type of Alarm: Burglary Fire Both Installed by:... - Page 48 OWNER'S INSURANCE PREMIUM CREDIT REQUEST (cont.) E. SMOKE DETECTOR LOCATIONS Furnace Room Kitchen Bedrooms Attic Basement Living Room Dining Room Hall F. BURGLARY DETECTING DEVICE LOCATIONS: Front Door Basement Door Rear Door All Exterior Doors 1st Floor Windows All windows nterior locations All Accessible Openings, Including Skylights, Air Conditioners and Vents G.
- Page 49 NOTES – –...
-
Page 50: Index
– INDEX – 2-Line Alpha Keypad ...... 9 Emergency Evacuation ....35 Paging Feature ......6, 25 AC Loss .......... 32 Entry Delay ..... 7, 8, 11, 12 Panic Functions ......23 Add A User ........28 Exit Delay ..... 5, 7, 8, 15, 16, 17 Panic Keys........ - Page 51 ADEMCO ONE YEAR LIMITED WARRANTY Alarm Device Manufacturing Company, a Division of Pittway Corporation, and its divisions, subsidiaries and affiliates ("Seller"), 165 Eileen Way, Syosset, New York 11791, warrants its security equipment (the "product") to be free from defects in materials and workmanship for one year from date of original purchase, under normal use and service. Seller's obligation is limited to repairing or replacing, at its option, free of charge for parts, labor, or transportation, any product proven to be defective in materials or workmanship under normal use and ser vice.
- Page 52 Two Mid America Plaza Suite 200 Oakbrook Terrace, Illinois, 60181 àN7527-3V1&ä N7527-3V1 Rev B 4/99...