
Related Manuals for Ferroli LIFE


Summary of Contents for Ferroli LIFE
- Page 1 LIFE Climatizzatore per ambienti Domestic air conditioner MANUALE UTENTE USER MANUAL...
- Page 2 FERROLI S.p.A Dear Customer, Thank you for having purchased a FERROLI Idustrial coolers. It is the result of many years experience, particular research and has been made with top quality materials and higlly advanced technologies. The CE mark guaranteed thats the appliances meets European Machine Directive requirements regarding safety. The qualitative level is kept under constant surveillance.
-
Page 3: Table Of Contents
SOMMARIO CARATTERISTICHE GENERALI . . . . . . . . . . . . . . . . . . . . . . . . . . . . . . . . . . . . . . . . . . . . . . .4 PRESA IN CONSEGNA DELLA MACCHINA . -
Page 4: Caratteristiche Generali
CARATTERISTICHE GENERALI PRESA IN CONSEGNA DELLA MACCHINA Al momento della presa in consegna dell'unità è indispensabile controllare di aver ricevuto tutto il materiale indica- to sul documento d'accompagnamento, ed inoltre che la stessa non abbia subito danni durante il trasporto. In caso affermativo, far costatare allo spedizioniere l'entità... -
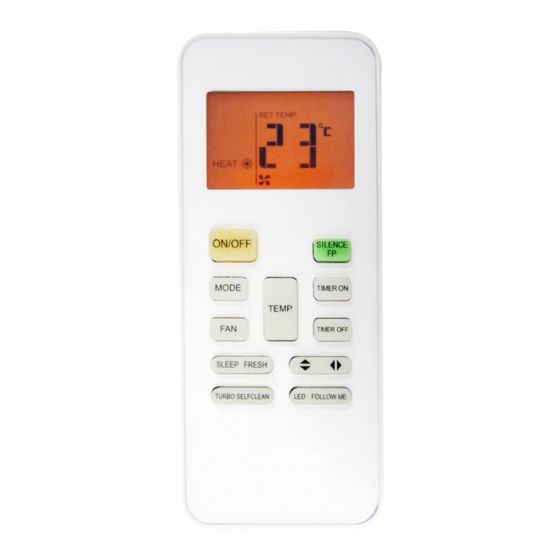
Page 5: Telecomando
CARATTERISTICHE GENERALI TELECOMANDO Il telecomando (Fig. 1) è composto da una serie di tasti e da un display che visualizza tutte le funzioni attive ed i vari parametri necessari all'utente ed all'installatore per un corretto utilizzo dell'unità stessa. Descrizione Tasti 1 . - Page 6 CARATTERISTICHE GENERALI Descrizione Display Fig. 1 1 . Icona accensione/spegnimento Viene visualizzata premendo il tasto “ON/OFF”. Premendo nuovamente l'icona scompare. 2 . Indicatore di trasmissione . L'indicatore di trasmissione si accende quando il telecomando trasmette il segnale all'unità interna. 3 . Visualizzazione modalità Area del display in cui è indicata la modalità operativa corrente: auto ( ), cool ( ), dry (...
-
Page 7: Messa In Funzione
MESSA IN FUNZIONE CONSIGLI PER L'UTILIZZO DEL TELECOMANDO Per un corretto utilizzo del telecomando ricordare quanto segue: 1 . Rimuovere la batteria se non viene usato per un lungo periodo. 2 . Quando si utilizza, indirizzarlo verso il ricevitore di segnale dell'unità interna (1). 3 . -
Page 8: Accensione Del Condizionatore
MESSA IN FUNZIONE ACCENSIONE DEL CONDIZIONATORE Fig. 3 Per accendere il condizionatore, premere il pulsante di ON/OFF (Fig. 3). La luce-spia verde del condizionatore si accenderà, indicando che è stato avviato. Tenete presente che il visualizzatore a cristalli liquidi indicherà sempre l'ultimo modo di funzionamento e le funzioni precedentemente usate. - Page 9 MESSA IN FUNZIONE Altre modalità di funzionamento Fig. 1 Alcune delle modalità selezionate vengono indicate nel display mentre altre vengono solo recepite dall’unità senza alcuna indicazione. 1 .Funzionamento SILENCE (part .1 Fig .3) In tale funzionamento viene forzata al minimo, compatibilmente con altre condizioni di funzionamento, la velocità...
-
Page 10: Visualizzazione Errori
MESSA IN FUNZIONE VISUALIZZAZIONE ERRORI Fig. 2 Nel caso insorgesse una condizione di errore durante il fun- zionamento dell’unità, tale condizione sarà visualizzata sul display da un codice che identifica il numero del sistema che ha causato l’errore. Per interpretare i codici di errore, utilizzare la tabella sottostante. -
Page 11: Funzionamento Auto
MESSA IN FUNZIONE FUNZIONAMENTO AUTO Durante il funzionamento AUTO, l’unità seleziona automaticamente HEAT, FAN, COOL in base alla temperatura ambiente. Attivazione della modalità AUTO: Prima selezionare sul telecomando la modalità AUTO mediante il tasto MODE. Selezionare quindi la tempera- tura di set point desiderata. La modalità di funzionamento dipenderà dalla differenza, positiva o negativa tra la temperatura impostata e la temperatura ambiente. -
Page 12: Impostazione Del Timer
MESSA IN FUNZIONE IMPOSTAZIONE DEL TIMER Fig. 1 Premere il tasto “TIMER ON” per impostare l'ora di accensione automatica dell'unità. Premere il tasto “TIMER OFF” per impostare l'ora di spegnimento automatico dell'unità. Impostazione dell'ora di accensione automatica 1 . Premere il tasto “TIMER” . Nell'apposita area di visualizzazione dello schermo “LCD” viene visualizzato “TI- MER ON”... -
Page 13: Funzione Timer
MESSA IN FUNZIONE FUNZIONE TIMER “TIMER ON” (funzionamento con accensione automatica) La funzione “TIMER ON” è utile, ad esempio, quando si desidera che l'unità si accenda automaticamente prima che si rientri in casa. Il condizionatore entrerà automaticamente in funzione all'ora impo- stata. -
Page 14: Indicatori Led Unita' Interna
Start Stop MESSA IN FUNZIONE 2 hours later 10 hours later after setting after setting TIMER COMBINATO (Impostazione simultanea dei timer di accensione e di spegnimento) “TIMER ON” → “TIMER OFF” (Spento → Avvio → Interruzione del funzionamento) Questa funzione è utile, ad esempio, quando si desidera mettere in funzione il condizionatore al mattino prima di alzarsi e spegnerlo una volta usciti di casa. -
Page 15: Funzione Auto-Restart
MESSA IN FUNZIONE FUNZIONE AUTO-RESTART L’unità è programmata per accendersi automaticamente in caso di interruzione di corrente elettrica. SPEGNIMENTO E MESSA A RIPOSO Per spegnere il condizionatore basta premere il tasto di "ON/OFF" sul telecomando. Appena acceso o quando viene spento e riacceso, il compressore del condizionatore non inizia a funzionare immediatamente ma dopo tre minuti, al fine di proteggere il sistema. -
Page 16: Sicurezza Ed Inquinamento
SICUREZZA ED INQUINAMENTO CONSIDERAZIONI GENERALI La macchina è stata progettata in modo da ridurre al minimo i rischi per le persone e l'ambiente nel quale essa viene installata. Pertanto per eliminare i rischi residui ai quali si va incontro è opportuno conoscere il più possibile della stessa per non incorrere in incidenti che potrebbero causare danni a persone e/o cose. -
Page 17: Norme Di Sicurezza
NORME DI SICUREZZA Le norme sottoindicate vanno seguite attentamente per evitare danni all'operatore e alla macchina. • L’istallazione della macchina deve essere eseguita secondo le norme di impiantistica nazionale. • Il presente manuale dell'installatore, il manuale dell'utente e gli schemi elettrici sono parte integrante della macchina. - Page 18 La ditta costruttrice declina ogni responsabilità per le inesattezze contenute nel presente, se dovute ad errori di stampa o di trascrizioni. The manufacturer declines all responsibility for any inaccuracies in this manual due to printing or typing errors.
- Page 19 SUMMARY GENERAL SPECIFICATIONS . . . . . . . . . . . . . . . . . . . . . . . . . . . . . . . . . . . . . . . . . . . . . . . . . . . 4 CONSIGNMENT OF THE MACHINE .
-
Page 20: General Specifications
GENERAL SPECIFICATIONS CONSIGNMENT OF THE MACHINE As soon as the machine is consigned, it is essential for the user to make sure that he has received all the items indicated on the consignment note and that the machine has not been damaged during transport. If damage is discovered, allow the forwarding agent to ascertain its entity and also inform our seller. -
Page 21: Remote Control
GENERAL SPECIFICATIONS REMOTE CONTROL The remote control (Fig. 1) has a series of keys and a display which visualizes all the activated functions and the various parameters the user and installer need in order to correctly use the unit itself. Button description 1 . - Page 22 GENERAL SPECIFICATIONS Indicators on LCD Fig. 1 1 . ON/OFF display Displayed by pressing the ON/OFF button. Press the ON/OFF button again to remove If present this icon indicates that you have set the power-up. 2 . Transmission Indicator . This transmission indicator lights when remote controller transmits signals to the indoor unit.
-
Page 23: Starting
STARTING ADVICE ON HOW TO USE THE REMOTE CONTROL Comply with the following instructions to correctly use the remote control: 1 . Remove the battery if the remote control is not going to be used for a long period of time. 2 . -
Page 24: Powering The Air Conditioner
STARTING POWERING THE AIR CONDITIONER Fig. 3 Press the ON/OFF button (Fig. 3) to power the air conditioner. The indicator light of the conditioner will come on to indicate that it has started. Re- member that the liquid crystal display will always indicate the last operating mode and previously used functions. - Page 25 STARTING Other operations mode Fig. 1 Some of the selected modes are indicated in the display while others are only implemented by the unit without any indication. 1 .SILENCE function (part.1 Fig.3) In this operation the indoor fan speed is forced to the minimum speed compatible with other operating conditions.
-
Page 26: Failure Display
STARTING FAILURE DISPLAY Fig. 2 When there is failure in the unit operation the code of failure will be displayed. The following table describes the error messages represented by the code displayed on the Indoor Display. It should be noted that some error codes are spe- cific only in conjunction with unit single Split or Multi-Split On the indoor LED display... -
Page 27: Auto Mode
STARTING AUTO MODE During the AUTO mode, the unit automatically selects HEAT, FAN, COOL based on the ambient temperature AUTO mode activation: First select the AUTO on the remote control using the MODE key. Then select the desired set point temperature. The mode of operation will depend on the difference, positive or negative, between the set temperature and the ambient temperature. -
Page 28: Timer Setting
STARTING TIMER SETTING Fig. 1 Press the TIMER ON key once to select the time when the air conditioner comes on. Press the TIMER OFF key once to select the time at which the air conditioner must switch off. Setting auto-start Press the TIMER ON button can set the auto-on time of the unit. -
Page 29: Timer Function
STARTING TIMER FUNCTION “TIMER ON” (Auto-on Operation) The TIMER ON feature is useful when you want the unit to turn on automatically before you return home. The air conditioner will auto- matically start operating at the set time. To start the air conditioner in 6 hours. -
Page 30: Led Indicator Indoor Unit
Start Stop STARTING 2 hours later 10 hours later after setting after setting TIMER ON TIMER OFF (Off Start Stop operation) This feature is useful when you want to start the air conditioner before you wake up and stop it after you leave the house. To start the air conditioner 2 hours after setting, and stop it 5 hours after setting. -
Page 31: Auto-Restart Function
STARTING Auto-restart function The unit is programmed to switch on automatically in the event of a power failure. SWITCHING OFF AND SHUT DOWN To switch off the conditioner, press the "ON/OFF" button on the remote control. As soon as it is switched on, or when it is switched off and back on again, the compressor does not start working immediately but waits three mi- nutes in order to protect the system. -
Page 32: Safety And Pollution
SAFETY AND POLLUTION GENERAL CONSIDERATIONS The machine has been designed to reduce risks to persons and to the environment in which it is installed, to the minimum. To eliminate residual hazards, it is therefore advisable to become as familiar as possible with the machine in order to avoid accidents that could cause injuries to persons and/or damage to the machine. -
Page 33: Safety Regulations
SAFETY REGULATIONS Strictly comply with the following regulations to prevent injury to the operator or damage to the machine. • The unit installation must be done according to the installation rules valid in your country. • This installer's handbook, the user manual and the wiring diagrams are integral part of the machine. They must be kept with care and be ready to hand should the operators require them for consultation. - Page 35 NOTE...
- Page 36 Ferroli spa ¬ 37047 San Bonifacio (Verona) Italy ¬ Via Ritonda 78/A tel. +39.045.6139411 ¬ fax +39.045.6100933 ¬ www.ferroli.it...