Canon ScanFront 300 Instructions Manual
Hide thumbs
Also See for ScanFront 300:
- Instructions manual (193 pages) ,
- Specification (2 pages) ,
- Operation manual (100 pages)

Related Manuals for Canon ScanFront 300


Summary of Contents for Canon ScanFront 300
- Page 1 ScanFront 300/300P/330 INSTRUCTIONS Please read this manual before using the scanner. After you finish reading this manual, keep it in a safe place for future reference.
- Page 2 Under factory default settings, the scanner will enter Low Canon U.S.A. Inc. Power mode after 12 minutes of inactivity. Although you can One Canon Park, Melville, NY 11747, U.S.A. change the period of time before the scanner enters Low Tel. No. (800)652-2666 Power mode to up to 230 minutes, we recommend using the default setting.
- Page 3 ELECTRONICS INC. UNDER THIS WARRANTY IS • Canon and the Canon logo are registered trademarks of LIMITED TO THE PURCHASE PRICE OF THE Canon Inc. in the United States and may also be trademarks PRODUCT COVERED BY THE WARRANTY. or registered trademarks in other countries.
- Page 4 Copyright derived from the RSA Data Security, Inc. MD5 Message- libtiff Digest Algorithm Copyright (c) 1988-1996 Sam Leffler Copyright (c) 1998 - 2002, Paul Johnston & Contributors Copyright (c) 1991-1996 Silicon Graphics, Inc. All rights reserved. Permission to use, copy, modify, distribute, and sell this Redistribution and use in source and binary forms, with or software and its documentation for any purpose is hereby without modification, are permitted provided that the...
- Page 5 Copyright (c) 1991-2, RSA Data Security, Inc. Created 1991. Opera® or Opera Software™ are registered trademarks of All rights reserved. Opera Software ASA in Norway or other countries. License to copy and use this software is granted provided that it is identified as the “RSA Data Security, Inc. MD5 Message- Digest Algorithm”...
- Page 6 REPRESENTATION OR WARRANTY OF ANY KIND from this software without prior written permission. For CONCERNING THE MERCHANTABILITY written permission, please contact openssl- OF THIS SOFTWARE OR ITS FITNESS FOR ANY core@openssl.org. PARTICULAR PURPOSE. 5. Products derived from this software may not be called 2.
- Page 7 Copyright (C) 1995-1998 Eric Young (eay@cryptsoft.com) "This product includes cryptographic software written by All rights reserved. Eric Young (eay@cryptsoft.com)" The word 'cryptographic' can be left out if the rouines [SIC] This package is an SSL implementation written by Eric from the library being used are not cryptographic related Young (eay@cryptsoft.com).
- Page 8 Copyright 2013 by CANON ELECTRONICS INC. All rights reserved. No part of this publication may be reproduced or transmitted in any form or by any means, electronic or mechanical, including photocopying and recording, or by any information storage or retrieval system without the prior written...
- Page 9 The ScanFront 300/300P/330 is a network scanner that you can use without connecting to a computer. You can transfer the data of an image scanned with the ScanFront 300/300P/330 to a shared folder on a server PC or client PC on the network or to an FTP server*, send it to a printer for printing**, or deliver it to a remote location via e-mail or Internet fax service.
- Page 10 About ScanFront 330 Web Application Mode The ScanFront 330 is equipped with not only an operation mode called Standard Mode that allows you to scan without connecting to a computer just like with the ScanFront 300P but also an operation mode called Web Application Mode, and you can use the scanner in either of these modes.* With Web Application Mode, the Web application for operating the ScanFront is installed on the server**, and you can access the Web application on the server and operate the ScanFront from the browser installed on the ScanFront.
-
Page 11: Manuals For The Scanner
❏ Symbols Used in This Manual The following manuals are provided with the Canon The following symbols are used in this manual to explain ScanFront 300/300P/330. Be sure to read these manuals procedures, restrictions, handling precautions, and thoroughly before using the scanner. -
Page 12: How This Manual Is Organized
❏ How This Manual is Organized Chapter 9 Maintenance This chapter describes how to clean the scanner and This manual consists of the following chapters. replace the consumable parts such as rollers. Chapter 1 Before Use Chapter 10 Troubleshooting This chapter provides an overview of the ScanFront. This chapter describes how to respond when problems occur or warning messages appear. -
Page 13: Table Of Contents
(ScanFront 300P only).......... 1-5 Connecting the Network Cable......3-3 Disposal..............1-5 2. Turning the Power ON and OFF ...... 3-4 2. Features of the ScanFront 300/300P/330 ..1-6 Turning the Power ON.......... 3-4 ScanFront 300/300P/330........1-6 Turning the Power OFF ........3-4 ScanFront 300P/330.......... - Page 14 3. ScanFront Service Setup .........4-6 9. Scan/Delivery Options........5-27 ScanFront Settings ..........4-6 Scan Settings ............. 5-28 Changing the Port Number Used for File Formats............5-32 Communication............. 4-6 Security Settings for PDF Files......5-33 Delivery Options ..........5-34 Chapter 5 Operating Procedures Chapter 6 Web Menu (Administrator Mode) 1.
- Page 15 8. System Settings ..........6-39 Chapter 9 Maintenance Backup and Restore ........... 6-40 1. Routine Cleaning..........9-2 Module Version Information/Update ....6-41 Cleaning the Scanner Unit........9-2 Log Settings............6-42 Cleaning the Touch Panel ........9-2 Screenshot ............6-43 Cleaning the Fingerprint Sensor (ScanFront 300P) ..........
- Page 16 Moving the Scanner ..........1-3 Handling ..............1-3 About the Fingerprint Sensor (ScanFront 300P only) ..........1-5 Disposal ..............1-5 2. Features of the ScanFront 300/300P/330..1-6 ScanFront 300/300P/330 ........1-6 ScanFront 300P/330 ..........1-7 ScanFront 300P ............1-8 ScanFront 330............1-8 3. Names and Functions of Parts ......1-9 Front and Document Feed and Eject Trays ..1-9...
-
Page 17: Important Safety Instructions
Chapter 1 Before Use Important Safety Instructions To ensure the safe operation of this scanner, be sure to read the safety warnings and precautions described below. ❏ Installation Location ● Avoid exposing the scanner to rapid changes in temperature. If the room in which the scanner is The performance of this scanner is affected by the installed is cold but rapidly heated, water droplets environment in which it is installed. -
Page 18: Moving The Scanner
When connecting ● If you have any questions regarding the power the power cord, make sure that the power plug is supply, contact your local authorized Canon dealer securely and completely inserted into the power or service representative for further information. - Page 19 Then, contact your local authorized Canon dealer ■ Leave sufficient space around the power plug so or service representative to have the unit serviced.
-
Page 20: About The Fingerprint Sensor (Scanfront 300P Only)
Chapter 1 Before Use ❏ About the Fingerprint Sensor ❏ Disposal (ScanFront 300P only) ● Prior to disposing of the scanner, initialize the ● The following actions may damage the sensor or scanner to ensure that the registered data is deleted. -
Page 21: Features Of The Scanfront 300/300P/330
Chapter 1 Before Use Features of the ScanFront 300/300P/330 The main features of the ScanFront 300/300P/330 are described below. ❏ ScanFront 300/300P/330 ● Fast Document Feeding The scanner can scan a maximum of 30 Legal/A4 ● Compact Network Document Scanner documents per minute. -
Page 22: Scanfront 300P/330
Chapter 1 Before Use ● Supports Mouse and Keyboard ● Deskew In addition to touch-panel operation, you can also use a If the scanner detects from a scanned image that the mouse and keyboard to operate the scanner. (See document was fed askew, the image is straightened. ●... -
Page 23: Scanfront 300P
Chapter 1 Before Use ❏ ScanFront 300P ● Fingerprint Authentication The authentication system that uses a fingerprint sensor to authenticate users enables you to log in to the ScanFront 300P without entering your user name and password. ❏ ScanFront 330 ●... -
Page 24: Names And Functions Of Parts
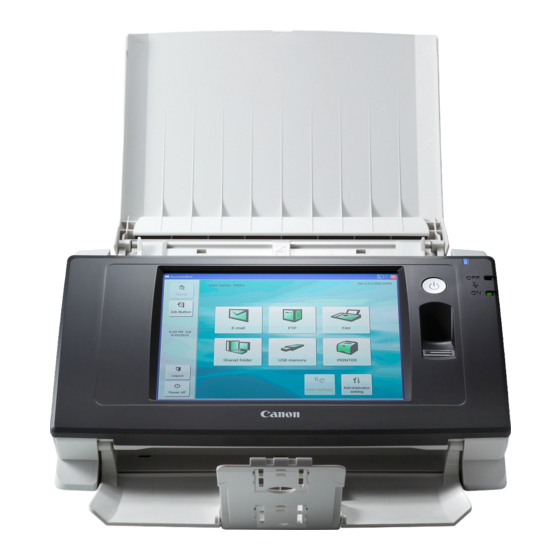
Chapter 1 Before Use Names and Functions of Parts The names and functions of the parts of the ScanFront are shown below. ❏ Front and Document Feed and Eject Trays c Panel Unit Open this when there is a paper jam or to perform maintenance. -
Page 25: Side And Rear
Chapter 1 Before Use ❏ Side and Rear m USB Port (Rear Left) Connect a USB1.1/Hi-Speed USB2.0 compatible USB memory device, USB keyboard, or USB mouse. n Power Connector (24 VDC) Connect the plug of the supplied AC adapter. (See p. 3-3.) o Kensington Slot This is an anti-theft slot that enables a key chain or lock to be connected to prevent theft. -
Page 26: Network Environment
Chapter 1 Before Use Network Environment The network environment required to use the ScanFront is described below. To obtain details on your network environment, contact your network administrator. ❏ Network Environment ● Fax Scanned images can be sent to specified addresses as ●... -
Page 27: Limitations
Chapter 1 Before Use ❏ Limitations ● Limitations for Network Environments without ScanFront Service To send image files to destinations and devices, such as the following, the supplied ScanFront Service software must be installed on a computer on the same network as the ScanFront scanner. -
Page 28: Chapter 2 Handling
Chapter 2 Handling 1. Documents............2-2 Plain Paper............2-2 Business Card............2-2 Card ..............2-3 2. Preparing the Scanner........2-4 Preparing the Document Feed Tray and Eject Tray ..............2-4 Feed Selection Lever ..........2-5 USB Port ...............2-5 3. Placing Documents.......... 2-6 Placing a Document ..........2-6 Placing a Folded Document ........2-7 Placing a Long Document ........2-7 Placing a Card............2-8... -
Page 29: Documents
Chapter 2 Handling Documents The ScanFront can scan documents in a range of sizes from business cards to Legal/A4. It is possible to feed documents of the following sizes and thicknesses depending on the feeding method used. ❏ Plain Paper •... -
Page 30: Card
Chapter 2 Handling ❏ Card Size 2.12" × 3.37" (53.9 × 85.5 mm) (Conforming to ISO Standards) Thickness 0.0299" (0.76 mm) and below Insertion orientation Landscape IMPORTANT • Insert cards one at a time. • Be careful when inserting cards to avoid damaging them. -
Page 31: Preparing The Scanner
Chapter 2 Handling Preparing the Scanner When placing a document in the scanner, pull out the document eject tray so that it matches the size of the document, and then move the feed selection lever to the appropriate position for the desired feed method (Page Separation ON or OFF) for the document. ❏... -
Page 32: Feed Selection Lever
Chapter 2 Handling ❏ Feed Selection Lever ❏ USB Port Change the position of the lever to the desired feed method You can insert a USB memory device to store image files. for the document. Page Separation ON Move the lever downward to separate a stack of documents one page at a time in order to continuously feed the documents. -
Page 33: Placing Documents
Chapter 2 Handling Placing Documents When placing documents into the scanner, place them face down into the tray with the top edge of the document at the bottom of tray. ❏ Placing a Document Place the document face down with its top edge at the bottom of the tray. -
Page 34: Placing A Folded Document
Chapter 2 Handling IMPORTANT IMPORTANT Make sure that document stacks placed in the feed tray do not • When folding the document, align the right and left sides and exceed the document guides. create a sharp, straight fold. Otherwise the document may jam or the image may not be aligned properly. -
Page 35: Placing A Card
Chapter 2 Handling ❏ Placing a Card CAUTION When you want to scan a card, follow the procedure below • A card placed into the document feed tray in the portrait to place the card. orientation may not be output properly because a load is placed on it during feeding. -
Page 36: Clearing A Paper Jam Or Double Feed Error
Chapter 2 Handling Clearing a Paper Jam or Double Feed Error When a paper jam or double feed error is detected, feeding and scanning stops. Check the displayed message. If a paper jam or double feed error is detected in the middle If a paper jam or double feed error is detected at the first of a document, the following messages appear. - Page 37 Chapter 2 Handling Pull out the jammed document in the direction that IMPORTANT seems the easiest to remove it. When the message above is displayed and the scanner transitions to Low Power Mode, all of the data scanned up until that point is discarded.
-
Page 38: Fingerprint Sensor (Scanfront 300P)
Chapter 2 Handling Fingerprint Sensor (ScanFront 300P) The ScanFront 300P is equipped with a fingerprint sensor for registering fingerprints and authenticating users. The fingerprint sensor is a precision component. Be careful when handling this sensor. ❏ Cautions for Handling the Fingerprint ●... -
Page 39: Fingerprint Authentication
Chapter 2 Handling ❏ Fingerprint Authentication ● Authentication performance may improve if the condition of the fingerprint is improved as a result ● Follow the procedure below to use fingerprint of washing your hands or applying hand cream. registration and authentication. ●... -
Page 40: Chapter 3 Scanfront Setup
Chapter 3 ScanFront Setup 1. Before Setting Up the Scanner ......3-2 Installation Location ..........3-2 Connecting the AC Adapter ........3-3 Connecting the Network Cable ......3-3 2. Turning the Power ON and OFF...... 3-4 Turning the Power ON ..........3-4 Turning the Power OFF.........3-4 3. -
Page 41: Before Setting Up The Scanner
Chapter 3 ScanFront Setup Before Setting Up the Scanner Before setting up the scanner, you need to move it to the installation site, and connect the AC adaptor and network cable. ❏ Installation Location ● Avoid exposing the scanner to rapid changes in temperature. -
Page 42: Connecting The Ac Adapter
Chapter 3 ScanFront Setup ❏ Connecting the AC Adapter Follow the procedure shown below to connect the AC adapter. CAUTION Make sure to use only the AC adapter and power cord included with the scanner. The shape of the power plug varies by country and region. -
Page 43: Turning The Power On And Off
Chapter 3 ScanFront Setup Turning the Power ON and OFF Use the power switch to turn the scanner ON, and press the [Power off] button on the touch panel to turn it OFF. ❏ Turning the Power ON ❏ Turning the Power OFF Press the power switch to turn the scanner ON. -
Page 44: Configuring The Scanner Settings
Chapter 3 ScanFront Setup Configuring the Scanner Settings The scanner setup consists of configuring the initial network settings from the [Administrator setting] screen, and then configuring the settings needed to use the scanner as described in Chapter 6 “Web Menu (Administrator Mode)”. -
Page 45: Web Menu (Administrator Mode)
Chapter 3 ScanFront Setup ❏ Web Menu (Administrator Mode) The following setting items are available from the Web Menu (Administrator Mode). For details, see Chapter 6 “Web Menu (Administrator Mode)”. Hint From the Web Menu (User Mode), which is available to all users, the configuration of some functions is restricted. Web Menu Web Menu Setting Item... - Page 46 Chapter 3 ScanFront Setup Web Menu Web Menu Setting Item Description (Administrator Mode) (User Mode) Register the mail server, address book server and Server Settings authorization server. E-mail Server / Fax Register the SMTP server to be used for sending e- (See p.
-
Page 47: Configuring Administrator Settings
Chapter 3 ScanFront Setup Configuring Administrator Settings Enter the administrator password and log in to configure administrator settings. ❏ Logging In to the Administrator Settings Select the setting item to configure. Follow the procedure below to configure the [Device name] and [IP address] needed to connect the scanner to a network. -
Page 48: Network Settings
Chapter 3 ScanFront Setup ❏ Network Settings Under Network Settings, configure the device name and IP address needed to connect the scanner to a network. ❏ Administrator Password Set the password required to log in to [Administrator setting] and the Web Menu (Administrator Mode). IMPORTANT •... -
Page 49: Backup/Restore Setting Information
Chapter 3 ScanFront Setup ❏ Backup/Restore Setting Information Hint Back up/restore setting information using a shared folder • Scanner setting information can be backed up to a folder on a on the network or USB memory device at the following USB memory device if the device is inserted when [Backup / Restore all settings] is pressed. -
Page 50: Roller Counter Reset
Chapter 3 ScanFront Setup ❏ Roller Counter Reset When submitting the ScanFront for repairs Before you submit the ScanFront for repairs, initialize the Reset the counter after replacing the feed roller when the ScanFront to protect the saved user information. scanner no longer feeds properly. -
Page 51: Display Language Setting
Chapter 3 ScanFront Setup ❏ Display Language Setting ❏ Switch to Web Application Mode (from Standard Mode of ScanFront 330 Only) You can select the language displayed on touch panel. If you change this setting, restart the scanner. Switch to Web Application Mode when using the ScanFront 330 in Standard Mode. -
Page 52: Chapter 4 Scanfront Service
Chapter 4 ScanFront Service 1. About ScanFront Service......... 4-2 2. Installing ScanFront Service ......4-3 System Requirements...........4-3 Installation .............4-3 3. ScanFront Service Setup......... 4-6 ScanFront Settings..........4-6 Changing the Port Number Used for Communication .............4-6... -
Page 53: About Scanfront Service
Chapter 4 ScanFront Service About ScanFront Service ScanFront Service is software that supplements the network functions of the ScanFront. To use this software, install it on a computer connected to the same network as the ScanFront. (The computer on which ScanFront Service is installed will be herein referred to as the “ScanFront Service Server”.) By configuring a ScanFront Service Server, you can send scanned images to locations on the network, such as the... -
Page 54: Installing Scanfront Service
Chapter 4 ScanFront Service Installing ScanFront Service ❏ System Requirements Click [Next]. Install ScanFront Service on a computer that is connected to the same network as the ScanFront, and that meets the following requirements. Operating System ● Windows XP (32 bit/64 bit) ●... - Page 55 Chapter 4 ScanFront Service Click [Next]. A screen for specifying whether to start the service A screen for entering account information appears. immediately appears. Enter the account information, and click [Next]. Specify [Execute now] if you want to start the service Use an administrator account on the computer on which immediately, or [Execute later] if you want to start the the service will be installed.
- Page 56 Chapter 4 ScanFront Service Click [Install]. Installation starts. When installation is complete, a screen indicating that installation is complete appears. Click [Close]. Notes on Installing ScanFront Service • ScanFront Service creates log files during operations. As a result, these log files and the install destination folder will not be deleted, even after ScanFront Service is uninstalled.
-
Page 57: Scanfront Service Setup
If port number 50000 is already in use, for example, and you want to use a different port number for communication with the ScanFront, modify the following ini file before specifying the new port number. Folder: C:\Program Files\Canon Electronics Inc\ScanFront Service\etc File name: ScanFront.ini Area to be modified: Replace the port number that appears in “port=50000”... - Page 58 Chapter 5 Operating Procedures 1. Flow of Scanner Operations ......5-2 7. Scanning Procedures........5-13 2. Turning the Power ON and OFF ......5-3 Scanning From the Home Screen ...... 5-13 Turning the Power ON.......... 5-3 Scanning From the Job Button Screen....5-14 Address Selection Screen ........
-
Page 59: Flow Of Scanner Operations
Chapter 5 Operating Procedures Flow of Scanner Operations The procedure and screen transitions for the process from turning the scanner ON, to sending an image file are as follows. For descriptions of the various settings, refer to the appropriate reference pages. Turn the power ON (See p. -
Page 60: Turning The Power On And Off
Chapter 5 Operating Procedures Turning the Power ON and OFF Use the power switch to turn the scanner ON, and press the [Power off] button on the touch panel to turn it OFF. ❏ Turning the Power ON ❏ Turning the Power OFF Press the power switch to turn the scanner ON. -
Page 61: Login Screen
Chapter 5 Operating Procedures Login Screen The login screen appears at the startup when the scanner is turned ON. ❏ Login Screen Types Hint There are two types of login screen: a list type login screen • Set the type of login screen from [Device Operation] of the for selecting from a list of registered users, and a key in Web menu (see p. -
Page 62: List Type Login
Chapter 5 Operating Procedures ❏ List Type Login Enter a password and then press [OK]. Use the procedure below to log in to the list type login screen. Select the user to log in as from the list, and then press [Next]. -
Page 63: Key In Type Login
Chapter 5 Operating Procedures ❏ Key in Type Login Press [Login] to log in to the scanner. In the key in type login screen, enter your user name and password to log in. Press [User name] ([Password]). The Home screen (or Job Button screen) appears. The keyboard screen appears. -
Page 64: Fingerprint Authentication (Only Available With The Scanfront 300P)
Chapter 5 Operating Procedures ❏ Fingerprint Authentication (Only The Home screen (or Job Button screen) appears if the fingerprint is authenticated correctly. Available with the ScanFront 300P) Hint Use the procedure below for fingerprint authentication. For details on fingerprint registration, see “Fingerprint •... -
Page 65: Screen Displayed After Login
Chapter 5 Operating Procedures Screen Displayed after Login You can set the screen (Home screen or Job Button screen) that is displayed after a user logs in. (See p. 6-7 and p. 8-4.) ❏ Home Screen ❏ Job Button Screen This screen enables you to select a job button to scan using the conditions registered to the job button, and then send the image file. -
Page 66: User Settings Screen
Chapter 5 Operating Procedures User Settings Screen The User Settings screen enables you to edit the user password and register a fingerprint (only available with the ScanFront 300P). ❏ Fingerprint Registration Fingerprint registration is enabled when you are using the ScanFront 300P. -
Page 67: Fingerprint Registration (Only Available With The Scanfront 300P)
Chapter 5 Operating Procedures Fingerprint Registration (Only Available with the ScanFront 300P) Fingerprint authentication is a function for registering the fingerprints of users that will log in when the device authentication or server authentication method is used, and enables users to log in by authenticating their fingerprints. When fingerprint authentication is used, there is no need to select a user in the list type login screen or enter a user name and password in the key in type login screen. -
Page 68: Registering A Fingerprint
Chapter 5 Operating Procedures ❏ Registering a Fingerprint Scan your fingerprint. Repeat scanning until the same fingerprint has been Register a fingerprint from the User Settings screen successfully scanned three times. accessed from the Home screen. IMPORTANT If the Home screen is not displayed, use of the Home screen has been restricted for the user by the ScanFront administrator. - Page 69 Chapter 5 Operating Procedures Perform an authentication test for the registered fingerprint by scanning your fingerprint. Press [Close] to end fingerprint registration. IMPORTANT If you want to change the registered fingerprint, start registration again from the beginning. 5-12...
-
Page 70: Scanning Procedures
Chapter 5 Operating Procedures Scanning Procedures You can perform scanning from the Home screen or the Job Button screen. ❏ Scanning From the Home Screen IMPORTANT Press a destination selection (E-mail, FTP, Fax, Shared If the network environment to which the ScanFront is connected folder, or USB memory) button to open an address is not running ScanFront Service, [Printer] is grayed out and cannot be selected. -
Page 71: Scanning From The Job Button Screen
Chapter 5 Operating Procedures ❏ Scanning From the Job Button Screen If you press a job button, the Scan/Delivery Options screen appears. Confirm the address and scanning settings registered to the job button and then start scanning. For details on the scanning procedure, read from the setting of scanning conditions in Step 5. -
Page 72: Address Selection Screen
Chapter 5 Operating Procedures ❏ Address Selection Screen From the address selection screen, you can select the address to send an image file and register addresses. a Address Book type • Each time you press an e-mail or group icon, the send condition changes (To, Cc, Bcc). - Page 73 Chapter 5 Operating Procedures h My E-mail address If “E-mail to my mailbox” is enabled in the user settings of the Web menu, the mail address of the logged in user is displayed. (See “User Settings” on p. 6-7.) When Sending to Fax Machines Directly Is Enabled If you are logged in as a user that has the “Permit to send to FAX directly”...
-
Page 74: Usb Memory Screen
Chapter 5 Operating Procedures ❏ USB Memory Screen The USB Memory screen enables you to specify the folder in the USB memory to save the image file. a Path c [Upward] button Enter the folder path of the USB memory. You can also Enables you to move to a higher level folder when a press [Downward] to select a folder. -
Page 75: Print Settings Screen
Chapter 5 Operating Procedures ❏ Print Settings Screen The print settings screen enables you to specify the printer, paper size, and other print settings. a Printer name e Copy number Select the printer that will be used to print the scanned Specify the number of copies to print. -
Page 76: Scanning
Chapter 5 Operating Procedures ❏ Scanning Press a displayed address to select it. A checkmark ( ) is added to the icon for the selected This section describes the procedure for scanning. address. Pressing a selected address again clears the If you want to save the image file to USB memory, specify selection. - Page 77 Chapter 5 Operating Procedures Press [Start] to start scanning. Scanning stops after the document has been scanned. Set the scan conditions. (See “Scan/Delivery Options” on p. 5-27.) IMPORTANT IMPORTANT • If [Send the files immediately after scanning] is set to [ON] in When you use a job button for scanning, the subsequent Delivery Options of the Scan/Delivery Options screen, procedure varies as follows in accordance with the job button...
- Page 78 Chapter 5 Operating Procedures Check the scanned images. Hint When the preview image is enlarged, you can drag your finger on the image to scroll. : Display the image of the next page. : Display the image of the previous page. : Move the viewing area around an image when an enlarged view of the image is shown.
- Page 79 Chapter 5 Operating Procedures Press [Send]. Confirm the address and press [OK] to send the scanned image. The address confirmation message appears. IMPORTANT If a send error message appears, check the address settings and send destination and try again. Returns to the screen set for [Screen after sending] in Delivery Options of the Scan/Delivery Options screen.
-
Page 80: Registering And Editing Addresses
Chapter 5 Operating Procedures Registering and Editing Addresses If an address to which you want to send an image file is not registered in the address book or the information of a registered address has not been updated, use the procedure below to register a new address or modify an address in the address book. ❏... - Page 81 Chapter 5 Operating Procedures 3. Press [Downward] to move to a level lower than the selected • User name/Password folder, or press [Edit] and [Create a new folder] to create a Enter the user name and password for logging in to the new folder.
-
Page 82: Modifying An Address
Chapter 5 Operating Procedures ❏ Modifying an Address Group Registration Screen Modify an address when there is a send error because the information of the transfer destination registered for the address is wrong or has been changed. Select the type of the address to modify and press [Details]. -
Page 83: Copying An Address
Chapter 5 Operating Procedures Modify the address. A confirmation message appears. Hint For details on editing items, see “Registering a New Address” on p. 5-23. ❏ Copying an Address You can copy addresses between My Address Book and Shared Address Book. Select the address book entry to copy. -
Page 84: Scan/Delivery Options
Chapter 5 Operating Procedures Scan/Delivery Options This section describes the scan settings and send settings for the scanner. g [Default] button Resets any modified settings to the default values of the scanner. IMPORTANT If you press [Default] in the Scan/Delivery Options screen opened from a job button, the settings are reset not to the setting values registered to the job button, but to the default values of the scanner. -
Page 85: Scan Settings
Chapter 5 Operating Procedures ❏ Scan Settings TIFF JPEG The scan settings include basic condition settings (page size, mode, resolution, scanning side, and brightness) and detailed settings for scanning. Basic Condition Settings Paper size Mode Resolution Scanning side • When [Text enhance] is selected, [Bleed-through reduction] in the Detailed Settings screen is grayed out and cannot be selected. - Page 86 • When using the ScanFront 300, the [Double feed detection by separately in the detailed settings and then perform scanning. Ultrasonic] setting is set to [OFF].
- Page 87 Chapter 5 Operating Procedures Deskew Hint • The initial value for the Skip Blank Page option is set to “90.” • As you lower the value from the default setting, pages of the document with text become more likely to be skipped as well. •...
- Page 88 Chapter 5 Operating Procedures The color drop-out function has a “drop-out” effect that Hint leaves out a specified color (red, blue, or green) while When using bleed-through reduction, adjust the bleed-through scanning, and a “color enhancement” effect that reduction level to match the type of document. emphasizes a specified color.
-
Page 89: File Formats
Chapter 5 Operating Procedures ❏ File Formats PDF format You can select from the three available file formats TIFF, JPEG, and PDF, and the modes available for scanning vary, depending on the file format setting. (See “Mode” on p. 5-28.) TIFF format Configure the following settings for saving in PDF format. -
Page 90: Security Settings For Pdf Files
Chapter 5 Operating Procedures ❏ Security Settings for PDF Files Use permissions password to restrict editing security settings Apply security to the PDF file. The following settings are restricted by the permissions password. • Printing allowed This permits printing of the PDF file with a printer. •... -
Page 91: Delivery Options
Chapter 5 Operating Procedures ❏ Delivery Options Action when the same named file exists Set the action to perform when there is already a file of the same name at the destination. • Display a message Display a message to confirm overwriting of the file. •... - Page 92 Chapter 5 Operating Procedures Screen after sending Select the screen to display after sending images. • Home screen (Job Button screen) Redisplay the Home screen (Job Button screen) after sending images. IMPORTANT • The [Screen after Login] setting that is set via the Web menu by the user applies to the Home screen (Job Button screen) setting.
-
Page 93: Chapter 6 Web Menu (Administrator Mode)
Chapter 6 Web Menu (Administrator Mode) 1. Web Menu Overview ........6-2 7. Server Settings..........6-33 2. Logging In to the Web Menu ......6-5 E-mail Server/Fax Settings......... 6-34 3. User Administration ..........6-6 Authentication Server ......... 6-35 Address Book Server.......... 6-36 Registering New Users......... 6-7 FTP server............ -
Page 94: Web Menu Overview
Chapter 6 Web Menu (Administrator Mode) Web Menu Overview The Web Menu function enables you to access and configure the scanner from the Web browser of a remote computer. It can be used to perform tasks such as user registration, basic network communication settings, and job button registration, as well as making scan settings. - Page 95 Chapter 6 Web Menu (Administrator Mode) The Web Menu features an Administrator Mode for configuring administrator settings and a User Mode for user access, from which the following settings can be configured. Administrator Mode a User Administration (See “User Administration” on e Server Settings (See “Server Settings”...
-
Page 96: User Mode
Chapter 6 Web Menu (Administrator Mode) User Mode For details on configuring the User Mode settings, see Chapter 8 “Web Menu (User Mode)”. a User Settings (See “User Settings” on p. 8-4.) Use to change the user settings. b Address Book Settings (See “Address Book Settings”... -
Page 97: Logging In To The Web Menu
Chapter 6 Web Menu (Administrator Mode) Logging In to the Web Menu You can log in to the Web Menu using the following procedure. IMPORTANT Use the device name or the IP address assigned to the scanner as the URL for accessing the Web Menu. For details on the device name and the IP address, see “Configuring Administrator Settings”... -
Page 98: User Administration
Chapter 6 Web Menu (Administrator Mode) User Administration From the User Administration screen, you can register and manage users and restrict the functions available to users. a [New User] button registered on the authentication server from the user list. Registers a new user. (See “Registering New Users”... -
Page 99: Registering New Users
Chapter 6 Web Menu (Administrator Mode) ❏ Registering New Users IMPORTANT Click [New User] to register a new user. • Users are not permitted to register and change e-mail addresses. Make sure e-mail addresses are registered and IMPORTANT changed by the administrator. •... - Page 100 Chapter 6 Web Menu (Administrator Mode) Job Button Screen Custom File Name Settings Specify the method in which file names used for saving scanned images are created. When you select to use custom file names during a scanning procedure, the image files will be saved under file names that are determined by the settings configured here.
- Page 101 Chapter 6 Web Menu (Administrator Mode) • Device name • User name Select the [Enable] check box to include the device name Select the [Enable] check box to include the user name in in the file name. the index file. You can change the default field name •...
-
Page 102: Restricting User Functions
Chapter 6 Web Menu (Administrator Mode) ❏ Restricting User Functions • Destination path Select the [Enable] check box to include the destination To restrict the functions available to a user, select the user path in the index file. You can change the default field and click [Functional Restriction]. -
Page 103: Editing Users
Chapter 6 Web Menu (Administrator Mode) ❏ Editing Users Restriction to Send Restricts the destinations to which the scanner can send You can change the settings of registered users. images. Deselect a destination to disable it. Ex.) When the destinations are restricted to shared folders only: Edit Enables you to edit a user’s settings. - Page 104 Chapter 6 Web Menu (Administrator Mode) By editing a user automatically registered by server authentication, you can set the user’s e-mail address in the user settings. Edit Address Book Enables you to register and edit entries in the user’s My Address Book.
-
Page 105: Exporting And Importing Users
Chapter 6 Web Menu (Administrator Mode) ❏ Exporting and Importing Users Select a processing method for importing the user settings file. You can back up your users as files, and import the backed • Replaces the whole data: Deletes the currently up user data to another ScanFront unit. -
Page 106: Address Book Settings
Chapter 6 Web Menu (Administrator Mode) Address Book Settings From the Address Book Settings screen, you can register entries in the Shared Address Book, which is available to all users. a Type of Address Book f [Select All] button Under normal conditions, you can only select the Shared Selects all of the displayed addresses. -
Page 107: Registering New Addresses
Chapter 6 Web Menu (Administrator Mode) ❏ Registering New Addresses Click [New Address] to register a new address. Hint • The number of addresses that can be registered to the Shared Address Book is up to 1000 in combination with the total number of addresses included in the Shared Job Button. - Page 108 Chapter 6 Web Menu (Administrator Mode) Passive Mode [Browse] button Uses passive mode to send transmissions to the FTP Shows a list of computers connected to the network for server. you to specify a shared folder. IMPORTANT Hint Use passive mode when normal communication with the FTP You can display the shared folders using the following server cannot be established.
- Page 109 Chapter 6 Web Menu (Administrator Mode) Save Password Address type: Group Select this check box to save the password to the address. This option registers several registered addresses together as a group. IMPORTANT If you do not save the password, password entry will be required Hint each time you send.
-
Page 110: Copying Addresses
Chapter 6 Web Menu (Administrator Mode) ❏ Copying Addresses Hint You can copy an address and register it as a new address. A duplicate address with the same name as the copy source is created. Hint • Use this function when you want to copy an address from the Shared Address Book and register it as a different address after changing some of the settings. - Page 111 Chapter 6 Web Menu (Administrator Mode) Click [Save], specify a save location, and save the Click [Execute]. address book data. Confirm the message that appears, and click [OK] to import the data. Hint • You can open the saved CSV file with software that supports CSV files such as spread sheet software in order to check the structure of the file.
-
Page 112: Job Button Settings
Chapter 6 Web Menu (Administrator Mode) Job Button Settings From the Job Button Settings screen, you can register the Shared Job Button, which is available to all users. a Job Button Type f [Except All] button You can only select Shared Job Button here. You can Deselects all of the displayed job buttons. -
Page 113: Registering New Job Buttons
Chapter 6 Web Menu (Administrator Mode) ❏ Registering New Job Buttons Address Click [New Job Button] to register a new job button. Job Button Settings Click [Add from Address Book], open the Address page, and select the address to send to. IMPORTANT •... -
Page 114: Scan Settings Overview
Chapter 6 Web Menu (Administrator Mode) Action when the same named file exists Index Settings Select the action to take when a file of the same name Specify whether to attach metadata (index files) to scanned exists at the destination. images. - Page 115 Chapter 6 Web Menu (Administrator Mode) Mode • When [Text enhance] is selected, [Bleed-through reduction] cannot be selected. Select the scanning mode (Black and White, Error Resolution (dpi) Diffusion, Text enhance, Gray, Color, Auto Color Detection). Select the scanning resolution (100, 150, 200, 300, 400, or When [Auto Color Detection] is selected, the scanner 600 dpi).
- Page 116 Chapter 6 Web Menu (Administrator Mode) Add Date to File name PDF: The scanner adds 17 digits that indicate the date and time Configure the settings for compression ratio, multi page, to the file name of the image to be sent. OCR (optical character recognition), and security.
- Page 117 Chapter 6 Web Menu (Administrator Mode) IMPORTANT IMPORTANT Take care not to forget the password once it is set. If you forget The [Double feed detection by Ultrasonic] setting only appears the password, the document can no longer be opened. when using the ScanFront 300P/330.
-
Page 118: Copying Job Buttons
Chapter 6 Web Menu (Administrator Mode) IMPORTANT Hint • Using the length of the first document page as a reference, the When using bleed-through reduction, adjust the bleed-through scanner detects a double feed when a subsequent page is reduction level to match the type of document. longer or shorter than the reference page by 1.38"... -
Page 119: Editing Jobs
Chapter 6 Web Menu (Administrator Mode) Click [OK] to copy the job button. Exporting from the Scanner You can save the job button settings file to a specified folder. Click [Export from ScanFront]. Hint A duplicate job button with the same name as the copy source is created. - Page 120 Chapter 6 Web Menu (Administrator Mode) Click [Execute]. Confirm the message that appears, and click [OK] to import the data. Hint When importing is completed, the following message appears. Click [OK] to return to Job Button Settings and confirm the imported job button.
-
Page 121: Device Configuration
Chapter 6 Web Menu (Administrator Mode) Device Configuration From the Device Configuration screen, you can configure the scanner settings. a Network Setting d Login Options Confirm or change the network settings of the scanner. Select the type of screen that appears when users log in. (See “Network Setting”... -
Page 122: Network Setting
Chapter 6 Web Menu (Administrator Mode) ❏ Network Setting ❏ Language/Timezone You can confirm the network settings configured under You can confirm or change the language and regional [Administrator setting] on the scanner. settings that appear on the scanner. Language on the device Set the language displayed on the touch panel. -
Page 123: Device Operation
Chapter 6 Web Menu (Administrator Mode) ❏ Device Operation ❏ Login Options You can configure the operation conditions of the scanner. You can set the type of user login screen that appears. Hint The login setting can also be changed under [Administrator setting] on the scanner. -
Page 124: Administrator Settings
Chapter 6 Web Menu (Administrator Mode) ❏ Administrator Settings You can set the password and e-mail address of the Administrator. Administrator Password Change the Administrator password. Administrator Address Register the Administrator e-mail address. IMPORTANT • The e-mail address of the Administrator is used as the originating address when a user without a registered e-mail address sends an e-mail message. -
Page 125: Server Settings
Chapter 6 Web Menu (Administrator Mode) Server Settings From the Server Settings screen, you can configure mail server settings for sending images via e-mail, and settings for accessing a network authentication server compatible with a directory service. IMPORTANT • You can simplify user administration on the scanner by using e-mail addresses registered on an LDAP server, or by logging in from user accounts that are registered on a domain server and are compatible with Active Directory or LDAP servers. -
Page 126: E-Mail Server/Fax Settings
Chapter 6 Web Menu (Administrator Mode) ❏ E-mail Server/Fax Settings IMPORTANT You can configure the mail server settings for sending e- If the destination mail server does not support divided mail messages and the fax server settings for sending attachments, it may not be possible to reconstitute a divided image file sent by the scanner. -
Page 127: Authentication Server
Chapter 6 Web Menu (Administrator Mode) If you enter the following substitution strings for these • For details on the use and configuration of an authorization server, consult your server administrator. settings, the strings will be replaced with the following strings when the fax is sent. -
Page 128: Address Book Server
Chapter 6 Web Menu (Administrator Mode) Port number • ScanFront Login Screen Enter the port number used for the LDAP protocol. The standard port number is 389. For SSL communication, the standard port number is 636. User name When using the authentication server as an address book server, enter a user name for referring e-mail addresses. -
Page 129: Ftp Server
Chapter 6 Web Menu (Administrator Mode) ❏ FTP server ❏ ScanFront Service Server You can use a function that transfers a scan result log along When a ScanFront Service Server (i.e., a computer on with an image file during transfer to the FTP server. When which ScanFront Service is installed) exists on the this function is enabled, a scan result log with the same file network, use this to specify the host name of the server and... - Page 130 Chapter 6 Web Menu (Administrator Mode) Click [Update]. Deleting a Certificate In the certificate list screen, select the check box at the beginning of the line of the certificate you want to delete, and then click [Delete]. 6-38...
-
Page 131: System Settings
ScanFront version. (See “Module Version Information/Update” on p. 6-41.) IMPORTANT For details on acquiring version update files, contact your dealer or a Canon service representative. c Log Settings Records usage statistics to a log file. (See “Log Settings” on p. 6-42.) -
Page 132: Backup And Restore
Chapter 6 Web Menu (Administrator Mode) ❏ Backup and Restore Specify a save location for the backup data, and save the backup data. You can backup or restore the scanner settings using the following procedure. Backup All Settings This option saves all the ScanFront settings to a specified folder. -
Page 133: Module Version Information/Update
If the scanner malfunctions, the version information is required when contacting support services. Acquiring Update Files For details on acquiring the update files needed to update the scanner, consult your dealer or a Canon service representative. Hint For ScanFront 330, only the update files of Standard Mode can be applied. -
Page 134: Log Settings
Chapter 6 Web Menu (Administrator Mode) ❏ Log Settings Click [Browse], and specify the update file to use. You can configure settings for log files. Hint • ScanFront Service is not used for log settings. • The log file is a text file in CSV format. You can view the Click [Version Up]. -
Page 135: Screenshot
Chapter 6 Web Menu (Administrator Mode) Hint The date and time that the log file was created are added to the entered file name. ❏ Screenshot Save the ScanFront screen display as a BMP file. Click [Execute] when the screen you want to save is displayed. - Page 136 Chapter 7 ScanFront Administration Tool 1. About ScanFront Administration Tool ....7-2 2. Installing ScanFront Administration Tool ..7-3 System Requirements...........7-3 Installation .............7-3 3. ScanFront Administration Tool Setup ....7-5 Starting ScanFront Administration Tool ....7-5 Registering ScanFront Scanners ......7-5 4. Managing the ScanFront Scanners ....7-6 Selecting a ScanFront...........7-6 Checking ScanFront Connections......7-6 Changing Passwords ..........7-6...
-
Page 137: About Scanfront Administration Tool
Chapter 7 ScanFront Administration Tool About ScanFront Administration Tool ScanFront Administration Tool is software that allows you to manage multiple ScanFront scanners at one time. To use this software, install it on a computer connected to the same network as the ScanFront scanners. The following operations can be performed for ScanFront scanners on the same network. -
Page 138: Installing Scanfront Administration Tool
Chapter 7 ScanFront Administration Tool Installing ScanFront Administration Tool ❏ System Requirements Click [Next]. Install ScanFront Administration Tool on a computer that is connected to the same network as the ScanFront scanners, and that meets the following requirements. Operating System ●... - Page 139 Chapter 7 ScanFront Administration Tool Click [Install]. Installation starts. When installation is complete, a screen indicating that installation is complete appears. Click [Finish].
-
Page 140: Scanfront Administration Tool Setup
Chapter 7 ScanFront Administration Tool ScanFront Administration Tool Setup ❏ Starting ScanFront Administration Tool Enter information for the ScanFront you want to register. Click the [Start] button, [All Programs], [ScanFront • Enter the IP address of the ScanFront in [IP address/ Administration Tool], and then [ScanFront Administration Device name]. -
Page 141: Managing The Scanfront Scanners
Chapter 7 ScanFront Administration Tool Managing the ScanFront Scanners You can change administrator passwords, check connections, and manage users for ScanFront scanners registered in ScanFront Administration Tool. ❏ Selecting a ScanFront ❏ Changing Passwords To manage a ScanFront scanner with ScanFront Select a check box at the far left of each row in the list, Administration Tool, select it in the ScanFront click the [Change Password] button to display the... -
Page 142: Changing Ip Addresses And Device Names
Chapter 7 ScanFront Administration Tool ❏ Changing IP Addresses and Device • To select a user for an operation, select the check box that appears at the far left of each row. Clicking [Select All] Names or [Except All] selects or clears all of the user check Double-click a ScanFront scanner in the list to display the boxes in the list, respectively. -
Page 143: Importing/Exporting Administration Data
Chapter 7 ScanFront Administration Tool [Export User Data] Save the user data of all selected ScanFront scanners to any location on the computer. [Version Up] Load ScanFront firmware stored on the computer, and update the firmware version of all selected ScanFront scanners. -
Page 144: Chapter 8 Web Menu (User Mode)
Chapter 8 Web Menu (User Mode) 1. Web Menu Overview ........8-2 2. Logging In to the Web Menu......8-3 3. User Settings ........... 8-4 User Settings............8-5 4. Address Book Settings ........8-9 Registering New Addresses........8-11 Copying Addresses ..........8-14 Exporting and Importing Address Books.....8-14 5. -
Page 145: Web Menu Overview
Chapter 8 Web Menu (User Mode) Web Menu Overview The Web Menu function enables you to access and configure the scanner from the Web browser of a remote computer. From the Web Menu, you can register address books and job buttons. Computer (Web Menu) Settings Network... -
Page 146: Logging In To The Web Menu
Chapter 8 Web Menu (User Mode) Logging In to the Web Menu You can log in to the Web Menu using the following procedure. Hint Use the device name or the IP address assigned to the scanner as the URL for accessing the Web Menu. Contact the ScanFront administrator for the device name and the IP address. -
Page 147: User Settings
Chapter 8 Web Menu (User Mode) User Settings From the User Settings screen, you can change the information of a user logged in by Device Authentication. a Setting (See “User Settings” on p. 8-4) Allows you to edit a user’s settings. -
Page 148: User Settings
Chapter 8 Web Menu (User Mode) ❏ User Settings • E-mail address may not be registered for a user logged in by Server Authentication. For details on e-mail address Click [Setting] to edit the user information. settings, consult the ScanFront administrator. •... - Page 149 Chapter 8 Web Menu (User Mode) • Default Address Book screen IMPORTANT Select “My Address Book” or “Shared Address Book” The following characters cannot be used to set the custom file for the address book type when the address selection name: screen is displayed from the Home screen.
- Page 150 Chapter 8 Web Menu (User Mode) Index Settings • Date Specify the content of index files (metadata) that are Select the [Enable] check box to include the date in the index file, and select a format for the date in the [Format] attached to scanned image files.
- Page 151 Chapter 8 Web Menu (User Mode) [OK] button Updates the user information with the changed settings.
-
Page 152: Address Book Settings
Chapter 8 Web Menu (User Mode) Address Book Settings From the Address Book Settings screen, you can register entries in the Shared Address Book, which is available to all users, and the My Address Book, which is provided for each user. a Type of Address Book f [Select All] button Selects the address book (Shared Address Book or My... - Page 153 Chapter 8 Web Menu (User Mode) IMPORTANT If the ScanFront administrator has restricted editing of the address books, the following Address Book settings apply. For details, consult the ScanFront administrator. • If editing is restricted for only one address book (either the My Address Book or the Shared Address Book), users can only copy addresses from the restricted address book and paste them into the unrestricted address book.
-
Page 154: Registering New Addresses
Chapter 8 Web Menu (User Mode) ❏ Registering New Addresses Address type: FTP Server This option registers a network FTP server. Select the type of address book (Shared Address Book or My Address Book), and click [New Address] to register a IMPORTANT new address. - Page 155 Chapter 8 Web Menu (User Mode) Save Password [Browse] button Saves the entered password. Shows a list of computers connected to the network for you to specify a shared folder. Passive Mode Uses passive mode to send transmissions to the FTP Hint server.
- Page 156 Chapter 8 Web Menu (User Mode) Save Password Address type: Group Select this check box to save the password to the address. This option registers several registered addresses together as a group. IMPORTANT If you do not save the password, password entry will be required Hint each time you send.
-
Page 157: Copying Addresses
Chapter 8 Web Menu (User Mode) ❏ Copying Addresses ❏ Exporting and Importing Address Books You can copy an address and register it as a new address. You can back up your address books as files in CSV You can also copy an address from one address book to format, and import the backed up address book data to another. - Page 158 Chapter 8 Web Menu (User Mode) Importing to the Scanner You can import previously exported address book data to the scanner. Click [Import to ScanFront]. Click [Browse] and specify a previously exported address book settings file. Select a processing method for importing the address book settings file.
-
Page 159: Job Button Settings
Chapter 8 Web Menu (User Mode) Job Button Settings From the Job Button Settings screen, you can register the Shared Job Button, which is available to all users, and the My Job Button, which is provided for each user. a Job Button Type f [Except All] button Select the job button (Shared Job Button or My Job Deselects all of the displayed job buttons. - Page 160 Chapter 8 Web Menu (User Mode) IMPORTANT If the ScanFront administrator has restricted editing of the job buttons, the following Job Button settings apply. For details, consult the ScanFront administrator. • If editing is restricted for only one set of job buttons (either the My Job Button or the Shared Job Button), users can copy job buttons from the restricted set of job buttons and paste them into the unrestricted set.
-
Page 161: Registering New Job Buttons
Chapter 8 Web Menu (User Mode) ❏ Registering New Job Buttons Address Click [New Job Button] to register a new job button. Job Button Settings Click [Add from Address Book], open the Address page, and select the address to send to. IMPORTANT •... -
Page 162: Scan Settings Overview
Chapter 8 Web Menu (User Mode) Action when the same named file exists Index Settings Select the action to take when a file of the same name Specify whether to attach metadata (index files) to scanned exists at the destination. images. - Page 163 Chapter 8 Web Menu (User Mode) Mode • When [Text enhance] is selected, [Bleed-through reduction] cannot be selected. Select the scanning mode (Black and White, Error Resolution (dpi) Diffusion, Text enhance, Gray, Color, Auto Color Detection). Select the scanning resolution (100, 150, 200, 300, 400, or When [Auto Color Detection] is selected, the scanner 600 dpi).
- Page 164 Chapter 8 Web Menu (User Mode) Add Date to File name PDF: The scanner adds 17 digits that indicate the date and time Configure the settings for compression ratio, multi page, to the file name of the image to be sent. OCR (optical character recognition), and security.
- Page 165 Chapter 8 Web Menu (User Mode) Protect Permission Brightness (Back) Permissions for printing and editing the PDF file are Enabled for duplex scanning. Use this option when the protected by a password. front and back sides of a document are shaded differently. To change the brightness settings for the front and back Printing allowed sides, clear the [Same as front] check box.
-
Page 166: Copying Job Buttons
Chapter 8 Web Menu (User Mode) Document orientation Color drop-out Rotates the scanned image to the specified angle. The color drop-out function has a “drop-out” effect that leaves out a specified color (red, blue, or green) while Hint scanning, and a “color enhancement” effect that When [Auto] is selected, the scanner detects text orientation emphasizes a specified color. -
Page 167: Editing Jobs
Chapter 8 Web Menu (User Mode) Select My Job Button for the copy destination, and Exporting from the Scanner click [OK]. You can save the job button settings file to a specified folder. Click [Export from ScanFront]. Confirm the copied job button. Click [Save], specify a save location, and save the job button settings file. - Page 168 Chapter 8 Web Menu (User Mode) Click [Execute]. Confirm the message that appears, and click [OK] to import the data. Hint When importing is completed, the following message appears. Click [OK] to return to Job Button Settings and confirm the imported job button.
-
Page 169: Chapter 9 Maintenance
Chapter 9 Maintenance 1. Routine Cleaning ..........9-2 Cleaning the Scanner Unit ........9-2 Cleaning the Touch Panel........9-2 Cleaning the Fingerprint Sensor (ScanFront 300P)..........9-2 Cleaning the Scanning Glass and Rollers.....9-3 Cleaning the Retard Roller........9-5 Cleaning the Feed Roller ........9-6 2. Replacing the Rollers and Document Holding Guide .......... -
Page 170: Routine Cleaning
Chapter 9 Maintenance Routine Cleaning Clean the scanner on a regular basis, as described below, to maintain scanning performance. ❏ Cleaning the Touch Panel CAUTION When cleaning the touch panel, use a soft, dry cloth to • When cleaning the scanner, do not spray water or detergent gently wipe the surface of the panel without applying directly on the scanner. -
Page 171: Cleaning The Scanning Glass And Rollers
IMPORTANT Scratches on the scanning glass may cause streaks on scanned images, as well as feeding errors. If there are scratches on a scanning glass, contact your local authorized Canon dealer. - Page 172 Chapter 9 Maintenance Remove any dirt from the rollers using a cloth that Remove the retard roller and feed roller, and remove has been soaked in water and thoroughly wrung out. any dirt from them. See “Cleaning the Retard Roller” on p. 9-5. See “Cleaning the Feed Roller”...
-
Page 173: Cleaning The Retard Roller
Chapter 9 Maintenance ❏ Cleaning the Retard Roller Move the retard roller in the direction of the arrow a, and then remove it from the shaft b. Use the procedure below to remove and attach the retard roller during cleaning or replacement. CAUTION Do not use excessive force when removing or attaching the retard roller. -
Page 174: Cleaning The Feed Roller
Chapter 9 Maintenance ❏ Cleaning the Feed Roller Slide the roller lock lever in the direction of the arrow, and then insert it into the hole of the retard roller. Use the procedure below to remove and attach the feed roller during cleaning or replacement. - Page 175 Chapter 9 Maintenance Move the feed roller in the direction of the arrow a, Move the roller lock lever in the direction of the arrow, and then remove it from the shaft b. and then insert it into the hole in the feed roller. Lower the roller lock lever to lock the feed roller into Remove any dirt from the roller using a cloth that has been soaked in water and thoroughly wrung out.
-
Page 176: Replacing The Rollers And Document Holding Guide
For details, contact your local Kit and replace the parts. (See “Checking the Page Count and authorized Canon dealer or service representative. Resetting the Counter” on p. 9-9.) Product name: Exchange Roller Kit • When the rollers start to wear out, problems such as paper... -
Page 177: Checking The Page Count And Resetting The Counter
Chapter 9 Maintenance ❏ Checking the Page Count and Resetting Remove the document holding guide from the rolloer cover by sliding it up. the Counter Check the page count on the Roller Counter Reset screen of the Administrator Setting screen. IMPORTANT The roller counter counts the number of pages fed by replaced rollers. - Page 178 Chapter 9 Maintenance [Roller counter reset] screen Total pages scanned This counter is for the total number of document pages fed by the scanner. Pages scanned from the previous roller change This counter is for the number of document pages fed by the scanner since the roller was replaced and the counter was reset.
-
Page 179: Chapter 10 Troubleshooting
Chapter 10 Troubleshooting 1. Troubleshooting ..........10-2 2. Error Messages (ScanFront) ......10-6 3. Error Messages (Web Menu)......10-9 4. Adjusting the Touch Panel......10-11 5. Initializing ScanFront ........10-13... -
Page 180: Troubleshooting
Chapter 10 Troubleshooting Troubleshooting If any of the following problems occurs, solve the problem as described in the corresponding solution. Network, Web Menu Cause JavaScript is disabled in the Web browser. Cannot log in to the Web menu Solution Enable JavaScript. The administrator has set user function restrictions. - Page 181 Chapter 10 Troubleshooting (1) The date and time settings are incorrect. (2) The time zone is set to a Cause The wrong send time is different country. displayed for an e-mail message Contact the administrator, and check the “Language/Timezone” setting. received at the destination Solution (See p.
- Page 182 The scanning glass is dirty. Streaks appear in images Clean the scanning glass. (See p. 9-3.) If there are scratches on a Solution scanning glass, contact your local authorized Canon dealer. Cause The rollers are dirty. Paper becomes jammed Solution Clean the rollers.
- Page 183 Check the connections of the AC adapter and power plug. If the Solution problem is not resolved after checking the connections, contact your local authorized Canon dealer. The scanner does not turn ON Cause A USB memory device in inserted in the scanner.
-
Page 184: Error Messages (Scanfront)
Chapter 10 Troubleshooting Error Messages (ScanFront) If any of the following error messages appears, solve the problem as described in the corresponding solution. If you are unsure about any other message that appears, contact the support services. Cause The settings of the registered FTP server are incorrect. Solution Check the settings of the FTP server. - Page 185 Chapter 10 Troubleshooting Cause The password that was entered is incorrect. Password is incorrect. Solution Enter the uppercase and lowercase letters for the password correctly. Cause A file name was not entered and “Auto file name” is set to [None]. There is no file name specified.
- Page 186 Chapter 10 Troubleshooting Cause The file format of the certificate file is invalid. Installation of the certificate file failed. Solution Use a file in CER format. Cause The number of registered certificates has reached the limit of 50. Maximum certificates exceeded. You can’t register any more.
-
Page 187: Error Messages (Web Menu)
Chapter 10 Troubleshooting Error Messages (Web Menu) If any of the following error messages appears, solve the problem as described in the corresponding solution. If you are unsure about any other message that appears, contact the support services. A user that has the same name as the user name to be registered is Same Username exists. - Page 188 Chapter 10 Troubleshooting The scanner cannot be used with the selected mode and file format Cause You can’t choose TIFF when combination. Gray or Color or Auto color Check which mode and file format combinations can be used. (See detection is selected. Solution p.
-
Page 189: Adjusting The Touch Panel
Chapter 10 Troubleshooting Adjusting the Touch Panel If there is no response when you press a button on the touch panel but there is a response when you press somewhere other than a button, the panel needs to be adjusted. Use the procedure below to adjust the touch panel. IMPORTANT •... - Page 190 Chapter 10 Troubleshooting IMPORTANT If you do not tap the panel within a period of 30 seconds after adjustment of the touch panel ends, the adjustment values will not take effect and the touch panel will return to the state prior to adjustment.
-
Page 191: Initializing Scanfront
Chapter 10 Troubleshooting Initializing ScanFront Initialize the ScanFront to protect user information when you submit the ScanFront for repairs or when you want to delete the user information because, for example, you are changing the operating location. This initializes all the information registered to the ScanFront, including user information, address books, and job buttons. - Page 192 Chapter 10 Troubleshooting Confirm the message and press [Yes] to perform initialization, and the scanner will turn OFF. Turn the scanner ON, and set up the scanner again. 10-14...
-
Page 193: Chapter 11 Appendices
Chapter 11 Appendices 1. Specifications..........11-2 Unit Specifications..........11-2 Network Specifications........11-3 Transfer Destinations ..........11-3 AC Adapter (100 to 240 V type) ......11-3 Consumable Parts..........11-4 External Dimensions ...........11-5 2. Index .............. 11-6... -
Page 194: Specifications
Chapter 11 Appendices Specifications ❏ Unit Specifications Scanning Modes Black and White, Error Diffusion, Text Enhance, Type Gray, Color, and Auto Color Detection Pass-through desktop scanner with network Scanning Resolution (Primary Scan Lines x compatibility Secondary Scan Lines) Operation Panel 100 ×... -
Page 195: Network Specifications
Chapter 11 Appendices ❏ Network Specifications Color Simplex 150 × 150 dpi 25 pages/min. Network 200 × 200 dpi 25 pages/min. Microsoft Windows Network Duplex 150 × 150 dpi 50 images/min. Protocol 200 × 200 dpi 40 images/min. TCP/IP Network Connector IP Address RJ-45 (10Base-T/100Base-TX) Obtained automatically (DHCP supported) or fixed... -
Page 196: Consumable Parts
If this happens, replace the rollers regardless of the page count. • For information about the Exchange Roller Kit, contact your local authorized Canon dealer or service representative. 11-4... -
Page 197: External Dimensions
Chapter 11 Appendices ❏ External Dimensions 8.35" 8.66" 5.74" (212 mm) (220 mm) (139 mm) 11-5... -
Page 198: Index
Document Holding Guide ..........9-8 Network Settings ............ 3-9 Documents ..............2-2 Roller Counter Reset ..........3-11 Double Feed Error ............2-9 ScanFront 300 Initialization ......... 3-11 Select Login Type ..........3-10 Editing Users ...............6-11 Touch Panel Adjustment ........3-11 Eject Tray ..............2-4 Authentication Server .......... - Page 199 Chapter 11 Appendices Fax Server ..............6-34 Language ..............6-30 Features ................. 1-6 List Type Login ........... 5-5, 6-31 Feed Roller ..............9-6 Loading Mark ..............2-7 Feed Selection Lever ............ 2-5 Lock Lever ............2-10, 9-3 Feed Tray ..............2-4 Log Settings ............6-37, 6-42 File Formats ..........5-32, 6-24, 8-21 Logging In to the Web Menu ........
- Page 200 Chapter 11 Appendices Safety Instructions ............1-2 Web Menu Scan Settings ............5-28, 8-19 User Mode ...............8-2 Basic Condition Settings ........5-28 Web Menu (Administrator Mode) ......3-6, 6-3 Detailed Settings ........... 5-29 Web Menu (User Mode) ..........6-4 Scan Settings (Job Button) .......... 6-22 Web Menu Overview ..........
- Page 201 CANON ELECTRONICS INC. 1248, SHIMOKAGEMORI, CHICHIBU-SHI, SAITAMA 369-1892, JAPAN CANON U.S.A. INC. ONE CANON PARK, MELVILLE, NY 11747, U.S.A. CANON CANADA INC. 6390 DIXIE ROAD, MISSISSAUGA, ONTARIO L5T 1P7, CANADA CANON EUROPA N.V. BOVENKERKERWEG 59, 1185 XB AMSTELVEEN, THE NETHERLANDS CANON LATIN AMERICA, INC.