Advertisement
Advertisement
Table of Contents

Related Manuals for Indesit K6E52/GR


Summary of Contents for Indesit K6E52/GR
- Page 1 Cooker K6E52/GR Installation and use K6E55/GR Êïõæßíá ÅãêáôÜóôáóç êáé ÷ñÞóç...
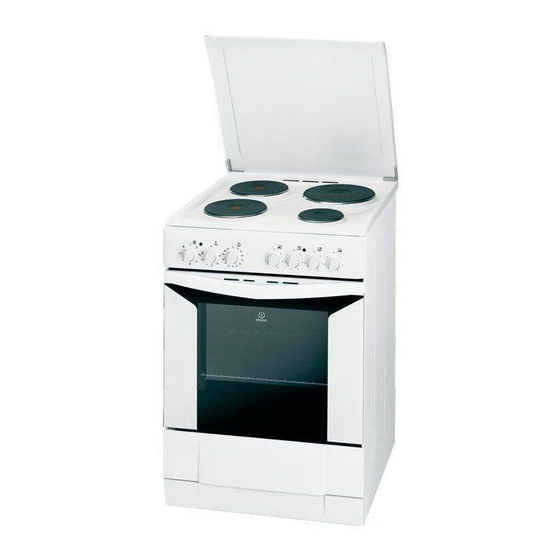
- Page 2 Cooker with electric multifunction oven and electric hob Instructions for installation and use Êïõæßíá ìå ðïëõëåéôïõñãéêü öïýñíï êáé çëåêôñéêÞ åðéöÜíåéá Ïäçãßåò åãêáôÜóôáóçò êáé ÷ñÞóçò...
- Page 3 Important To maintain the EFFICIENCY and SAFETY of this appliance, we recommend: • call only the Service Centers authorized by the manufacturer • always use original Spare Parts 1 This appliance is intended for non-professional use damage or replacement. within the home. 13 This appliance must be used for the purpose for which 2 Before using your appliance, read the instructions in it was expressly designed.
-
Page 4: Installation Instructions
Installation Instructions To install the cable, proceed as follows: • unscrew the wire clamp screw and the contact screws The following instructions should be read by a qualified Note: the jumpers are factory-set for a single-phase technician to ensure that the appliance is installed, 230V connection (Fig. -
Page 5: How To Use Your Appliance
ture of more than 50°C with respect to the room tempera- • the mains are properly earthed in compliance with ture, anywhere along its length. current directives and regulations; Before making the connection, check that: • there is easy access to the socket and omnipolar circuit •... - Page 6 ing temperatures are the same. A maximum of 2 racks can be used at the same time, following the instructions in the section entitled: “Cooking On More Than One Rack”. This fan assisted mode is particularly recommended for dishes requiring a gratin finish or for those requiring con- siderably prolonged cooking times, such as for example: lasagne, pasta bakes, roast chicken and potatoes, etc…...
-
Page 7: Electronic Timer
The control knobs for the hob electric hotplates (N) c) start the turnspit using knob “L” to select setting The cookers can be fitted with normal and rapid electric hotplates in a variety of combinations (the rapid hotplates can be distinguished from the rest by the red boss in the centre of the same). -
Page 8: Practical Cooking Advice
To cancel a previous setting You can display the time by pressing button , and symbol Press button up until 0 • 00. " " indicates the timer function has been set. After approximately 7 seconds, the display automatically goes Adjusting the buzzer volume back to indicating the timer. -
Page 9: Routine Maintenance And Cleaning
• Do not open the oven door frequently while the pizza is Cooked well on the inside but sticky on the cooking; outside • If the pizza has a lot of toppings (three of four), we recommend you add the mozzarella cheese on top Use less liquid, lower the temperature, and increase halfway through the cooking process. - Page 10 Selector knob Weight Cooking rack Preheating time Thermostat Cooking Food to be cooked setting (in kg) position from (minutes) knob time bottom setting (minutes) Defrosting All frozen food Convection Duck 65-75 Roast veal or beef 70-75 Pork roast 70-80 Biscuits (short pastry) 15-20 Tarts 30-35...
-
Page 11: Technical Characteristics
Technical Characteristics Oven Dimensions (HxWxD): 32x43.5x40 cm Volume: 56 Litres Max. Oven Power Absorption: 2250 W This appliance conforms with the following European Innder dimensions of the plate plate warmer: Economic Community directives: Width: 46 cm 2006/95/EC of 12/12/06 (Low Voltage) and subsequent modifications;... - Page 12 ÐñïåéäïðïéÞóåéò Ãéá ôç äéáóöÜëéóç ôçò áðïôåëåóìáôéêüôçôáò êáé ôçò áóöÜëåéáò áõôÞò ôçò ïéêéáêÞò çëåêôñéêÞò óõóêåõÞò: • íá áðåõèýíåóôå áðïêëåéóôéêÜ óôá åîïõóéïäïôçìÝíá êÝíôñá ôå÷íéêÞò õðïóôÞñéîçò • íá æçôÜôå ðÜíôá ôç ÷ñçóéìïðïßçóç áõèåíôéêþí áíôáëëáêôéêþí 1 Ç óõóêåõÞ áõôÞ ó÷åäéÜóôçêå ãéá ìç åðáããåëìáôéêÞ ÷ñÞóç óôï...
- Page 13 ÅãêáôÜóôáóç Ïé ïäçãßåò ðïõ áêïëïõèïýí áðåõèýíïíôáé óôïí åéäéêåõìÝíï Ãéá ôçí ôïðïèÝôçóç ôïõ êáëùäßïõ åêôåëÝóôå ôá ðáñáêÜôù: ôå÷íéêü þóôå íá óõíôåëÝóåé ôéò åñãáóßåò åãêáôÜóôáóçò, • îåâéäþóôå ôç âßäá ôïõ êáëùäéïäÝôç êáé ôéò âßäåò ôùí ñýèìéóçò êáé ôå÷íéêÞò óõíôÞñçóçò ìå ôïí ðëÝïí ïñèü ôñüðï åðáöþí...
- Page 14 Óýíäåóç ôïõ êáëùäßïõ ôñïöïäïóßáò óôï äßêôõï Ðñéí äéåíåñãÞóåôå ôç óýíäåóç âåâáéùèåßôå üôé: ÌïíôÜñåôå óôï êáëþäéï Ýíá âýóìá êáíïíéêïðïéçìÝíï ãéá • ç ðåñéïñéóôéêÞ âáëâßäá êáé ç ïéêéáêÞ åãêáôÜóôáóç íá ôï öïñôßï ðïõ áíáöÝñåôáé óôçí ðéíáêßäá ÷áñáêôçñéóôéêþí, ìðïñïýí íá õößóôáíôáé ôï öïñôßï ôçò óõóêåõÞò (âëÝðå óôçí...
- Page 15 Ôå÷íéêÜ ÷áñáêôçñéóôéêÜ Öïýñíïò ENERGY LABEL Ïäçãßá ãéá ôçí åôéêÝôá ôùí çëåêôñéêþí öïýñíùí ÄéáóôÜóåéò ( ): 3 Êáíïíéóìüò ¼ãêïò: ßôñá ÊáôáíÜëùóç åíÝñãåéáò ÄõíáìéêÞò áãùãéìüôçôáò ÌÝãéóôç áðïññüöçóç ïýñíïõ: ëåéôïõñãßá èÝñìáíóçò: Áåñüèåñìïò ÊáôáíÜëùóçåíÝñãåéáòäÞëùóçÊáôçãïñßáò õóéêÞòäéÜäïóçò ÙöÝëéìåò äéáóôÜóåéò ôïõ óõñôáñéïý èÝñìáíóçò ôñïößìùí: ôçòèåñìüôçôáò ðëÜôïò m. ëåéôïõñãßá...
- Page 16 Ïäçãßåò ÷ñÞóçò Ç åðéëïãÞ ôùí äéáöüñùí ëåéôïõñãéþí ðïõ õðÜñ÷ïõí óôçí óôïí ðßíáêá ïñãÜíùí. êïõæßíá ãßíåôáé åíåñãþíôáò óôéò äéáôÜîåéò êáé óôá üñãáíá Öïýñíïò “Áðüøõîçò” ÷åéñéóìïý ðïõ âñßóêïíôáé óôïí ðßíáêá ïñãÜíùí ôçò ßäéáò. Ýóç åðéëïãÝá èåñìïóôÜôç “M”: ïðïéáäÞðïôå Ðñïóï÷Þ: Óôï ðñþôï Üíáììá óáò óõìâïõëåýïõìå íá Ï...
- Page 17 æïõìéþí äéáôçñþíôáò ôï êñÝáò ðéï ìáëáêü ìå ìéêñüôåñç áðþëåéá âÜñïõò. Ï öïýñíïò Áåñüèåñìùí çóéìÜôùí åêôéìÜôáé éäéáßôåñá ãéá ôï Þóéìï ôùí áñéêþí ðïõ ìðïñïýí íá ìáãåéñåõôïýí ìå åëÜ÷éóôç ðñïóèÞêç ìðá÷áñéêþí äéáôçñþíôáò Ýôóé áíáëëïßùôç ôç ãåýóç êáé ôçí ü ç. : óßãïõñá áðïôåëÝóìáôá åðéôõã÷Üíïíôáé Þíïíôáò êÝéê...
- Page 18 Ðñéí ôéò ÷ñçóéìïðïéÞóåôå ãéá ðñþôç öïñÜ, ðñÝðåé íá èåñìÜíåôå ôéò åóôßåò ìáãåéñÝìáôïò óôç ìÝãéóôç èåñìïêñáóßá ãéá ðåñßðïõ 4 ëåðôÜ, ÷ùñßò êáôóáñüëá. Qšsh Est…a kanonik¾ ¾ tace…a Óå áõôÞ ôçí áñ÷éêÞ öÜóç, ç ðñïóôáôåõôéêÞ åðÝíäõóç SbhstÒ óêëçñáßíåé êáé öôÜíåé óôç ìÝãéóôç áíôï÷Þ ôçò. Y»simo cortarikèn, yarikèn Ôï...
- Page 19 ÐñáêôéêÝò óõìâïõëÝò ãéá ôï øÞóéìï Ï öïýñíïò èÝôåé óôç äéÜèåóÞ óáò ìéá åõñåßá ãêÜìá Ç ëåéôïõñãßá “Grill áåñüèåñìï”, áðïêëåéóôéêÜ ìå ôçí äõíáôïôÞôùí ãéá íá ìáãåéñåýåôå ïðïéïäÞðïôå öáãçôü ìå ðüñôá ôïõ öïýñíïõ êëåéóôÞ, åßíáé ÷ñçóéìüôáôç ãéá ôïí êáëýôåñï ôñüðï. Ìå ôïí êáéñü èá ìðïñåßôå íá ãñÞãïñá...
- Page 20 ØÞóéìï ôùí øáñéêþí êáé ôùí êñåáôéêþí Ôï ãëõêü äåí îåêïëëÜåé áðü ôç öüñìá Ãéá ôá ëåõêÜ êñÝáôá, ôá ðïõëåñéêÜ êáé ôá áñéêÜ ÷ñçóéìïðïéåßôå èåñìïêñáóßåò ìåôáîý êáé Áëåßøôå êáëÜ ôç öüñìá êáé áëåõñþóôå ôç Þ Ãéá ôá êüêêéíá êñÝáôá ðïõ ðñÝðåé íá åßíáé êáëï çìÝíá ÷ñçóéìïðïéÞóôå...
- Page 21 ÔáêôéêÞ óõíôÞñçóç êáé êáèáñéóìüò ôçò êïõæßíáò Ðñéí áðü êÜèå åñãáóßá íá áðïóõíäÝåôå ôçí êïõæßíá ÁíôéêáôÜóôáóç ôçò ëõ÷íßáò ôïõ äéáìåñßóìáôïò áðü ôï çëåêôñéêü ñåýìá.Ãéá ìåãÜëç äéÜñêåéá æùÞò ôçò öïýñíïõ • êïõæßíáò åßíáé áíáãêáßï íá åêôåëåßôå óõ÷íÜ Ýíáí åðéìåëÞ Äéáêüøôå ôçí ôñïöïäïóßá ôïõ öïýñíïõ ìÝóù ôïõ ãåíéêü...
- Page 22 ÐñáêôéêÝò óõìâïõëÝò ãéá ôï øÞóéìï ÈÝóç ôïõ Ôñüöéìï ãéá ìáãåßñåìá ÂÜñïò ÈÝóç ×ñüíïò ÈÝóç ×ñüíïò åðéëïãÝá øçóßìáôïò ðñïèÝñìáíóçò åðéëïãÝá øçóßìáôïò (Kg) åðßðåäá áðü èåñìïóôÜôç (ëåðôÜ) (ëåðôÜ) êÜôù Áðüøõîç ¼ëá ôá êáôåøõãìÝíá ôñüöéìá Óôáôéêüò ÐÜðéá 65-75 Øçôü ìïó÷áñßóéï Þ âïäéíü 70-75 Øçôü...
- Page 24 Aristide Merloni, 47 60044 Fabriano (AN) Italy tel. +39 0732 6611 www.indesit.com...