Sign In
Upload
Manuals
Brands
Thermo Scientific Manuals
Laboratory Equipment
CryoStar NX50
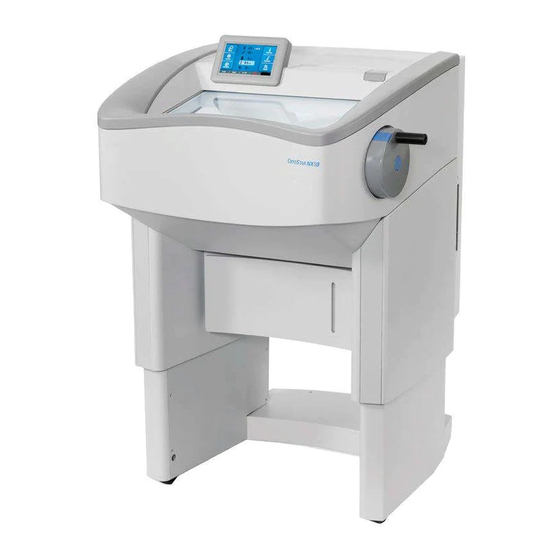
Thermo Scientific CryoStar NX50 Manuals
Manuals and User Guides for Thermo Scientific CryoStar NX50. We have
3
Thermo Scientific CryoStar NX50 manuals available for free PDF download: Operator's Manual
Thermo Scientific CryoStar NX50 Operator's Manual (126 pages)
Brand:
Thermo Scientific
| Category:
Laboratory Equipment
| Size: 2 MB
Table of Contents
Table of Contents
7
Safety Information
11
Introduction
15
Introduction to the Cryostar NX70 / NX50
15
Intended Use
15
Instrument Features
15
Technical Specifications
16
Instrument Setup
19
Unpacking and Repacking
19
Location & Setup
21
Identification of Parts
22
Set up
28
Fitting or Exchanging the Anti Roll Plate
28
Fitting or Exchanging Low Profile Blades
29
Removing Used Blades with the Magnetic Blade Tool
31
Blade Positioning and Orientation
32
Adjusting the Cutting Angle
33
Adjusting the Anti-Roll Plate
35
Specimen Setup
36
Specimen Orientation NX70
36
Specimen Orientation NX50
38
Filling with Disinfectant to Perform the Cold D Function
41
Filling the Cryostat with Disinfectant Solution (Sanosil )
41
Operation
43
Switching on
43
System Interfacing
44
Using the Touchscreen
44
Main Screen
44
Setting Preferences
46
Quick Freezing of the Specimen
46
Trimming and Fine Section Thickness
47
Temperature
49
Cutting Window
51
Select a Favorite
53
Vacutome and Cleaning Mode
53
Height Adjustment
58
Multi Function Bar
59
Time and Date
59
Cutting Mode Selection
59
Handwheel Brake
66
Multi-Function Button
67
Menu
69
Chamber Light
69
Standby
70
Display Lock
71
Favorites
72
User Guide
74
Settings Menu
75
Language
77
Time and Date
78
Start Time
82
Defrost
85
Immediate Defrosting
85
Programming the Daily Defrost Cycle
88
Screen
89
Retraction
91
Data Log
92
Default Settings
93
Service
95
Emergency Stop
96
Standard Emergency Stop Function
96
Optional Foot Pedal Emergency Stop
96
Cooling Processes
97
Specimen and Blade Holder Cooling
97
Sectioning Procedures
98
Cutting Movement and Retraction
98
Trimming and First Cuts
98
Trimming
99
Sectioning and Taking off Sections
99
Handwheel Brakes
101
Electronic Handwheel Brake
101
Mechanical Handwheel Brake
102
Cold D
104
Starting the Disinfection (Cold D) Function
104
Aborting the Disinfection
105
Programming Cold D
106
Troubleshooting
109
Troubleshooting Tables
109
Tips for Successful Sectioning
111
Optimum Temperature Ranges for Sectioning Different Types of Fresh Specimen
112
Cleaning and Maintenance
113
Cleaning the Touch Screen Display
113
Shutting off for Cleaning
113
Cleaning and Care of the Blade Holder
113
Emptying the Defrosting and Cold D Liquids
114
Exchange the Vacutome Filter Bag
115
Adjustment of the Movable Specimen Head Jaw
117
Transportation of the Instrument
118
Appendices
120
Appendix A - Spares and Accessories
121
Appendix B - Recommended Disinfection Procedure
123
Recommended Disinfection Procedure
123
Index
124
Advertisement
Thermo Scientific CryoStar NX50 Operator's Manual (85 pages)
Brand:
Thermo Scientific
| Category:
Laboratory Equipment
| Size: 8 MB
Table of Contents
Important Note Regarding Instrument Variants
5
Symbols
6
Table of Contents
8
Safety Information
11
General Safety
11
Chemical Safety
12
Environment
12
Introduction
14
Intended Use
14
Instrument Features
14
Technical Specifications
15
Mechanical Specifications
15
Electrical Specifications
15
Cooling Specifications
16
Mictotome and Sectioning Specifications
16
Cold D Specification
17
Default Settings
17
Instrument Setup
18
Unpacking and Repacking
18
Safety Precautions
18
Unpacking Procedure
18
Location & Setup
20
Identification of Parts
21
Overview
21
Connections Panel
21
Cryochamber
22
Blade Holder
22
Specimen Head NX50
22
Set up
23
Fitting or Exchanging the Anti Roll Plate
23
Fitting or Exchanging Low Profile Blades
24
Removing Used Blades with the Magnetic Blade Tool
25
Blade Positioning and Orientation
26
Adjusting the Cutting Angle
27
Adjusting the Anti-Roll Plate
28
Specimen Setup
28
Filling with Disinfectant to Perform the Cold D Function
30
Filling the Cryostat with Disinfectant Solution
30
Operation
32
Switching on
32
System Interfacing
33
Using the Touchscreen
33
Main Screen
33
OK Button
33
Arrow Keys
34
Trimming and Fine Section Thickness
35
To Set the Fine Section Thickness
35
Temperature
36
Setting the Temperature of the Specimen Head
36
Cutting Window
37
To Set the Lower Limit of the Cutting Window
37
To Set the Upper Limit of the Cutting Window
37
Knife Assembly Positioning
38
Backward Fast Button
38
Forward Button
38
Forward Fast Button
38
Quick Freezing of the Specimen
39
Cryobar
39
Vacutome and Cleaning Mode
40
Activate the Vacutome
40
Turning off the Vacutome Function
41
Turning on the Cleaning Mode
41
Turning off the Cleaning Mode
42
Height Adjustment
43
Multi-Function Bar
43
Time and Date
44
Multi-Function Button
44
Remaining Distance to the Front End Position
44
Section Thickness Sum
44
Menu
45
Language
45
Standby
46
Defrost
46
Immediate Defrosting
47
To Start the Defrosting Immediately
47
Programming the Daily Defrost Cycle
48
Chamber Light
49
Screen
49
To Set the Screen Brightness
49
Display Lock
50
To Activate the Display Lock
50
To Deactivate the Display Lock
50
Retraction
51
To Toggle the Retraction on or off
51
To Turn on the Retraction
51
Data Log
52
To Enter the Data Log
52
Factory Settings
53
Display Icons with Text
53
Service
54
User Guide
54
To Activate the User Guide
54
Set the Year
56
Change to ISO Format
56
Setting the Time
56
Set the Minutes
57
Set the Hour
57
Set the Time Format
57
Sectioning Procedures
58
Cutting Movement and Retraction
58
Trimming
58
First Cuts
58
Sectioning and Taking off Sections
59
Hand Brake Lock
60
Mechanical Hand Brake Lock
60
Cold D
61
Starting the Disinfection Function
61
Aborting the Disinfection
62
Programming Cold D
63
Troubleshooting
65
Troubleshooting Tables
65
Tips for Successful Sectioning
67
Sectioning Temperature Guidelines for Fresh Tissues
69
Cleaning and Maintenance
70
Cleaning the Touch Screen Display
70
Shutting off for Cleaning
70
Cleaning and Care of the Blade Holder
70
Emptying the Defrosting and Cold D Liquids
71
To Empty the Defrosting Liquid Bottle
71
Exchange the Vacutome Filter Bag
72
Adjustment of the Movable Specimen Head Jaw
74
Transportation of the Instrument
75
Conditions for the Transportation of the Instrument
75
Taking Back the Instrument for the Repair or Routine Maintenance
77
Spares and Accessories
78
Recommended Disinfection Procedure
81
Cold D + Sanosil
81
Universal Precautions
81
Definition of Disinfection
81
Index
83
Thermo Scientific CryoStar NX50 Operator's Manual (75 pages)
Brand:
Thermo Scientific
| Category:
Laboratory Equipment
| Size: 2 MB
Table of Contents
Company Information
3
Important Note Regarding Instrument Variants
4
Symbols
5
Table of Contents
6
Safety Information
9
General Safety
9
Chemical Safety
10
Environment
10
Warranty Statement
10
Introduction
11
Intended Use
11
Instrument Features
11
Technical Specifications
12
Mechanical Specifications
12
Electrical Specifications
12
Environmental Specifications
12
Cooling Specifications
13
Microtome and Sectioning Specifications
13
Cold D Specification
14
Default Settings
14
Instrument Setup
15
Unpacking and Repacking
15
Safety Precautions
15
Unpacking Procedure
15
Repacking the Instrument
16
Location & Setup
16
Identification of Parts
17
Overview
17
Connections Panel
17
Cryochamber
18
Blade Holder
18
Specimen Head NX50
18
Set up
19
Fitting or Exchanging the Anti Roll Plate
19
Fitting or Exchanging Low Profile Blades
20
Removing Used Blades with the Magnetic Blade Tool
21
Blade Positioning and Orientation
22
Adjusting the Cutting Angle
22
Adjusting the Anti-Roll Plate
24
Specimen Setup
24
Filling with Disinfectant to Perform the Cold D Function (Optional)
26
Filling the Cryostat with Disinfectant Solution (Sanosil®)
26
Operation
28
Switching on
28
Switching off
28
System Interfacing
29
Using the Touchscreen
29
Main Screen
29
Trimming and Fine Section Thickness
30
Temperature
31
Chamber Temperature
31
Cutting Window
31
Knife Assembly Positioning
32
Quick Freezing of the Specimen
34
Vacutome and Cleaning Mode (Optional)
34
Height Adjustment (Optional)
37
Multi Function Bar
37
Time and Date
38
Multi Function Button
38
Menu
39
Language
39
Standby
40
Defrost
40
Immediate Defrosting
40
Programming the Daily Defrost Cycle
41
Chamber Light
42
Screen
43
Display Lock
43
Retraction
44
Data Log
44
Factory Settings
45
Service
46
User Guide
46
Time and Date
47
Setting the Time
49
Set the Time Format
49
Sectioning Procedures
50
Cutting Movement and Retraction
50
Trimming and First Cuts
50
Trimming
50
Sectioning and Taking off Sections
51
Hand Brake Lock
52
Mechanical Hand Brake Lock
52
Cold D (Optional)
53
Starting the Disinfection (Cold D) Function
53
Aborting the Disinfection
54
Programming Cold D
54
Troubleshooting
57
Troubleshooting Tables
57
Tips for Successful Sectioning
58
How to Avoid Malfunctions When Working with the Vacutome
59
Sectioning Temperature Guidelines for Fresh Tissues
59
Cleaning and Maintenance
61
Cleaning the Touch Screen Display
61
Shutting off for Cleaning
61
Cleaning and Care of the Blade Holder
61
Emptying the Defrosting and Cold D Liquids
62
Exchange the Vacutome Filter Bag
63
Adjustment of the Movable Specimen Head Jaw
65
Transportation of the Instrument
65
Conditions for the Transportation of the Instrument
65
Appendices
69
Appendix A - Spares and Accessories
69
Appendix B - Recommended Disinfection Procedure
71
Appendix C - Cold Disinfection Certificate
72
Index
73
Advertisement
Advertisement
Related Products
Thermo Scientific CryoStar NX50 HOP
Thermo Scientific CryoStar NX50 OP
Thermo Scientific CryoStar NX50 OPD
Thermo Scientific CryoStar NX50 OPV
Thermo Scientific CryoStar NX50OPDV
Thermo Scientific NS-FANT12-CH
Thermo Scientific NanoDrop One
Thermo Scientific NESLAB EX Series
Thermo Scientific NCP-3200RS
Thermo Scientific NanoDrop Lite Plus
Thermo Scientific Categories
Laboratory Equipment
Measuring Instruments
Accessories
Freezer
Refrigerator
More Thermo Scientific Manuals
Login
Sign In
OR
Sign in with Facebook
Sign in with Google
Upload manual
Upload from disk
Upload from URL