Sign In
Upload
Manuals
Brands
JUKI Manuals
Sewing Machine
MEB-3200 Series
JUKI MEB-3200 Series Manuals
Manuals and User Guides for JUKI MEB-3200 Series. We have
5
JUKI MEB-3200 Series manuals available for free PDF download: Instruction Manual, Engineer's Manual, Specification, Safety Notes
Juki MEB-3200 Series Instruction Manual (520 pages)
Brand:
Juki
| Category:
Sewing Machine
| Size: 10.55 MB
Table of Contents
English
13
Table of Contents
13
1 Specifications
15
2 Name of each Component
16
Names of the Sewing Machine Main Unit
16
3 Installation
17
Installing the Air Hose
17
Raising and Returning the Sewing Machine
17
Installing the Thread Stand
19
Installing the Operation Panel Base
19
Installing/Removing the Presser Unit
20
Attaching the Dust Bag
20
4 Preparation before Operation
21
Lubricating the Machine and How to Lubricate
21
Attaching the Needle
23
Threading the Machine Head
24
How to Set the Cloth
26
5 Structure of the Operation Switch
27
Structure of the Operation Panel
27
Temporary Stop Switch
29
Hand Switch
29
Foot Switch
29
6 How to Use the Operation Panel
30
Basic Operation of the Sewing Machine
30
Setting the Thread Tension
30
Temporarily Stopping the Sewing Machine
31
Performing Re-Sewing
31
Performing Threading
32
How to Use the Counter
32
When Dropping of the Knife Is Temporarily Not Desired
33
Changing the Operation Mode
33
Changing Procedure of the Sewing Pattern
34
Confirming the Pattern Shape
34
7 Setting Procedure of the Sewing Data
35
Setting the Knife no
36
Setting the Cut Length
36
Setting the Cut-Before/Cut-After Knives
36
Setting the Number of Stitches of the Parallel Section
37
Setting the Number of Stitches of the Eyelet
37
Setting the Cut Space
37
Setting the Eyelet Space
37
Setting the Length of Taper Bar
38
Setting the Number of Stitches of Taper Bar
38
Setting the Offset of Taper Bar
38
Setting the Sewing Speed
38
Setting the Reduction Speed of Eyelet
39
Setting the FUNCTION F1
39
Setting the FUNCTION F2
39
8 Adjustment of each Part
40
Replacing the Cloth Cutting Knife and the Knife Holder
40
Adjusting the Cloth Cutting Knife Pressure
41
Worn-Out of the Knife Holder Face
42
Setting the Material Thickness of the Cloth Cutting Knife
42
Adjusting the Stitch Bite Width
43
Adjusting the Presser
43
Adjusting the Presser Opening Amount
44
Adjusting the Feeding Amount of the Needle Thread
45
Adjusting the Thread Take-Up Thread Guide
45
Adjusting the Remaining Amount of the Gimp (J and C Types)
46
Adjusting the Gimp Thread Tension (J and C Types)
46
9 Compensation of the Data
47
Knife Position Compensation
47
Number of Stitches of Sewing End Compensation
47
Compensation of Turning
48
Parallel Section Turning Compensation
48
Eyelet Crosswise Compensation
48
Eyelet Lengthwise Compensation
48
Left Eyelet Lengthwise Compensation
48
Left Parallel Section Lengthwise Compensation
49
Needle Throwing Width of the Right Bottom of Eyelet Setting
49
Needle Throwing Width of the Left Bottom of Eyelet Setting
49
Needle Throwing Width Setting
49
Number of Stitches of the Slant Taper Bar
49
Number of Stitches of the Right Side Taper Bar Compensation
50
Shape of the Straight Bar
50
Number of Stitches of the Round Bar
51
Left Side Cut Space Compensation
51
Soft Start
52
Number of Stitches of the Sewing Start of Thread Tension
52
Number of Stitches of the Sewing End of Thread Tension
52
Copy Destination no
52
10 How to Use the Various Functions
53
Performing Procedure of the Cycle Sewing
53
Operating Procedure of Thread Tension Compensation of each Section
54
Changing the Setting Position of Cloth
57
Changing over the Mode of the Start Switch
57
Changing over the Presser Movement
57
Changing over the Counter (down Counting)
57
Stop before Cloth Cut Mode
57
Setting the Pattern Data of Cloth Cutting Knife Pressing Amount
58
11 Maintenance
59
Height of the Needle Bar
59
Timing between the Needle and the Looper
59
Clearance between the Needle and the Looper
61
Adjusting the Needle Guard
61
Installation Positions of the Spreaders and the Timing to Open/Close the Spreaders
62
Position of the Presser Foot and the Needle Entry Point
64
Adjusting the Knife Dropping Position
64
Installing Position of the Needle Thread Trimming Knife
65
Adjusting the Looper Thread Trimming
67
Cleaning
69
Draining
69
Checking the Fan Filter
69
Replacing the Fuse
70
Standard of Replacing Time of the Gas Spring
70
Replacing the Gas Spring
71
12 Exchanging Gague Parts and Optional
74
Changing the Thread Trimming Method
74
Exchanging Gauge Parts
75
13 Troubles and Corrective Measures in Sewing
80
14 Memory Switch
82
Operating Procedure
82
Memory Switch List
82
15 Error List
84
16 Standard Pattern List
86
Deutsch
99
Technische Daten
101
Bezeichnung der Teile
102
Teile der Nähmaschinen-Haupteinheit
102
Installation
103
Installieren des Luftschlauchs
103
Anheben und Absenken der Nähmaschine
103
Installieren des Garnständers
105
Installieren des Bedienungstafelhalters
105
Montieren/Demontieren der Stoffdrückereinheit
106
Anbringen des Staubsacks
106
Betriebsvorbereitungen
107
Schmieren der Maschine und Schmierverfahren
107
Anbringen der Nadel
109
Einfädeln des Maschinenkopfes
110
Einlegen des Nähguts
112
Anordnung der Bedienungstasten
113
Aufbau der Bedienungstafel
113
Pausentaste
115
Handschalter
115
Fußschalter
115
Gebrauchsweise der Bedienungstafel
116
Grundlegende Bedienung der Nähmaschine
116
Einstellen der Fadenspannung
116
Vorübergehendes Anhalten der Nähmaschine
117
Durchführung einer Nähwiederholung
117
Durchführen des Einfädelns
118
Verwendung des Zählers
118
Vorübergehendes Sperren des Messers
119
Ändern der Betriebsart
119
Ändern des Nähmusters
120
Überprüfen der Musterform
120
Nähdaten-Einstellverfahren
121
Einstellen der Messernummer
122
Einstellen der Schnittlänge
122
Einstellen des Vorschnitt-/Nachschnittmessers
122
Einstellen der Stichzahl des Parallelabschnitts
123
Einstellen der Stichzahl des Augenabschnitts
123
Einstellen des Schnittabstands
123
Einstellen des Augenschnittabstands
123
Einstellen der Keilriegellänge
124
Einstellen der Stichzahl des Keilriegels
124
Einstellen des Keilriegelversatzes
124
Einstellen der Nähgeschwindigkeit
124
Einstellen der Geschwindigkeitsreduzierung für den Augenabschnitt
125
Einstellen der Funktion F1
125
Einstellen der Funktion F2
125
Einstellung der Einzelnen Teile
126
Auswechseln des Stoffmessers und Messeranschlags
126
Einstellen des Stoffmesserdrucks
127
Verschleiß der Messeranschlagfläche
128
Einstellen des Stoffmessers auf die Stoffdicke
128
Einstellen der Stichbreite
129
Einstellen des Stoffdrückers
129
Einstellen des Stoffdrücker-Öffnungsbetrags
130
Einstellen des Nadelfaden-Zuführbetrags
131
Einstellen der Fadengeberführung
131
Einstellen des Gimpen-Restbetrags (Typ J und C)
132
Einstellen der Gimpenfadenspannung (Typ J und C)
132
Datenkorrektur
133
Korrektur der Messerposition
133
Korrektur der Stichzahl am Nähende
133
Winkelkorrektur
134
Korrektur des Stichneigungswinkels IM Parallelabschnitt
134
Korrektur der Horizontalposition des Augenabschnitts
134
Korrektur der Vertikalposition des Augenabschnitts
134
Korrektur der Länge des Linken Augenabschnitts
134
Korrektur der Länge des Linken Parallelabschnitts
135
Einstellung der Stichbreite IM Unteren Rechten Augenabschnitt
135
Einstellung der Stichbreite IM Unteren Linken Augenabschnitt
135
Einstellung der Stichbreite
135
Stichzahl des Schrägen Keilriegelabschnitts
135
Korrektur der Stichzahl des Rechten Keilriegelabschnitts
136
Form des Geradriegels
136
Stichzahl des Rundriegels
137
Linke Schnittabstandkorrektur
137
Soft-Start
138
Stichzahl für Fadenspannungs-Einstellung am Nähanfang
138
Stichzahl für Fadenspannungs-Einstellung am Nähende
138
Kopierzielnummer
138
Verwendung der Verschiedenen Funktionen
139
Verfahren für Zyklusnähen
139
Bedienungsverfahren zur Korrektur der Fadenspannung der Einzelnen Abschnitte
140
Ändern der Stoffeinlegeposition
143
Umschalten des Startschaltermodus
143
Umschalten des Stoffdrückerbetriebs
143
Umschalten des Zählers (Abwärtszählung)
143
Stoppmodus vor dem Stoffschnitt
143
Einstellen der Musterdaten des Stoffmesser-Druckbetrags
144
Wartung
145
Höhe der Nadelstange
145
Synchronisierung von Nadel und Greifer
145
Spiel zwischen Nadel und Greifer
147
Einstellen des Nadelschutzes
147
Montagepositionen und Öffnungs-/Schließungszeitpunkt der Spreizer
148
Position von Stoffdrückerfuß und Nadeleinstichpunkt
150
Einstellen der Messerabfallposition
150
Montageposition des Nadelfadenmessers
151
Einstellen des Greiferfadenschnitts
153
Reinigen
155
Ölablassen
155
Überprüfung des Gebläsefilters
155
Auswechseln der Sicherungen
156
Standard des Austauschzeitpunkts des Gasdruckfederbeins
156
Auswechseln des Gasdruckfederbeins
157
Austauschteile und Sonderzubehör
160
Ändern der Fadenabschneidemethode
160
Austauschteile
161
Auf den Nähbetrieb Bezogene
166
Speicherschalter
168
Bedienungsverfahren
168
Liste der Speicherschalter
168
Fehlerliste
170
Liste der Standardmuster
172
Français
185
Caracteristiques
187
Nomenclature des Pieces
188
Nomenclature des Pièces de la Machine
188
Installation
189
Pose du Flexible D'air
189
Ouverture Et Refermeture de la Tête de la Machine
189
Pose du Porte-Bobines
191
Pose du Socle du Panneau de Commande
191
Pose/Retrait du Presseur
192
Installation du Sac À Poussière
192
Preparation Avant L'utilisation
193
Procédure de Lubrification de la Tête de la Machine
193
Pose de L'aiguille
195
Enfilage de la Tête de la Machine
196
Comment Mettre Le Tissu en Place
198
Description des Touches de Commande
199
Description du Panneau de Commande
199
Interrupteur de Pause
201
Interrupteur de Commande Manuelle
201
Interrupteur Au Pied
201
Comment Utiliser Le Panneau de Commande
202
Opérations de Base de la Machine
202
Réglage de la Tension des Fils
202
Arrêt Temporaire de la Machine
203
Ré-Exécution de la Couture
203
Enfilage
204
Comment Utiliser Le Compteur
204
Pour Désactiver Temporairement L'actionnement du Couteau
205
Sélection du Mode de Fonctionnement
205
Changement de la Procédure de la Configuration de Couture
206
Vérification de la Forme de la Configuration
206
Procedure de Saisie des Donnees de Couture
207
Sélection du Numéro de Couteau
208
Sélection de la Longueur de Coupe
208
Sélection des Couteaux de Coupe Antérieure/Coupe Postérieure
208
Sélection du Nombre de Points de la Partie des Lèvres
209
Sélection du Nombre de Points de L'oeillet
209
Sélection de L'espace de Coupe
209
Sélection de L'espace de L'oeillet
209
Sélection de la Longueur de Bride en Pointe
210
Sélection du Nombre de Points de Bride en Pointe
210
Sélection du Décalage de Bride en Pointe
210
Sélection de la Vitesse de Couture
210
Sélection de la Vitesse Réduite de Couture de L'oeillet
211
Sélection de la FONCTION F1
211
Sélection de la FONCTION F2
211
Reglage des Pieces
212
Remplacement du Couteau Fendeur Et du Porte-Couteau
212
Réglage de la Pression du Couteau Fendeur
213
Usure de la Face du Porte-Couteau
214
Réglage du Couteau Fendeur Pour L'épaisseur de Tissu
214
Réglage de la Largeur des Points
215
Réglage du Presseur
215
Réglage de L'ouverture du Presseur
216
Réglage de la Longueur de Distribution de Fil D'aiguille
217
Réglage du Guide-Fil de Relevage de Fil
217
Réglage de la Longueur Restante de Cordonnet (Types J Et C)
218
Réglage de la Tension du Cordonnet (Types J Et C)
218
Correction des Donnees
219
Correction de la Position du Couteau
219
Correction du Nombre de Points À la Fin de la Couture
219
Correction de Rotation
220
Correction de Rotation de la Partie des Lèvres
220
Correction Transversale de L'oeillet
220
Correction Longitudinale de L'oeillet
220
Correction Longitudinale du Côté Gauche de L'oeillet
220
Correction Longitudinale de la Lèvre Gauche
221
Réglage de la Largeur de Jetée D'aiguille du Côté Droit du Bas de L'oeillet
221
Largeur de Jetée D'aiguille du Côté Gauche du Bas de L'oeillet
221
Réglage de la Largeur de Jetée D'aiguille
221
Nombre de Points de Bride en Pointe Oblique
221
Nombre de Points de la Correction du Côté Droit de la Bride en Pointe
222
Forme de la Bride Droite
222
Nombre de Points de la Bride Arrondie
223
Correction de L'espace de Coupe du Côté Gauche
223
Départ en Douceur
224
Nombre de Points de Tension du Fil Au Début de la Couture
224
Nombre de Points de Tension du Fil À la Fin de la Couture
224
Numéro de Destination de Copie
224
Comment Utiliser Les Diverses Fonctions
225
Exécution D'une Couture Par Cycles
225
Procédure de Correction de Tension du Fil Pour Chaque Partie
226
Sélection de la Position du Presseur Lors de la Mise en Place du Tissu
229
Sélection du Mode de L'interrupteur de Départ
229
Sélection du Mouvement du Presseur
229
Sélection du Mode du Compteur (Comptage DEGRESSIF)
229
Arrêt de la Couture Avant la Coupe du Tissu
229
Réglage de la Valeur de Pression du Couteau Fendeur Dans Les Données de Configuration
230
Maintenance
231
Hauteur de la Barre À Aiguille
231
Relation entre L'aiguille Et Le Boucleur
231
Jeu entre L'aiguille Et Le Boucleur
233
Réglage du Garde-Aiguille
233
Positions D'installation des Étendeurs Et Synchronisation de Leur Ouverture / Fermeture
234
Position du Pied Presseur Et du Point de Pénétration de L'aiguille
236
Réglage de la Position de Chute du Couteau
236
Position D'installation du Coupe-Fil D'aiguille
237
Réglage du Coupage du Fil du Boucleur
239
Nettoyage
241
Vidange
241
Vérification du Filtre du Ventilateur
241
Remplacement D'un Fusible
242
Echéance Standard de Remplacement du Vérin À Gaz
242
Remplacement du Vérin À Gaz
243
Changement de L'equipement Interchangeable Et Options
246
Changement de Le Type de Coupe du Fil
246
Remplacement de L'équipement Interchangeable
247
Problemes de Couture Et Remedes
252
Interrupteur Logiciel
254
Procédure D'utilisation
254
Liste des Paramètres de L'interrupteur Logiciel
254
Liste D'erreurs
256
Liste des Configurations Standard
258
Español
271
Especificaciones
273
Nombre de cada Componente
274
Nombres de la Unidad Principal de la Máquina de Coser
274
Instalación
275
Modo de Instalar la Manguera de Aire
275
Elevación de la Máquina de Coser y Su Retorno a Su Posición Original
275
Modo de Instalar el Pedestal de Hilos
277
Modo de Instalar la Base del Panel de Operación
277
Modo de Montar/Desmontar el la Unidad del Prensatelas
278
Modo de Colocar la Bolsa del Polvo
278
Preparación Antes de la Operación
279
Modo de Lubricar la Máquina de Coser
279
Modo de Colocar la Aguja
281
Modo de Enhebrar el Cabezal de la Máquina
282
Modo de Fijar la Tela
284
Estructura del Interruptor Operacional
285
Estructura del Panel de Operación
285
Interruptor de Parada Temporal
287
Interruptor Manual
287
Interruptor de Pedal
287
Modo de Usar el Panel de Operación
288
Operación Básica de la Máquina de Coser
288
Modo de Fijar la Tensión del Hilo
288
Parada Temporal de la Máquina de Coser
289
Modo de Ejecutar la Nueva Operación de Cosido
289
Modo de Ejecutar el Enhebrado
290
Modo de Usar el Contador
290
Cuando no Se Desea Caída de la Cuchilla Temporalmente
291
Modo de Cambiar la Modalidad de Operación
291
Modo de Cambiar el Procedimiento de Patrón de Cosido
292
Modo de Confirmar la Configuración de Patrón
292
Procedimiento de Fijación de Datos de Cosido
293
Modo de Fijar el No. de Cuchilla
294
Modo de Fijar la Longitud de Corte
294
Modo de Fijar las Cuchillas Precorte y Poscorte
294
Modo de Fijar el Número de Puntadas de la Sección en Paralelo
295
Modo de Fijar el Número de Puntadas de Ojalillo
295
Modo de Fijar el Espacio de Corte
295
Modo de Fijar el Espacio de Ojalillo
295
Modo de Fijar la Longitud de la Barra Cónica
296
Modo de Fijar el Número de Puntadas de Barra Cónica
296
Modo de Fijar el Offset de Barra Cónica
296
Modo de Fijar la Velocidad de Cosido
296
Modo de Fijar la Velocidad de Reducción de Ojalillo
297
Modo de Fijar la FUNCION F1
297
Modo de Fijar la FUNCION F2
297
Ajuste de cada Pieza
298
Modo de Reemplazar la Cuchilla Cortadora de Tela y el Portacuchilla
298
Modo de Ajustar la Presión de la Cuchilla Cortadora de Tela
299
Desgaste de la Cara del Portacuchilla
300
Fijación de Grosor de Material para la Cuchilla Cortadora de Tela
300
Modo de Ajustar la Anchura de Bocado de Puntada
301
Modo de Ajustar el Prensatelas
301
Modo de Ajustar la Cantidad de Abertura del Prensatelas
302
Modo de Ajustar la Cantidad de Transporte del Hilo de Aguja
303
Modo de Ajustar la Guía del Tirahilo
303
Modo de Ajustar la Cantidad Remanente de Trencilla (Tipos J y C)
304
Modo de Ajustar la Tensión de Hilo de Trencilla (Tipos J y C)
304
Compensación de Datos
305
Compensación de Posición de la Cuchilla
305
Número de Puntadas de Compensación de Fin de Cosido
305
Compensación de Giro de Sección Paralelo
306
Compensación de Giro de Sección de Ójalillo
306
Compensación de Cruzado de Ojalillo
306
Compensación Longitudinal de Ojalillo
306
Compensación Longitudinal de Ojalillo Lado Izquierdo
306
Compensación Longitudinal de la Sección en Paralelo del Lado Izquierdo
307
Anchura de Cursa de Aguja del Fondo Derecho de Fijación de Ojalillo
307
Anchura de Cursa de Aguja del Fondo Izquierdo de la Fijación de Ojalillo
307
Fijación de Anchura de Cursa de Aguja
307
Número de Puntadas de la Barra Cónica
307
Número de Puntadas de Compensación de Barra Cónica del Lado Derecho
308
Configuración de la Barra Recta
308
Número de Puntadas de la Barra Redonda
309
Compensación de Espacio de Corte de Lado Izquierdo
309
Inicio Suave
310
Número de Puntadas de Inicio de Cosido de Tensión de Hilo
310
Número de Puntadas de Fin de Cosido de Tensión de Hilo
310
No. de Destino de Copia
310
Modo de Usar Varias Funciones
311
Modo de Ejecutar el Procedimiento de Cosido Cíclico
311
Procedimiento de Operación de Compensación de Tensión de Hilo de cada Sección
312
Modo de Cambiar la Posición de la Tela
315
Cambio de Modalidad de Interruptor de Arranque
315
Cambio de Movimiento del Prensatelas
315
Cambio del Contador (Cuenta down (Descendente))
315
Parada Antes de la Modalidad de Corte de Tela
315
Modo de Fijar Los Datos de Patrón de Cantidad de Presión de Cuchilla Cortadora de Tela
316
Mantenimiento
317
Altura de la Barra de Aguja
317
Temporización entre la Aguja y el Enlazador
317
Separación entre la Aguja y el Enlazador
319
Modo de Ajustar el Protector de Aguja
319
Posiciones de Instalación de Los Estiradores y la Temporización para Abrir/Cerrar Los Estiradores
320
Posición del Prensatelas y el Punto de Entrada de la Aguja
322
Modo de Ajustar la Posición de Caída de Aguja
322
Posición de Instalación de la Cuchilla Cortadora de Hilo de Aguja
323
Modo de Ajustar el Cortahilo de Enlazador
325
Limpieza
327
Drenaje
327
Comprobación del Filtro de Ventilador
327
Modo de Cambiar el Fusible
328
Norma para Juzgar Cuándo Reemplazar el Muelle de Gas
328
Reemplazo del Muelle de Gas
329
Cambio de Piezas de Calibrador y Opcionales
332
Cambio de Método de Cortar el Hilo
332
Modo de Cambiar las Piezas Calibradoras
333
Problemas y Medidas Correctivas en el Cosido
338
Interruptor de Memoria
340
Procedimiento de la Operación
340
Lista de Interruptores de Memoria
340
Lista de Errores
342
Lista de Patrones Estándar
344
Italiano
357
1 Caratteristiche Tecniche
359
2 Nome DI Ciascun Componente
360
Nomi Dell'unità Principale Della Macchina Per Cucire
360
3 Installazione
361
Installazione del Tubo Dell'aria
361
Sollevamento E Rimessa a Posto Della Macchina Per Cucire
361
Installazione del Portafilo
363
Installazione Della Base del Pannello Operativo
363
Installazione/Rimozione Dell'unità DI Pressore
364
Attacco del Sacco Per Ritagli del Tessuto
364
4 Preparazione da Effettuare Prima Della Messa in Funzione
365
Rifornimento Dell'olio Alla Macchina E Modalità DI Lubrificazione
365
Posizionamento Dell'ago
367
Infilatura del Filo Nella Testa Della Macchina
368
Come Posizionare Il Tessuto
370
5 Struttura Dell'interruttore Operativo
371
Struttura del Pannello Operativo
371
Interruttore DI Arresto Temporaneo
373
Interruttore a Mano
373
Interruttore a Piedi
373
6 Come Usare Il Pannello Operativo
374
Funzionamento Fondamentale Della Macchina Per Cucire
374
Impostazione Della Tensione del Filo
374
Arresto Temporaneo Della Macchina Per Cucire
375
Esecuzione Della Ricucitura
375
Esecuzione Dell'infilatura
376
Come Usare Il Contatore
376
Quando Temporaneamente Non si Desidera Fare Cadere Il Coltello
377
Modifica del Modo Operativo
377
Procedura Per la Modifica del Modello DI Cucitura
378
Conferma Della Forma del Modello
378
7 Procedura Per L'impostazione Dei Dati DI Cucitura
379
Impostazione del No.DI Coltello
380
Impostazione Della Lunghezza del Taglio
380
Impostazione del Coltello "Tagliare Prima"/Coltello "Tagliare Dopo
380
Impostazione del Numero DI Punti Della Sezione Parallera
381
Impostazione del Numero DI Punti Dell'occhiello
381
Impostazione Dello Spazio del Taglio
381
Impostazione Dello Spazio Dell'occhiello
381
Impostazione Della Lunghezza Della Barra Affusolata
382
Impostazione del Numero DI Punti Della Barra Affusolata
382
Impostazione Dell'offset Della Barra Affusolata
382
Impostazione Della Velocità DI Cucitura
382
Impostazione Della Velocità Ridotta Dell'occhiello
383
Impostazione Della FUNZIONE F1
383
Impostazione Della FUNZIONE F2
383
8 Regolazione DI Ciascuna Parte
384
Sostituzione del Coltello Tagliatessuto E Portacoltello
384
Regolazione Della Pressione del Coltello Tagliatessuto
385
Usura Della Faccia del Portacoltello
386
Impostazione Dello Spessore del Materiale del Coltello Tagliatessuto
386
Regolazione Dell'ampiezza del Punto
387
Regolazione del Pressore
387
Regolazione Della Quantità DI Apertura del Pressore
388
Regolazione Della Quantità DI Alimentazione del Filo Dell'ago
389
Regolazione del Guidafilo del Tirafilo
389
Regolazione Della Quantità Rimanente del Cordoncino (Tipi J E C)
390
Regolazione Della Tensione del Cordoncino (Tipi J E C)
390
9 Compensazione Dei Dati
391
Compensazione Della Posizione del Coltello
391
Compensazione del Numero DI Punti Della Fine Della Cucitura
391
Compensazione Della Girata Della Sezione Parallera
392
Compensazione Della Girata Della Sezione DI Occhiello
392
Compensazione Trasversale Dell'occhiello
392
Compensazione Longitudinale Dell'occhiello
392
Compensazione Longitudinale del Lato Sinistro Dell'occhiello
392
Compensazione Longitudinale del Lato Sinistro Della Sezione Parallera
393
Impostazione Della Larghezza Dell'oscillazione Dell'ago del Lato Destro Della Sezione Inferiore Dell'occhiello
393
Impostazione Della Larghezza Dell'oscillazione Dell'ago del Lato Sinistro Della Sezione Inferiore Dell'occhiello
393
Impostazione Della Larghezza Dell'oscillazione Dell'ago
393
Numero DI Punti Della Barra Affusolata Inclinata
393
Compensazione del Numero DI Punti del Lato Destro Della Barra Affusolata
394
Forma Della Barra Diritta
394
Numero DI Punti Della Barra Rotonda
395
Compensazione Dello Spazio Per Taglio del Lato Sinistro
395
Partenza Dolce
396
Numero DI Punti Dell'inizio Della Cucitura Per la Tensione del Filo
396
Numero DI Punti Della Fine Della Cucitura Per la Tensione del Filo
396
No.DI Destinatario Della Copia
396
10 Come Usare Le Varie Funzioni
397
Procedura Per L'esecuzione Della Cucitura del Ciclo
397
Procedura Operativa Per la Compensazione Della Tensione del Filo DI Ciascuna Sezione
398
Modifica Della Posizione DI Collocazione del Tessuto
401
Commutazione del Modo Operativo Dell'interruttore DI Avviamento
401
Commutazione del Movimento del Pressore
401
Commutazione del Contatore (Conteggio a SOTTRAZIONE)
401
Modo DI Arresto Prima del Taglio del Tessuto
401
Impostazione del Dato DI Modello Della Quantità DI Pressatura del Coltello Tagliatessuto
402
11 Manutenzione
403
Altezza Della Barra Ago
403
Tempismo Tra L'ago E Il Crochet
403
Gioco Tra L'ago E Il Crochet
405
Regolazione Della Protezione Ago
405
Posizioni DI Montaggio Degli Stendifilo E Il Tempismo Per Aprire/Chiudere Gli Stendifilo
406
Posizione del Piedino Premistoffa E del Punto DI Entrata Dell'ago
408
Regolazione Della Posizione DI Caduta del Coltello
408
Posizione DI Montaggio del Coltello Rasafilo Dell'ago
409
Regolazione del Taglio del Filo del Crochet
411
Pulizia
413
Scarico Dell'olio
413
Controllo del Filtro del Ventilatore
413
Sostituzione Dei Fusibili
414
Standard Dell'intervallo DI Sostituzione Della Molla a Gas
414
Sostituzione Della Molla a Gas
415
12 Calibri DI Ricambio E Optional
418
Modifica del Metodo DI Taglio del Filo
418
Calibri DI Ricambio
419
13 Inconvenienti Erimedi in Cucitura
424
14 Interruttore DI Memoria
426
Procedura Operativa
426
Lista Degli Interruttori DI Memoria
426
15 Lista Degli Errori
428
16 Lista Dei Modelli Standard
430
Advertisement
JUKI MEB-3200 Series Instruction Manual (445 pages)
S, R, J, C, and T types
Brand:
JUKI
| Category:
Sewing Machine
| Size: 27.79 MB
Table of Contents
Important Safety Instructions
3
For Safe Operation
4
Cautions in Operation
4
Contents
5
Specifications
7
Name of each Component
8
Names of the Sewing Machine Main Unit
8
Installing the Air Hose
9
Raising the Sewing Machine
9
Installing the Thread Stand
10
Installing the Operation Panel Base
10
Installing/Removing the Presser Unit
11
Attaching the Dust Bag
11
Preparation before Operation
12
Lubricating the Machine and How to Lubricate
12
Lubricating the Looper and Spreader Components
12
Attaching the Needle
13
Lubricating the Needle Bar and Cam Components
13
Threading the Machine Head
14
Threading the Upper Thread (Needle Thread)
14
Threading the Lower Thread (Looper Thread)
15
How to Set the Cloth
16
Threading the Machine with Gimp
16
Structure of the Operation Switch
17
Structure of the Operation Panel
17
Table of Functions of the Operation Panel
17
Temporary Stop Switch
19
Hand Switch
19
Foot Switch
19
How to Use the Operation Panel
20
Basic Operation of the Sewing Machine
20
Setting of the Looper Thread Tension
20
Setting of the Needle Thread Tension
20
How to Stop the Sewing Machine
21
How to Re-Start
21
Performing Re-Sewing
21
Performing Threading
22
How to Use the Counter
22
When Dropping of the Knife Is Temporarily Not Desired
23
Changing the Operation Mode
23
Changing Procedure of the Sewing Pattern
24
Confirming the Pattern Shape
24
Setting Procedure of the Sewing Data
25
Setting the Knife No.
26
Setting the Cut Length
26
Setting the Cut-Before/Cut-After Knives
26
Setting the Number of Stitches of the Parallel Section
27
Setting the Number of Stitches of the Eyelet
27
Setting the Cut Space
27
Setting the Eyelet Space
27
Setting the Length of Taper Bar
28
Setting the Number of Stitches of Taper Bar
28
Setting the Offset of Taper Bar
28
Setting the Sewing Speed
28
Setting the Reduction Speed of Eyelet
29
Setting the FUNCTION F1
29
Setting the FUNCTION F2
29
Adjustment of each Part
30
Replacing the Upper Cloth Cutting Knife and the Knife Holder
30
Lower Cloth Cutting Knife and the Knife Holder
30
Adjusting the Cloth Cutting Knife Pressure
31
Adjusting the Knife Pressing Amount
31
Adjusting the Stopping Time of the Knife Lower Position
31
Worn-Out of the Knife Holder Face
32
Setting the Material Thickness of the Cloth Cutting Knife
32
Adjusting the Stitch Bite Width
33
Adjusting the Height of the Presser
33
Adjusting the Presser Pressure
33
Adjusting the Presser Opening Amount
34
Checking the Cloth Open Amount at the Time of Adjustment
34
Adjusting the Thread Take-Up Thread Guide
35
Adjusting the Feeding Amount of the Needle Thread During Sewing
35
Adjusting the Drawing Amount of the Needle Thread at the Sewing Start
35
Adjusting the Remaining Amount of the Gimp (J and C Types)
36
Adjusting the Gimp Thread Tension (J and C Types)
36
Compensation of the Data
37
Knife Position Compensation
37
Number of Stitches of Sewing End Compensation
37
Compression of Turning
38
Parallel Section Turning Compensation
38
Eyelet Crosswise Compensation
38
Eyelet Lengthwise Compensation
38
Left Parallel Section Lengthwise Compensation
39
Needle Throwing Width of the Right Bottom of Eyelet Setting
39
Needle Throwing Width of the Left Bottom of Eyelet Setting
39
Needle Throwing Width Setting
39
Number of Stitches of the Right Side Taper Bar Compensation
40
Shape of the Straight Bar
40
Number of Stitches of the Round Bar
41
Left Side Cut Space Compensation
42
Soft Start
42
Number of Stitches of the Sewing Start of Thread Tension
42
Number of Stitches of the Sewing End of Thread Tension
42
Copy Destination No.
43
How to Use the Various Functions
44
Performing Procedure of the Cycle Sewing
44
Operating Procedure of Thread Tension Compensation of each Section
45
Performing the Compensation of Thread Tension in the State of Sewing
45
Setting of Needle Thread Tension
46
Setting of Looper Thread Tension
46
Compensation Position of Taper Bar
47
Compensation Position of Straight Bar
47
Compensation Position of Round Bar
47
Changing the Setting Position of Cloth
48
Changing over the Mode of the Start Switch
48
Changing over the Presser Movement
48
Changing over the Counter
48
Setting the Pattern Data of Cloth Cutting Knife Pressing Amount
49
Pattern Data Setting Procedure
49
Height of the Needle Bar
50
Timing between the Needle and the Looper
50
Maintenance
50
Clearance between the Needle and the Looper
51
Adjusting the Needle Guard
52
Installation Positions of the Spreaders and the Timing to Open/Close the Spreaders
52
Installation Position of the Left Spreader
53
Installation of the Right Spreader
53
Position of the Presser Foot and the Needle Entry Point
54
Adjusting the Knife Dropping Position
54
Installing Position of the Needle Thread Trimming Knife
55
S and R Type (Long Thread Trimming)
55
T Type (Short Thread Trimming Without Gimp)
55
J and C Type (Short Thread Trimming)
56
Adjusting the Looper Thread Trimming
57
Cleaning
59
Draining
59
Checking the Fan Filter
59
Replacing the Fuse
60
Changing the Thread Trimming Method
61
Exchanging Gauge Parts and Optional
61
Throat Plate
62
Presser Set
62
Presser Foot
63
Presser Holding Plate
64
Cloth Cutting Knife
65
Looper (Left)/Spreader(Left)
65
Knife Holder
65
Installing the Optional Foot Pedal
66
Troubles and Corrective Measures in Sewing
67
Memory Switch Operating Procedure
70
Memory Switch List
70
Error List
72
Standard Pattern List
74
Sewing Data Entry Sheet
75
JUKI MEB-3200 Series Engineer's Manual (173 pages)
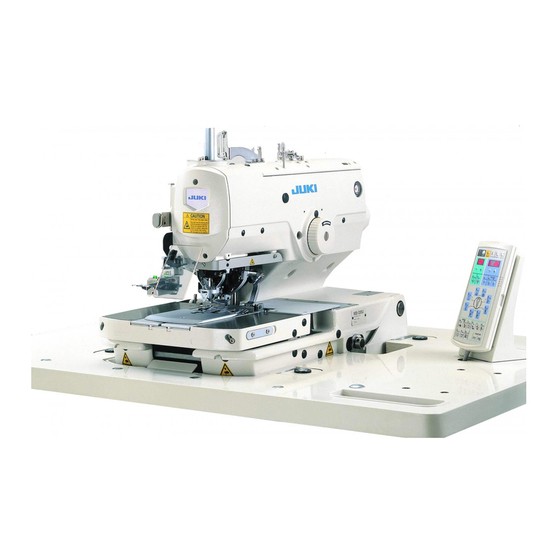
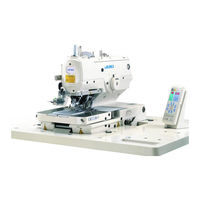
Direct-drive Computer-controlled Eyelet Buttonholing Machine (with Compound Thread Trimmer)
Brand:
JUKI
| Category:
Sewing Machine
| Size: 2.32 MB
Table of Contents
Table of Contents
3
Specifications
5
Name of each Component
6
Names of the Sewing Machine Main Unit
6
Structure of the Operation Switch
7
Structure of the Operation Panel
7
Temporary Stop Switch
9
Hand Switch
9
Foot Switch
9
Standard Adjustments
10
Adjusting the Center of the Needle
10
Adjusting the Stitch Base Line of the Inside Needle
12
Adjusting the Stitch Bite Width
12
Height of the Needle Bar
14
Timing between the Needle and the Looper
14
Clearance between the Needle and the Looper
16
Adjusting the Needle Guard
16
Installation Positions of the Spreaders and the Timing to Open/Close the Spreaders
16
Adjusting the Cloth Open
18
Adjusting the Presser
20
Adjusting the Knife
20
Adjusting the Longitudinal Position of the Cloth Cutting Knife
20
Adjusting the Inclination of the Cloth Cutting Knife
22
Adjusting the Lateral Position of the Cloth Cutting Knife
22
Adjusting the Knife Holder
24
Adjusting the Lateral Position of the Knife Holder
24
Adjusting the Longitudinal Position of the Knife Holder
24
Adjusting the Inclination of the Knife Holder and the Backlash of the Cloth Cutting Direct Drive Shaft
26
Installing Position of the Needle Thread Trimming Knife
28
Adjusting the Needle Thread Trimming Vertical Moving Arm
34
Adjusting the Looper Thread and Gimp Trimming
36
Adjusting the Short Thread Trimming Without Gimp (T Type)
38
Adjusting the Position of the Looper Thread Guide Plate and the Inclination of the Counter Knife (S/R Types)
40
Adjusting the Looper Thread Clamp and the Thread Hauling (S/R Types)
42
Adjusting the Blade Pressure of the Looper Thread Trimming Knife (S/R Types)
44
Adjusting the Short Thread Trimming
46
Adjusting the Stroke of the Upper Knife
46
Initial Position of the Lower Knife
46
Adjusting the Knife Pressure
48
Adjusting the Position of the Thread Haul Plate
48
Adjusting the Position of the Upper Knife Lower Cover
50
Adjusting the Needle Thread Clamp
52
Adjusting the Length of Remaining Needle Thread
54
Adjusting the Feeding Amount of the Needle Thread
54
Adjusting the Haul Amount of the Looper Thread (Long Thread Trimming/Short Thread Trimming)
56
Adjusting the Looper Thread Haul Driving Arm (Long Thread Trimming)
58
Adjusting the Remaining Amount of the Gimp (J/C Types)
60
Adjusting the Tension of the Needle Bar Rotary Timing Belt
60
Adjusting the Tension of the Looper Turning Timing Belt
62
Adjusting the Position of the Needle Bar Rotary Pulley
62
Adjusting the Position of the Looper Bracket
64
Adjusting the Main Shaft Sensor
64
Adjusting the Origin Position of the Crosswise Feed Sensor
66
Adjusting the Origin Position of the Lengthwise Feed Sensor
66
Adjusting the Cloth Cutting Origin Sensor
68
Adjusting the Backlash of the Cloth Cutting Stepping Motor
70
Adjusting the Cloth Cutting Lever Stopper
70
Adjusting the Positions of the Lengthwise Feed and Crosswise Feed Motor Installing Bases (Adjusting the Backlash of the Feed Drive Gear)
72
Adjusting the Thread Take-Up Thread Guide
72
Adjusting the Active Tension
74
Adjusting the Cloth Cutting Knife Pressure
76
Disassembly/Assembly
78
Disassembling the Needle Bar Driving Gear
78
Disassembling the Needle Bar Arm
80
Adjusting the Backlash of the Needle Bar Driving Gear
80
Disassembling the Cloth Cutting Mechanism
82
Installing the Cloth Cutting Plate
82
Replacing the Main Shaft Timing Belt
84
Replacing the Needle Bar Rotary Upper Timing Belt
86
Replacing the Needle Bar Rotary Lower Timing Belt
88
Disassembling the Marking Light
90
Fine Adjustment of the Laser Marking Projector
92
Adjusting the Light Axis of the Laser Marking Projector
92
Adjusting the Irradiating Range of the Laser Beam
94
Adjusting the Lateral Direction of the Laser Marking Projector
94
Replacing the Presser Set
96
Removing Procedure of the Looper Thread Trimming Unit (When Sewing Beyond 38 MM)
98
Setting Procedure of the Sewing Data
100
Sewing Data Setting Item
101
Compensation of the Data
105
Compensation Table
106
Thread Tension Compensation Table
107
Memory Switch
109
Setting the Memory Switch
109
Initializing the Memory Switch
109
Setting the DIP Switch
109
Memory Switch List
110
Test Mode
113
Input Check
113
Output Check
114
Operation Panel Check
114
Crosswise Feed / Lengthwise Feed / Turning Origin Check
115
Cloth Cutting Knife Origin Check
115
Sewing Machine Check
116
Thread Tension Check
116
Thread Trimming Check
116
Error List
117
Replacing the Fuse
118
Changing the Voltage
119
Changing the Voltage between 100 and 240V
119
Changing the Voltage between between 220 and 415V
119
Troubles and Corrective Measures
120
Air Piping Diagram
124
Circuit Diagram
125
Connector Circuit Board Wiring Diagram
125
Main Circuit Board Wiring Diagram
125
Block Diagram (1) 1 / 2
126
Block Diagram (2) 1 / 2
128
Block Diagram (3) 1 / 2
130
Stepping Motor Circuit Diagram
132
Sensor Circuit Diagram
133
Power Source Circuit Diagram 100V, 200V
134
Power Source Circuit Diagram 380V
135
Solenoid Valve Curcuit Diagram
136
Active Tension Curcuit Diagram
137
Servo Motor Circuit Diagram
138
15. Multicutting Device
139
Multicutting Device
139
Specifications
140
Installing the Multicutting Device
142
Removing the Cloth Cutting Knife Base
142
Installing the Cloth Chip Suction Device Asm
142
Installing the Cloth Cutting Knife Base a Asm
144
Changing the Position of the Knife Stopper
146
Connecting the Pneumatic Components
148
Piping the Knife Base Cylinder
148
Piping the Cloth Chip Suction Device
150
Adjusting the Multicutting Device
152
Adjusting the Knife
152
Adjusting the Lateral Position of the Cloth Cutting Knife
152
Adjusting the Longitudinal Position of the Cloth Cutting Knife
152
Adjusting the Inclination of the Cloth Cutting Knife
154
Timing between the Needle and the Looper
154
Adjusting the Inclination of the Cloth Cutting Knife (Eyelet)
154
Adjusting the Lateral Position of Knife Holder
156
Adjusting the Pneumatic Components
158
Adjusting the Speed Controller
158
Setting the Dip Switch
158
Replacing the Cloth Cutting Knife
160
Replacing the Cloth Cutting Knife (Eyelet)
160
Replacing the Cloth Cutting Knife (Straight)
160
Adjusting the Cloth Cutting Knife Pressure
162
Adjusting the Knife Pressing Amount
162
Setting the Pattern Data
164
Setting the Knife no
164
Cut Length Compensation
164
Plural Times Selection
166
Decorative Buttonhole Offset
168
Memory Switch
168
Replacement Gauge
172
Advertisement
JUKI MEB-3200 Series Specification (6 pages)
MEB-3200 Series Computer-controlled, Eyelet Buttonholing Machine with Trimmer for Needle And Looper Thread with Gimp
Brand:
JUKI
| Category:
Sewing Machine
| Size: 1.06 MB
JUKI MEB-3200 Series Safety Notes (2 pages)
Brand:
JUKI
| Category:
Sewing Machine
| Size: 0.56 MB
Advertisement
Related Products
JUKI MEB-3200SS
JUKI MEB-3200RS
JUKI MEB-3200JS
JUKI MEB-3200CS
JUKI MEB-3200TS
JUKI MEB-3200RD
JUKI MEB-3810
JUKI MEB-3810N Series
JUKI MEB-3810NJ
JUKI MEB-3810NC
JUKI Categories
Sewing Machine
Industrial Equipment
Sewing Machine Accessories
Accessories
Printer
More JUKI Manuals
Login
Sign In
OR
Sign in with Facebook
Sign in with Google
Upload manual
Upload from disk
Upload from URL